Are you frustrated with your 3D printer not working as it should? Maybe your prints have gaps, layers that don’t stick, or annoying stringing between parts.
These common problems can slow you down and waste valuable time and materials. But don’t worry—understanding the basics of 3D printer troubleshooting can save your day. You’ll discover simple, effective solutions to fix issues like poor bed adhesion, clogged nozzles, and layer shifting.
Keep reading, and you’ll gain the confidence to get your printer back on track and produce flawless prints every time.
First Layer Issues
The first layer is the foundation of every 3D print. Problems in this layer affect the whole object’s quality and strength. Common issues include poor adhesion, wrong nozzle height, and bed leveling errors. Fixing these can save time and filament.
Poor Adhesion
Poor adhesion means the first layer does not stick well to the print bed. The print may peel or move during printing. Clean the bed surface before each print to remove dust and oils. Use glue stick, painter’s tape, or a special printing surface. Adjust the bed temperature to help the filament stick better. Slower print speed on the first layer can improve adhesion as well.
Nozzle Height Adjustment
The nozzle must be at the right height from the bed. Too high causes gaps and poor sticking. Too low can block filament flow or damage the bed. Start with the manufacturer’s recommended distance, often around the thickness of a paper sheet. Fine-tune by printing a test line and checking if it is smooth and flat. Adjust the Z-offset in your printer’s settings if needed.
Bed Leveling Tips
A level bed ensures the nozzle is the same distance from the surface across the entire print area. Use a piece of paper or feeler gauge to check the gap at multiple points. Adjust the bed screws or knobs until the resistance is even everywhere. Some printers have automatic bed leveling; make sure the sensors are clean and calibrated. Regularly check the bed level before each print for best results.
Bed Adhesion Problems
Bed adhesion problems occur when the first layer of your 3D print does not stick well to the build surface. This issue can cause prints to warp, shift, or even detach during printing. Ensuring strong bed adhesion is critical for a successful print. Several simple techniques can help improve adhesion and reduce failures.
Surface Cleaning Methods
Clean the build plate before every print. Dust, oil, and residue block proper adhesion. Use isopropyl alcohol and a lint-free cloth to wipe the surface. Avoid touching the plate with bare hands after cleaning. For glass beds, a thin layer of glue stick or hairspray can help the filament stick better. Some surfaces may need light sanding to increase grip.
Using Brim And Raft
Brims add extra lines around the base of your print. They increase the surface area and help keep corners from lifting. Rafts create a thick, flat base under the print to improve stability. Both options are easy to enable in slicing software. They prevent warping and improve first layer adhesion on tricky models.
Temperature Settings
Bed temperature affects how well the filament sticks. Set the bed temperature according to filament type. For PLA, 50-60°C works well. ABS requires higher temperatures, around 90-110°C. Adjust nozzle temperature for a smooth first layer. Too hot or too cold can cause poor adhesion. Experiment with small changes to find the best settings.
Extrusion Troubles
Extrusion troubles often cause frustrating print failures in 3D printing. The extrusion system controls how filament melts and flows through the nozzle. Problems here show as gaps, weak layers, or rough surfaces. Understanding common extrusion issues helps fix prints faster.
Extrusion issues fall into three main types: under-extrusion, over-extrusion, and nozzle clogs. Each problem affects print quality differently. Learning their causes and solutions improves your printing results.
Under-extrusion Causes
Under-extrusion happens when too little filament flows out. It creates thin, weak layers and gaps. Common causes include a partially clogged nozzle, incorrect filament diameter settings, or low print temperature. Filament feeding problems, like tangles or poor tension, also reduce flow. Slow print speeds and worn extruder gears contribute to under-extrusion. Check these factors first to restore proper extrusion.
Over-extrusion Effects
Over-extrusion forces too much filament through the nozzle. It results in blobs, stringing, and rough surfaces. Layers may appear thicker and lose detail. Over-extrusion can cause poor layer adhesion and warping. Typical causes include wrong filament diameter settings, excessive flow rate, or too high print temperature. Calibrating extrusion multiplier and temperature helps prevent these issues. Balanced extrusion ensures clean, smooth prints.
Clogged Nozzle Solutions
A clogged nozzle blocks filament flow and stops extrusion. It causes gaps, under-extrusion, or no extrusion at all. To fix clogs, first heat the nozzle to printing temperature. Use a cleaning needle or small wire to clear the blockage gently. Performing a cold pull with nylon filament can remove stubborn debris. Regular nozzle maintenance prevents clogs. Always use good quality filament to reduce buildup inside the nozzle.
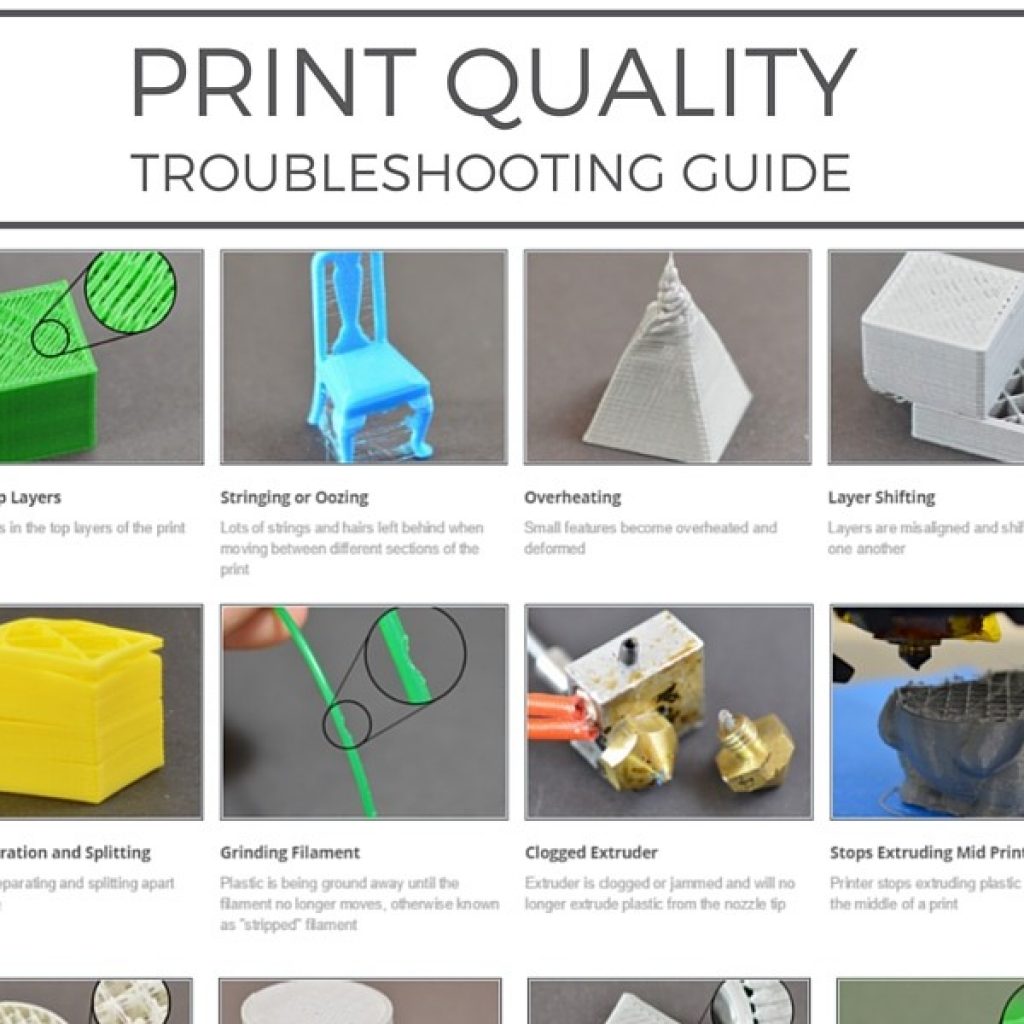
Stringing And Oozing
Stringing and oozing are common problems in 3D printing. They happen when thin strands of filament appear between parts of the print. These unwanted strings can make the model look messy and reduce print quality. Oozing occurs when the nozzle leaks filament while moving without printing. Both issues waste material and increase cleanup time.
Understanding how to fix stringing and oozing improves your prints. Small adjustments in settings and filament care make a big difference. Below are key areas to check and adjust for better results.
Retraction Settings
Retraction pulls filament back into the nozzle during travel moves. This stops filament from leaking out. Adjust retraction distance and speed to reduce stringing. Too little retraction causes strings. Too much can cause clogs or gaps.
Start with moderate values and test prints. Increase retraction distance slowly if strings remain. Raise speed to make the pull faster but avoid grinding filament. Different filaments need different retraction settings.
Nozzle Temperature Control
High nozzle temperature makes filament more liquid. This leads to easy oozing and stringing. Lower the temperature in small steps to find the best balance. The filament should melt enough to flow well but not drip.
Each filament type has a recommended temperature range. Staying near the lower end reduces oozing. Watch for under-extrusion if temperature goes too low. Consistent temperature helps keep prints clean and sharp.
Filament Maintenance
Old or damp filament causes printing problems. Moisture in filament creates bubbles and strings. Store filament in dry, sealed containers with desiccant packs. Dry filament if it absorbs moisture before printing.
Check for dust or debris on filament. Clean the filament path and nozzle regularly. Use quality filament for fewer issues. Proper filament care reduces stringing and improves print quality.
Warping And Curling
Warping and curling are common problems in 3D printing. These issues happen when the edges of a print lift and bend away from the print bed. Warping causes prints to lose shape and can ruin the final product. Curling often starts at the corners and spreads, making the print unusable. Understanding how to control temperature, speed, and adhesion helps reduce these problems.
Bed Temperature Adjustment
Setting the right bed temperature is key to preventing warping. A heated bed keeps the first layers warm and stuck. Different materials need different temperatures. For example, PLA works well around 60°C, while ABS needs about 100°C. Too low temperature causes poor adhesion, leading to curling. Too high temperature may cause other print issues.
Print Speed Optimization
Slowing down the print speed helps with better layer bonding. Fast printing can cause layers to cool unevenly. This uneven cooling causes warping and curling. Reducing speed gives the filament time to stick and settle. Start with a moderate speed and adjust based on results. Balance speed and quality for the best outcome.
Use Of Adhesives
Adhesives improve bed grip and reduce edge lifting. Common choices include glue sticks, painter’s tape, and hairspray. Apply a thin, even layer before printing. Adhesives help the first layer stick firmly to the bed. This prevents corners from curling up during printing. Choose an adhesive that matches your filament type and bed surface.
Credit: all3dp.com
Layer Shifts
Layer shifts occur when the layers of a 3D print move out of alignment. This problem causes the print to look jagged or stepped rather than smooth. Common reasons include mechanical issues or print speed errors. Fixing layer shifts improves print quality and prevents waste of materials.
Belt Tension Checks
Loose belts cause the printer’s carriage to slip during printing. Check the tension by pressing the belt lightly. It should feel firm but not too tight. Adjust the tension using the printer’s belt tensioners or screws. Proper belt tension helps keep layers aligned throughout the print.
Pulley And Motor Inspection
Check the pulleys on the stepper motors for looseness. Loose pulleys can cause the belts to slip, creating layer shifts. Tighten the pulley set screws if needed. Inspect the motor wiring for damage or loose connections. Secure motors firmly to avoid vibrations and missteps.
Print Speed Reduction
High print speeds can cause missed steps and layer shifts. Lower the print speed in your slicer settings. Slower speeds give the motors more time to move accurately. Reducing speed often solves layer misalignment without hardware changes.
Surface Defects
Surface defects are common issues in 3D printing that affect the look and quality of your prints. These flaws can appear as bumps, blobs, or uneven textures on the printed object. Understanding the causes helps in fixing them quickly. This section covers key tips to solve surface defects effectively.
Blobs And Zits Fixes
Blobs and zits are small bumps on the print surface. They happen when extra filament oozes from the nozzle. To fix this, reduce the retraction distance and speed. Adjust the print speed to avoid over-extrusion. Also, check the nozzle travel moves to minimize unnecessary stops. These changes help prevent blobs and zits from forming.
Temperature Stability
Stable temperature is crucial for smooth surface finish. Fluctuations cause inconsistent extrusion and surface defects. Use a good quality power supply to keep the heater stable. Monitor the hotend temperature during printing. Avoid setting temperatures too high or too low. Correct temperature settings improve layer bonding and reduce surface flaws.
Nozzle Cleaning
A dirty nozzle causes rough surfaces and clogs. Clean the nozzle regularly to maintain smooth extrusion. Use a brass brush or needle to remove filament build-up. Perform a cold pull to clear internal debris. Replacing the nozzle may be necessary if damage occurs. Keeping the nozzle clean ensures better print quality and fewer surface defects.

Credit: makezine.com
Infill Problems
Infill problems can affect the strength and appearance of 3D prints. These issues often cause weak, incomplete, or uneven internal structures. Understanding how to fix infill problems improves print quality and durability.
Increasing Density
Low infill density leads to weak prints. Raise the infill percentage in your slicer settings. A higher density creates stronger internal support. Balance density with print time and material use. For heavy-duty parts, use at least 20-30% infill.
Temperature Adjustment
Incorrect temperature causes poor layer bonding in the infill. Too low temperature stops filament from sticking properly. Too high temperature can cause stringing and blobs. Find the optimal temperature for your filament type. Adjust in small steps and test print each change.
Calibration Tips
Calibrate your printer for accurate infill. Check extrusion rate to avoid under or over-extrusion. Use a calibration cube to verify dimensional accuracy. Make sure the nozzle moves smoothly without skipping steps. Proper bed leveling also helps infill stick well.
Auditory And Mechanical Signs
Auditory and mechanical signs reveal many 3D printer problems early. Listening closely helps detect issues before they worsen. Mechanical resistance or strange noises often indicate filament or motor troubles. This section explains key sounds and mechanical feedback to watch for.
Clicking And Grinding Sounds
Clicking sounds come from the extruder trying to push filament. It often means a blockage or jam in the nozzle or hotend. Grinding noises may signal gear slippage or stripped teeth inside the extruder motor. These sounds warn of filament feeding problems. Check filament path and clean the nozzle to fix them.
Motor Skipping Issues
Motor skipping happens when the stepper motor misses steps while moving. This causes layers to shift or prints to fail. Skipping can occur from too high print speed or resistance in the filament path. Tight belts or loose pulleys also cause skipping. Reduce speed and check all mechanical parts for smooth movement.
Manual Filament Resistance
Feeling strong resistance when pulling filament by hand signals a problem. It may mean the filament is tangled, brittle, or blocked inside the extruder. Resistance can also come from incorrect tension settings on the feeder gear. Inspect the filament spool and feeder mechanism. Clear any jams and adjust tension for smooth feeding.
Credit: www.simplify3d.com
Checking For Nozzle Clogs
Checking for nozzle clogs is a key step in 3D printer troubleshooting. A clogged nozzle stops filament flow and ruins prints. Clogs cause under-extrusion, gaps, or no extrusion at all. Identifying and clearing clogs restores smooth printing and saves time.
Heating Nozzle Properly
Heat the nozzle to the filament’s printing temperature. This softens any stuck filament inside the nozzle. Use the printer’s control panel to set the exact temperature. Allow the nozzle to reach and stabilize at that heat before proceeding. Proper heating prevents damage during cleaning.
Disengaging Extruder
Release the extruder gear to free the filament. This step helps avoid stress on the motor or filament. Most printers have a lever or button to disengage the extruder. Gently pull the filament out by hand once the extruder is free. This allows better access for cleaning the nozzle.
Manual Filament Test
Push filament through the heated nozzle by hand. This tests if the nozzle is clear or still blocked. Filament should flow smoothly with moderate pressure. If it resists or does not come out, a clog remains. Repeat cleaning steps or try a needle to clear the blockage.
Frequently Asked Questions
What Are Four Common Issues With 3d Prints And How Can You Troubleshoot Them?
Common 3D print issues include poor bed adhesion, stringing, under-extrusion, and warping. Fix bed adhesion by leveling and cleaning the bed. Reduce stringing by adjusting retraction settings and temperature. Solve under-extrusion by checking filament feed and nozzle clogs. Prevent warping with heated beds and proper cooling.
What To Do If Your 3d Printer Is Not Printing?
Check filament feed for tangles or jams. Level the bed and clean the surface. Heat nozzle properly and clear clogs. Adjust print speed and nozzle height. Ensure proper extrusion and bed adhesion for smooth printing.
What Is The 45 Degree Rule For 3d Printing?
The 45 degree rule in 3D printing limits overhang angles to 45° to avoid support structures. This improves print quality and reduces material use.
How Do I Tell If My 3d Printer Nozzle Is Clogged?
Signs of a clogged 3D printer nozzle include no or thin filament extrusion, clicking extruder sounds, gaps in prints, and filament curling around the nozzle. Heat the nozzle and try manually pushing filament; resistance or irregular flow confirms a clog.
What Causes Poor First Layer Adhesion In 3d Printing?
Poor first layer adhesion often results from an unlevel bed or incorrect nozzle height. Dust or grease on the build plate can also prevent proper sticking. Cleaning the bed and adjusting the nozzle gap usually fix this issue.
Conclusion
Troubleshooting a 3D printer takes patience and careful checks. Small issues can cause bigger print problems. Start with simple fixes like cleaning the nozzle or adjusting bed level. Watch for signs like gaps, stringing, or poor adhesion. Regular maintenance helps keep your printer running smoothly.
Keep notes of what you try and what works best. With practice, you will solve problems faster each time. Enjoy better prints and less frustration on every project.
")


