Struggling with a 4-way switch that just won’t cooperate? You’re not alone.
These switches can feel like a mystery when something goes wrong, leaving you flipping switches in frustration. But here’s the good news: troubleshooting a 4-way switch doesn’t have to be complicated. With the right approach, you can quickly pinpoint the issue and get your lighting back on track.
In this post, you’ll learn simple, step-by-step tips to identify and fix common problems. Stick around—by the end, you’ll feel confident tackling this electrical hiccup without breaking a sweat. Ready to take control? Let’s get started!
How Does A 4-way Switch Work?
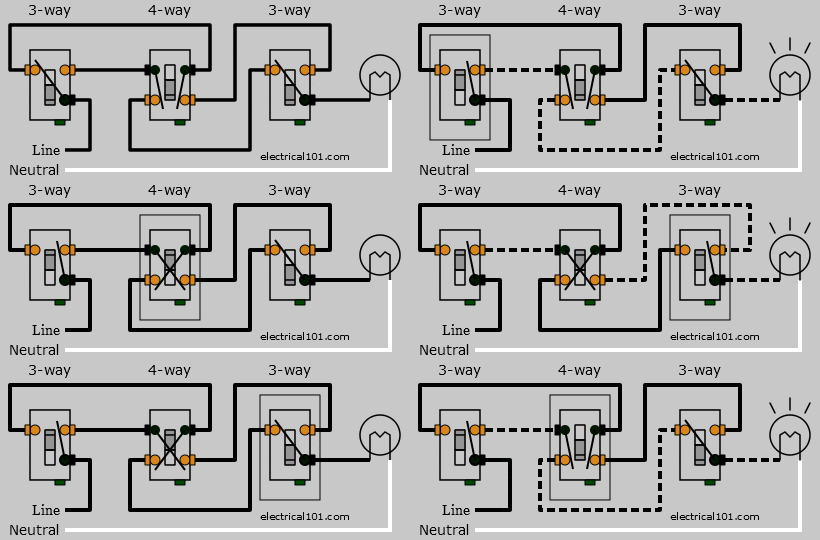
A 4-way switch is part of a multi-switch setup. It works with two 3-way switches. The 4-way switch itself doesn’t control the light directly. Instead, it changes the path of current between the 3-way switches.
Key Components Of A 4-way Switch
The switch has four terminals: two “input” and two “output.” The terminals are usually marked or color-coded. The wires from the 3-way switches connect to these terminals. The 4-way switch reroutes the current between the terminals, depending on its position.
Switching Paths
When you flip the 4-way switch, it changes the current flow. This allows the light to turn on or off, depending on the position of the other switches. The system works in a loop, ensuring seamless operation.
Common Wiring Patterns
The wires connecting the switches follow specific patterns. These include travelers and hot wires. Travelers carry current between switches. The hot wire connects to the light fixture. Proper wiring ensures smooth functionality.
Why Understanding The Circuit Matters
A clear understanding of the circuit helps in troubleshooting. Identifying a broken connection or misplaced wire becomes easier. It also prevents potential electrical hazards.
Common Wiring Problems

Understanding common wiring problems in a 4-way switch system is essential. Issues can disrupt the functionality of your light switches. Troubleshooting requires identifying specific problems and addressing them effectively. Below are some common wiring issues you may encounter.
Loose Connections
Loose connections can cause inconsistent switch operation or no power flow. Wires may loosen due to improper installation or wear over time. Check all wire terminals and screws for tightness. Ensure wires are securely fastened to prevent interruptions.
Incorrect Wire Placement
Incorrect wire placement often leads to switches not working properly. Misplaced wires can disrupt the circuit and confuse the system. Double-check the wiring diagram specific to your switch setup. Verify each wire is connected to its correct terminal.
Damaged Switch Components
Damaged switch components can also create problems in the circuit. Switches may degrade due to age or physical damage. Inspect switches for cracks, corrosion, or burnt areas. Replace damaged parts promptly to restore functionality and prevent further issues.
Essential Tools For Troubleshooting
When troubleshooting a 4-way switch, having the right tools can make all the difference. Without them, you might spend hours scratching your head over what seems like a simple wiring issue. The good news? You don’t need an advanced toolkit—just a few essential items to get the job done efficiently.
1. Multimeter
A multimeter is your best friend for diagnosing electrical problems. Use it to check for voltage, continuity, and resistance in your 4-way switch circuit. Set it to the continuity mode, and you’ll quickly identify if a switch or wire is faulty.
Don’t have a multimeter? They’re affordable and available at most hardware stores. Even a basic model will do the trick for home troubleshooting tasks.
2. Screwdrivers
You’ll need a flathead and Phillips screwdriver to access the switches and terminals. Electrical panels and switch plates often use these screws, so having both types on hand ensures you can handle any situation.
Keep your tools magnetized if possible. It’ll save you time fishing out dropped screws, especially in tight spaces.
3. Voltage Tester
A non-contact voltage tester adds an extra layer of safety. Before working on any wiring, use it to confirm that the circuit is powered off. This quick step can prevent accidental shocks.
Hold the tester near the wires or terminals. If it lights up or beeps, the circuit is still live—time to double-check your breaker!
4. Electrical Tape
Electrical tape is essential for insulating wires and marking connections. Use it to wrap exposed wires or to label specific wires you’ve disconnected. This helps you stay organized and avoid mix-ups during reassembly.
Opt for high-quality tape that won’t peel or lose adhesion over time. It’s a small investment but ensures a safer and cleaner repair.
5. Wiring Diagram
A clear wiring diagram is like having a GPS for your electrical project. It shows you how the switches and wires are connected, saving you from second-guessing. Many 4-way switch diagrams are available online or in your switch’s user manual.
Print it out or keep it open on your phone. You’ll thank yourself when you’re tracing the maze of wires behind your walls.
Do you already have these tools in your toolbox? If not, consider picking them up before diving into your troubleshooting project. You’ll save yourself frustration and ensure the job gets done safely and correctly.
Step-by-step Troubleshooting Guide

Having trouble with a 4-way switch? This guide breaks down the steps to identify and fix common issues. A 4-way switch setup can seem tricky, but with the right approach, it’s manageable. Follow these steps to troubleshoot safely and effectively.
Turn Off Power
Begin by turning off the power at the circuit breaker. Double-check with a voltage tester to ensure no current flows through the wires. This step is critical for your safety during troubleshooting.
Inspect The Switches
Remove the wall plates and inspect the switches for visible damage. Look for burn marks, loose screws, or broken parts. Replace damaged switches to avoid further complications.
Test Continuity
Use a multimeter to test the continuity of each switch. Set the multimeter to the continuity mode and touch the probes to the terminals. A beep or reading on the screen indicates proper functionality. Replace any switches that fail this test.
Verify Wire Connections
Check all wire connections for tightness and proper placement. Ensure wires are connected to the correct terminals according to the wiring diagram. Loose or misplaced wires can disrupt the circuit.
If you find loose wires, tighten them securely to the terminals. Replace frayed or damaged wires to maintain safe connections.
Tips For Preventing Future Issues
Preventing future issues with your 4-way switch system isn’t just a matter of luck—it’s about doing things right from the start and staying proactive. Small steps during installation and regular upkeep can save you hours of frustration later. Let’s dive into some practical tips that will keep your switches working smoothly.
Label Wires During Installation
Confusion during installation is one of the most common causes of 4-way switch problems. Labeling wires as you go eliminates guesswork. Use simple tags like “common,” “traveler 1,” and “traveler 2” to identify each wire clearly.
Don’t rely on memory—trust me, you won’t remember which wire goes where two years down the line. Keep a roll of masking tape and a marker handy. This small effort can save you from ripping out the switch later to figure out what went wrong.
Perform Regular Maintenance
Just because the switches are hidden behind a plate doesn’t mean they don’t need attention. Dust, moisture, and wear can affect their functionality. Take a few minutes every year to check for loose screws or signs of corrosion.
Turn off the power before you inspect the switches. If you spot frayed wires or rust on connections, replace them immediately. A little maintenance now prevents costly repairs later.
Use High-quality Components
Cheap switches may save you a few dollars upfront, but they often fail sooner. Invest in switches from reputable brands with good reviews. Quality components are built to last and handle regular usage better.
Don’t overlook the wiring either. Using durable wires with proper insulation can make a big difference. Think of it as an investment in your home’s safety and convenience.
What’s your strategy for keeping your home’s electrical systems running smoothly? Share your tips in the comments below—we’d love to hear your experiences!
When To Call A Professional
Sometimes, troubleshooting a 4-way switch can feel like solving a puzzle that’s missing a piece. Even with patience and a basic understanding of wiring, there are moments when it’s best to call a professional. Knowing when to step back can save you time, money, and potential safety risks.
1.
If your 4-way switch causes lights to flicker or doesn’t respond at all, it might signal faulty wiring or a worn-out switch. These issues can be frustrating to deal with on your own. A licensed electrician can quickly identify whether the problem lies in the wiring, the switch itself, or something bigger, like a circuit breaker issue.
Don’t let a “quick fix” turn into a bigger electrical hazard. If you’ve replaced the switch and the problem persists, it’s time to call in a pro.
2.
Noticing a burning smell or seeing sparks when using your switch? That’s a red flag you shouldn’t ignore. This could mean overheating wires, loose connections, or even a short circuit.
Electrical issues like these are not a DIY situation—they’re a safety risk. Professionals have the tools and expertise to address these dangers without putting you or your home at risk.
3.
Does one switch work fine while the others seem to have a mind of their own? This often happens when the 4-way switch wiring isn’t properly connected. Miswired circuits can confuse even seasoned handymen.
Instead of spending hours testing and re-testing the connections, an electrician can trace the wiring and fix the issue efficiently. Why struggle when help is just a phone call away?
4.
Did you know your wiring must comply with local electrical codes? If you’re unsure what these codes require, making changes yourself could lead to violations—or worse, safety risks.
Electricians stay up-to-date on code requirements and ensure your repairs are both safe and legal. It’s better to have peace of mind than to risk faulty installations.
5.
Sometimes, the most important sign that you need a professional is your gut feeling. If you’re staring at wires and feeling overwhelmed, there’s no shame in asking for help. Safety comes first.
Electrical work can be tricky, and even a small mistake can have big consequences. A professional can get the job done right the first time, saving you stress and potential hazards.
Remember, you don’t have to tackle everything alone. Calling an expert ensures your 4-way switch is functioning safely and reliably, giving you one less thing to worry about.
Frequently Asked Questions (FAQs)
How does a 4-way switch work?
A 4-way switch doesn’t control the light directly. Instead, it works with two 3-way switches by changing the current’s path, allowing lights to be controlled from multiple locations.
Why is my 4-way switch not working properly?
Common reasons include loose wire connections, incorrect wire placement, or damaged switch components. Inspect connections, check for burnt areas, and replace faulty parts if necessary.
How do I test a 4-way switch with a multimeter?
Set the multimeter to continuity mode, touch the probes to the switch terminals, and flip the switch. A beep or reading shows proper function. If there’s no response, the switch is likely faulty.
Can a 4-way switch go bad?
Yes, switches can wear out over time due to age, frequent use, or physical damage. Symptoms include flickering lights, inconsistent performance, or dead switches that no longer function.
How do I know if my 4-way switch is wired correctly?
Check against a wiring diagram. Each traveler wire must connect to the correct terminals. Misplaced wires often cause switches to work inconsistently or not at all.
When should I call an electrician for a 4-way switch problem?
If you notice sparks, burning smells, persistent flickering, or feel unsure about wiring codes, it’s safer to call a professional electrician rather than attempt a DIY fix.
Conclusion
Troubleshooting a 4-way switch can seem tricky but is manageable. Start by checking connections and ensuring wires are secure. Use a multimeter to test for continuity and voltage. Replace faulty switches or wires to restore proper function. Always prioritize safety when working with electrical systems.
If issues persist, consulting an electrician may be necessary. Regular maintenance can prevent future problems and keep your switches working smoothly. With patience and basic tools, you can solve most common issues confidently. Keep these tips in mind for a hassle-free troubleshooting experience.


