An alternator is vital for your vehicle’s electrical system. It keeps the battery charged and powers the electrical components.
Understanding alternator troubleshooting can save time and money. Many drivers face issues like dim lights or a dead battery, often linked to alternator problems. Identifying these signs early helps prevent bigger issues. In this guide, we’ll explore common alternator problems and their solutions.
You’ll learn how to diagnose issues and take necessary actions. Whether you’re a car enthusiast or a regular driver, this information is useful. Stay with us to ensure your vehicle runs smoothly and efficiently.
Introduction To Alternator Troubleshooting
The alternator is a crucial component of your vehicle’s electrical system. It powers the battery and supplies electricity to various electrical systems. Knowing how to troubleshoot your alternator can save you time and money.
Importance Of Alternator
The alternator converts mechanical energy into electrical energy. It keeps the battery charged and ensures your car’s electrical systems run smoothly. Without a working alternator, your car won’t start or run properly.
Common Symptoms Of Alternator Failure
Recognizing the symptoms of alternator failure is vital. Here are some common signs:
- Dim or Flickering Lights: Your headlights or dashboard lights may flicker or appear dim.
- Battery Warning Light: A warning light on the dashboard may illuminate.
- Weak or Dead Battery: The battery may drain quickly or die completely.
- Strange Noises: You might hear whining or grinding noises from the engine bay.
- Electrical Issues: Power windows, seats, or other electrical components may malfunction.
| Symptom | Possible Cause |
|---|---|
| Dim or Flickering Lights | Weak alternator output |
| Battery Warning Light | Alternator failure |
| Weak or Dead Battery | Battery not charging |
| Strange Noises | Worn bearings or belt |
| Electrical Issues | Insufficient power supply |
Addressing these symptoms early can prevent further damage. If you suspect an alternator issue, seek professional help.
Tools And Equipment Needed
Troubleshooting an alternator can be a challenging task. Having the right tools and equipment makes it easier. This guide will detail the necessary tools for diagnosing alternator problems. Organized into basic and advanced categories, it helps ensure you have everything you need.
Basic Tools
Basic tools are essential for any alternator troubleshooting. These tools help you perform initial checks and basic tests. Here is a list of basic tools:
- Wrenches and Sockets: Essential for removing and tightening bolts.
- Screwdrivers: Needed for removing covers and connectors.
- Multimeter: Measures voltage, current, and resistance. Very useful in checking electrical circuits.
- Wire Brush: Cleans battery terminals and connectors.
- Safety Gloves: Protects your hands from injuries and electrical shocks.
Advanced Diagnostic Equipment
For more detailed troubleshooting, advanced diagnostic equipment is necessary. These tools provide more precise data and can diagnose complex issues. Here is a list of advanced diagnostic tools:
- Oscilloscope: Helps in viewing the waveforms of electrical signals. Important for detecting irregularities.
- Battery Load Tester: Tests the battery’s ability to hold a charge under load.
- Scan Tool: Reads fault codes from the vehicle’s computer. Useful for identifying specific errors.
- Clamp Meter: Measures the current flowing through the alternator without disconnecting the circuit.
- Infrared Thermometer: Measures the temperature of the alternator and related components.
Having both basic and advanced tools ensures you can handle any troubleshooting scenario. These tools help diagnose and fix alternator problems effectively.
Initial Visual Inspection
Performing an initial visual inspection is crucial in alternator troubleshooting. This step helps identify obvious issues before diving deeper into diagnostics. Focus on checking for physical damage and inspecting wiring and connections.
Checking For Physical Damage
First, examine the alternator for any physical damage. Look for cracks, dents, or signs of wear. Also, check if the alternator is securely mounted. A loose alternator can cause issues.
Use the following checklist to guide your inspection:
- Check for cracks in the housing.
- Look for worn-out or broken pulleys.
- Inspect the alternator belt for wear and tear.
- Ensure the alternator is firmly mounted.
Inspecting Wiring And Connections
Next, inspect the wiring and connections. Faulty wiring can lead to alternator failure. Ensure all connections are secure and free from corrosion.
Follow these steps to inspect the wiring:
- Check for loose or disconnected wires.
- Look for signs of corrosion on the terminals.
- Ensure the battery cables are tight and clean.
- Inspect the ground wire for any damage.
By performing these inspections, you can identify and address potential issues early. This step saves time and reduces the risk of further damage.
Testing The Battery
Testing the battery is a crucial step in alternator troubleshooting. A weak or faulty battery can cause many electrical issues. Knowing the battery’s condition helps diagnose if the problem lies within the battery or the alternator. This section will guide you through two essential tests: the battery voltage test and load testing the battery.
Battery Voltage Test
Start by checking the battery voltage. Use a digital multimeter for accurate results. Set the multimeter to DC voltage. Connect the red probe to the battery’s positive terminal and the black probe to the negative terminal. A fully charged battery should read around 12.6 volts. If the reading is below 12.4 volts, the battery may be weak or discharged.
Load Testing The Battery
Next, perform a load test on the battery. This checks the battery’s ability to hold a charge under load. Turn off the engine and all electrical accessories. Connect a load tester to the battery. Apply the load for 10-15 seconds. Watch the voltage reading during this test. A healthy battery should not drop below 9.6 volts. If it does, the battery may need replacement.
Checking The Drive Belt
Checking the drive belt is essential during alternator troubleshooting. The drive belt connects the alternator to the engine. If the belt is damaged, the alternator cannot charge the battery. Below are steps to check the drive belt.
Inspecting Belt Condition
Start by turning off the engine. Look at the belt for any cracks, fraying, or wear. A worn-out belt may slip, causing charging issues. If the belt shows signs of damage, it needs replacing. This step ensures the alternator runs smoothly.
Tension And Alignment Check
Next, check the belt tension. Press the belt with your thumb. It should not give more than an inch. A loose belt may not drive the alternator properly. Adjust the tension if necessary.
Then, inspect the belt alignment. The belt should run straight along the pulleys. Misalignment can cause the belt to slip or wear out faster. Align the belt correctly to avoid these issues.
Using A Multimeter
A multimeter is a handy tool for troubleshooting your alternator. It helps you check the voltage and current. This ensures your alternator is working well. Follow these steps to measure voltage and test current.
Measuring Alternator Voltage
To measure the alternator voltage, follow these steps:
- Turn off your car engine.
- Set the multimeter to the DC voltage setting.
- Connect the red probe to the battery’s positive terminal.
- Attach the black probe to the battery’s negative terminal.
- Start the engine.
- Read the voltage on the multimeter display.
A healthy alternator should show 13.8 to 14.4 volts with the engine running. If the voltage is too low or too high, there may be an issue.
Testing Alternator Current
Testing the alternator current is also important. Here are the steps:
- Turn off your car engine.
- Set the multimeter to the DC current (amperes) setting.
- Disconnect the battery’s negative terminal.
- Connect the multimeter in series with the battery’s negative cable and terminal.
- Start the engine.
- Read the current on the multimeter display.
A properly functioning alternator should show 10 to 30 amperes. This depends on the car’s electrical load. If the current is outside this range, the alternator might need attention.
Using a multimeter for these checks can help maintain your car’s electrical system. Regular checks can save you from unexpected breakdowns.
Common Alternator Issues
Understanding common alternator issues can help you maintain your vehicle’s health. The alternator is key to your car’s electrical system. It keeps the battery charged and powers the electrical components while driving. Knowing the signs of alternator problems is crucial. This knowledge can save you from unexpected breakdowns and costly repairs.
Dead Battery
A dead battery is a common sign of alternator trouble. If your battery frequently dies, the alternator might not be charging it properly. You may need to jump-start your car often. This could indicate the alternator is failing to generate enough power. Check the battery connections and alternator output. This helps identify the root cause.
Dim Or Flickering Lights
Dim or flickering lights can be a clear sign of alternator issues. The alternator supplies power to your car’s lights. If they dim or flicker, the alternator may not be providing enough power. This can happen especially at night when lights are crucial for visibility. It might also affect your dashboard lights and other electrical components. Check your alternator if you notice these signs.
Advanced Troubleshooting Techniques
Dealing with alternator issues can be complex. Knowing advanced troubleshooting techniques helps in quickly identifying and solving problems. Here, we’ll discuss two key methods: using an oscilloscope and interpreting diagnostic codes.
Using An Oscilloscope
An oscilloscope is a powerful tool for diagnosing alternator problems. It measures voltage over time, providing a visual representation of electrical signals. To use an oscilloscope:
- Connect the oscilloscope probes to the alternator output.
- Set the oscilloscope to the correct voltage range.
- Observe the waveform on the screen.
A healthy alternator produces a smooth, consistent waveform. Irregular patterns may indicate issues such as:
- Worn brushes
- Damaged diodes
- Faulty voltage regulator
Refer to your oscilloscope manual for specific settings and readings.
Interpreting Diagnostic Codes
Modern vehicles often come with onboard diagnostic systems. These systems generate diagnostic codes when an issue arises. To interpret these codes:
- Use an OBD-II scanner to read the codes.
- Refer to the vehicle’s manual to understand the codes.
- Identify the specific problem based on the code.
Common diagnostic codes for alternator issues include:
| Code | Description |
|---|---|
| P0562 | System voltage low |
| P0563 | System voltage high |
| P0620 | Generator control circuit malfunction |
By understanding these codes, you can pinpoint the issue and take appropriate action. This makes alternator troubleshooting more efficient and effective.
When To Seek Professional Help
Troubleshooting an alternator can be tricky. Sometimes, you need professional help. Knowing when to seek help can save time and money. Here’s what to look for.
Recognizing Complex Problems
Some issues are too complex for DIY solutions. Here are signs you may need a professional:
- Dashboard warning lights – If your dashboard lights up, it could signal alternator trouble.
- Strange noises – Unusual sounds from your engine may mean alternator issues.
- Electrical problems – Flickering lights or dead accessories can be signs of deeper issues.
If you notice these symptoms, it’s best to consult an expert. Ignoring them can lead to bigger problems.
Choosing A Reliable Mechanic
Finding a reliable mechanic is crucial. Here are tips to help you:
- Check reviews – Look online for customer feedback.
- Ask for certifications – Ensure the mechanic has proper credentials.
- Compare prices – Get quotes from different shops.
| Factor | Importance |
|---|---|
| Experience | High |
| Location | Medium |
| Customer Service | High |
Choosing the right mechanic ensures your car gets the best care. Be selective and thorough in your search.
Preventive Maintenance Tips
Preventive maintenance keeps your alternator in top condition. It prevents unexpected breakdowns and costly repairs. Focus on regular inspections and replacing worn components. These steps ensure your alternator works efficiently and lasts longer.
Regular Inspections
Regular inspections help detect potential problems early. Check the alternator’s belt for wear and tear. A loose or damaged belt reduces efficiency. Ensure all connections are tight and free from corrosion. Clean terminals allow better electrical flow.
Listen for unusual sounds. Grinding or whining noises indicate issues. Inspect the voltage output with a multimeter. Proper voltage ensures the battery charges correctly. Regular checks help maintain your alternator’s health.
Replacing Worn Components
Worn components affect the alternator’s performance. Replace the belt if it shows signs of wear. A new belt ensures smooth operation. Check the bearings for wear. Worn bearings cause noise and overheating. Replace them to avoid further damage.
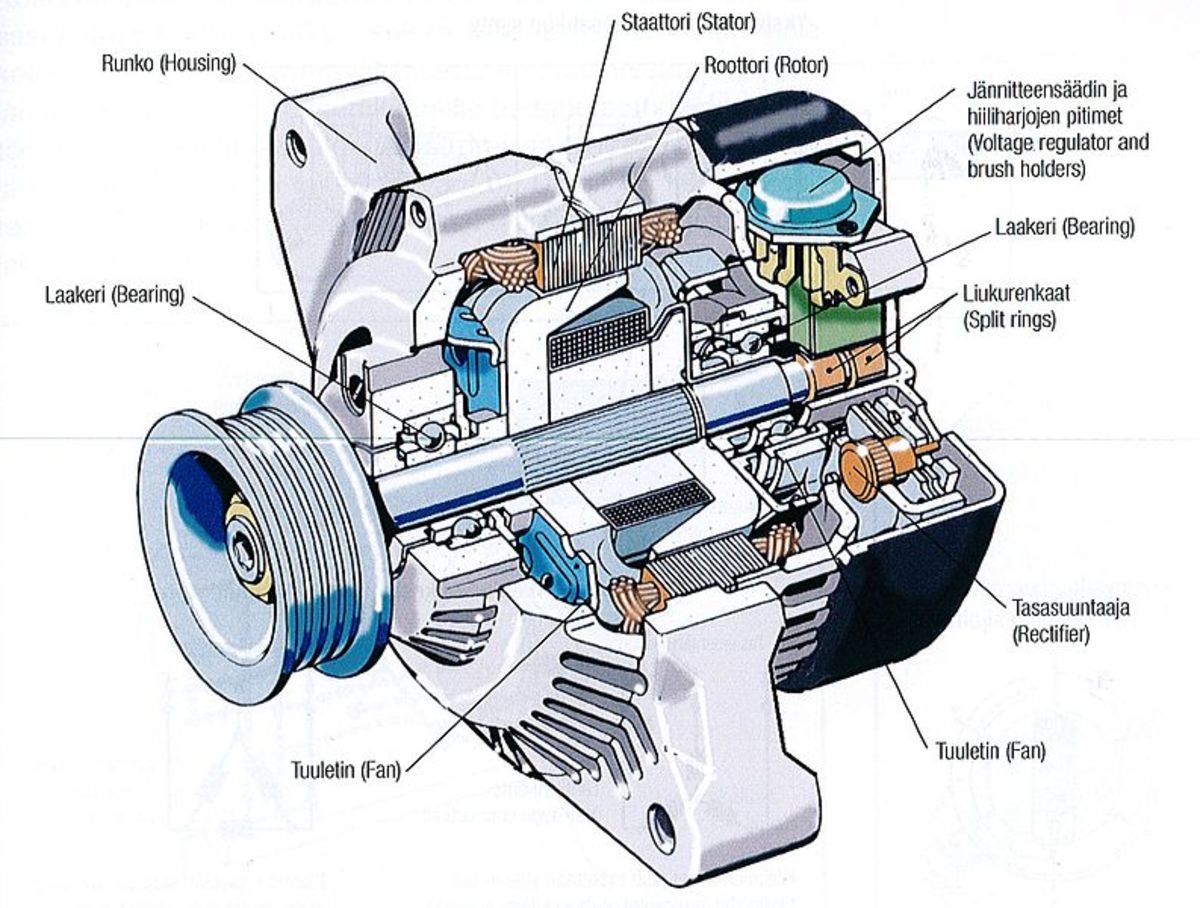
Inspect the brushes and slip rings. Worn brushes reduce the alternator’s efficiency. Replace them if necessary. Clean slip rings for better contact. Regularly replacing worn components keeps your alternator running smoothly.
Conclusion And Summary
Troubleshooting an alternator can seem complex at first. But with the right knowledge, it becomes easier. This section will recap the key points and provide final thoughts.
Key Takeaways
Understanding the signs of a failing alternator is crucial. Common symptoms include dimming headlights and a dead battery. Testing the alternator involves checking the voltage output. A healthy alternator usually shows a reading between 13.5 and 14.5 volts.
Replacing a faulty alternator can restore vehicle performance. Always ensure connections are tight and clean. Regular maintenance can prevent many alternator problems.
Final Thoughts
Dealing with alternator issues can be straightforward with the right approach. Regular checks and understanding warning signs can save time and money. Always consult a professional if unsure about any step.
Frequently Asked Questions
What Are Common Symptoms Of A Bad Alternator?
Dim lights, battery warning light, slow electrical accessories, strange noises, and frequent engine stalls.
How Do You Test An Alternator At Home?
Use a multimeter. Check voltage at battery terminals. Should read 13. 8 to 14. 4 volts.
Can A Car Run With A Bad Alternator?
For a short time. The battery will drain quickly, causing the car to stop.
What Causes An Alternator To Fail?
Worn bearings, faulty diodes, bad voltage regulator, and poor electrical connections.
How Much Does It Cost To Replace An Alternator?
Typically, $300 to $500 including labor. Prices vary based on car model and location.
Conclusion
Troubleshooting your alternator doesn’t have to be difficult. Follow the steps outlined. Check the battery, belts, and connections regularly. Identify the problem early to avoid bigger issues. Regular maintenance ensures your vehicle runs smoothly. Don’t ignore warning signs. Taking action promptly saves time and money.
Keep your alternator in good shape for a reliable car. Ensure you understand each step clearly. With these tips, you can handle alternator issues confidently. Happy driving!
")


