Is your American Standard automatic faucet giving you trouble? You’re not alone.
These high-tech faucets are designed to make life easier, but when they stop working as they should, frustration can quickly follow. Whether it’s a sensor that won’t respond, water that won’t flow, or a faucet that just won’t turn off, these issues can disrupt your daily routine.
Don’t worry—this guide is here to help. You don’t need to be a plumber or a tech expert to get your faucet back in working order. By the time you finish reading, you’ll know exactly what steps to take to troubleshoot the problem. Stick with us, and you’ll save time, money, and the hassle of unnecessary repairs. Ready to fix that faucet? Let’s dive in!
Common Issues With Automatic Faucets
Automatic faucets are convenient and save water. But, they can develop issues over time. Understanding common problems helps identify the cause quickly. This guide explains frequent issues and how to address them.
Faucet Not Turning On
If the faucet doesn’t turn on, the sensor could be blocked. Ensure no dirt or debris is covering the sensor. Weak or dead batteries can also stop the faucet from working. Replace the batteries and test the faucet again. Check if the water supply is turned on. A disconnected power source might also be the problem.
Faucet Not Turning Off
A faucet that won’t stop running may have a sensor issue. Ensure the sensor is clean and free from water spots. Faulty wiring between the sensor and power source could also be the cause. Inspect the connections and tighten any loose wires. Sometimes, a stuck solenoid valve keeps the water flowing. Clean or replace the valve to fix this issue.
Weak Water Flow
If the water flow is weak, the aerator might be clogged. Remove the aerator and clean it to improve flow. Low water pressure in your home could also affect the faucet. Verify the pressure from other fixtures to confirm. A dirty filter inside the faucet can block water flow. Clean or replace the filter to solve the problem.
Sensor Malfunctions
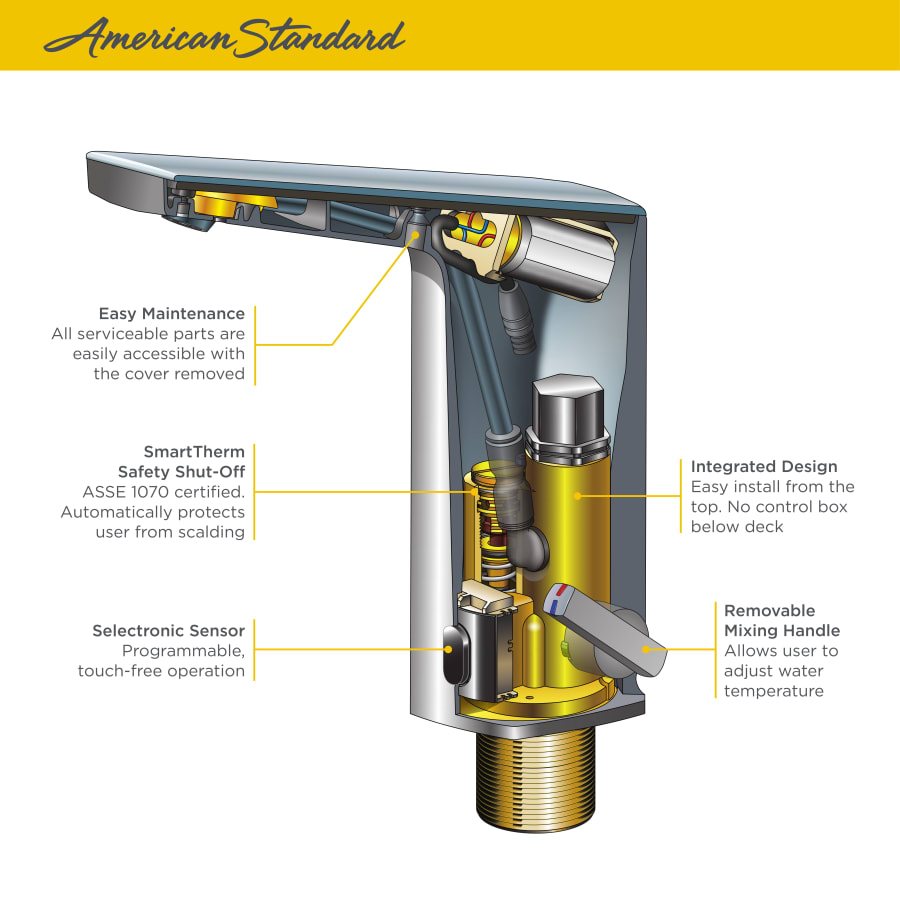
Sensor malfunctions can cause the faucet to act unpredictably. Ensure the sensor is not obstructed by dirt or water stains. Distance settings could be incorrect, making the sensor overly sensitive. Adjust the settings to match the sink’s needs. Faulty or damaged sensors may require replacement for proper functioning.
Tools You’ll Need For Repairs
When your American Standard automatic faucet isn’t working as it should, it’s natural to feel frustrated. But before jumping into repairs, gathering the right tools can save you time and headaches. Having the proper equipment ensures your troubleshooting process is smooth and efficient. Let’s dive into the essentials you’ll need.
1. Phillips And Flathead Screwdrivers
A good screwdriver set is a must. Most automatic faucet components are held together with screws, and you’ll likely encounter both Phillips and flathead types. Make sure the screwdrivers are appropriately sized to avoid stripping screws.
2. Adjustable Wrench
An adjustable wrench helps loosen and tighten nuts and bolts connecting the faucet to your plumbing. If your faucet has been installed for a while, these connections might be tight, so a wrench with a comfortable grip will make the task easier.
3. Hex Key (allen Wrench)
Many American Standard faucets use hex screws for securing parts. A hex key set with multiple sizes will give you flexibility when dealing with components like the sensor housing or control box.
4. Soft Cloth Or Microfiber Towel
A soft cloth is essential for cleaning parts while you troubleshoot. You don’t want to accidentally scratch the finish of your faucet. Use it to wipe away dust, water spots, or grime that might be interfering with the sensor.
5. Multimeter
If your faucet isn’t turning on, a multimeter can help you check the battery voltage or electrical connections. This tool is especially useful if the issue seems related to the sensor or power source.
6. Replacement Batteries
Automatic faucets rely heavily on battery power. Always have a set of fresh batteries on hand to test whether power supply issues are causing the malfunction.
7. Needle-nose Pliers
Needle-nose pliers are great for gripping small components or pulling out wires without damaging them. They’re particularly helpful if you need to reconnect loose wires inside the faucet’s control box.
8. Bucket Or Towel For Water Spills
Water spills can happen during repairs, especially if you need to disconnect plumbing. Keep a bucket or towel nearby to catch any drips and prevent messes.
9. User Manual
Don’t underestimate the power of your faucet’s user manual. It often includes diagrams and troubleshooting tips specific to your model. If you’ve misplaced it, you can usually download a copy online.
Having these tools ready before you start repairs can make a world of difference. What’s the one tool you often forget but always need when fixing things around the house? Share your thoughts below!
Fixing Power Supply Problems
Your American Standard automatic faucet is a marvel of convenience—until it stops working. Power supply issues are one of the most common culprits. Whether your faucet runs on batteries or a power adapter, a quick check can often solve the problem. Let’s dive into the simple steps to get your faucet up and running again.
Checking Battery Connections
Loose or misaligned batteries can cause your faucet to stop responding. Open the battery compartment and inspect the connections. Are the batteries snugly in place? Look for corrosion or dirt on the terminals that might be blocking the connection. A quick wipe with a clean cloth or a little vinegar can restore the contact. Don’t forget to double-check the polarity (+/- signs) when reinserting the batteries.
Replacing Dead Batteries
When was the last time you replaced the batteries? If your faucet suddenly stopped working, dead batteries might be the issue. Swap them out for fresh ones. Always use the recommended battery type—check your user manual if you’re unsure. It’s a good idea to keep spare batteries on hand to avoid future interruptions. Replacing them takes minutes and can save you a lot of frustration.
Inspecting Power Adapter
If your faucet uses a power adapter, examine it closely. Is it securely plugged into the outlet? A loose connection can disrupt the power supply. Look for signs of wear, like frayed wires or bent prongs. Try plugging the adapter into a different outlet to rule out issues with the socket. If the adapter looks damaged, it might be time to replace it. Don’t risk using a faulty adapter—it could cause more problems down the line.
Take these steps to troubleshoot your faucet’s power supply and save yourself the hassle of unnecessary repairs. What’s the first thing you’ll check? A small fix could bring big convenience back to your daily routine!

Adjusting The Sensor Range
Adjusting the sensor range on your American Standard automatic faucet can make a world of difference in its performance. If your faucet is too sensitive, it may activate unnecessarily. On the other hand, a sensor that doesn’t respond well can leave you waving your hands in frustration. Let’s focus on a few simple steps to fine-tune your sensor range for optimal performance.
Cleaning The Sensor
The first step in improving sensor range is making sure the sensor is clean. Dirt, water spots, or soap residue can block the sensor and affect its accuracy. Use a soft, damp cloth to gently wipe the sensor area.
Avoid abrasive cleaners that could scratch the sensor. Scratches can interfere with the sensor’s ability to detect motion. Regular cleaning can prevent this issue and keep your faucet working smoothly.
Resetting Sensor Settings
If cleaning doesn’t help, resetting the sensor settings may resolve the issue. Most American Standard automatic faucets have a reset button or a specific procedure in the user manual to reset the sensor.
Turn off the water supply before resetting to avoid accidental activation. Once reset, test the faucet to see if the sensor responds more accurately. This simple step can often restore your faucet’s functionality.
Calibrating Sensor Distance
Calibration is key if the sensor is either too responsive or not responsive enough. Check your faucet’s user manual for instructions on adjusting the sensor distance. Typically, this involves pressing a button or turning a small adjustment dial.
Start by setting the sensor distance to a mid-range position. Test the faucet by waving your hand at different distances to find the sweet spot. Keep in mind, every bathroom setup is unique, so you may need to tweak it a couple of times to get it just right.
Does your faucet feel more intuitive to use now? Adjusting these small details can make your daily routine more seamless. If you’ve tried these steps and the sensor still isn’t working well, it may be time to contact a professional or check for replacement parts.
Clearing Water Flow Blockages
Automatic faucets are a modern convenience, but when water flow slows or stops altogether, frustration can quickly set in. Clearing water flow blockages is often the key to restoring functionality. With a few simple steps, you can tackle common issues and get your American Standard faucet running smoothly again.
Cleaning The Aerator
The aerator is the small screen at the tip of your faucet that mixes air with water to create a smooth flow. Over time, mineral deposits or debris can clog this screen, reducing water pressure.
- Unscrew the aerator using your hand or a wrench. Be gentle to avoid damaging the threads.
- Rinse the screen under warm water and use a toothbrush to scrub away buildup.
- Soak the aerator in vinegar for 30 minutes to dissolve stubborn deposits.
Reattach the aerator and test your faucet. Does the water flow improve? If not, it’s time to move on to other possible blockages.
Checking The Filter
Some American Standard automatic faucets come equipped with a filter to catch debris before it reaches the faucet head. A clogged filter can significantly impact water flow.
- Locate the filter—it’s usually near the base of the faucet or inside the valve body.
- Remove the filter gently and inspect it for dirt or debris.
- Rinse the filter under running water and, if needed, use a soft brush to clean stubborn particles.
Place the filter back into its position and check your faucet. Did you notice an improvement? If not, there’s one more step to try.
Flushing The Water Lines
If debris has settled deeper in the plumbing, you may need to flush the water lines. This step can clear hidden blockages that might be affecting your faucet.
- Turn off the water supply to your faucet using the shut-off valve.
- Disconnect the faucet from the water lines carefully. Use a wrench if necessary.
- Flush the water lines by running water directly into a bucket or sink.
Reconnect the faucet and turn the water supply back on. Observe the flow—does it feel stronger now? Flushing the lines often solves issues that cleaning the aerator and filter can’t.
Have you successfully restored your faucet’s performance, or are you still troubleshooting? Addressing these blockages can make all the difference in your faucet’s functionality. Share your experience—what worked for you?
Addressing Leaks
Leaks in your American Standard automatic faucet can be frustrating, but they’re often easier to fix than you might think. Whether it’s a slow drip or water pooling at the base, addressing leaks promptly can save you money and prevent water waste. Let’s break down the steps you can take to fix those leaks and keep your faucet running smoothly.
Inspecting Seals And O-rings
Seals and O-rings are small but critical components that keep your faucet watertight. Over time, they can wear out or become misaligned. Start by turning off the water supply and carefully removing the faucet handle or spout.
Look for any visible signs of damage, such as cracks or tears in the seals or O-rings. If they look worn, it’s time to replace them. Make sure to get the right size and type for your specific faucet model—check the user manual or the manufacturer’s website for details.
Sometimes, dirt or debris can also cause leaks. Clean the seals and O-rings with a soft cloth and reassemble the faucet to see if the issue is resolved.
Tightening Loose Connections
Loose connections are another common cause of faucet leaks. Over time, screws and fittings can loosen due to regular use or vibrations in the plumbing system. Grab a wrench or screwdriver and check all the connections, including the ones under the sink.
If you find a loose screw or nut, tighten it gently. Be careful not to overdo it, as overtightening can damage the threads or other components. A snug fit is all you need to stop water from seeping through.
Don’t forget to test the faucet after tightening the connections. Run the water for a few seconds and check if the leak persists.
Replacing Damaged Parts
Sometimes, a leak is caused by a part that’s too damaged to repair. This could be the cartridge, valve, or even the spout. If you’ve inspected seals and tightened connections but the problem remains, replacing the faulty part might be your best option.
Identify the part that needs replacement by disassembling the faucet and inspecting each component. Many American Standard faucets have readily available replacement parts, which you can find online or at a hardware store. Always double-check compatibility to avoid additional trips to the store.
Once you have the new part, follow the installation instructions carefully. Reassemble the faucet and test it to confirm the leak is gone. If you’re unsure about tackling this step yourself, consider reaching out to a professional plumber.
What’s the most challenging leak you’ve dealt with? Share your story in the comments and let’s troubleshoot together!
When To Call A Professional
Automatic faucets are a great addition to modern bathrooms and kitchens, providing convenience and helping conserve water. However, when troubleshooting your American Standard automatic faucet, there might come a point where DIY fixes just don’t cut it. Knowing when to call a professional can save you time, frustration, and even prevent further damage to your faucet or plumbing system.
Is It A Persistent Issue?
If your faucet has been acting up for days, despite trying basic troubleshooting steps like cleaning the sensor or checking the batteries, it might be time to call in a professional. Persistent issues often indicate underlying problems that require specialized tools or expertise.
For example, a damaged valve or wiring problem might not be visible to you. Ignoring these can lead to bigger and costlier repairs later. It’s better to act early than wait for the faucet to completely stop working.
Are Electrical Components Involved?
Automatic faucets rely heavily on electronic parts like sensors and control boxes. If you suspect a wiring issue or notice inconsistent sensor responses, it’s best to avoid tinkering yourself. Electrical repairs can be tricky and potentially hazardous if handled incorrectly.
A professional plumber or technician familiar with American Standard faucets will have the knowledge to diagnose and repair electrical faults safely, ensuring the system works as it should.
Water Pressure Problems?
Low water pressure can make your faucet frustrating to use. This might not be due to the faucet itself but could stem from plumbing issues like clogged pipes or leaks in your system. If your troubleshooting points to water pressure as the culprit, a plumber can inspect your system more thoroughly.
They might identify problems you hadn’t considered, like mineral buildup in your pipes or issues with your main water line.
Do Repairs Exceed Your Comfort Zone?
Let’s be honest—some repairs just feel overwhelming. If you’re staring at a disassembled faucet and thinking, “I have no idea what I’m doing,” it’s time to make the call. Trying to fix something you’re unsure about can cause more harm than good.
Professionals handle these repairs daily, so they can quickly assess the problem, fix it, and get your faucet back in working order.
What’s The Cost Of Waiting?
Think about this: Could delaying professional help lead to bigger problems? If your faucet is leaking, malfunctioning, or not shutting off properly, you could be wasting water and increasing your utility bills.
Calling a professional sooner rather than later often saves money, especially if a minor repair prevents a major replacement down the road.
To wrap it up: Trust your instincts. If something feels beyond your skill set or is getting worse despite your efforts, don’t hesitate to contact a professional. Your time and peace of mind are worth it.
Conclusion
Troubleshooting an American Standard automatic faucet doesn’t have to be complicated. Start by checking power sources, sensors, and connections for common issues. Regular maintenance can help prevent many problems from arising. Always refer to the user manual for specific guidance.
If the issue persists, contacting a professional might be the best option. Keeping your faucet in good condition ensures long-term reliability. A little effort today can save bigger repairs tomorrow. Remember, simple steps often fix the most frustrating problems. Stay proactive and keep your faucet functioning smoothly.
")


