Dealing with a faulty flush valve can be frustrating. Understanding common issues and solutions helps.
Flush valves are crucial for toilets to function properly. A malfunction can cause leaks, poor flushing, or constant running water. This guide will walk you through troubleshooting steps for American Standard flush valves. Whether you face a minor issue or a significant problem, knowing how to identify and fix it saves time and money.
Learn common problems, simple solutions, and when to call a professional. Let’s dive into troubleshooting American Standard flush valves and ensure your toilet operates efficiently again.
Common Flush Valve Issues
Flush valves are a crucial component in any toilet. They ensure the toilet flushes properly. Over time, these valves can develop problems. This can lead to various issues. Knowing the common flush valve issues can help you troubleshoot effectively. Here are some of the most frequent problems:
Weak Flush
A weak flush can be frustrating. It may not fully clear the bowl. This issue often arises due to low water levels in the tank. Check the water level first. It should be about an inch below the top of the overflow tube.
Another cause could be a clogged flush valve. Debris or mineral buildup can restrict water flow. Clean the flush valve to remove any obstructions. Use a brush and vinegar for best results.
Sometimes, the problem lies with the flapper. A worn or damaged flapper won’t seal properly. This causes insufficient water release. Replace the flapper if it’s old or damaged. This simple fix can restore a strong flush.
Continuous Running Water
Continuous running water is a common issue. It can waste a lot of water. Often, the problem is with the flapper. If the flapper doesn’t seat properly, water will keep flowing. Adjust or replace the flapper to fix this.
Another cause might be the flush valve seal. A worn-out seal can cause leaks. Inspect the seal for any wear or damage. Replace it if necessary.
Sometimes, the fill valve might be the culprit. An improperly adjusted fill valve can cause overflow. Ensure the fill valve is set correctly. Adjust it so the water stops filling at the right level.
| Issue | Possible Causes | Solutions |
|---|---|---|
| Weak Flush | Low water level, clogged flush valve, worn flapper | Adjust water level, clean flush valve, replace flapper |
| Continuous Running Water | Improperly seated flapper, worn flush valve seal, fill valve issue | Adjust or replace flapper, inspect and replace seal, adjust fill valve |
Tools Needed
To troubleshoot an American Standard flush valve, you need the right tools. These tools can be divided into two categories: basic and specialized. Having these tools on hand can make the process smoother and more efficient. Let’s look at what you’ll need.
Basic Tools
Basic tools are essential for any plumbing task. Here is a list of basic tools you might need:
- Adjustable Wrench: Useful for loosening and tightening nuts and bolts.
- Screwdrivers: Both flathead and Phillips are needed for various screws.
- Pliers: Helpful for gripping and turning small parts.
- Bucket: To catch any water that might spill.
- Cloth or Rag: To clean up spills and keep the area dry.
Specialized Tools
Some tasks might require more specialized tools. These tools are designed for specific plumbing needs:
- Toilet Tank Wrench: Specially designed for toilet tank bolts.
- Plumber’s Tape: Also known as Teflon tape, used for sealing pipe threads.
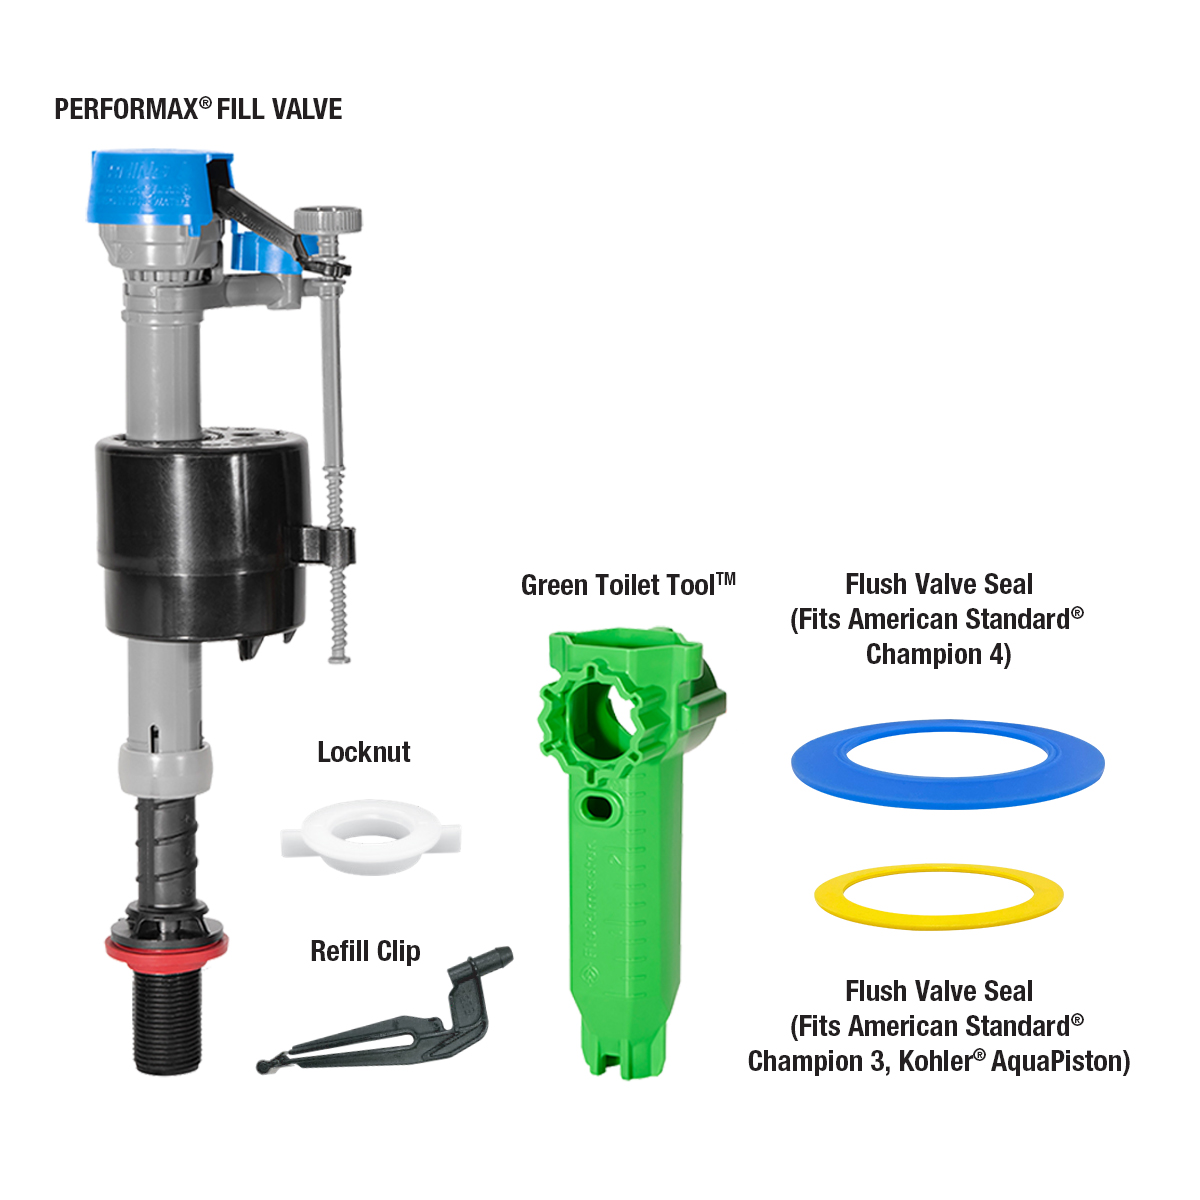
- Flush Valve Repair Kit: Contains all parts needed to repair a flush valve.
- Toilet Auger: Useful if there is a blockage in the toilet.
Having these tools ready before you start can save time and reduce frustration. Make sure you have both basic and specialized tools to handle any issues that arise.
Step-by-step Troubleshooting
Step-by-step troubleshooting is crucial for resolving issues with your American Standard flush valve. This guide will help you identify and fix common problems. Follow these steps to ensure your toilet flushes properly.
Identifying The Problem
First, identify the problem with your flush valve. Look for signs like weak flushing, continuous running water, or leaks. These issues indicate something is wrong with the flush valve.
Next, lift the toilet tank lid. Check the water level inside. It should be about an inch below the overflow tube. If the water level is too high or too low, this can cause flushing issues.
Testing The Flush
To test the flush, press the flush handle. Observe the water flow and listen for any unusual sounds. A weak flush might indicate a blockage or a problem with the flush valve.
Check the flapper. It should lift and drop smoothly when you flush. If it’s not sealing properly, it can cause leaks and weak flushing. Adjust or replace the flapper if necessary.
Ensure the chain is properly connected to the flapper and the flush handle. A loose or broken chain can prevent the flapper from lifting.
Finally, check for any visible damage to the flush valve. Cracks or worn parts can lead to poor performance.

Fixing Weak Flush
Experiencing a weak flush from your American Standard toilet can be frustrating. A weak flush can leave waste behind and cause multiple flushes, wasting water. Luckily, you can troubleshoot and fix this issue with a few simple steps.
Adjusting The Chain
The chain connecting the flush lever to the flapper can affect the flush. If the chain is too loose, the flapper won’t open fully. If it’s too tight, the flapper won’t close properly.
First, remove the toilet tank lid. Locate the chain attached to the flush lever and the flapper. Adjust the chain length so there is a slight slack when the flapper is closed. This allows the flapper to open fully during a flush. Test the flush to ensure the chain adjustment worked.
Cleaning The Flush Valve
A dirty flush valve can also cause weak flushes. Debris or mineral buildup can block water flow. Cleaning the flush valve can restore a strong flush.
Turn off the water supply to the toilet. Flush the toilet to drain the tank. Use a sponge or towel to soak up any remaining water. Inspect the flush valve for debris or buildup. Use a brush or cloth to clean the valve. Make sure to remove any obstructions. Turn the water supply back on and test the flush.
These steps should help in fixing weak flush issues with your American Standard toilet. Regular maintenance can prevent future problems and ensure a strong flush every time.
Stopping Continuous Running Water
Dealing with continuous running water in your American Standard toilet can be frustrating. This issue often leads to higher water bills and can waste a significant amount of water. Thankfully, troubleshooting the flush valve is a straightforward task. Follow these steps to stop the continuous running water and get your toilet back in good working order.
Checking The Flapper
The flapper is a crucial component in your toilet’s flushing system. It controls the release of water from the tank to the bowl. A faulty flapper can cause continuous running water. Here’s how to check it:
- First, turn off the water supply to the toilet.
- Next, remove the tank lid and set it aside carefully.
- Inspect the flapper for any visible damage or wear.
- If the flapper looks worn out or damaged, replace it with a new one.
- Ensure the new flapper forms a tight seal to prevent water from leaking.
Sometimes, the flapper chain might be too short or tangled. Ensure it’s adjusted properly to allow the flapper to close completely.
Inspecting The Fill Valve
The fill valve controls the water level in the toilet tank. If it’s not working correctly, it might cause the tank to overfill, leading to continuous running water. Follow these steps to inspect the fill valve:
- Check the water level in the tank. It should be about one inch below the top of the overflow tube.
- If the water level is too high, adjust the fill valve.
- Turn the adjustment screw on the fill valve to lower the water level.
- Inspect the fill valve for any signs of damage or malfunction.
- If necessary, replace the fill valve with a new one.
After adjusting or replacing the fill valve, turn the water supply back on. Flush the toilet to ensure the issue is resolved.
Replacing The Flush Valve
Replacing the flush valve on your American Standard toilet can solve many issues. It helps improve the toilet’s performance and can stop leaks. With the right tools and steps, it’s a task you can handle. Follow this guide to replace your flush valve efficiently.
Removing The Old Valve
First, turn off the water supply to the toilet. Flush the toilet to empty the tank. Use a sponge or towel to soak up any remaining water in the tank.
Next, remove the tank lid and set it aside. Locate the flush valve at the bottom of the tank. Disconnect the water supply line from the bottom of the tank using a wrench.
Unscrew the tank bolts with a screwdriver and carefully lift the tank off the bowl. Place the tank on a flat surface. Use pliers to remove the lock nut holding the flush valve in place. Take out the old flush valve from the tank.
Installing The New Valve
Begin by placing the new flush valve into the tank. Ensure it fits snugly in the hole. Secure it with a new lock nut and tighten it with pliers. Be careful not to over-tighten.
Next, place the tank back onto the bowl. Align the tank bolts with the holes on the bowl. Tighten the bolts with a screwdriver. Reconnect the water supply line to the bottom of the tank.
Turn on the water supply and let the tank fill up. Check for any leaks around the flush valve and the water supply line. If everything looks good, replace the tank lid. Flush the toilet a few times to ensure the new valve works properly.
Preventive Maintenance
Ensuring your American Standard flush valve works properly requires regular preventive maintenance. Simple tasks like cleaning and inspections help prevent issues and extend the valve’s lifespan. Below are some effective preventive maintenance practices.
Regular Cleaning
Regular cleaning is crucial for maintaining a flush valve. Mineral deposits and debris can cause clogging. Clean the valve every few months to ensure smooth operation.
To clean the valve:
- Turn off the water supply.
- Remove the valve cover.
- Use a brush to scrub away deposits.
- Rinse thoroughly with clean water.
- Replace the cover and turn the water back on.
Routine Inspections
Routine inspections help identify potential issues early. Inspect the valve and its components regularly.
During inspections, look for:
- Leaks around the valve.
- Cracks or damage in the valve components.
- Corrosion or mineral buildup.
If you find any issues, address them immediately. This prevents small problems from becoming big ones.
Keeping a log of your inspections and maintenance helps track the valve’s condition. Note the date and any actions taken. This ensures a consistent maintenance schedule.
When To Call A Professional
Dealing with flush valve issues can be frustrating. Sometimes, the problems are too complex for a DIY fix. Knowing when to call a professional plumber can save you time and money. Here are some situations when you should consider professional help.
Complex Issues
If your flush valve has complex issues, a professional can help. These issues may include damaged or broken internal parts. A professional has the right tools and knowledge to fix these problems. Attempting to fix it yourself can lead to more damage.
Persistent Problems
Persistent problems with your flush valve may need expert attention. If you have tried to fix the issue multiple times without success, it’s time to call a plumber. A professional can identify hidden issues that you might have missed. They can ensure the problem is fixed correctly and stays fixed.
Frequently Asked Questions
How Do I Fix A Leaking Flush Valve?
Check the flapper for wear and tear. Replace it if necessary. Ensure the chain is not tangled.
Why Is My Toilet Not Flushing Properly?
Check if the flush valve is clogged. Clean it and ensure the water level is correct.
How Do I Adjust The Water Level In The Tank?
Adjust the float arm or float cup. This will change the water level in the tank.
What Causes A Running Toilet?
A worn-out flapper or a misaligned chain can cause a running toilet. Replace or adjust them.
How Do I Remove A Stuck Flush Valve?
Turn off the water supply. Use a wrench to loosen the valve. Carefully remove and replace it.
Conclusion
Troubleshooting an American Standard flush valve can be straightforward. Start with simple checks. Ensure water supply is on. Inspect for leaks and clogs. Clean or replace faulty parts as needed. Regular maintenance prevents issues. This guide helps keep your toilet in good shape.
Save time and avoid frustration. With these tips, your flush valve will work smoothly.
")


