Is your AO Smith water heater giving you trouble? Don’t worry—you’re not alone.
A malfunctioning water heater can be frustrating, especially when you’re counting on that warm shower or hot water for daily tasks. But here’s the good news: many common issues with AO Smith water heaters can be fixed quickly, often without the need for professional help.
In this guide, you’ll discover simple troubleshooting steps to get your water heater back on track. Whether it’s a lack of hot water, strange noises, or error codes flashing on the screen, we’ll break it all down for you. Stick around, and by the end of this article, you’ll feel more confident in tackling these problems head-on. Why wait? Let’s get started and bring comfort back to your home!
Common Issues With Ao Smith Water Heaters
AO Smith water heaters are known for their reliability and efficiency. Yet, like any appliance, they can encounter problems over time. Knowing common issues can help you troubleshoot and maintain your water heater effectively. Below are some frequent problems users face and their potential causes.
No Hot Water
A lack of hot water is a common issue with water heaters. This could mean the heating element is faulty or the thermostat is set incorrectly. In some cases, a tripped circuit breaker or blown fuse may be the cause. For gas models, it may indicate the pilot light has gone out or the gas supply is interrupted.
Inconsistent Water Temperature
Fluctuating water temperature can be frustrating during showers or household chores. This issue often stems from a malfunctioning thermostat or sediment buildup in the tank. Excessive sediment can interfere with the heating process, causing uneven water temperatures. Check the thermostat settings and flush the tank if necessary.
Water Leaking From The Tank
A leaking water heater tank can lead to water damage and higher bills. Leaks often occur due to corrosion, loose connections, or a faulty pressure relief valve. Inspect the tank for visible cracks or rust. Tighten loose connections and replace damaged parts promptly to prevent further damage.
Strange Noises During Operation
Loud or unusual noises can indicate sediment buildup or a failing component. Sediment settling at the bottom of the tank can cause popping or rumbling sounds. These noises may also indicate a loose heating element or scale buildup. Regularly flushing the tank can reduce sediment and prolong its lifespan.
Pilot Light Not Staying Lit
The pilot light may go out due to a faulty thermocouple or gas supply issues. A draft or buildup of dirt around the pilot assembly can also extinguish the flame. Clean the pilot assembly and check the thermocouple for damage. Ensure the gas supply is uninterrupted and functioning properly.
Tools Needed For Troubleshooting
Whether your Ao Smith water heater is acting up or simply needs a check-up, having the right tools can make troubleshooting much easier. Without proper equipment, you might waste time or even risk damaging the unit. Let’s dive into the essential tools you’ll need to tackle the job confidently.
Basic Household Tools
Start with tools you probably already have in your home. A screwdriver set is a must-have since you’ll need it to remove panels or tighten loose connections. A wrench or pliers can be handy for adjusting fittings or valves. You’ll also need a flashlight to inspect hard-to-see areas like the inside of your water heater.
Even basic tools like a bucket can be incredibly useful for collecting drained water during maintenance. If you don’t have these items, consider borrowing from a neighbor or picking them up at a local hardware store. It’s worth it—trust me, I once tried troubleshooting without a flashlight and spent ages squinting in the dark!
Safety Equipment
Safety should always be your top priority when working on a water heater. At the very least, wear insulated gloves to protect yourself from electrical shocks or hot surfaces. Safety glasses are also essential since debris or water could splash unexpectedly during repairs.
A voltage tester is another tool you shouldn’t skip. It helps confirm whether the heater’s electrical components are live before you start poking around. Imagine the peace of mind knowing you’re working safely—would you want to risk injury over neglecting these simple precautions?
Manufacturer’s Manual
Many people overlook the importance of the manufacturer’s manual, but it’s a goldmine of information. It offers specific troubleshooting tips for your exact Ao Smith model. You’ll find diagrams, step-by-step instructions, and even a list of compatible replacement parts.
Keep the manual handy during repairs. If you misplaced it, don’t worry—many manufacturers provide digital copies online. Trust me, having the manual open next to you can save hours of guesswork. Have you checked your storage area for it recently?
With these tools, you’ll be ready to tackle basic troubleshooting tasks confidently. Equip yourself properly, and you’ll save time, avoid mistakes, and keep your water heater running smoothly.
Steps To Fix No Hot Water
Dealing with a water heater that’s not producing hot water can be frustrating, especially when you’re looking forward to a warm shower. But before you panic or call for professional help, there are a few steps you can take to troubleshoot the issue yourself. Here’s a simple guide to help you fix the “no hot water” problem with your A.O. Smith water heater.
Checking The Power Supply
Your water heater relies on a consistent power supply to function. Start by ensuring the unit is properly plugged into the outlet. If it’s an electric water heater, confirm that the outlet is working by plugging in another device, like a phone charger, to test it.
If the outlet is fine, check your circuit breaker panel. Sometimes, a tripped breaker can interrupt power to the heater. Flip the breaker switch off and then back on to reset it.
Ask yourself: Could a small power issue be the root cause? It’s worth investigating before moving on to more complex checks.
Inspecting The Thermostat
The thermostat controls the water temperature, and a misaligned or faulty thermostat can easily cause your water heater to stop producing hot water. Locate the thermostat panel on your heater. You may need a screwdriver to open it.
Once open, verify the temperature setting. If it’s set too low, increase it slightly—around 120°F is a safe and efficient setting. If the thermostat doesn’t respond, it might need replacement, a task better left to a professional if you’re unsure.
Could a simple adjustment save you from a cold shower? It’s worth a shot!
Resetting The Breaker
Sometimes, electrical surges or minor faults can trip the breaker on your water heater, cutting off its functionality. To reset it, locate the reset button—usually a small red button on the thermostat panel.
Press and hold the reset button for a few seconds. You might hear a click, which indicates the system has been reset. Afterward, wait for the heater to restore hot water, which can take 30 minutes to an hour depending on your model.
Still no luck? This might point to a deeper issue that requires professional attention.
With these troubleshooting steps, you could resolve the issue without calling a technician. But remember, safety first—always turn off power to the unit before inspecting internal components!

Resolving Inconsistent Water Temperature
Dealing with inconsistent water temperature can be frustrating. A properly functioning water heater should provide a steady flow of hot water. If your A.O. Smith water heater struggles with fluctuating temperatures, there are simple fixes. Addressing the issue can improve efficiency and prevent further problems.
Here are common troubleshooting steps to resolve inconsistent water temperature.
Adjusting The Thermostat
The thermostat regulates the water temperature inside your heater. First, locate the thermostat panel on your A.O. Smith water heater. Use a screwdriver to remove the cover and access the controls. Check the current temperature setting. For most homes, 120°F is ideal. If the setting is too low, increase it slightly. Avoid setting it too high to prevent scalding. After adjusting, wait for a few hours and test the water temperature again.
Cleaning The Heating Elements
Mineral buildup on heating elements can reduce their efficiency. Over time, sediment can coat the elements, leading to uneven heating. Turn off the power supply to the heater before cleaning. Drain the tank completely to access the elements. Use a wrench to remove the heating elements carefully. Soak them in a vinegar solution to dissolve the buildup. Rinse thoroughly and reinstall the elements. Restore power and check for consistent water heating.
Inspecting The Dip Tube
The dip tube directs cold water to the bottom of the tank. If it’s cracked or broken, cold water may mix with hot water. This results in fluctuating temperatures. Turn off the water supply and unscrew the cold water inlet. Inspect the dip tube for damage. Replace it if you notice cracks or wear. A new dip tube will ensure proper water flow inside the tank.
Fixing Water Leaks
Water leaks in your AO Smith water heater can be frustrating. A steady drip or sudden puddle can disrupt your day and increase your water bills. Fortunately, most leaks are manageable with a little troubleshooting.
Tightening Loose Connections
Loose connections are a common culprit behind water leaks. Check the inlet and outlet pipes for signs of dripping water. Use a wrench to gently tighten loose fittings. Be careful not to overtighten, as this could damage the threads or cause further leaks.
If you notice water pooling around the base, inspect the drain valve. Sometimes, it just needs a snug twist to stop the leak. A few minutes of tightening can save you from hours of frustration later.
Replacing The Pressure Relief Valve
The pressure relief valve is a safety feature that prevents your tank from over-pressurizing. If it’s faulty or clogged, it may continuously drip water. Shut off the power and water supply before attempting any repairs.
To replace it, unscrew the old valve using a wrench, then install the new one tightly. Make sure the new valve matches your water heater model to avoid compatibility issues. Test it afterward to confirm the leak is fixed.
Inspecting The Tank For Cracks
Cracks in the tank are more serious but not impossible to handle. Drain your water heater fully to inspect the tank’s surface. Look closely for rust, dents, or tiny fractures, especially near the bottom.
If you spot any cracks, you might need to seal them with epoxy or a water-resistant patch. However, large cracks usually mean the tank needs replacement. Ask yourself: is it worth repairing, or should you consider a new unit?
Addressing leaks promptly can extend the life of your water heater. What’s the worst leak you’ve encountered, and how did you fix it?
Dealing With Strange Noises
Strange noises from your A.O. Smith water heater can be concerning. These sounds often signal underlying issues that need attention. Resolving these problems early can prevent costly repairs. Below, explore common causes and solutions for these noises.
Flushing Sediment From The Tank
Over time, sediment builds up at the bottom of the tank. This buildup can cause popping or rumbling noises during operation. To fix this, drain and flush the tank. Turn off the power supply and water connection before starting. Attach a garden hose to the drain valve and let the water flow out. This removes sediment and restores the tank’s efficiency.
Inspecting The Heating Elements
Damaged heating elements can create buzzing or humming sounds. Turn off the power to the heater and remove the access panels. Check the elements for signs of corrosion or wear. Replace faulty elements with compatible ones to ensure smooth operation. Regular inspection helps prevent long-term issues.
Checking For Loose Parts
Loose parts inside the heater can produce rattling or clanking noises. Tighten screws, bolts, and other components to secure them. Ensure the access panels are firmly in place. If noises persist, inspect the anode rod or other internal parts. Replace any damaged or worn-out components as needed.
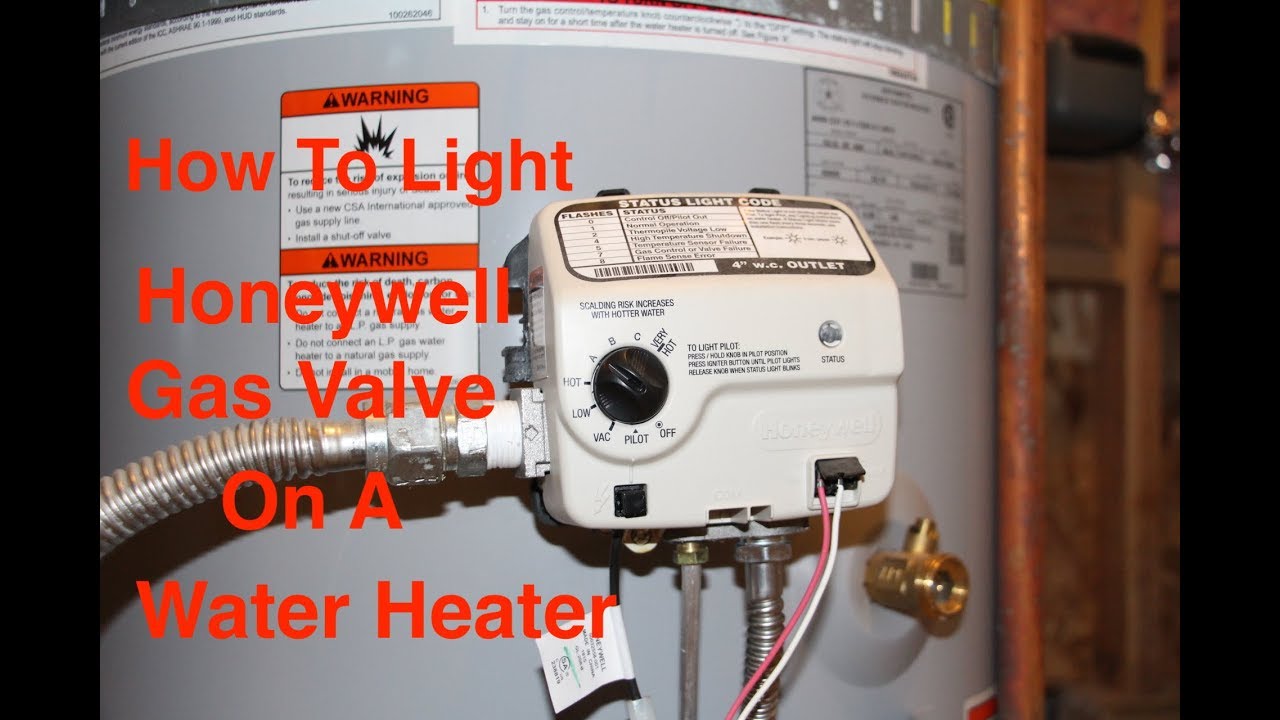
Pilot Light Troubleshooting
The pilot light is an essential part of your AO Smith water heater. If it stops working, the heater won’t produce hot water. Troubleshooting the pilot light can help resolve common issues. This guide covers inspecting the gas supply, cleaning the pilot orifice, and replacing the thermocouple. Follow these steps to ensure your water heater runs smoothly.
Inspecting The Gas Supply
Check if the gas supply to the water heater is turned on. Locate the gas valve and confirm it is in the open position. Verify the gas line is free of leaks or damage. If unsure, use a leak detection solution to check for gas leaks. Ensure there is a steady gas flow to the heater.
Cleaning The Pilot Orifice
Dirt or debris can block the pilot orifice, preventing the flame from staying lit. Turn off the gas supply before cleaning the orifice. Use a small brush or compressed air to remove debris. Avoid using sharp tools that can damage the orifice. Once cleaned, reattach the pilot assembly securely.
Replacing The Thermocouple
The thermocouple detects the pilot flame and signals the gas valve to stay open. If the thermocouple is damaged, the pilot light may not stay lit. Turn off the gas and disconnect the thermocouple from the valve. Replace it with a compatible new thermocouple. Ensure the connection is tight and secure.
Maintenance Tips For Long-term Performance
Proper maintenance ensures your AO Smith water heater performs efficiently for years. Regular care prevents common issues and extends the heater’s lifespan. Below are essential tips for long-term performance.
Flushing The Tank Regularly
Minerals in water can settle at the bottom of the tank. Over time, these deposits reduce efficiency and increase energy costs. Flush the tank every six months to remove sediment buildup. Turn off the heater, connect a hose to the drain valve, and let the water flow out. This simple step keeps your heater running smoothly.
Inspecting Anode Rods
Anode rods protect the tank from rust by attracting corrosive elements. Check the rod every two years to ensure it’s not worn out. A depleted rod can lead to tank corrosion. Replace the rod if it’s less than half an inch thick or covered in calcium. Use a wrench to remove the rod and replace it with a new one. This helps prevent costly repairs.
Checking For Corrosion
Corrosion weakens the tank and may cause leaks. Inspect the tank’s exterior for rust spots or discoloration. Look for signs of corrosion near the valves and connections. If you find rust, clean the affected areas and apply a protective sealant. Early detection helps avoid severe damage and ensures the heater lasts longer.
Conclusion
Troubleshooting your AO Smith water heater doesn’t have to feel overwhelming. Start by identifying the issue and using simple fixes where possible. Regular maintenance can prevent many common problems and extend its lifespan. If the issue persists, contacting a professional is the safest choice.
Always prioritize safety when working with water heaters. By addressing problems promptly, you ensure efficient performance and consistent hot water. A little attention today can save you from bigger repairs later. Keep your water heater in good shape, and it will serve you well for years to come.
")


