Is your Bryant heating or cooling system not working the way it should? Don’t worry—you’re not alone.
When your HVAC system starts acting up, it can feel overwhelming, especially when the temperature outside is anything but comfortable. But here’s the good news: many common issues can be solved without calling in a professional. In this guide, we’ll walk you through simple troubleshooting tips that can save you time, money, and frustration.
Whether your system isn’t heating, cooling, or turning on at all, we’ve got actionable solutions to get it back on track. Keep reading—you might be just a few steps away from fixing the problem yourself!
Common Issues With Bryant Systems
Bryant heating and cooling systems are known for their reliability. Yet, like any HVAC system, they can face common issues. Understanding these problems can help you troubleshoot effectively. Below, we explore some frequent challenges with Bryant systems.
No Heating Or Cooling
A Bryant system failing to heat or cool can be frustrating. Start by checking the thermostat settings. Ensure it’s set to the correct mode and temperature. Inspect the circuit breaker to ensure it hasn’t tripped. A dirty air filter can also restrict airflow, impacting performance. Clean or replace the filter regularly. If these steps don’t work, there may be a deeper mechanical issue. Call a professional technician for help.
Unusual Noises From The Unit
Strange noises from your Bryant unit often signal a problem. A rattling sound may indicate loose parts. Turn off the system and inspect for loose screws or panels. A squealing noise might mean a worn belt or motor issue. Grinding sounds could suggest damaged bearings. Addressing these noises early can prevent further damage. Always contact an expert for complex repairs.
Poor Airflow
Poor airflow can reduce your system’s efficiency. Start by checking the air filter. A clogged filter blocks airflow and strains the system. Clean or replace it as needed. Inspect the vents for blockages or obstructions. Open all vents to ensure even airflow throughout your home. If the problem persists, the blower motor or ductwork may need attention. Seek professional assistance for these issues.

Credit: emadlangeni.gov.za
Inspecting Thermostat Settings
Inspecting thermostat settings is a crucial step in troubleshooting Bryant heating and cooling systems. An improperly configured thermostat can lead to inefficient performance or no heating or cooling. Regular checks help ensure the thermostat works as intended and maintains your desired comfort level.
Checking Power Supply
Ensure the thermostat has power. Check if the display is active. If the screen is blank, inspect the batteries or power source. Replace dead batteries or reconnect the thermostat to its power supply. Confirm the circuit breaker linked to the system is not tripped.
Ensuring Correct Temperature Settings
Verify the temperature settings match your comfort preferences. Check if the temperature is set higher or lower than the room temperature. Adjust it to the desired level. Ensure the thermostat is not accidentally set to a temperature that prevents heating or cooling.
Switching Between Modes
Review the mode settings on the thermostat. Check if it’s set to “Heat,” “Cool,” or “Auto.” Ensure the mode matches the system’s current operation requirement. If switching modes, wait a few minutes for the system to respond.
Air Filter Maintenance
Regular air filter maintenance is crucial for your Bryant heating and cooling system. Clean filters improve airflow, enhance efficiency, and prevent costly repairs. Neglecting filters can lead to poor performance and increased energy bills. This section will guide you on keeping your filters in top condition.
Identifying Dirty Filters
Dirty air filters are easy to spot with a quick inspection. Remove the filter and check for dust, dirt, or discoloration. A filter packed with debris needs immediate attention. Reduced airflow or unusual noises may also indicate a clogged filter.
Replacing Or Cleaning Filters
Disposable filters should be replaced every 1 to 3 months. Ensure you buy the correct size for your system. Reusable filters require cleaning with water and mild soap. Let them dry completely before reinstalling. Always refer to your system’s manual for specific instructions.
Impact Of Clogged Filters
Clogged filters restrict airflow, forcing your system to work harder. This can lead to higher energy consumption and uneven heating or cooling. Prolonged neglect may damage internal components, reducing the system’s lifespan. Clean filters keep your air cleaner and your unit efficient.

Credit: www.bryant.com
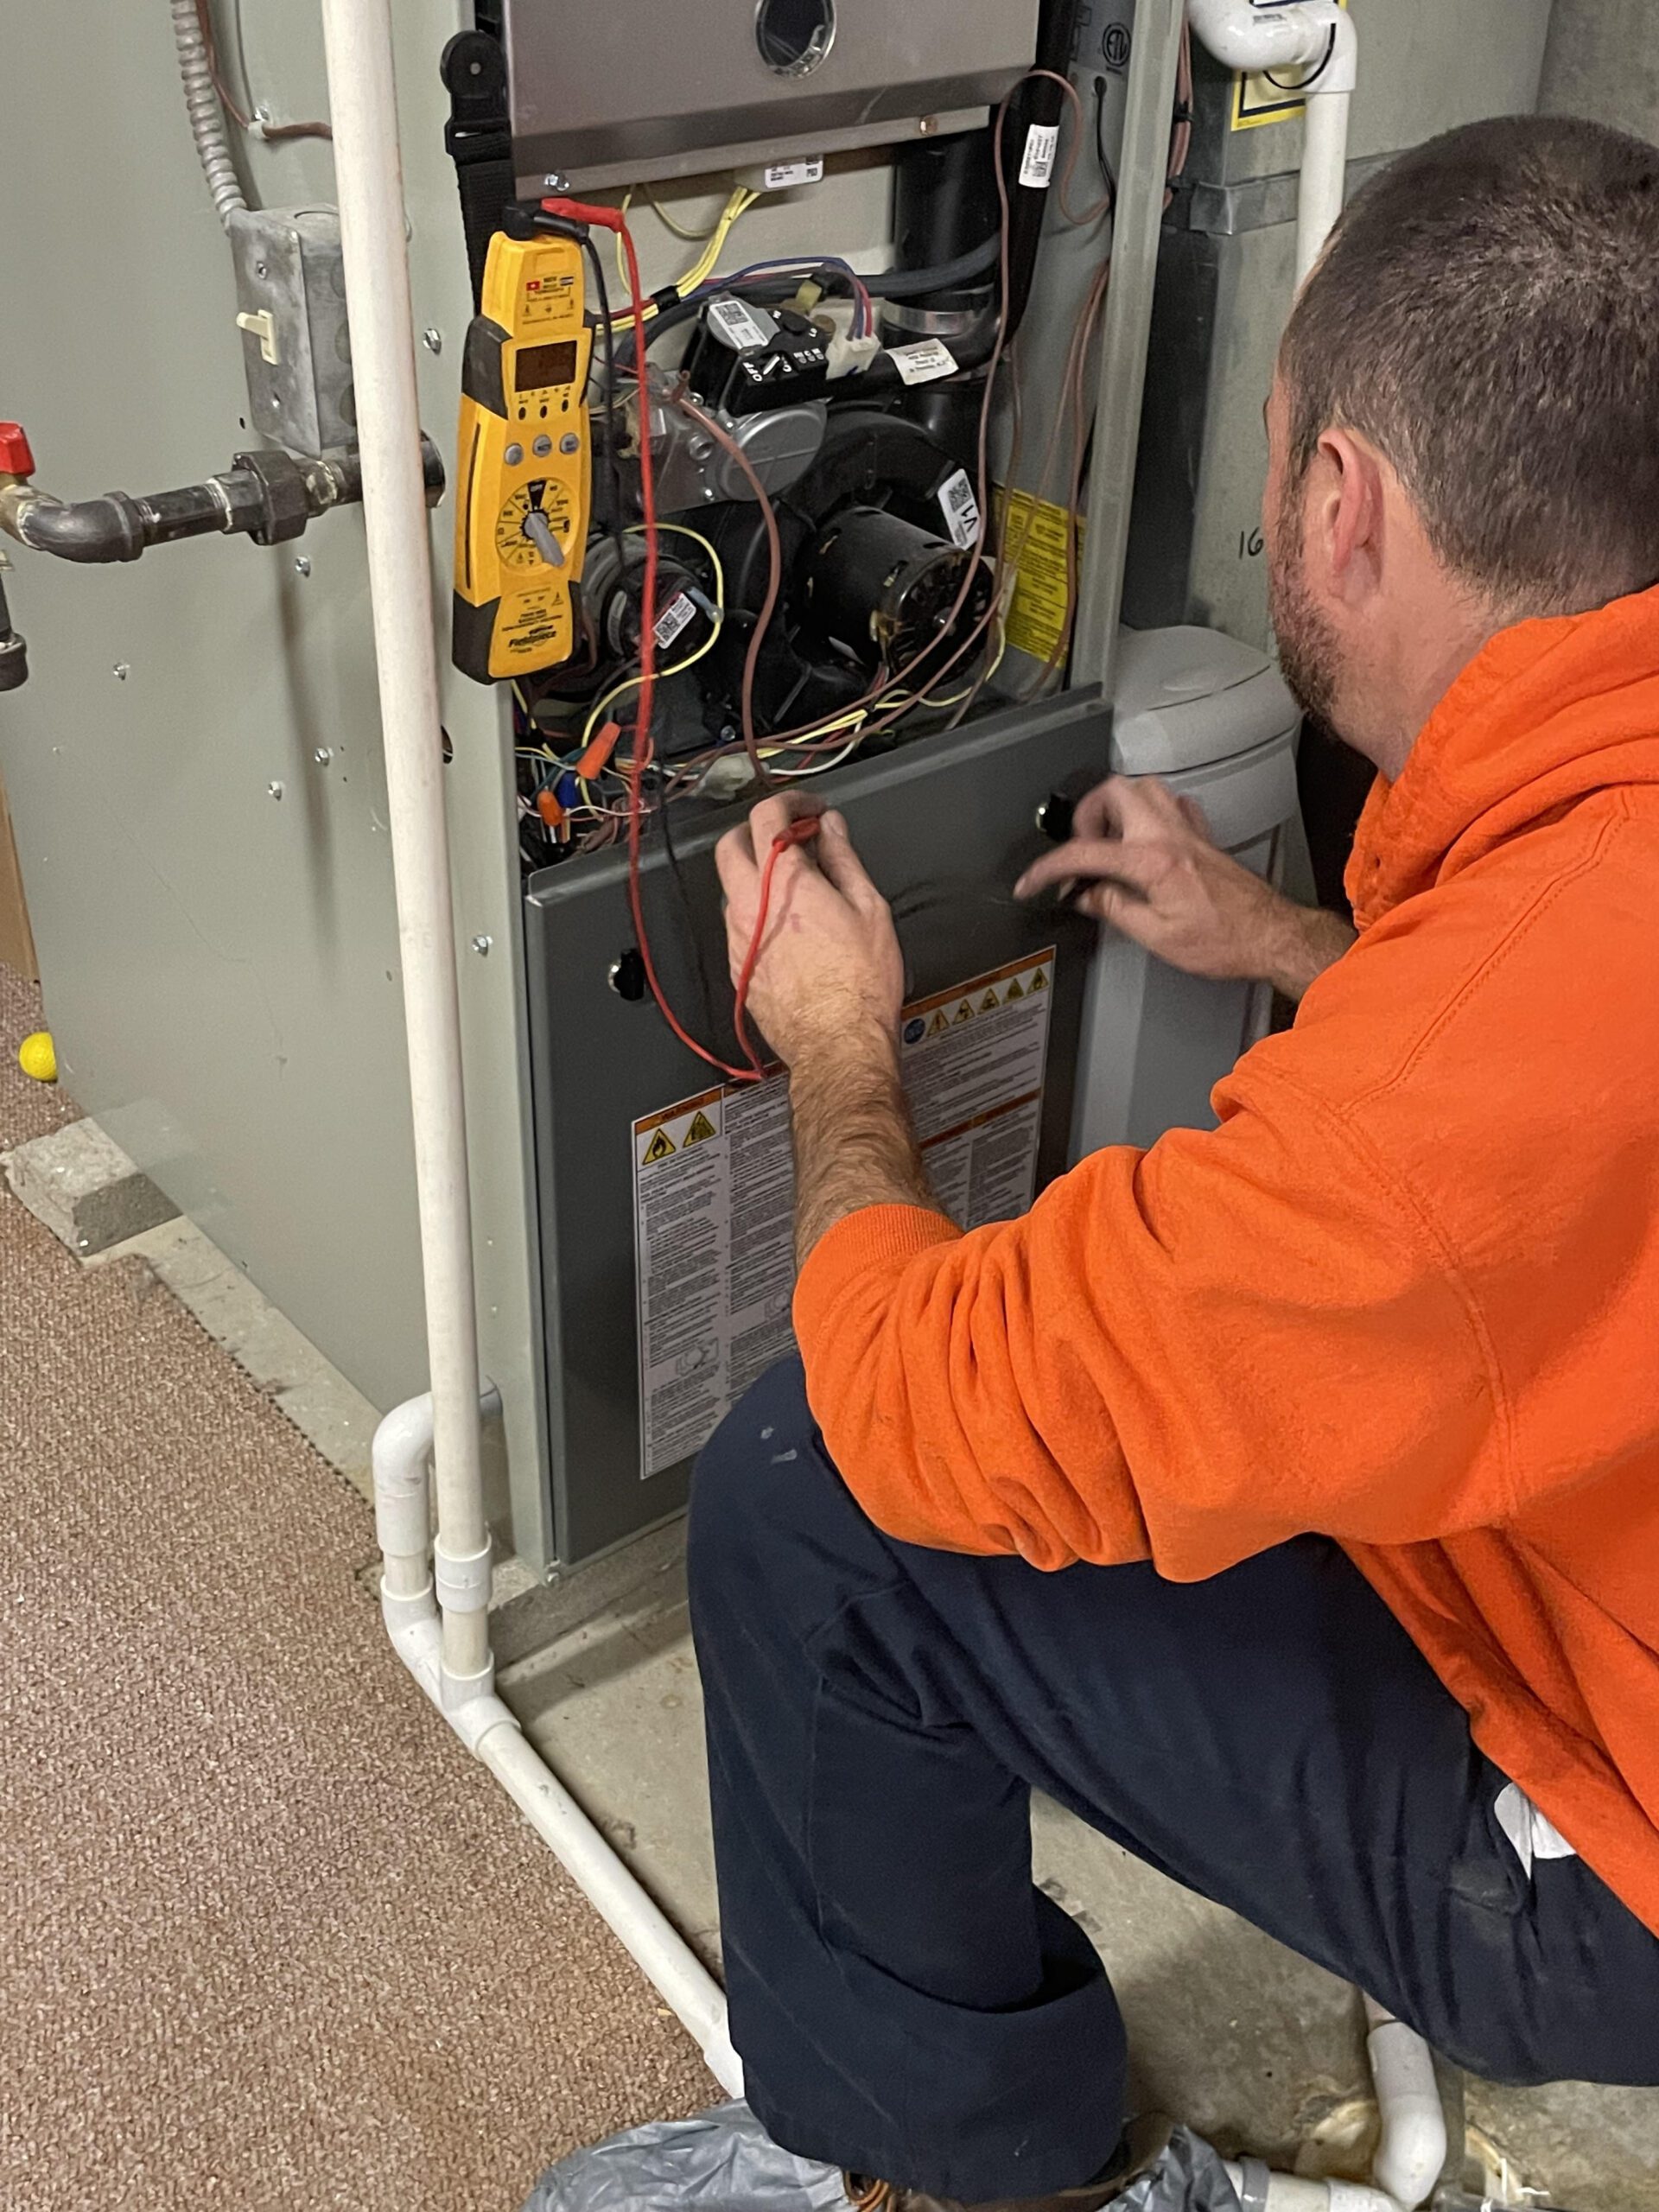
Examining Electrical Connections
Examining electrical connections is a key step in troubleshooting Bryant heating and cooling systems. Faulty or loose electrical connections can disrupt the system’s performance. Identifying and addressing these issues ensures your unit operates efficiently and safely. This process involves checking circuit breakers, wires, and voltage levels for any irregularities.
Resetting Tripped Circuit Breakers
Circuit breakers are designed to prevent electrical overload. A tripped breaker can stop your Bryant system from working. Locate the breaker panel and find the switch controlling your unit. If the breaker is off or in a neutral position, reset it. Flip it off completely, then switch it back on. Ensure the breaker stays in the “on” position. If it trips again, there may be an underlying issue requiring professional help.
Inspecting Loose Wires
Loose wires can cause your system to malfunction or stop working. Turn off the power to the unit before inspecting any connections. Check all visible wires for signs of looseness or damage. Secure any loose wires using a screwdriver or wire connectors. Replace damaged wires to prevent further issues. Properly connected wires ensure steady power flow to your system.
Testing Voltage Levels
Testing voltage levels ensures the system is receiving adequate power. Use a multimeter to measure voltage at the electrical terminals. Ensure the unit is powered off before testing to avoid accidents. Compare the readings with the manufacturer’s specifications. Low or irregular voltage might indicate a deeper electrical issue. Contact a licensed technician if the voltage is outside the normal range.
Addressing Refrigerant Issues
Refrigerant plays a vital role in maintaining your Bryant heating and cooling system’s efficiency. Without the right refrigerant levels, your system can struggle to cool or heat effectively. Addressing refrigerant issues promptly ensures your unit runs smoothly and avoids further damage. Refrigerant problems often stem from leaks or improper levels, which can lead to costly repairs if ignored.
Below are common troubleshooting steps to identify and fix refrigerant issues in your Bryant system.
Detecting Refrigerant Leaks
Refrigerant leaks can occur due to worn-out components or tiny holes in the coils. Look for signs like hissing sounds or visible oil stains near your system. A professional can use specialized tools to locate leaks quickly. Ignoring leaks can reduce efficiency and harm your system over time.
Recharging Refrigerant Levels
Low refrigerant levels can disrupt your system’s cooling or heating performance. A certified technician can recharge the refrigerant to restore normal function. Ensure the correct type of refrigerant is used to match your Bryant system specifications. Overcharging refrigerant can also damage the system, so precise handling is essential.
Signs Of Low Refrigerant
Low refrigerant levels often cause uneven cooling or heating. You may notice your system running longer without achieving the desired temperature. Ice buildup on refrigerant lines is another common sign. If your energy bills are increasing unexpectedly, low refrigerant might be the culprit.
Troubleshooting Compressor Problems
Your HVAC system’s compressor is like the heart of your Bryant heating and cooling unit. If it’s not working right, your entire system can fail to heat or cool your home effectively. Understanding how to spot issues, fix them, and prevent future failures can save you money and headaches.
Identifying A Faulty Compressor
A faulty compressor isn’t always easy to spot, but there are clear signs you can look for. Is your AC blowing warm air when it should be cold? Or is the outdoor unit making strange noises like rattling or hissing?
Another red flag is if the unit frequently trips your circuit breaker. This often signals electrical problems within the compressor. Regularly checking these signs can help you catch issues early before they worsen.
Repairing Or Replacing The Unit
If you’ve confirmed the compressor is the issue, you might wonder whether to repair or replace it. Minor problems like clogged coils or low refrigerant levels can often be fixed by a technician. These repairs usually cost less and restore your system’s efficiency.
However, if your compressor is completely dead or the repair cost is close to the price of a new unit, replacement may be the smarter choice. Always get a professional opinion to weigh the costs and benefits. Think of it as an investment in your home’s comfort.
Preventing Future Failures
Wouldn’t it be great to avoid compressor issues altogether? Regular maintenance is your best tool. Clean the unit’s coils, replace air filters on time, and schedule professional tune-ups annually.
Also, ensure your unit isn’t overworking itself. Keep vents unobstructed and set your thermostat to reasonable temperatures. Small steps like these can extend the life of your compressor and keep your energy bills in check.
Have you ever faced compressor problems with your HVAC system? How did you handle it? Share your insights in the comments to help others troubleshoot smarter!
Cleaning Coils And Condensers
Cleaning coils and condensers is a critical step in troubleshooting your Bryant heating and cooling system. These components play a major role in transferring heat, so keeping them clean ensures your system works efficiently. Neglecting this maintenance task can lead to poor performance, higher energy bills, and even system breakdowns.
Removing Dirt And Debris
Start by turning off your HVAC system for safety. Locate the coils and condensers—typically, the outdoor unit houses the condenser, while the indoor unit contains the evaporator coil.
Use a soft brush to gently remove large debris like leaves or dust. A vacuum with a brush attachment can also help dislodge stubborn particles without damaging the fins.
Don’t forget to check areas where dirt tends to build up, such as the corners of the unit or between tightly spaced fins. Cleaning thoroughly minimizes airflow blockages.
Using Proper Cleaning Techniques
Avoid using high-pressure water, as it can bend delicate fins. Instead, use a garden hose with a gentle spray to rinse off dirt.
For deep cleaning, apply a coil cleaner solution designed for HVAC systems. Follow the instructions on the cleaner bottle to ensure safe and effective use.
Always wear gloves and work in a well-ventilated area when using chemical cleaners. If you’re unsure, consult your Bryant system manual for recommendations.
Improving System Efficiency
Clean coils and condensers allow your HVAC system to absorb and release heat more effectively. This reduces strain on the system and helps it cool or heat your home faster.
You’ll also notice a drop in energy consumption. A clean system doesn’t have to work as hard, which saves you money in the long run.
When was the last time you cleaned your system’s coils and condensers? If it’s been a while, you might be losing efficiency without realizing it. Take action now for better performance and lower costs.
Credit: emadlangeni.gov.za
Drainage Line Blockages
Drainage line blockages in Bryant heating and cooling systems can cause serious problems. These blockages can lead to water leaks, reduced efficiency, and potential system damage. Addressing clogs early prevents costly repairs and ensures your system runs smoothly. This section covers spotting clogged lines, clearing blockages safely, and preventing water damage effectively.
Spotting Clogged Lines
Signs of clogged drainage lines include water pooling near your unit. You may also notice higher humidity levels indoors or unusual dripping sounds. If your system shuts down unexpectedly, check the drainage line for blockages. Inspect for dirt, mold, or debris in the line. Regular visual checks help catch clogs before they worsen.
Clearing Blockages Safely
Turn off your heating or cooling unit before clearing blockages. Use a wet-dry vacuum to remove debris from the drainage line. A soft brush can loosen stubborn dirt inside the pipe. Avoid harsh chemicals, as they may damage the system. Flush the line with warm water to ensure it’s fully clear. If the blockage persists, consult a professional technician.
Preventing Water Damage
Routine maintenance prevents water damage caused by drainage line blockages. Clean the line every few months to avoid buildup. Install a drain pan under your unit to catch leaks. Ensure proper system installation with no bends or kinks in the pipe. Regular inspections protect your home and extend your system’s life.
When To Call A Professional
Dealing with heating and cooling issues can be frustrating, especially when your Bryant system isn’t working as it should. While some minor fixes can be handled with a quick adjustment, there are moments when calling a professional is the safest and smartest choice. Knowing when to bring in an expert can save you time, money, and prevent further damage to your HVAC system.
Identifying Severe Issues
Your system might be trying to tell you something serious. Unusual noises, like banging or grinding, often signal mechanical problems that need immediate attention. If your unit isn’t heating or cooling at all, despite trying basic troubleshooting steps, it’s time to call a pro.
Strange odors, especially burning smells, are red flags. They could indicate electrical issues or overheating components. Ignoring these signs can lead to more costly repairs or even safety hazards in your home.
Avoiding Diy Risks
It’s tempting to troubleshoot everything yourself, but some repairs require specialized tools and expertise. Messing with electrical components or refrigerant lines without proper training can be dangerous. You could accidentally void your warranty or even hurt yourself.
I once tried fixing an airflow issue myself, only to discover I’d worsened the problem by damaging a vent. It ended up costing me more to repair than if I’d called a technician from the start. Sometimes, DIY isn’t worth the risk.
Choosing Certified Technicians
Not all HVAC technicians are created equal. Always choose someone who is certified and experienced in working with Bryant systems. Certifications like NATE (North American Technician Excellence) ensure the technician knows what they’re doing.
Check reviews and ask questions about their experience before scheduling a visit. A certified technician will diagnose the problem accurately and fix it efficiently, saving you unnecessary stress.
So, when should you pick up the phone? If you’re dealing with severe issues, safety concerns, or repairs beyond your skillset, trust a professional. Your comfort—and peace of mind—are worth it.
Conclusion
Troubleshooting Bryant heating and cooling systems doesn’t have to feel overwhelming. Start with simple checks like filters, thermostat settings, or power supply. Many common issues can be resolved without expert help. For complex problems, calling a professional ensures safe and proper repairs.
Regular maintenance prevents breakdowns and keeps your system running smoothly. Always address small issues early to avoid costly repairs later. A well-maintained system saves energy and improves comfort. Use these tips to keep your home cozy year-round. Stay proactive, and your HVAC system will thank you with reliable performance.
")


