Dealing with WiFi issues on your Chromebook can be frustrating. Connectivity problems disrupt your work and entertainment.
But don’t worry, solutions exist. Chromebooks are known for their simplicity and efficiency. Yet, like any device, they can encounter problems, especially with WiFi. Whether it’s a weak signal, frequent disconnections, or not connecting at all, these issues can be a real headache.
This blog will guide you through common WiFi problems on Chromebooks and provide easy solutions. By understanding these troubleshooting steps, you can ensure a smoother and more reliable internet experience. Stay connected without the stress!
Credit: support.google.com
Checking Wifi Connection
Experiencing WiFi issues on your Chromebook? Don’t worry, you’re not alone. WiFi problems can be frustrating but often have simple solutions. Let’s explore how to check your WiFi connection and get you back online.
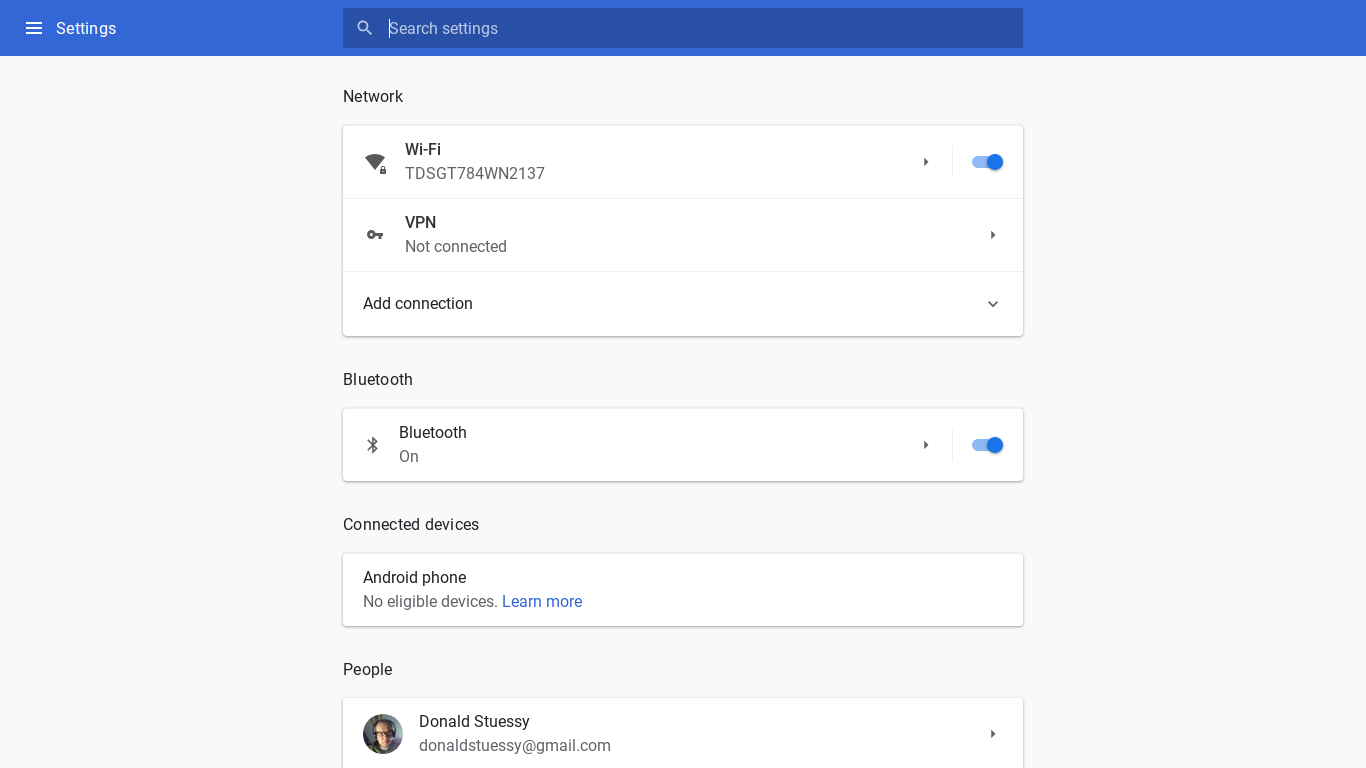
Verify Network Settings
Begin by ensuring your Chromebook is connected to the correct network. Follow these steps:
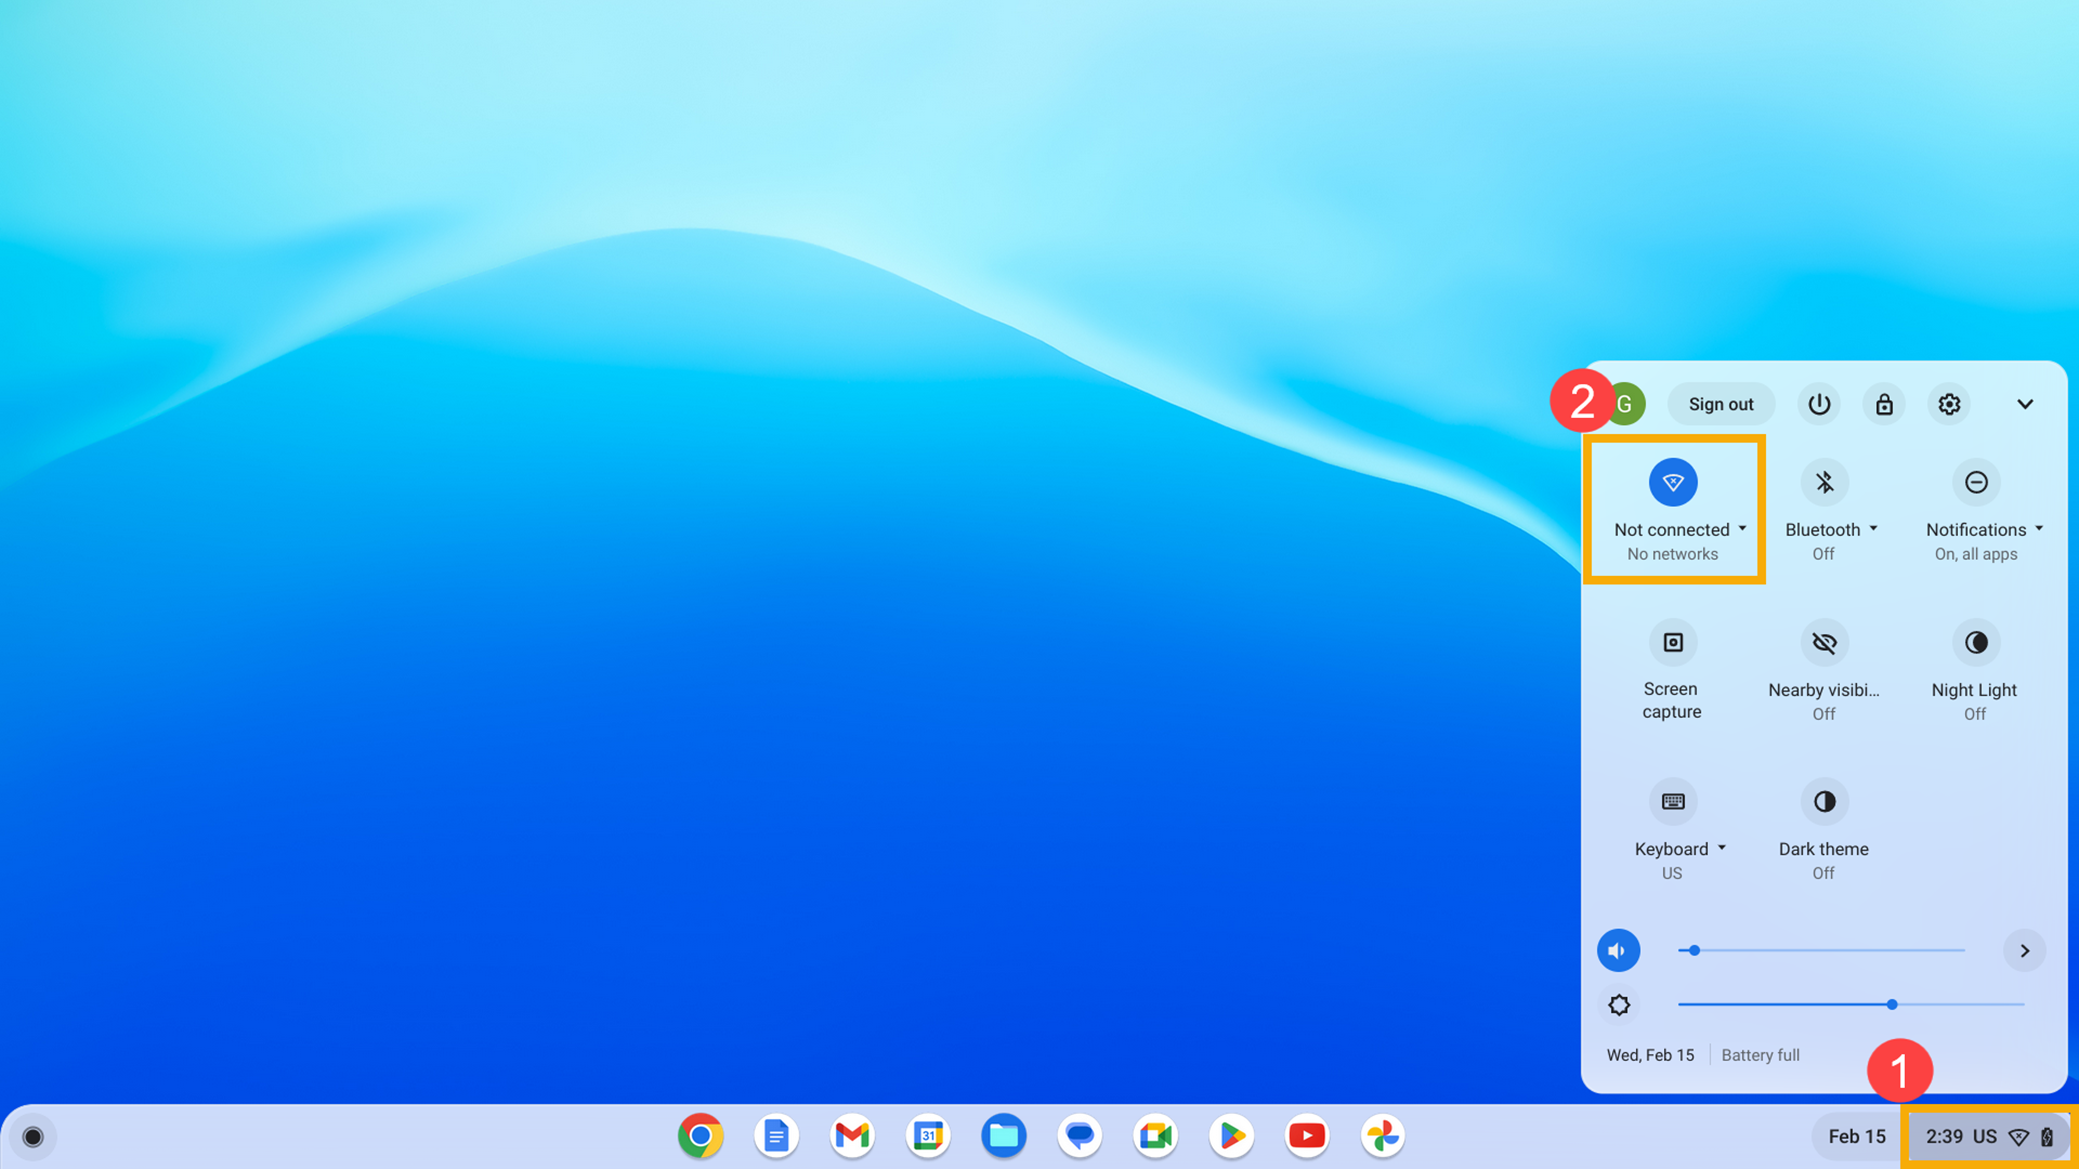
- Click the status area at the bottom right of your screen.
- Select the WiFi network you want to connect to.
- Enter the correct password if prompted.
If you’re still unable to connect, check the network settings:
- Open Settings and go to Network.
- Ensure the WiFi toggle is switched on.
- Verify that your network is listed and selected.
Test On Another Device
To rule out issues with your Chromebook, test the WiFi connection on another device. Follow these steps:
- Grab a smartphone, tablet, or another laptop.
- Connect the device to the same WiFi network.
- Check if the other device can access the internet.
If the other device connects successfully, the issue may be with your Chromebook. If not, there might be a problem with the network itself.
By verifying network settings and testing on another device, you can identify the root cause of your WiFi issues. Stay connected and enjoy a seamless online experience on your Chromebook.
Credit: www.asus.com
Restarting Chromebook
Experiencing WiFi issues on your Chromebook can be frustrating. One of the simplest solutions is to restart your device. This can help fix minor software glitches and improve your WiFi connection. Below are two effective methods to restart your Chromebook.
Perform Soft Reset
A soft reset is a quick way to restart your Chromebook without losing any data.
- Click on the time at the bottom-right corner of your screen.
- Click on the power icon.
- Wait for the Chromebook to shut down completely.
- Press the power button to turn it back on.
This method helps refresh the system and can often solve WiFi issues.
Full Power Cycle
If a soft reset does not work, try a full power cycle.
- Shut down your Chromebook by clicking the time and then the power icon.
- Once the Chromebook is off, disconnect the power adapter.
- Hold down the power button for at least 10 seconds.
- Reconnect the power adapter.
- Press the power button to turn on your Chromebook.
This method can help clear any residual power, which might be causing WiFi issues.
Restarting your Chromebook using these methods can solve many common WiFi problems. If issues persist, further troubleshooting may be required.
Router And Modem Check
Experiencing wifi issues with your Chromebook can be frustrating. A good first step in troubleshooting is to check your router and modem. These devices are the backbone of your home network. Ensuring they are working correctly is crucial for a stable internet connection.
Restart Router
Often, a simple restart can fix many wifi problems. Turn off your router. Wait for at least 30 seconds. Then, turn it back on. This process can clear minor glitches. It can also refresh the connection to your internet service provider.
Check Cable Connections
Loose or damaged cables can disrupt your internet connection. Ensure all cables are securely connected to your router and modem. Check for any signs of wear or damage. Replace any faulty cables immediately. This can help restore a stable internet connection.
Updating Chromebook Os
Updating your Chromebook OS can solve many WiFi issues. Keeping your Chromebook’s operating system up-to-date ensures it runs smoothly. This section will guide you on how to update your Chromebook OS. Follow these steps to check for updates and install the latest version.
Check For Updates
First, you need to check if there are any available updates. Follow these steps:
- Click on the bottom-right corner of the screen to open the system tray.
- Select the Settings icon (gear symbol).
- Scroll down and click on About Chrome OS.
- Click on Check for updates.
If an update is available, it will start downloading automatically.
Install Latest Version
Once the update has been downloaded, follow these steps to install it:
- Click on the notification that says an update is ready to install.
- Click on Restart to Update.
- Your Chromebook will restart and begin the installation process.
- Wait for the installation to complete. This may take a few minutes.
After the installation, your Chromebook will reboot with the latest OS version. This can help resolve many WiFi issues and improve overall performance.
| Step | Action |
|---|---|
| 1 | Click on the system tray |
| 2 | Select Settings |
| 3 | Click on About Chrome OS |
| 4 | Click Check for updates |
| 5 | Install and restart |
Keeping your Chromebook up-to-date is crucial for optimal performance. It ensures you have the latest features and security updates.
Resetting Network Settings
Resetting network settings can help resolve WiFi issues on your Chromebook. It clears saved network configurations. This can fix connectivity problems. Let’s explore how to reset network settings step by step.
Forget Network
First, forget the troublesome network. Click on the WiFi icon in the bottom-right corner. Select the gear icon to open settings. Choose the network you want to forget. Click on it and select “Forget”. This removes the network’s saved settings from your Chromebook. It also clears any errors.
Reconnect To Wifi
After forgetting the network, reconnect to WiFi. Click on the WiFi icon again. Select the network you want to connect to. Enter the password if required. Your Chromebook should now connect to the network. This step ensures a fresh connection. It often resolves common WiFi issues.
Checking Network Configuration
Troubleshooting WiFi on your Chromebook often starts with checking your network configuration. This ensures all settings are correct and functional. Incorrect configurations can lead to connectivity issues. Let’s dive into two key areas: IP settings and DNS settings.
Ip Settings
Start by checking your Chromebook’s IP settings. Open the settings menu and navigate to “Network.” Select your WiFi network. Scroll down to find the “IP address” section. Ensure your Chromebook has a valid IP address. It should look something like “192.168.x.x”. If the IP address is missing or incorrect, reconnect to your network. This often resolves the issue.
Dns Settings
Next, verify the DNS settings. DNS translates domain names to IP addresses. Incorrect DNS settings can block internet access. Go back to your WiFi network settings. Look for the “DNS” section. You can use Google’s public DNS: 8.8.8.8 and 8.8.4.4. Enter these values and save the settings. This change often fixes connectivity problems.
Disabling Extensions
Disabling extensions on your Chromebook can help fix Wifi issues. Extensions sometimes interfere with network connections. This simple step can quickly restore your internet access.
Having trouble with your Chromebook’s WiFi? Extensions can sometimes cause issues. Disabling them might solve your problem. Extensions add features to your browser but can sometimes conflict with your WiFi connection. Here’s how to identify and disable problematic extensions.Identify Problematic Extensions
First, open the Chrome browser. Click the three dots in the upper-right corner. Select “More tools,” then “Extensions.” You will see a list of installed extensions. Disable all extensions by toggling off the switch next to each one. Restart your Chromebook and check if the WiFi issue is resolved.Next, enable each extension one by one. Check your WiFi connection after enabling each one. This helps identify which extension is causing the problem. Note the name of the problematic extension.Disable Or Remove
Once you have identified the problematic extension, return to the “Extensions” page. Toggle off the switch next to the problematic extension to disable it. If you prefer, you can remove the extension completely. Click the “Remove” button next to the extension. Confirm the removal when prompted. Restart your Chromebook to apply the changes.Disabling or removing problematic extensions can resolve WiFi issues. This simple step can improve your Chromebook’s performance and connectivity. “`
Credit: support.google.com
Contacting Support
If your Chromebook’s WiFi isn’t working, it can be frustrating. Sometimes, the best solution is to contact support. This section will guide you on how to get help from Chromebook support and your Internet Service Provider (ISP).
Reach Out To Chromebook Support
First, try contacting Chromebook Support. They are experts on Chromebook issues and can offer specific solutions. You can contact them via chat, phone, or email. Here’s a step-by-step guide:
- Open your Chromebook.
- Click on the time at the bottom right.
- Click on the Settings gear icon.
- Scroll down and click on About Chrome OS.
- Click on Get Help.
- Choose your preferred contact method: chat, phone, or email.
Be ready to provide details like your Chromebook model and the issue. The more details you provide, the better support you will get.
Consult Internet Service Provider
If Chromebook Support determines the issue is not with the device, the next step is to contact your Internet Service Provider (ISP). They can check if your WiFi connection is working correctly. Here’s how to contact your ISP:
- Find your ISP’s customer service number on their website.
- Call the number and explain your issue.
- They may ask you to restart your modem or router.
- Follow their instructions carefully.
Your ISP can also send a technician to your home if needed. They can check the hardware and connection to ensure everything is working properly. Always keep your ISP account number handy for quick reference.
Frequently Asked Questions
How Do I Connect My Chromebook To Wifi?
Click on the WiFi icon. Select your network. Enter the password. Connect.
Why Is My Chromebook Not Connecting To Wifi?
Check your router. Restart your Chromebook. Ensure the password is correct. Try reconnecting.
How Can I Reset My Chromebook’s Network Settings?
Go to Settings. Click on “Network”. Select “WiFi”. Click “Forget”. Reconnect to the network.
What Should I Do If My Wifi Is Slow On Chromebook?
Restart your router. Close unused tabs. Move closer to the router. Check other devices’ connection.
Can A Vpn Cause Wifi Issues On A Chromebook?
Yes, sometimes VPNs can slow or block connections. Try disconnecting the VPN and test your WiFi.
Conclusion
Resolving WiFi issues on your Chromebook can be simple. Follow the steps mentioned. Restart your Chromebook and router. Check your WiFi settings. Ensure you’re within range. Update your software regularly. If the problem persists, contact support. With these steps, your Chromebook should connect smoothly.
Happy browsing!
")


