Troubleshooting Club Car golf carts is important for identifying and fixing any issues. Avoiding starting sentences with certain words and phrases, we will provide a brief and concise answer: The reset button on an electric golf cart is typically located on the controller, which can be found under the seat or on the dashboard.
To diagnose a golf cart problem, start by examining the battery and using a hydrometer to measure the specific gravity of its electrolytes. Additionally, ensure that the batteries are properly charged and cleaned. It is also essential to check if the solenoid is engaging and monitor the voltage meter while operating the accelerator pedal.
By following these troubleshooting steps, you can identify and resolve common issues with Club Car golf carts.

Common Club Car Golf Cart Issues
Club Car golf carts are known for their durability and reliability on the golf course. However, like any vehicle, they can experience issues from time to time. In this section, we will discuss some of the most common issues Club Car golf cart owners may encounter, along with troubleshooting tips to help you get back on the green.
Battery Not Charging Properly
A common issue that Club Car owners may face is a battery that is not charging properly. This can be caused by a variety of factors, including a faulty charger, dirty battery terminals, or a weak or dead battery. To troubleshoot this issue, follow these steps:
- Check the charger: Ensure that the charger is plugged in properly and turned on. Check for any error codes or flashing lights on the charger that may indicate a problem.
- Clean the battery terminals: Use a wire brush or battery terminal cleaner to remove any corrosion or buildup on the battery terminals. This can help improve the connection between the battery and the charger.
- Test the battery: If cleaning the terminals does not solve the issue, you may need to test the battery with a multimeter. This will help determine if the battery itself is the problem.
Cart Not Starting
Another common issue with Club Car golf carts is when the cart fails to start. This can be frustrating, but there are a few troubleshooting steps you can take to diagnose and fix the problem:
- Check the key switch. Ensure that the key switch is in the “on” position and that the key is inserted properly. Sometimes, a loose or faulty key switch can prevent the cart from starting.
- Inspect the battery connections. Check the battery terminals to make sure they are clean and securely attached. Loose or corroded connections can prevent the cart from starting.
- Test the solenoid: The solenoid is responsible for transmitting electrical current from the battery to the starter motor. Use a multimeter to test the solenoid for continuity. If it fails the test, it may need to be replaced.
Slow Cart Speed
If your Club Car golf cart is not reaching its usual speed, there are a few potential causes to consider:
- Check the throttle cable: inspect the throttle cable for any damage or tight spots. A frayed or kinked cable can restrict the movement of the accelerator pedal, resulting in slower cart speed.
- Test the speed sensor: The speed sensor is responsible for measuring the cart’s speed and relaying that information to the motor controller. Use a multimeter to test the speed sensor for continuity. If it fails the test, it may need to be replaced.
- Inspect the motor brushes. If the motor brushes are worn or damaged, it can affect the performance of the motor and result in slower cart speed. Check the brushes and replace them if necessary.
Strange Noises While Driving
If you notice any unusual noises coming from your club car while driving, it’s important to address the issue promptly to prevent further damage. Here are a few potential causes of strange noises:
- Check the wheel bearings. Worn or damaged wheel bearings can cause grinding or humming noises. Inspect the wheel bearings for any signs of wear and replace them if necessary.
- Inspect the brakes: Squeaking or squealing noises when you apply the brakes may indicate worn brake pads. Check the brake pads for wear and replace them if needed.
- Test the differential: A noisy differential can be caused by low fluid levels or worn gears. Check the differential fluid level and inspect the gears for any signs of damage.
Headlights Not Working
If the headlights on your Club Car golf cart are not working, there are a few troubleshooting steps you can take:
- Check the bulbs: Make sure that the bulbs are properly seated in the headlight housing and that they are not burnt out. Replace any bulbs that are not functioning.
- Inspect the wiring: Check the wiring connections for any loose or damaged wires. Repair or replace any damaged wiring.
- Test the light switch: Use a multimeter to test the light switch for continuity. If it fails the test, it may need to be replaced.
By addressing these common Club Car golf cart issues and following the troubleshooting tips provided, you can keep your cart running smoothly and enjoy your time on the golf course.
Quick Fixes For Battery Issues
If you’re experiencing battery issues with your Club Car golf cart, there are a few quick fixes you can try to get your cart back up and running. By following these troubleshooting steps, you can identify and resolve common battery problems that may be affecting the performance of your golf cart.
check Battery Connections And Clean If Necessary
The first step in troubleshooting battery issues is to check the battery connections. Over time, these connections can become loose or dirty, leading to poor electrical conductivity. To check the connections:
- Locate the batteries in your Club Car golf cart.
- Visually inspect the battery terminals for any signs of corrosion or buildup.
- If there is corrosion, mix a solution of baking soda and water and use a wire brush to clean the terminals.
- Tighten any loose connections and ensure they are securely fastened.
Test the Charger And Replace If Faulty
If you’ve checked the battery connections and they are in good condition, the next step is to test the charger. Faulty chargers can prevent the batteries from charging properly. To test the charger:
- Plug in the charger and ensure it is securely connected to the cart.
- Turn on the charger and check if the charging gauge on the cart moves.
- If the gauge moves, the charger is working fine. If not, it may be faulty.
- In that case, consider replacing the charger with a new one that is compatible with your Club Car golf cart model.
H3inspect And Replace Damaged Or Worn-out Batteries/h3
If you’ve ruled out any issues with the connections and charger, it’s important to inspect the batteries themselves. Damaged or worn-out batteries can cause power issues in your golf cart. To inspect and replace batteries:
- Visually inspect each battery for any signs of damage, such as cracks or leaks.
- If there are damaged or worn-out batteries, consider replacing them with new ones.
- Make sure to choose batteries that are compatible with your Club Car golf cart model.
Check the Battery Voltage With A Multimeter
Another way to troubleshoot battery issues is by checking the voltage of each battery using a multimeter. This helps determine if the batteries are providing enough power. Here’s how you can check the battery voltage:
- Set the multimeter to the DC voltage setting.
- Connect the multimeter’s leads to the positive and negative terminals of each battery.
- Take note of the voltage readings for each battery.
- If any battery has a significantly lower voltage reading than the others, it may be a sign of a weak or failing battery.
By following these quick fixes for battery issues, you can troubleshoot and resolve common problems with your Club Car golf cart. Remember to always prioritize your safety, and consult a professional if you’re unsure about any troubleshooting steps.
Troubleshooting Cart Start-up Problems
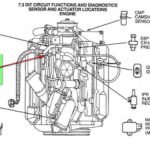
One of the most frustrating issues you can face with your Club Car golf cart is when it fails to start. Luckily, there are a few common culprits that can cause this problem, and in this guide, we will walk you through the troubleshooting process to get your cart up and running again. Below, you’ll find step-by-step instructions for checking the key switch and ignition wiring, inspecting and replacing the solenoid if necessary, testing the pedal switch, and examining the motor. Let’s get started!
Check the Key Switch And Ignition Wiring
The first step in troubleshooting a cart start-up problem is to check the key switch and ignition wiring. Begin by visually inspecting the key switch to ensure it is in good condition and securely connected. Look for any signs of damage or loose connections, and make any necessary repairs or replacements.
Next, inspect the ignition wiring for any frayed or loose wires. Ensure that all wires are properly connected and that there are no visible signs of damage. If you find any issues, you may need to repair or replace the wiring.
Inspect And Replace the solenoid if necessary.
The solenoid is responsible for engaging the electrical circuit that starts the motor. If the solenoid is faulty or damaged, it can prevent the cart from starting. To inspect the solenoid, begin by locating it in the engine compartment. Check for any signs of physical damage or corrosion. If you notice any issues, it is recommended to replace the solenoid with a new one.
Test The Pedal Switch And Replace If Faulty
The pedal switch, also known as the accelerator switch, plays a crucial role in starting the cart. It sends a signal to the controller to engage the motor when the accelerator pedal is pressed. If the pedal switch is faulty, it can prevent the cart from starting. To test the pedal switch, use a multimeter to check for continuity when the pedal is pressed. If there is no continuity, the switch is faulty and should be replaced.
Examine The Motor And Replace it if needed.
If all else fails, it may be necessary to examine the motor itself. Start by checking the motor brushes for wear or damage. If the brushes are worn down, they may need to be replaced. Additionally, inspect the motor for any signs of physical damage or overheating. If the motor appears damaged or is not functioning properly, it may need to be replaced.
By following these troubleshooting steps, you can effectively diagnose and resolve start-up problems with your Club Car golf cart. Remember to always prioritize safety and consult a professional if you are unsure or uncomfortable performing any of these tasks.
Fixing Slow Cart Speed
If you find that your Club Car golf cart is running slower than usual, there are a few troubleshooting steps you can take to identify and resolve the issue. In this section, we will discuss some common causes of slow cart speed and how to fix them.
Check Tire Pressure And Adjust If Necessary
One possible reason for a slow cart speed is improper tire pressure. Low tire pressure can cause increased rolling resistance, resulting in reduced speed. To fix this issue, start by checking the tire pressure of all four tires using a tire pressure gauge. Refer to your Club Car’s manual for the recommended tire pressure. If the tire pressure is below the recommended level, inflate the tires to the appropriate PSI using an air compressor or a tire inflator.
Clean And Lubricate The Brake System
An inefficient brake system can also contribute to slow cart speed. Dirt, debris, and rust can build up on the brake components, causing them to stick and create friction. To fix this issue, perform a thorough cleaning and lubrication of the brake system. Start by removing the wheels to access the brake components. Use a brake cleaner to remove any dirt or debris, and inspect the brake pads for wear. If the brake pads are worn out, replace them. Apply a thin layer of brake lubricant to the moving parts of the brake system to ensure smooth operation.
Inspect And Adjust The Throttle Linkage
A misadjusted or damaged throttle linkage can affect the cart’s speed. Inspect the throttle linkage for any signs of wear or damage, such as loose or frayed cables. If you notice any issues, replace the damaged parts. Additionally, make sure that the throttle cable is properly adjusted. Follow the instructions in your Club Car’s manual to adjust the throttle linkage to the correct specifications.
Replace The Controller If It’s Faulty
If the above steps do not resolve the slow cart speed issue, the problem may lie with the controller. The controller is responsible for regulating the power delivery to the cart’s motor. Over time, controllers can wear out or become faulty, resulting in reduced speed. To fix this issue, replace the controller with a new one that is compatible with your Club Car model. Consult your Club Car’s manual or seek professional assistance if you are unsure how to replace the controller.
Resolving Strange Noises
Troubleshooting Headlight Issues
If you’re experiencing issues with the headlights on your Club Car golf cart, don’t worry; we’ve got you covered. Troubleshooting headlight problems can be a straightforward process if you know what to look for and how to fix it. In this section, we’ll guide you through the steps to identify and resolve common headlight issues.
Check The Light Switch And Wiring Connections
Start by checking the light switch and its wiring connections. Faulty or loose connections can cause the headlights to malfunction. Inspect the switch for any signs of damage, such as melted wires or corrosion. Ensure that all wires are properly connected and securely in place. If you notice any issues, repair or replace the switch and ensure the wiring connections are tight.
Inspect And Replace The Light Bulbs If Necessary
If the light switch and wiring connections are in good condition, the next step is to inspect the light bulbs. Over time, bulbs can become burned out or damaged, resulting in a dim or non-functional headlight. Carefully remove the bulbs and examine them for any signs of damage or blackened areas. If you notice any issues, replace the bulbs with new ones that are compatible with your Club Car golf cart model.
Test the voltage regulator and replace it if it is faulty.
The voltage regulator plays a crucial role in regulating the electrical power of the headlights. A faulty voltage regulator can cause inconsistent or flickering headlights. To test the voltage regulator, use a multimeter to measure the voltage output. If the reading is below or above the recommended range, it indicates a faulty regulator. In this case, replace the voltage regulator with a new one to ensure the proper functioning of the headlights.
Check The Battery Voltage And Connections To The Lights
The battery voltage and its connections to the lights are integral to the proper operation of the headlights. Start by checking the battery voltage using a voltmeter. A low voltage reading could indicate a weak battery that needs to be recharged or replaced. Additionally, inspect the connections between the battery and the lights for any loose or damaged wires. Ensure all connections are secure and free from corrosion. If necessary, clean the terminals and tighten the connections to resolve any issues.
By following these troubleshooting steps, you can identify and resolve headlight issues with your Club Car golf cart. Remember to always prioritize safety when working with electrical components, and consult a professional if you’re unsure or uncomfortable performing any repairs.
Frequently Asked Questions
Where Is the Reset Button On A Club Car Motor?
The reset button on a club car motor is usually located on the controller, which can be found under the seat or on the dashboard of the golf cart.
How Do I Know If My Golf Cart Solenoid Is Bad?
To determine if your golf cart solenoid is bad, check if the cart fails to turn on when you turn the key. A failing solenoid may not snap or make a clicking sound during regular operation.
How Do You Diagnose a Golf Cart Problem?
To diagnose a golf cart problem: 1. Check the battery using a hydrometer to measure its charge. 2. Ensure the batteries are fully charged and properly cleaned. 3. Test the solenoid by turning the key and listening for a clicking sound. 4. Troubleshoot the speed controller if the cart doesn’t run. 5. Use a test light to check the charging receptacle and other electrical components.
Why Is My Electric Golf Cart Not Working?
Check the batteries first, as they are usually the culprit for an electric golf cart not working. Make sure they are charged and clean. If the key turns on but nothing happens, it could be a bad solenoid. Use a hydrometer to check the battery’s performance.
Where Is The Reset Button Located On An Electric Golf Cart?
The reset button on an electric golf cart is usually located on the controller, which can be found under the seat or on the dashboard of the cart.
Conclusion
Troubleshooting issues with Club Car golf carts can be a bit challenging, but with the right knowledge and guidance, you can easily overcome them. Remember to check the charging receptacle, test light, solenoid, and low-amp switching circuit for potential problems.
Take the time to troubleshoot the wiring and speed sensor, and ensure that your batteries are charged and in good condition. By following these steps, you’ll be able to diagnose and resolve any issues with your Club Car golf cart, keeping it running smoothly for years to come.
")