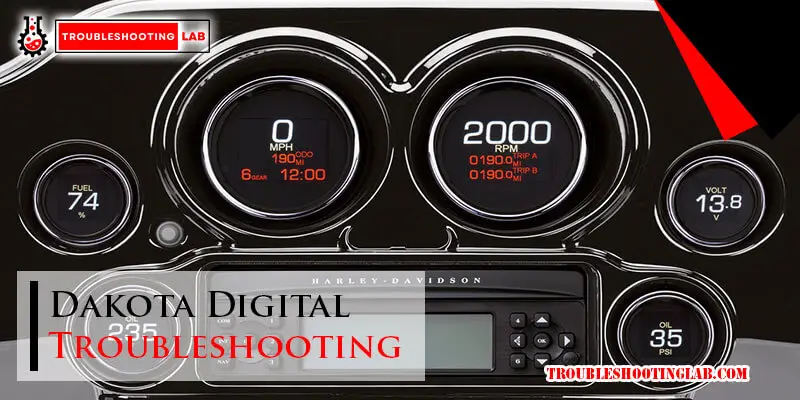
Dakota Digital dashboards are popular for their sleek design and advanced features. But even the best systems can face issues.
Troubleshooting Dakota Digital products can seem daunting, but it doesn’t have to be. Understanding common problems and their solutions can save time and frustration. This guide will walk you through typical issues you might encounter with your Dakota Digital dashboard.
From display glitches to sensor misreads, we’ll cover the essentials to keep your system running smoothly. Whether you’re a seasoned pro or new to digital dashboards, these tips will help you troubleshoot like an expert. Stay tuned to get your Dakota Digital dashboard back on track.
Common Dakota Digital Problems
Dealing with Dakota Digital issues can be frustrating. Understanding common problems makes troubleshooting easier. This section covers the most frequent issues you may face with Dakota Digital systems.
Display Problems
Display problems are common with Dakota Digital systems. Sometimes, the screen may go blank. Check the power connections first. Loose or disconnected wires can cause this issue.
Another problem is incorrect readings. This can be due to faulty sensors or wiring issues. Ensure all connections are secure. If the problem persists, consider recalibrating the system. Refer to the user manual for specific instructions.
Sensor Failures
Sensor failures can also occur. These sensors monitor various vehicle parameters. A common sign of sensor failure is erratic readings. This can be caused by damaged sensors or wiring issues.
Inspect the sensors for any visible damage. Replace damaged sensors immediately. Check the wiring connections to ensure they are secure. Loose connections can cause incorrect readings or sensor failure.
Regular maintenance and inspection can prevent these issues. Keep your Dakota Digital system running smoothly by addressing problems early.
Initial Checks For Dakota Digital
When troubleshooting your Dakota Digital system, the first step is performing initial checks. These checks can help you identify common issues quickly. This section will guide you through the initial checks, focusing on two key areas: Power Supply and Connections.
Power Supply
Ensure your Dakota Digital system receives the correct power supply. An incorrect power supply can cause the system to malfunction. Follow these steps to verify the power supply:
- Check the voltage levels using a multimeter.
- Confirm that the power supply matches the system’s requirements.
- Inspect for any blown fuses or tripped circuit breakers.
A steady and correct power supply is crucial for the system’s performance. Double-check all power connections and replace any faulty components.
Connections
Proper connections are vital for your Dakota Digital system. Loose or incorrect connections can lead to issues. Follow these steps to ensure proper connections:
- Inspect all wiring for any loose or damaged connections.
- Ensure all connectors are securely plugged in.
- Verify that the wiring matches the system’s manual.
Use a wiring diagram if available. This can help you identify any misplaced wires. Properly connected wires ensure smooth operation and prevent potential issues.
By performing these initial checks, you can often identify and resolve common issues. This helps ensure your Dakota Digital system runs smoothly and efficiently.
Dakota Digital Error Codes
Error codes on Dakota Digital systems can be confusing and frustrating. These codes help identify specific issues within your vehicle’s digital display system. Understanding and resetting these codes can save you time and money. Let’s dive into the details.
Understanding Codes
Error codes communicate specific problems within the digital system. Each code corresponds to a unique issue. The user manual provides a comprehensive list of these codes. Refer to it for detailed explanations.
Common codes might indicate sensor failures or connection problems. Understanding these codes is crucial for troubleshooting. Always start by identifying the exact code displayed.
Resetting Codes
Resetting error codes can often resolve minor issues. First, ensure all connections are secure. Loose wires can trigger error codes. Next, turn off the vehicle’s power.
Wait a few minutes before turning it back on. This simple reset can clear temporary glitches. If the code persists, further diagnostics might be necessary.
Consult the user manual for specific reset procedures. Each Dakota Digital system may have unique steps. Follow these steps closely to ensure a proper reset.
Calibration Tips For Dakota Digital
Calibration is a key part of ensuring your Dakota Digital gauges work correctly. Whether it’s your speedometer or tachometer, proper calibration ensures accurate readings. This guide will walk you through some essential tips for calibrating your Dakota Digital gauges.
Speedometer Calibration
Calibrating your speedometer ensures accurate speed readings. Start by verifying your tire size and gear ratio. These factors affect the speedometer’s accuracy. Use the Dakota Digital setup menu to enter these details. Follow the instructions provided in your user manual.
Next, you’ll need to perform a calibration run. Drive your vehicle at a steady speed. The speedometer should match the known speed. If not, adjust the calibration settings. Repeat the process until the readings match. This ensures your speedometer is precise.
Tachometer Calibration
The tachometer measures engine RPM. Correct calibration provides accurate RPM readings. Begin by setting the correct pulse per revolution (PPR) value. This value depends on your engine type. Refer to your engine’s specifications for the correct PPR.
Access the Dakota Digital setup menu. Enter the PPR value. Start your engine and observe the tachometer. It should match the engine’s RPM. If there is a discrepancy, make adjustments. Recheck the readings after each adjustment. This ensures your tachometer is accurate.
How To Update Dakota Digital Software
Software Updates are vital for keeping your Dakota Digital system running smoothly. Regular updates can fix bugs and enhance performance. In this section, we will cover how to download and install these updates.
Downloading Updates
First, ensure you have a stable internet connection. Visit the official Dakota Digital website. Navigate to the Support section. Locate the Software Updates page. You will find a list of available updates.
Check the version number and release date. Download the latest update that matches your device model. Click the download link. Save the file to your computer. Remember the download location. It will be helpful later.
Installing Updates
Once the update file is downloaded, locate it on your computer. Double-click the file to begin the installation process. Follow the on-screen instructions. These steps are straightforward.
Here is a simple table to illustrate the installation steps:
| Step | Description |
|---|---|
| 1 | Double-click the update file. |
| 2 | Follow the on-screen instructions. |
| 3 | Complete the installation process. |
| 4 | Restart your device, if prompted. |
After installation, restart your Dakota Digital system. This ensures the new software is fully integrated. Check if the update resolved your issue. If not, consult the Dakota Digital support team for further assistance.
Wiring Issues For Dakota Digital
Wiring issues can cause headaches with Dakota Digital gauges. Faulty connections or damaged wires often lead to malfunctioning displays or erratic readings. Addressing these issues promptly ensures your gauges work correctly and reliably.
Identifying Faults
First, inspect all wiring connections. Loose or disconnected wires are common culprits. Carefully check each connection point, ensuring wires are secure and intact. Look for signs of wear or damage, such as frayed or burnt wires. Use a multimeter to test continuity. This helps identify broken or faulty wires. If the reading is inconsistent, there might be an issue.
Repairing Wires
Once you identify the fault, repair or replace the damaged wires. Start by cutting out the damaged section. Strip the ends of the remaining wire. Use a wire stripper for clean cuts. Connect the wires using a crimp connector or solder. Ensure the connection is secure and insulated. Use heat shrink tubing or electrical tape for insulation. This prevents future damage and ensures a reliable connection.
Check the repaired wires with a multimeter. Ensure continuity is restored. Reconnect everything and test your Dakota Digital gauges. They should now function correctly.
How To Replace Dakota Digital Sensor
Sensor replacement is crucial for the proper functioning of Dakota Digital systems. This section will guide you through choosing the right sensors and installing them correctly. Ensuring your sensors are working well is essential for accurate data readings.
Choosing Sensors
Selecting the right sensor can be challenging. Always refer to your Dakota Digital manual. Make sure the sensor is compatible with your vehicle model. Not all sensors fit all models. Check the specifications before purchasing. Quality sensors ensure accurate readings and long-term reliability.
Installing Sensors
Once you have the right sensor, install it carefully. Disconnect the battery before starting. This prevents any electrical mishaps. Follow the instructions in your Dakota Digital manual closely. Mount the sensor in the designated spot. Ensure it is secure and properly aligned. Connect the wiring as per the manual. Double-check all connections before reattaching the battery. Testing the sensor post-installation is crucial. Make sure it is giving accurate data.
Advanced Dakota Digital Troubleshooting
Advanced troubleshooting can help solve complex issues with Dakota Digital systems. It involves using diagnostic tools and consulting support. These steps ensure optimal system performance. Follow these guidelines for a smoother troubleshooting experience.
Using Diagnostic Tools
Diagnostic tools are essential for identifying problems in your Dakota Digital systems. They provide detailed information on system status and errors. Here’s how you can effectively use these tools:
- Connect the diagnostic tool: Ensure it is properly connected to the system. This helps in accurate readings.
- Run a full system scan: This will check for any errors or malfunctions.
- Analyze the error codes: Refer to the user manual for error code meanings.
- Follow troubleshooting steps: The diagnostic tool may provide specific steps to resolve the issue.
Using these tools can save time and pinpoint specific issues. This makes the repair process more efficient.
Consulting Support
If diagnostic tools don’t resolve the issue, consult Dakota Digital support. They have expert knowledge and can guide you through complex problems. Here are steps to get the best support:
- Gather information: Note down error codes, system behavior, and steps taken so far.
- Contact support: Use the contact information provided on the Dakota Digital website.
- Explain the issue clearly: Provide all gathered information to the support team.
- Follow advice: Implement the solutions recommended by the support team.
Consulting support can provide insights that may not be available through standard troubleshooting. Their expertise can help resolve persistent issues.
Frequently Asked Questions
How Do I Reset My Dakota Digital Gauge?
To reset your Dakota Digital gauge, hold the reset button for 10 seconds.
Why Is My Dakota Digital Speedometer Not Working?
Check the wiring connections first. A loose or damaged wire can cause issues.
How Can I Calibrate My Dakota Digital Tachometer?
Use the calibration mode in the settings menu. Follow the instructions in your manual.
What Should I Do If My Dakota Digital Display Is Blank?
Verify the power supply. Ensure all connections are secure and check the fuse.
Why Is My Dakota Digital Fuel Gauge Inaccurate?
Ensure the sending unit is compatible. Check the wiring and settings for proper calibration.
Conclusion
Solving Dakota Digital issues can seem tough, but it’s manageable. Follow the steps outlined in this guide. Check connections, update software, and read the manual. Consistent maintenance helps avoid problems. If stuck, reach out for support. Regular checks ensure your system runs smoothly.
Remember, patience and attention to detail are key. With these tips, you’ll handle any Dakota Digital troubleshooting with ease. Happy driving!
")


My controller won’t do anything but stay on the of day what can I do tho fix this
Hey there! 😊 If your Dakota Digital controller is stuck showing just the time or “OF DAY”, it’s likely an issue with either the power cycle or a system freeze. Here’s what you can try:
If none of these work, your unit may need servicing. You can reach out to Dakota Digital support—they’re super helpful! 👍