Experiencing issues with your Dish Wally receiver? Don’t worry; you’re not alone.
Many users face common problems that can disrupt their TV experience. Dish Wally Troubleshooting can seem daunting, but it doesn’t have to be. This guide will walk you through simple steps to solve frequent issues. From signal loss to software glitches, we’ll cover everything you need to know.
Our aim is to help you get back to watching your favorite shows with minimal fuss. Whether you’re a tech novice or a seasoned pro, these tips are designed to be easy to follow. Let’s dive into the solutions and get your Dish Wally running smoothly again.

Credit: support.dish.com
Common Problems
Experiencing issues with your Dish Wally can be frustrating. Understanding common problems can help you troubleshoot and fix them quickly. Below are some typical issues you might encounter with your Dish Wally.
Signal Loss
Signal loss is a frequent problem with Dish Wally. It often happens due to obstructions or weather conditions. Ensure there are no trees, buildings, or other objects blocking your dish. Heavy rain, snow, or strong winds can also affect the signal. Check the dish’s alignment and make adjustments if necessary.
Intermittent Connectivity
Another common issue is intermittent connectivity. This can cause disruptions while watching your favorite shows. Loose or damaged cables often lead to intermittent signals. Inspect all connections to ensure they are secure and free from damage. Sometimes, interference from other electronic devices can also cause this problem. Keep your Dish Wally away from routers, microwaves, and other gadgets.

Credit: m.youtube.com
Initial Checks
Before diving into complex troubleshooting steps, start with some initial checks. These basic steps can often resolve common issues with your Dish Wally receiver. Let’s look at two crucial areas: the power supply and cable connections.
Power Supply
First, ensure the Dish Wally receiver is properly powered.
- Check if the power cord is securely plugged into the outlet and the receiver.
- Verify that the outlet works by plugging in another device.
- If the receiver is connected to a power strip, ensure it is turned on.
- Look for any visible damage on the power cord.
If the receiver does not power on, try a different outlet. This will help determine if the issue is with the outlet or the receiver.
Cable Connections
Next, inspect the cable connections to ensure they are secure and properly connected.
| Connection Type | Check |
|---|---|
| Coaxial Cable | Ensure it’s tightly connected to both the receiver and the satellite dish. |
| HDMI Cable | Make sure it’s firmly plugged into the receiver and the TV. |
| Ethernet Cable | Check for a secure connection to both the receiver and the router (if applicable). |
Loose or damaged cables can cause signal issues. If needed, replace damaged cables with new ones.
By performing these initial checks, you can often resolve many common issues with your Dish Wally receiver. If problems persist, further troubleshooting may be required.
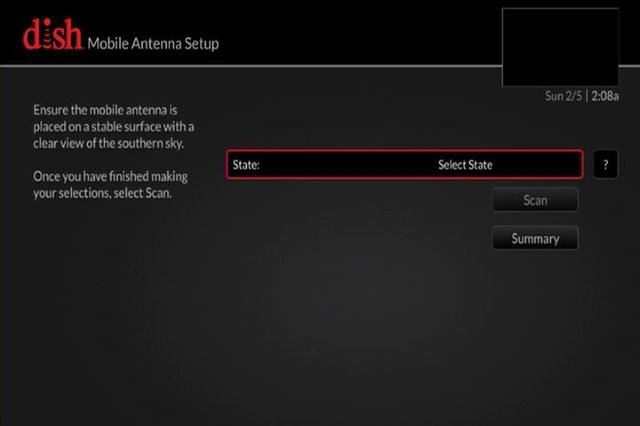
Signal Strength
Signal strength is vital for a seamless TV viewing experience with your Dish Wally. Poor signal strength can lead to interruptions and a fuzzy picture. Ensuring strong signal strength helps you enjoy your favorite shows without hassle. Let’s explore how to check and adjust your dish for better signal strength.
Checking Signal Levels
First, access the menu on your Dish Wally remote. Navigate to the “Settings” option. Then select “Diagnostics” and choose “Dish.” Here, you can see the current signal levels. A strong signal will have high numbers, usually above 50. If the signal strength is low, it might cause issues. This is your first step in troubleshooting.
Adjusting The Dish
If the signal strength is low, adjusting the dish might help. Carefully loosen the bolts that hold the dish in place. Slightly move the dish to the left or right. Check the signal levels as you move it. Small adjustments can make a big difference. Once you find the best signal, tighten the bolts again.
Remember to adjust the elevation angle as well. This is the dish’s up-and-down position. Small changes can improve the signal. Always check the signal levels after each adjustment.
Software Updates
Software updates are vital for keeping your Dish Wally receiver running smoothly. They fix bugs, improve performance, and add new features. Staying current with updates ensures a better viewing experience.
Checking For Updates
First, turn on your Dish Wally receiver. Using your remote, press the “Menu” button. Navigate to “Settings” and select “Diagnostics.” In this section, choose “Receiver” to check for available updates. The receiver will search for the latest software version. If an update is found, you will see a notification.
Installing Updates
If an update is available, select “Install.” The installation process will begin automatically. Make sure your receiver stays powered on during the update. Interruptions can cause issues. The update may take several minutes to complete. Once finished, your receiver will restart. Check that the new software version is installed.
Updating your Dish Wally receiver ensures optimal performance. Regular updates bring new features and fix known issues. Always keep your software up to date for the best experience.
Error Codes
Dealing with error codes on your Dish Wally can be frustrating. Understanding these codes is crucial. Each code indicates a specific issue. Let’s break down what these codes mean and how to resolve common errors.
Interpreting Codes
Error codes on Dish Wally help identify issues quickly. Each code has a unique meaning. For instance, Error 015 means your receiver has signal issues. Error 004 indicates a problem with your smart card. Knowing these meanings helps in troubleshooting. Always refer to your user manual for detailed explanations.
Resolving Common Errors
Some errors are easy to fix. For Error 015, check your dish alignment. Ensure nothing blocks the signal. If you see Error 004, check your smart card. Reinsert it properly. Sometimes, a simple reboot solves many issues. Unplug your receiver. Wait for 10 seconds. Plug it back in.
For persistent errors, contact Dish support. They can guide you further. Remember, regular maintenance helps prevent errors. Keep your equipment clean and in good condition.
Remote Control Issues
Experiencing issues with your Dish Wally remote control can be frustrating. Whether it’s unresponsive buttons or a completely non-functional remote, this section will guide you through common problems and solutions. Let’s dive into the key areas of remote control troubleshooting.
Pairing The Remote
To ensure your remote is properly paired with the receiver, follow these steps:
- Press the SAT button on your remote.
- Press and hold the System Info button on your receiver until the System Info screen appears.
- Press the Record button on your remote.
- Check if the remote address changes on the System Info screen.
If the remote still doesn’t work, try repeating these steps. Ensure there’s no obstruction between the remote and the receiver.
Replacing Batteries
Weak or dead batteries can cause remote control issues. Follow these instructions to replace them:
- Slide the battery cover off the back of the remote.
- Remove the old batteries.
- Insert new AAA batteries, ensuring the positive and negative ends match the markings.
- Slide the battery cover back on.
Test the remote by pressing any button. If it still doesn’t work, try using a different set of batteries. Make sure the batteries are inserted correctly.
Advanced Troubleshooting
Advanced troubleshooting can solve many issues with your Dish Wally receiver. These steps involve deeper fixes that go beyond basic troubleshooting. Advanced methods often include resetting the receiver or performing a factory reset.
Resetting The Receiver
Resetting the receiver can fix many common issues. This process clears temporary glitches and reboots the system. First, locate the power button on your Dish Wally receiver. Press and hold the power button for ten seconds. Release the button and wait for the receiver to reboot. This process may take a few minutes. Be patient and let the receiver complete its reset.
Factory Reset
A factory reset returns the receiver to its original settings. This can resolve more persistent problems. Remember, a factory reset erases all your settings and recordings. To perform a factory reset, go to the main menu. Select “Settings,” then “System Setup.” Choose “Factory Reset” and confirm your choice. The receiver will start the reset process. This step may take several minutes. Allow the receiver to finish the reset without interruption.
Credit: support.dish.com
Customer Support
Experiencing issues with your Dish Wally receiver can be frustrating. But don’t worry, the Dish Customer Support team is here to help. They provide solutions and guidance to get your receiver back on track.
Contacting Support
The first step in resolving your Dish Wally issues is to contact customer support. You can reach them through various methods:
- Phone: Call their support line for immediate assistance.
- Live Chat: Use the live chat feature on the Dish website.
- Email: Send an email detailing your issue for a more in-depth response.
Gathering Necessary Information
Before contacting support, gather all necessary information. This will help the support team diagnose and fix your issue faster.
Here’s a quick checklist:
- Account Information: Have your account number and billing details ready.
- Receiver Details: Note down your receiver model and serial number.
- Error Messages: Write down any error messages displayed on your screen.
- Troubleshooting Steps: List any troubleshooting steps you have already tried.
| Information | Description |
|---|---|
| Account Information | Account number and billing details |
| Receiver Details | Model and serial number |
| Error Messages | Any error messages displayed |
| Troubleshooting Steps | Steps you have already tried |
Having this information ready helps in making your interaction with customer support smoother and more efficient.
Frequently Asked Questions
How Do I Reset My Dish Wally Receiver?
Press the reset button on the front of your receiver. Wait for it to reboot.
Why Is My Dish Wally Not Turning On?
Check if the power cord is properly connected. Verify the outlet is working.
What Should I Do If My Dish Wally Has No Signal?
Ensure the satellite dish is not obstructed. Check all cables and connections.
How Can I Fix Dish Wally Remote Not Working?
Replace batteries in the remote. Ensure there are no obstructions between the remote and receiver.
Why Is My Dish Wally Stuck On A Loading Screen?
Unplug the receiver for 10 seconds. Plug it back in and let it restart.
Conclusion
Solving Dish Wally issues can be simple with the right steps. Follow the troubleshooting tips provided. They can save time and reduce frustration. Always check connections and settings first. Ensure your remote and receiver are working properly. Resetting the device often helps.
If problems persist, contact customer support for help. Remember, regular maintenance can prevent many issues. Happy viewing!
")