Is your electric fence not working the way it should? If you’ve noticed it clicking but not delivering a proper shock, or maybe it just feels weak, you’re not alone.
Troubleshooting an electric fence can feel frustrating, especially when you rely on it to keep your property secure or your animals safe. But don’t worry—this guide will help you quickly identify what’s wrong and get your fence back up and running.
You’ll learn simple steps to test your energizer, spot common faults like shorts or bad connections, and fix issues caused by vegetation or damaged insulators. Keep reading, and you’ll gain the confidence to troubleshoot your electric fence like a pro—without any guesswork or extra stress.
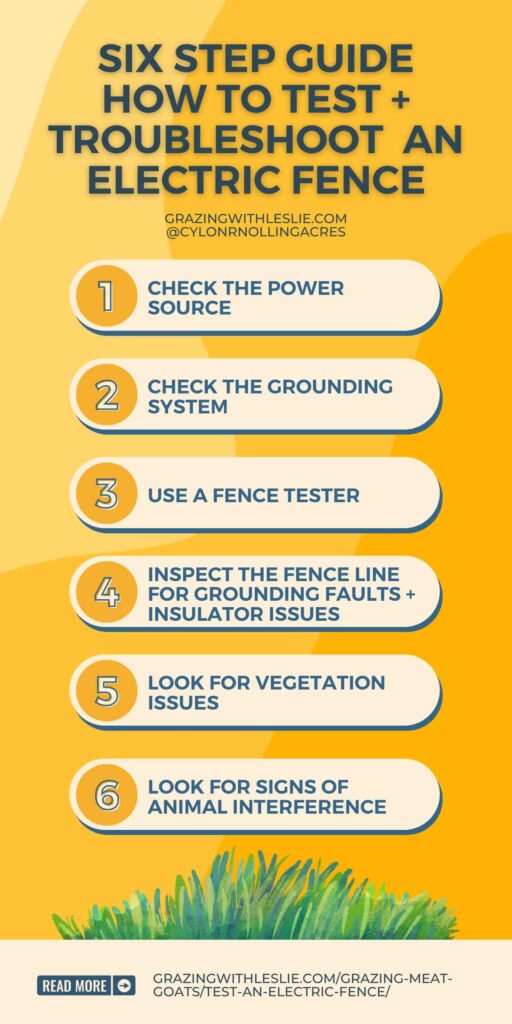
Credit: grazingwithleslie.com
Common Electric Fence Issues
Electric fences require regular care to keep working well. Common problems can stop them from giving a strong shock. Knowing these issues helps fix the fence fast. This saves time and protects animals or property. Below are some common electric fence problems and how to spot them.
No Shock Or Weak Charge
The fence gives no shock or a weak one. This often means a power problem or a break in the wire. Check the energizer first. It may not be getting power or could be damaged. Look for loose or broken wires along the fence line. Wet grass or plants touching the wire can also lower the charge.
Clicking Sounds Without Shock
Clicking sounds come from the energizer, but the fence does not shock. This means the energizer tries to send pulses but fails to deliver current. The fence might be shorting out or the ground system may be poor. Check for broken wires or metal touching the fence wire. Make sure the ground rods are deep and connected well.
Frequent Power Failures
The fence keeps losing power often. This can happen if the energizer overheats or has an internal fault. Power surges or bad wiring in the supply can cause failure too. Check the power source and wiring for damage. Keep the energizer in a dry, cool place to avoid overheating.

Credit: www.youtube.com
Testing The Energizer
Testing the energizer is a key step in electric fence troubleshooting. It helps find if the energizer works correctly. A faulty energizer can cause the fence to lose power. Testing ensures the energizer sends strong pulses to the fence wire. Follow simple steps to check its function safely and accurately.
Disconnecting Fence And Ground Wires
Start by turning off the energizer. Then, disconnect the fence wire from the energizer terminal. Also, disconnect the ground wire from its terminal. This isolates the energizer for testing. It stops interference from the fence wire or ground. Always use insulated tools to avoid shocks during this step.
Measuring Voltage Output
Use a voltmeter or electric fence tester to measure output voltage. Connect the tester to the energizer’s fence terminal and ground terminal. Turn on the energizer and read the voltage. A good energizer produces pulses around 5,000 to 10,000 volts. Lower voltage means weak or no charge. No voltage shows a faulty energizer or power issue.
Resetting The Energizer
Switch off the energizer to start resetting. Wait a few seconds before turning it back on. This clears minor faults and resets the internal system. Some models have a reset button to press. After resetting, check the voltage output again. If voltage returns to normal, the energizer works fine. Otherwise, consider repair or replacement.
Inspecting The Fence Line
Inspecting the fence line is a key step in electric fence troubleshooting. A thorough inspection helps find problems that stop the fence from working. Walk along the fence slowly. Look closely at each part of the wire and posts. Spotting issues early saves time and repair costs. Use a systematic approach to check every section carefully.
Checking For Shorts And Breaks
Start by checking the wires for shorts or breaks. Look for places where the wire touches the ground or plants. These contacts can cause shorts and reduce the fence charge. Also, check for broken or cut wires. Broken wires stop the electric flow. Repair or replace any damaged wire immediately.
Examining Insulators
Inspect the insulators on the fence posts. Insulators keep the wire from touching the post and losing charge. Look for cracked or broken insulators. Dirty insulators can also cause problems. Clean them with a dry cloth to remove dirt or debris. Replace any insulator that is damaged to maintain a strong electric charge.
Listening For Electrical Pops
Listen closely for electrical popping sounds along the fence. These pops indicate electrical arcing or shorts. Electrical arcing happens when electricity jumps from the wire to a nearby object. It weakens the fence voltage. Identify the source of the popping sound and fix the problem. This step helps maintain fence effectiveness and safety.
Grounding And Power Supply
Proper grounding and a stable power supply are crucial for an electric fence to function well. Without good grounding, the electric pulses cannot complete the circuit. This issue often causes the fence to lose its shock or stop working. The power supply must deliver steady voltage to keep the fence charged. Regular checks can help you avoid problems and keep your fence reliable.
Testing Ground Rods
Start by inspecting your ground rods. Use a voltmeter to check the resistance between the ground rod and the earth. A high resistance reading means poor grounding. Clean any dirt or rust on the rods. Make sure rods are driven deep into the soil for better contact. Test each rod separately to find weak spots.
Ensuring Moist Soil Contact
Dry soil reduces grounding effectiveness. The ground rods need good contact with moist soil. Water the soil around the rods during dry periods. Avoid rocky or sandy areas for grounding. Moist soil helps electricity flow easily through the ground. Check soil moisture regularly, especially in hot weather.
Adding Extra Ground Rods
Add more ground rods if the fence still underperforms. Space rods about 10 feet apart for best results. Connect the rods with a thick wire to form a grounding system. Extra rods lower the overall resistance and improve shock strength. This step often solves weak or no shock issues.
Clearing Vegetation And Debris
Clearing vegetation and debris plays a crucial role in electric fence troubleshooting. Plants and objects touching the wires can cause shorts and reduce fence voltage. Regular maintenance keeps your fence working efficiently and prevents power loss. It also extends the fence’s lifespan and keeps your property secure.
Removing Tall Grass And Weeds
Tall grass and weeds often grow close to electric fence wires. These plants can create a path for electricity to leak into the ground. Cut grass and weeds away from the fence line regularly. Use a weed trimmer or hand tools to clear the area. Keep at least 12 inches of space between the vegetation and the wires. This simple step stops power loss and improves fence performance.
Clearing Branches And Metal Contacts
Branches touching the fence can cause shorts and reduce voltage. Trim tree branches that hang over or touch the fence wires. Remove fallen branches and sticks from the fence line. Metal objects like wire scraps or fence staples can also cause faults. Inspect the fence for any metal contacts that touch the wires. Clearing these objects ensures the electric current flows properly along the fence.
Credit: www.zarebasystems.com
Fixing Wire And Connection Issues
Fixing wire and connection issues is essential to keep your electric fence working well. Faulty wires or poor connections can stop the fence from delivering the right shock. These problems reduce the fence’s effectiveness and can let animals escape or intruders enter. Regular checks help find and fix these issues fast. Focus on broken wires, loose connections, and lightning diverters to maintain a strong electric fence system.
Repairing Broken Wires
Look closely along the fence for any cuts or breaks in the wire. Broken wires stop electricity from flowing properly. Use wire cutters to remove damaged parts. Twist the two ends of the good wire together tightly. Wrap the joint with electrical tape or use a wire connector for safety. Check the repair by testing the fence voltage after fixing the wire.
Tightening Loose Connections
Loose connections cause weak or no electric shocks. Check all connection points between wires and fence posts. Tighten screws and clamps to secure the wires firmly. Make sure the wires do not move or slip out. Clean any rust or dirt at connection points as they reduce conductivity. Proper connections help keep the fence charged and working well.
Checking Lightning Diverters
Lightning diverters protect your fence from power surges during storms. Inspect the diverters for any visible damage or corrosion. Replace damaged diverters immediately to avoid system failure. Ensure the diverters are connected correctly between the energizer and fence wire. Testing the fence after storms helps catch any diverter problems early. Good diverters extend the life of your electric fence system.
Safety Tips During Troubleshooting
Working on electric fences requires attention to safety. Troubleshooting can expose you to electric shocks. Following proper safety tips protects you and ensures effective repairs.
Use caution around live wires. Understand how the fence system works before starting. Wear protective gear and stay alert to avoid accidents.
Testing Without Getting Shocked
Never touch the fence wire with bare hands. Use insulated tools or a voltage tester designed for electric fences. Stand on dry ground and avoid wet conditions. Keep a safe distance from the wire while testing. This lowers the risk of receiving a shock.
Using Proper Tools
Choose tools with insulated handles. Use a fence tester or voltmeter to check the current. Avoid metal tools without insulation. Proper tools help detect issues safely and quickly. They prevent accidental electric shocks during troubleshooting.
Turning Off Power When Needed
Switch off the energizer before repairs. Disconnect the power source to stop electricity flow. Confirm the fence is de-energized before touching wires. Turning off power eliminates shock risks during fixes. Only turn power on after completing all checks.
Frequently Asked Questions
Why Is My Electric Fence Clicking But Not Shocking?
Your electric fence clicks but doesn’t shock due to weak power supply, poor grounding, or a fault in the energizer or wiring. Check for damaged insulators, vegetation touching the wire, and test voltage output at the energizer terminals to identify and fix the issue quickly.
How To Find A Fault In An Electric Fence?
Turn off power and disconnect fence and ground wires. Test energizer output voltage at terminals. Inspect fence line for shorts, damaged insulators, or vegetation touching wires. Reconnect wires and test voltage along the fence. Listen for popping sounds to locate faults.
How To Test An Electric Fence To See If It’s Working?
Turn off the energizer and disconnect fence and ground wires. Turn power on and measure voltage at energizer terminals. Reconnect wires, inspect fence for shorts or vegetation touching the wire. Use a blade of grass to feel a light shock, confirming the fence works.
How To Reset Electric Fence Energizer?
Turn off the energizer power. Disconnect fence and ground wires. Turn power on and test output voltage. Reconnect wires and clear alarms by toggling power off and on.
Why Isn’t My Electric Fence Delivering Shocks?
A weak or broken power supply can stop shocks. Check the energizer and power source for faults.
Conclusion
Troubleshooting an electric fence takes patience and simple checks. Start by inspecting the fence line for breaks or shorts. Test the energizer output to ensure it sends power properly. Clear vegetation or debris touching the fence to avoid grounding issues.
Regular maintenance keeps your fence working well and protects your property. Remember, small problems can cause the fence to fail. Stay calm, follow steps carefully, and fix issues one by one. A working electric fence keeps animals safe and secure.
Keep your system in good shape with basic troubleshooting skills.
")


