Is your Epson printer acting up just when you need it most? Whether it’s printing blank pages, showing flashing lights, or simply refusing to print, these common issues can be frustrating and confusing.
But don’t worry—you’re not alone, and most problems can be fixed quickly with the right steps. In this Epson Printer Troubleshooting Guide, you’ll discover easy-to-follow solutions that help you get your printer back to perfect working order. By the end, you’ll know exactly how to run diagnostics, clear jams, clean print heads, reset settings, and much more.
Ready to save time and avoid costly repairs? Let’s dive in and tackle those Epson printer problems together!
Diagnosing Nozzle Issues
Diagnosing nozzle issues is key to fixing print quality problems in Epson printers. Nozzles can get clogged or misaligned, causing streaks, missing lines, or faded prints. Checking the nozzles helps find the exact problem. It also guides you on how to clear blockages and restore print quality. This section explains how to perform a nozzle check, interpret the test patterns, and use the head cleaning utility.
Performing A Nozzle Check
Start by turning off your Epson printer. Next, press and hold the Stop or Maintenance button. While holding it, press the Power button to turn on the printer. Release both buttons when the power light flashes or the printer starts printing. The printer will print a nozzle check pattern automatically. This pattern helps you see if the nozzles spray ink evenly.
Interpreting Test Patterns
Look closely at the printed nozzle check pattern. It should have solid lines with no gaps or missing sections. If the pattern is complete, the nozzles work fine. Gaps or broken lines indicate clogged or blocked nozzles. These issues cause poor print quality. Identifying these signs helps decide if cleaning is needed. A perfect pattern means the problem may be with the computer or software, not the printer.
Using Head Cleaning Utility
Access the head cleaning utility through your printer’s maintenance menu or computer settings. This tool sends ink through the nozzles to clear clogs. Run the cleaning cycle once or twice, then print another nozzle check pattern. Repeat cleaning if gaps remain. Avoid overusing the cleaning utility, as it consumes ink. Use it only when necessary to restore clear, even printing. Regular nozzle checks help keep your Epson printer running smoothly.
Credit: www.mercomrepair.com
Fixing Print Quality Problems
Print quality problems can ruin your important documents and photos. Blurred lines, streaks, or faded colors often indicate issues with the print head or ink supply. Fixing these problems restores sharp, clear prints and saves ink and paper. Follow simple steps to resolve print quality issues quickly and easily.
Running Head Cleaning Cycles
Head cleaning removes dried ink blocking the nozzles. Start the cleaning from your printer’s control panel or software. This process pushes ink through the nozzles to clear clogs. Run a nozzle check after cleaning to see if the print improves. Repeat the cleaning if needed, but avoid excessive cycles to save ink.
Power Cleaning For Stubborn Clogs
Power cleaning is a deeper cleaning process for tough clogs. Use the printer’s maintenance menu to select power cleaning. This method uses more ink and takes longer but clears stubborn blockages. Perform a nozzle check after power cleaning to confirm nozzle flow has restored. Avoid frequent power cleaning to prevent ink wastage.
Replacing Or Refilling Cartridges
Low or empty cartridges cause faded or missing colors. Check ink levels in your printer software or display. Replace cartridges with genuine Epson ink for best results. If you refill cartridges, ensure no leaks or damage occur. Proper cartridge care prevents print quality issues and extends printer life.
Resolving Connectivity Errors
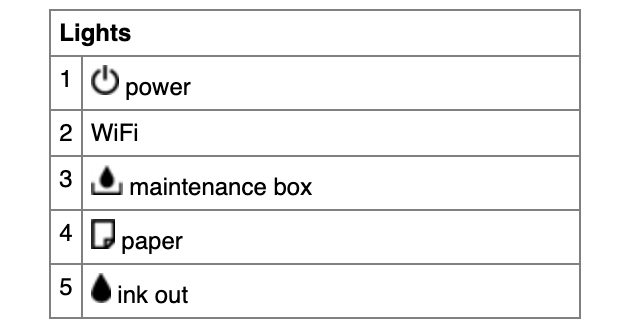
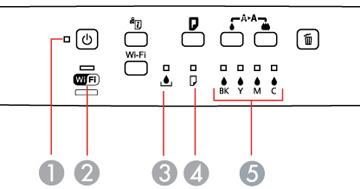
Understanding the error lights on your Epson printer is key to quick fixes and smooth printing. These lights signal issues that need attention. Knowing what each light means helps you solve problems fast. This section covers the most common error lights and what to do about them.
Orange Light For Paper Jams
An orange light often means a paper jam inside the printer. Check the paper path carefully. Remove any stuck paper gently to avoid damage. Open the paper tray and rear cover to look for jammed sheets. Clear all pieces before closing the covers. Restart the printer to see if the light turns off.
Cover Open Alerts
The printer shows a warning light if a cover is open. Make sure all covers are firmly closed. Check the scanner lid and ink cartridge access door. Sometimes the cover looks closed but is not fully latched. Press each cover firmly until it clicks. The alert should disappear once all covers are secure.
Other Indicator Light Meanings
Different lights or blinking patterns signal various issues. A blinking green light may mean the printer is warming up or processing data. A red light usually means a serious error like low ink or cartridge problems. Check the printer screen or software for exact messages. Follow the instructions to fix the issue. Always refer to the user manual for detailed light codes.
Credit: www.compandsave.com
Handling Common Error Lights
Resetting Epson printers can solve many common problems quickly. It clears errors and restores default settings. This process helps when the printer behaves oddly or stops responding. Knowing how to reset your Epson printer saves time and avoids unnecessary repairs.
Factory Reset Procedures
To perform a factory reset, first turn off the printer. Press and hold the reset button or combination keys specified in your model’s manual. While holding the buttons, turn the printer on. Release the buttons when the power light flashes or the screen shows a reset message. This process restores all settings to factory defaults. Note that some models may have a reset option in the menu under setup or maintenance.
Clearing Data And Settings
Clearing data removes stored preferences and network settings. Access the printer menu and find the reset or restore option. Select “Clear All Data” or “Restore Network Settings.” Confirm the action to erase saved information. This step is useful if your printer has connection problems or displays error codes. After clearing, you must reconfigure Wi-Fi and other preferences.
When To Reset Your Printer
Reset your Epson printer if it freezes or shows error lights. Resetting helps with paper jam errors, print quality issues, and communication problems. Use reset when cleaning or ink replacement does not fix the problem. Avoid resetting too often as it may erase useful settings. Always try basic troubleshooting before performing a full reset.
Credit: files.support.epson.com
Frequently Asked Questions
How Do I Run A Diagnostic On My Epson Printer?
Turn off the printer. Hold the Stop/Maintenance button and press Power. Release both when lights flash. The printer prints a test pattern. Check for gaps. Use Head Cleaning in maintenance menu if needed. Repeat test until pattern is clear.
Where Is The Reset Button On An Epson Printer?
The reset button on an Epson printer is usually inside the printer’s control panel menu. Access settings, find “Restore Defaults,” and confirm. Some models may have a small physical reset button near the power or back panel. Check your manual for exact location.
How Do I Fix The Orange Flashing Light On My Epson Printer?
Check for paper jams and ensure the printer cover is fully closed. Clear any jammed paper carefully. Restart the printer to reset the orange flashing light.
What Are Three Possibilities That Might Cause A Printer Not To Print At All?
Three common causes for a printer not printing are empty ink cartridges, paper jams, and connectivity issues with cables or Wi-Fi.
How Do I Run A Diagnostic On My Epson Printer?
You can run a nozzle check by holding the Stop or Ink button while powering on. This prints a test pattern to spot clogs or alignment issues. Use the head cleaning option if you see gaps or missing lines.
Conclusion
Troubleshooting your Epson printer can be simple with clear steps. Start by running a nozzle check to spot print issues. Use the head cleaning feature to fix clogs and improve print quality. If the test page looks perfect, check your cables and software next.
Regular maintenance helps keep your printer working smoothly. Keep this guide handy for quick fixes anytime. Your Epson printer will stay reliable and ready to print.
")


