Is your toilet making strange noises, taking forever to refill, or refusing to work altogether? If so, your Fluidmaster fill valve might be the culprit.
These handy components usually keep your toilet running smoothly, but like any part, they can run into issues over time. The good news? Most problems with a Fluidmaster fill valve are easy to troubleshoot and fix, even if you’re not a plumbing expert.
In this guide, we’ll walk you through the most common issues and step-by-step solutions to get your toilet back in perfect working order. Don’t let frustration flush your day down the drain—read on to discover how you can save time, money, and stress with a few simple adjustments.
Common Issues With Fill Valves
Fill valves are the unsung heroes of your toilet. They regulate the flow of water into the tank, ensuring everything works smoothly. But when something goes wrong, it can feel like a mystery you don’t want to solve. Let’s break down some of the most common issues with fill valves so you can troubleshoot and get your toilet back in action.
Toilet Won’t Stop Running
Is your toilet constantly running? This is one of the most frequent fill valve issues. It often happens because the fill valve isn’t shutting off when the tank is full.
Check the float—if it’s too high, water may overflow into the tube, keeping the valve open. Adjust the float to the correct level, usually about an inch below the top of the overflow tube. If that doesn’t work, the fill valve seal might be worn out and need replacing.
Slow Tank Refilling
Does your toilet take forever to refill after a flush? A slow fill usually points to a clogged valve or low water pressure. Debris, like sediment from hard water, can block the valve.
Turn off the water supply and remove the top of the fill valve. Check for any visible buildup and clean it out. If water pressure is the issue, you might need to check the shut-off valve under the toilet to ensure it’s fully open.
No Water Filling The Tank
If your tank stays empty, it’s time to investigate. First, confirm the water supply to your toilet hasn’t been accidentally turned off. Then, inspect the fill valve for damage or blockages.
Sometimes, the valve itself stops working due to wear and tear. Replacing it is usually the quickest solution. Don’t hesitate to consult your fill valve’s manual if you’re unsure how to proceed.
Unusual Noises From The Valve
Strange noises, like whistling or screeching, can be alarming. These sounds often occur when the fill valve is struggling to regulate water flow. Mineral deposits or worn components are common culprits.
Flush the system by removing the fill valve cap and running water through it for a few seconds. If the noise persists, it might be time for a new fill valve. Nobody wants a noisy toilet interrupting their day!
Addressing these issues early can save you from bigger headaches down the road. Which of these problems have you faced? Let us know in the comments below!
/fluidmaster-fill-valve-repair-2719029-hero-513e35ed3fe248ccbf91b126e5a4910e.jpg)
Credit: www.thespruce.com
Tools You’ll Need
Fixing a Fluidmaster fill valve may seem tricky without preparation. The right tools make the process smoother and save time. Being ready with these items can help avoid frustration during troubleshooting.
1. Adjustable Wrench
An adjustable wrench is essential for loosening or tightening nuts. It helps to secure the fill valve or remove old components. Ensure the wrench fits snugly to avoid damaging parts.
2. Bucket Or Container
A bucket is useful for catching excess water during repairs. Place it under the valve to keep the area clean and dry. This prevents spills and minimizes cleanup later.
3. Clean Cloth Or Towel
A cloth helps wipe away water or dirt on the valve. Use it to clean surfaces before reassembling parts. It ensures a better fit and reduces the risk of leaks.
4. Screwdriver (flathead Or Phillips)
A screwdriver is often needed to remove screws holding the valve. Check if your fill valve uses flathead or Phillips screws. Using the correct type avoids damage to the screws.
5. Plumber’s Tape
Plumber’s tape ensures tight and leak-free connections. Wrap it around threads before attaching the fill valve. This seals gaps and prevents water from escaping.
6. User Manual
The user manual provides guidance specific to your fill valve model. It helps identify parts and understand assembly steps. Keep it handy during the troubleshooting process.
Adjusting The Water Level
Adjusting the water level in your toilet tank is a simple yet crucial step for ensuring your toilet operates efficiently. If the water level is too high, it can lead to constant running water. Too low, and your toilet might not flush properly. Understanding how to make this adjustment can save you time and frustration without requiring a plumber.
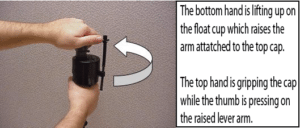
Locating The Float Adjustment
The first step to adjusting the water level is finding the float adjustment mechanism. Most Fluidmaster fill valves use a float that moves up and down with the water level. This float is often a small plastic piece attached to the fill valve with a screw or clip for easy adjustment.
Open your toilet tank lid and look for the float on the side of the fill valve. It might be a cylindrical piece or a cup that slides along the valve shaft. Spotting this part is key to making precise water-level changes.
Steps To Adjust The Float
Adjusting the float is straightforward but requires attention to detail. Follow these steps:
- Turn off the water supply:Locate the shut-off valve near the base of your toilet and turn it clockwise to stop water flow.
- Drain the tank:Flush your toilet to empty the tank. This will allow you to work on the float without interference.
- Adjust the float height:Use the screw or clip on the float to either raise or lower it. Turning the screw clockwise will lower the water level, while counterclockwise will raise it.
- Test the adjustment:Turn the water supply back on and let the tank fill. Check if the water level aligns with the “waterline” mark inside the tank.
If the water level still isn’t right, repeat the steps in small increments. Adjusting too much at once can make troubleshooting harder.
Have you ever thought about how such a minor adjustment can prevent larger issues? A correctly set water level not only saves water but also helps avoid costly repairs. Next time your toilet acts up, you’ll know exactly where to start.
Credit: www.fluidmaster.com
Clearing Debris From The Valve
Debris buildup inside a Fluidmaster fill valve can cause performance issues. Cleaning the valve regularly ensures smooth operation. Follow these steps to remove debris effectively and restore your toilet’s functionality.
Shutting Off The Water Supply
Start by turning off the water supply to your toilet. Locate the shut-off valve on the wall near the base of the toilet. Turn the valve clockwise until it stops. This prevents water from flowing while you work on the fill valve.
Removing The Fill Valve Cap
Press down on the top of the valve cap and twist it counterclockwise. This unlocks the cap for removal. Carefully lift it off and place it aside. Be gentle to avoid damaging the cap or the valve.
Cleaning The Valve Components
Inspect the valve components for any visible debris or mineral buildup. Use a soft cloth or small brush to clean the surfaces. Rinse the parts under running water to remove fine particles. Ensure the valve opening is clear of obstructions. Reassemble the valve by aligning the cap and twisting it clockwise to secure it. Turn the water supply back on and test the toilet for proper function.
Replacing The Fill Valve
Fixing issues with a Fluidmaster fill valve starts by identifying the problem, such as slow refilling or constant running. Replacing the fill valve involves shutting off the water, removing the faulty part, and installing a new one. Ensuring proper alignment and secure connections helps restore efficient toilet performance.
Replacing the fill valve in your toilet can seem like a daunting task, but it’s actually simpler than you might think. If you’ve noticed issues like your toilet running continuously, a weak flush, or inconsistent water levels in the tank, the fill valve might be the culprit. Knowing when and how to replace it can save you money and avoid unnecessary frustration.When To Replace The Valve
You don’t need to be an expert to figure out if your fill valve needs replacing. Look for clear signs of wear and tear. If your toilet won’t stop running despite adjustments or you hear strange noises, it’s time to act. Have you noticed water leaking from the fill valve? This is a red flag that the valve’s seal may be damaged. Ignoring this can lead to higher water bills. Sometimes, the valve might look fine, but your toilet fills much slower than usual. This often indicates internal blockages or aging components. Replacing the valve is usually quicker than attempting to clean it.Steps To Install A New Valve
Replacing the fill valve is a straightforward process you can tackle in under an hour. Here’s how: 1. Turn off the water supply: Locate the shut-off valve near the base of your toilet and turn it clockwise. Flush the toilet to drain the tank completely. 2. Remove the old fill valve: Unscrew the water supply line from the base of the tank. Loosen the nut holding the valve in place and pull it out carefully. 3. Prepare the new valve: Adjust the height of the new valve to match the water level in your tank. Most valves come with clear instructions for adjustment. 4. Install the new valve: Place the valve into the tank opening and tighten the nut underneath. Attach the refill tube to the valve and clip it to the overflow pipe. 5. Reconnect the water supply: Screw the water line back into place and ensure all connections are tight. Turn the water back on and check for leaks. 6. Test the flush: Flush the toilet a few times to ensure it’s filling correctly and the water level is consistent. Adjust the float if needed.It’s satisfying to fix something yourself and see immediate results. If you’ve never replaced a fill valve before, you might be surprised by how easy it is. Is there a fill valve issue you’ve been putting off? Give this process a try and reclaim your toilet’s efficiency.
:max_bytes(150000):strip_icc()/fluidmaster-fill-valve-repair-2719029-hero-513e35ed3fe248ccbf91b126e5a4910e.jpg)
Credit: www.thespruce.com
Preventing Future Issues
Preventing future issues with your Fluidmaster fill valve doesn’t have to feel like a daunting task. With the right approach, you can keep your toilet running smoothly and avoid unnecessary headaches. Let’s dive into some practical steps you can take to maintain your fill valve and extend its lifespan.
Regular Maintenance Tips
A little regular maintenance can go a long way in keeping your Fluidmaster fill valve in top shape. Start by inspecting the valve for wear and tear every few months. Look for visible cracks, mineral buildup, or any signs of leaks.
Clean the valve components periodically to prevent blockages. Sediment or hard water deposits can clog the valve, reducing its efficiency. Use a soft brush or a damp cloth to gently remove any buildup.
Don’t forget the refill tube! Ensure it’s securely connected to the overflow pipe and isn’t kinked. A loose or damaged tube can disrupt the water flow and cause the toilet to run constantly.
Checking Water Pressure
High water pressure might seem harmless, but it can damage your fill valve over time. Use a water pressure gauge to measure the pressure in your home’s plumbing. Ideally, it should be between 40 and 60 PSI.
If your water pressure is too high, consider installing a pressure-reducing valve. This simple fix can save your plumbing system from unnecessary strain and extend the life of your toilet components.
On the other hand, low water pressure can also cause issues. A sluggish fill valve might take longer to refill the tank, leading to inefficiency. Check your home’s plumbing for any clogs or leaks that could be affecting water flow.
Have you ever had to deal with a constantly running toilet because of a faulty fill valve? By taking these simple steps, you can prevent that frustration from happening again. Regular checks and adjustments can make all the difference in keeping your bathroom trouble-free.
Conclusion
Troubleshooting a Fluidmaster fill valve doesn’t have to feel overwhelming. Start with basic checks like water pressure and valve alignment. Clean the parts regularly to prevent clogs and ensure smooth operation. Replace worn-out components promptly to avoid bigger issues later.
Always follow the manufacturer’s instructions for adjustments and repairs. Simple maintenance can save time, money, and frustration. With these steps, your toilet will run efficiently again. A little effort goes a long way in keeping your plumbing in top shape.
")