Is your fluorescent light flickering, buzzing, or refusing to turn on? You’re not alone.
A malfunctioning fluorescent light fixture can be incredibly frustrating, especially when it disrupts your daily routine or productivity. But here’s the good news—you don’t need to be an electrician to figure out what’s wrong. With the right guidance, you can quickly identify the issue and possibly fix it yourself.
In this post, we’ll walk you through simple troubleshooting tips to help you get your fluorescent lights back in working order. Stick around, because understanding these fixes could save you time, money, and a lot of stress!
Common Issues With Fluorescent Lights
Fluorescent lights are a popular choice for homes, offices, and garages due to their energy efficiency and longevity. However, like any electrical device, they can run into problems. Knowing how to troubleshoot common issues can save you time, frustration, and unnecessary costs.
Flickering Lights
Flickering lights can be distracting and might even give you a headache. This is often caused by a loose or faulty bulb. Start by turning off the power and ensuring the bulb is securely screwed into the fixture.
If the bulb is fine, check the ballast, which regulates the current to the light. Older ballasts can wear out over time and may need replacing. Also, inspect the starter if your fixture has one—it might be failing and causing the flickering.
Lights Not Turning On
When your fluorescent light doesn’t turn on, the first step is simple—check the bulb. A burned-out bulb is often the culprit and can be replaced easily.
If the bulb is fine, look at the starter. A faulty starter can stop the light from igniting. Also, confirm the power supply to the fixture; a tripped breaker or a loose wire could be to blame.
Dim Or Weak Illumination
Dim lights can make your space feel gloomy and inefficient. This might be due to an aging bulb that’s nearing the end of its lifespan. Replacing it with a new one can restore brightness.
Another common cause is a failing ballast. If the ballast isn’t providing enough power, the light will appear weak. Ensure that the fixture is clean as well—dust and debris can block light output.
Buzzing Or Humming Sounds
A noisy fluorescent light can be incredibly annoying. This sound often points to an aging or faulty ballast. Replacing the ballast can usually resolve the issue.
Sometimes, buzzing can occur if the bulb isn’t seated properly in the socket. Turn off the power, adjust the bulb, and see if the sound stops. If the noise persists, it might be worth upgrading to a newer, quieter fixture.
Have you encountered any of these issues before? The good news is that most of them are easy to fix with a little effort. By keeping your fluorescent lights in good shape, you can enjoy bright, reliable lighting without the hassle.
Credit: blog.1000bulbs.com
Essential Tools For Troubleshooting
Having the right tools is essential when troubleshooting fluorescent light fixtures. Without them, you might waste hours trying to pinpoint the issue. The good news? You don’t need a complex toolkit—just a few key items to get the job done efficiently.
Screwdrivers
A trusty screwdriver is your go-to tool for opening light fixtures. Whether it’s a Phillips or flat-head screwdriver, it allows you to access internal components like the ballast and wiring. Keep both types handy since you never know what kind of screws you’ll encounter.
Tip: Opt for a magnetic screwdriver to avoid losing screws while working. It’s a simple upgrade that saves frustration.
Voltage Tester
A voltage tester is essential for checking if electricity is flowing to the fixture. Before handling any wires, use this tool to ensure safety and prevent shocks. Many testers light up or beep when voltage is detected, making them easy to use.
Example: If your fixture doesn’t light up, test the wiring connections with a voltage tester to confirm power is reaching the unit.
Replacement Bulbs
Sometimes, the issue is as simple as a worn-out bulb. Keep compatible replacement bulbs on hand to test whether the fixture is faulty or if the bulb itself is the problem. Check the wattage and type to match your fixture.
Pro tip: Store extra bulbs in a cool, dry place to prolong their lifespan.
Ballast Tester
A ballast tester helps you determine if the ballast is still functional. If your light flickers or doesn’t turn on, testing the ballast can save time diagnosing the issue. These testers are straightforward and often come with user-friendly instructions.
Question: Did you know that a faulty ballast can cause bulbs to burn out prematurely? A ballast tester can help you avoid unnecessary replacements.
With these tools, troubleshooting becomes less daunting and more precise. Which of these tools do you already have in your toolbox, and which ones might you need to add?
Inspecting The Bulbs
Fluorescent light fixtures are reliable, but they can occasionally stop working. When this happens, the first step is often the simplest: inspect the bulbs. A quick check can save you time and money before diving into more complicated fixes. Let’s break it down step by step.
Checking For Burnt-out Tubes
Start by turning off the power to the fixture to ensure your safety. Carefully remove the cover or diffuser, if your fixture has one, to access the bulbs.
Look for dark or blackened ends on the fluorescent tubes. This is a common sign of a burnt-out bulb. Another indicator is flickering or dim light output before the fixture stopped working.
If you notice any of these signs, it’s likely time to replace the bulb. However, don’t stop here—move on to the next step to rule out other possible issues.
Rotating Tubes For Connection Issues
Sometimes the problem isn’t the bulb itself, but the connection. Fluorescent tubes sit in sockets that require a snug fit to work properly.
Gently grasp the tube and rotate it about 90 degrees. You should feel it click into place. If the bulb wasn’t fully seated, this simple adjustment might solve the issue.
After rotating, turn the power back on to check if the light works. If it does, you’ve just saved yourself the trouble of replacing a perfectly good bulb!
Replacing Old Bulbs
If the bulb is burnt out or rotating it didn’t help, it’s time for a replacement. Make sure to choose a bulb that matches the specifications of your fixture—check the label on the fixture or the old bulb for details.
Carefully remove the old bulb by rotating and sliding it out of the socket. Dispose of it responsibly—most fluorescent bulbs contain small amounts of mercury and should be recycled.
Insert the new bulb by sliding it into the socket and rotating it until it clicks. Turn the power back on, and enjoy your bright, functional lighting once again.
Still having trouble after replacing the bulb? It might be time to inspect other components like the ballast or starter. But starting with the bulbs is always the easiest and most practical first step.

Credit: www.youtube.com
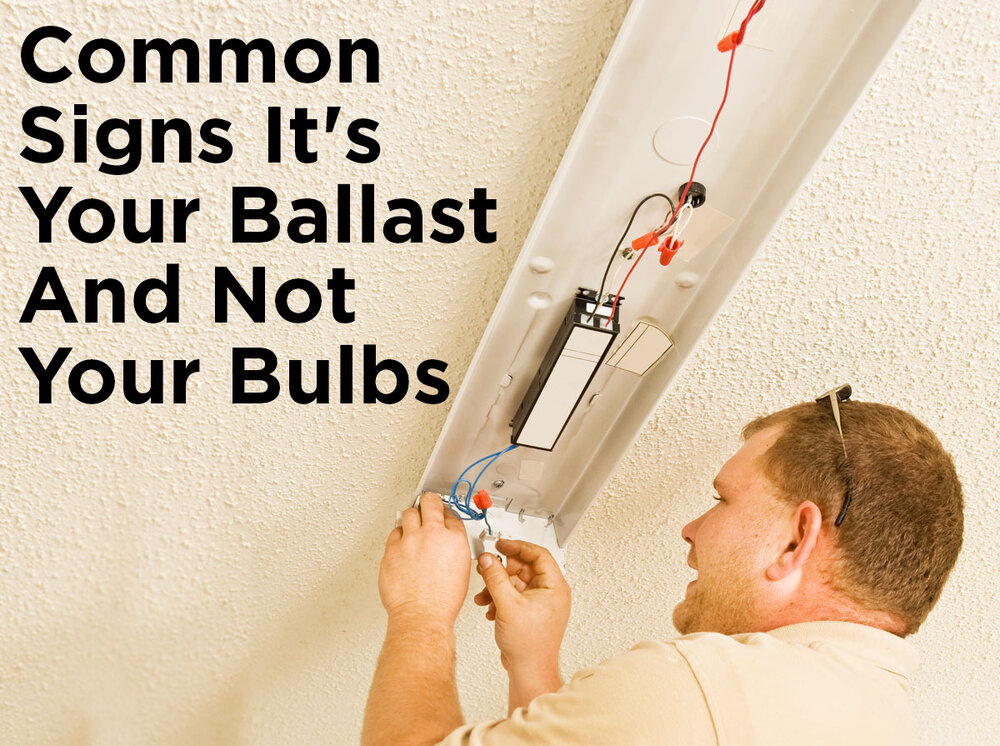
Examining The Ballast
Fluorescent light fixtures are great for energy efficiency, but when something goes wrong, they can leave you scratching your head. One common culprit behind a malfunctioning fluorescent light is the ballast. The ballast regulates the current to the lamp, and if it’s faulty, your light won’t work as expected—or at all. Let’s break this down step by step so you can troubleshoot effectively.
Signs Of A Faulty Ballast
How do you know if the ballast is the issue? Look for these signs:
- Flickering Lights:If your fluorescent light flickers constantly, the ballast may not be supplying steady current.
- Buzzing Sounds:A loud hum or buzz from the fixture often points to a failing ballast.
- Dim or Discolored Light:If the light is unusually dim or appears off-color, it could mean the ballast isn’t doing its job.
- Lights Not Turning On:If the bulb is new and properly installed but still won’t turn on, the ballast might be dead.
Recognizing these symptoms early can save you time and frustration. Have you noticed any of these issues with your light fixture lately?
Testing The Ballast
Before replacing the ballast, test it to confirm the issue. You’ll need a multimeter for this task. Here’s how:
- Turn off the power to the light fixture from the circuit breaker. Safety first!
- Remove the fluorescent bulb and access the ballast. This might involve unscrewing or unclipping the fixture cover.
- Set your multimeter to the resistance setting (ohms). Place the probes on the ballast’s wires—check your fixture’s manual for the correct terminals.
- If the readings are outside the manufacturer’s specified range, the ballast is faulty and needs replacement.
Testing might feel technical, but it’s a straightforward process. Take your time and double-check the connections. If you don’t have a multimeter, ask yourself: Is it worth investing in one, or should you call a professional?
Replacing A Ballast
If the ballast is indeed faulty, replacing it is the next step. Here’s what you’ll need:
- A compatible replacement ballast (check your fixture model for compatibility).
- Screwdriver, wire cutter, and wire nuts.
- Safety gloves and goggles.
Follow these steps:
- Turn off the power and confirm there’s no electricity running to the fixture.
- Disconnect the wires connected to the old ballast. Note their placement or take a photo for reference.
- Remove the old ballast by unscrewing or unclipping it.
- Install the new ballast by securing it in place and reconnecting the wires according to the photo or your notes.
- Replace the fixture cover, insert the bulb, and turn the power back on to test.
Replacing the ballast can seem intimidating, but it’s manageable with the right tools and patience. Have you ever replaced a part in your home before? This could be your next DIY success story!
Checking The Starter
Fluorescent lights are reliable, but troubleshooting them can feel like solving a puzzle. One common culprit when your fixture stops working is the starter. Checking the starter is straightforward and can save you time and money. Let’s break it down step by step.
Identifying The Starter
First, locate the starter. It’s a small cylindrical or disk-shaped component, usually near the base of your fluorescent light fixture.
Starters are often labeled with wattage and voltage ratings. Make sure you note these details—they’ll be crucial if you need a replacement.
Older fixtures tend to have starters, but newer models might use electronic ballasts instead. If you can’t find a starter, double-check your fixture type.
Testing The Starter
Before testing, turn off the power for safety. Never work on electrical components while the fixture is live.
Remove the starter by twisting it gently. Once it’s out, visually inspect it for burns or cracks. A damaged starter is often the problem.
If you have a spare starter, swap it in. If the light works with the new starter, you’ve identified the issue. No spare? Try testing the suspect starter in another working fixture.
Replacing A Malfunctioning Starter
If the starter is faulty, replace it with one matching the wattage and voltage ratings. This ensures compatibility and prevents further damage.
To install the new starter, insert it into the socket and twist until it locks in place. Make sure it’s secure but don’t force it.
Turn the power back on and check if the light operates correctly. If it doesn’t, you may need to troubleshoot other components, like the bulb or ballast.
Have you ever overlooked something simple like a starter during troubleshooting? Next time your fluorescent light flickers or goes out, start here—it’s an easy fix that often resolves the issue. Taking a few minutes to check and replace the starter can save you from unnecessary frustration.
Addressing Wiring Problems
Addressing wiring problems in fluorescent light fixtures is essential for proper function. Faulty wiring can cause flickering, dim lights, or complete failure. Identifying and resolving wiring issues ensures safety and restores reliable performance. Below are simple steps to inspect and fix wiring problems effectively.
Inspecting For Loose Connections
Loose connections can disrupt the power flow to the fixture. Begin by turning off the power at the circuit breaker. Remove the fixture cover and carefully check all wiring connections. Look for wires that are not tightly secured or seem out of place. Tug gently on each connection to ensure it is firm. Loose connections often cause intermittent flickering or failure to light.
Checking For Damaged Wires
Damaged wires are a common cause of lighting issues. Examine the wiring for signs of wear, cracks, or exposed copper. Check for burns or melted insulation, which may indicate overheating. Rodents or pests can also chew wires, causing visible damage. Use a flashlight to inspect hard-to-see areas inside the fixture.
Securing Or Replacing Wiring
Secure any loose wires using wire connectors or electrical tape. Ensure all connections are tight and properly insulated. Replace damaged or frayed wires to prevent electrical hazards. Use wires of the same gauge and material as the originals. If unsure, consult a qualified electrician for assistance.
Preventative Maintenance Tips
Keeping your fluorescent light fixtures in top shape isn’t just about fixing problems when they arise. A little preventative maintenance can save you time and money while ensuring your lights function efficiently. Let’s dive into practical tips that will help you avoid those frustrating flickers or sudden failures.
Regular Cleaning
Dust and grime can silently reduce the efficiency of your fluorescent fixtures. Over time, dirt builds up on the bulbs and covers, dimming the light output. Wipe them down with a soft, damp cloth every few months to keep things bright.
Don’t forget the surrounding areas. Dust inside vents or near electrical components can lead to overheating. A clean fixture runs smoother and lasts longer.
Have you ever noticed how much clearer your room looks after cleaning the light covers? Try it—it’s a small effort with a noticeable payoff.
Replacing Components On Time
Don’t wait for your bulbs to burn out completely. Replace them as soon as they start flickering or losing brightness to avoid electrical strain on the ballast. A faulty ballast can shorten the lifespan of your entire fixture.
Pay attention to signs like humming sounds or delayed startup. These often mean it’s time to replace the ballast or starter. Ignoring them could lead to more expensive repairs.
Keep spare components handy. It’s far easier to swap out a bulb or starter when you already have the right replacement at home.
Ensuring Proper Voltage Supply
Fluorescent lights rely heavily on stable voltage. Fluctuating power can cause flickering, overheating, or even damage to the fixture. Use a multimeter to check the voltage periodically, especially if you notice inconsistent lighting.
Consider adding surge protectors to safeguard your fixtures. Sudden spikes in electricity can harm not just the lights but other appliances too.
If your home often experiences power dips, think about consulting an electrician. They can help ensure your fixtures receive the proper voltage for optimal performance.
Ready to give your fluorescent lights the care they deserve? A little effort goes a long way in keeping them shining brightly. Which of these tips will you start with today?
When To Call A Professional
Fluorescent light fixtures are great for energy efficiency, but they can sometimes leave you scratching your head when they don’t work as expected. While DIY repairs can handle many common issues, there are times when it’s better—and safer—to call a professional. Knowing when to seek expert help can save you time, money, and frustration.
Complex Electrical Issues
If your fluorescent light fixture has wiring problems or keeps tripping your circuit breaker, it’s a sign of deeper electrical issues. Handling these problems without the proper knowledge can be dangerous. A professional electrician can quickly diagnose faulty wiring, overloaded circuits, or grounding issues and provide safe solutions.
Persistent Problems After Repairs
Have you already replaced the bulb or starter, but the light still flickers or refuses to turn on? Troubleshooting doesn’t always solve the root problem. Persistent issues like these may point to problems with the ballast or internal wiring.
Instead of guessing what’s wrong, let a professional identify the exact issue. They have the tools and expertise to fix what’s causing the problem once and for all.
Safety Concerns
Electrical work can be risky, especially if you don’t have experience. If you notice signs like melted wires, burnt smells, or sparks, don’t attempt to fix the fixture yourself. These are red flags that indicate serious safety hazards.
Even if you’re confident in your DIY skills, ask yourself: is it worth risking your safety? Calling an expert ensures the problem is resolved without putting you or your home in danger.
Knowing when to step back and call a professional isn’t admitting defeat—it’s making the smart choice. You’ll save yourself unnecessary headaches and gain peace of mind knowing the job is done right.

Credit: diy.stackexchange.com
Conclusion
Troubleshooting fluorescent light fixtures doesn’t have to be overwhelming. Start with basic checks like bulbs and connections. Replace faulty components as needed. Always turn off power before inspecting or repairing. Regular maintenance can prevent many common issues. If problems persist, consult a professional for help.
Proper care extends the lifespan of your fixtures. Keep your workspace well-lit and functional. A little effort today saves bigger headaches later. Remember, small fixes often make a big difference. Keep your lighting reliable and working smoothly.
")


