Imagine this: you’ve just settled into your cozy living room, ready to relax after a long day, when your trusty iRobot decides to throw a wrench in your plans. It’s not cleaning as it should, and you’re left scratching your head, wondering what went wrong.
Sound familiar? You’re not alone. Many iRobot users encounter hiccups with their devices, and the good news is, you can often resolve these issues yourself with a little guidance. This article is designed with you in mind, to simplify the often daunting task of troubleshooting your iRobot.
By understanding the basics and knowing where to look, you can save time, money, and the hassle of professional repairs. Whether it’s a minor glitch or a more complex problem, having the right manual at your fingertips can make all the difference. Are you ready to take control of your cleaning companion and ensure it runs smoothly? Let’s dive into the world of iRobot troubleshooting and get your device back to its prime performance.
Common Issues
Global Irobot Com Manual Troubleshooting helps users solve common iRobot problems. Understanding these issues ensures smooth robot operation. Below, find solutions to frequent problems.
Battery Problems
Battery issues often affect iRobot performance. If your robot stops unexpectedly, check the battery. Ensure it’s fully charged before use. Replace old batteries to improve efficiency.
Navigation Errors
Navigation errors can disrupt cleaning. If your robot gets stuck, inspect the surroundings. Clear obstacles that block its path. Regularly clean sensors to maintain optimal navigation.
Charging Difficulties
Charging difficulties can prevent your robot from working. Check the charger connection for secure fit. Clean charging contacts for better conductivity. Confirm the outlet provides power.
Reset Procedures
The reset procedures for iRobot devices are crucial. These ensure optimal performance and solve common issues. Knowing the steps can save time and frustration. Resetting your iRobot can resolve minor glitches without professional help. Explore the simple methods below to reset your iRobot.
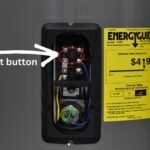
Soft Reset Steps
Performing a soft reset is simple. First, locate the home and spot buttons on your iRobot. Press and hold both buttons simultaneously for 10 seconds. Release the buttons after the device beeps. Your iRobot will reboot, clearing temporary errors. This method is effective for minor issues. It’s a quick fix that maintains settings and data.
Factory Reset Instructions
A factory reset restores your iRobot to default settings. This process erases all saved data and preferences. Begin by ensuring your robot is charged. Connect to the iRobot Home app on your smartphone. Navigate to settings and select “Remove Device.” Confirm the removal to initiate the factory reset. Once completed, your iRobot returns to original settings. Use this method for persistent problems that a soft reset cannot solve.
Sensor Maintenance
Proper sensor maintenance is crucial for your iRobot’s optimal performance. Sensors play a vital role in navigation and obstacle detection. Regular upkeep ensures your robot functions efficiently. This section covers cleaning and calibration of sensors.
Cleaning Techniques
Dust and debris can hinder sensor effectiveness. Use a soft, lint-free cloth for cleaning. Avoid using water or harsh chemicals. Gently wipe the sensor surface to remove dirt. For stubborn spots, a slightly damp cloth can help. Regular cleaning prevents buildup and maintains sensor accuracy.
Calibration Tips
Calibrating sensors ensures your iRobot navigates correctly. Start by placing your robot on a flat surface. Ensure the area is free of obstacles. Access the settings through the iRobot app. Follow the calibration instructions provided. Repeat the process if navigation issues persist. Calibration keeps your robot aligned and efficient.

Credit: www.scribd.com
Software Updates
Discover effective solutions for troubleshooting issues with Global Irobot Com Manual. Keep your software updated to ensure smooth operations. Regular updates enhance performance and fix bugs, providing a better experience for users.
Keeping your iRobot device in tip-top shape often hinges on ensuring its software is up to date. Software updates can bring new features, enhance performance, and fix bugs that might affect your device. But navigating these updates can sometimes feel like a maze. Don’t worry! With a bit of guidance, you can master the update process and even learn how to revert to previous versions if needed.Update Process
Updating your iRobot’s software is simpler than you might think. Start by connecting your device to Wi-Fi. This connection is crucial as it allows your iRobot to download the latest updates automatically. Once connected, you can initiate the update through the iRobot Home App. Open the app and look for any notifications about pending updates. If there’s an update available, follow the on-screen instructions to start the process. Updates usually happen in the background, meaning you can go about your day without any disruptions. But ensure your iRobot has enough battery life to complete the update smoothly.Rollback Options
What if the new update isn’t working well with your device? Sometimes, updates can introduce unexpected issues. Luckily, iRobot provides rollback options. To revert to a previous software version, you may need to contact iRobot’s support team. They can guide you through the rollback process. Always ensure you have a stable internet connection during this process to avoid further complications. Consider your needs before deciding to roll back. Ask yourself: Is the previous version more stable for my usage? Making an informed decision can save you time and hassle. Software updates are an essential part of keeping your iRobot device performing optimally. By understanding the update process and knowing your options for rollback, you can take full control of your device’s functionality. What’s the latest update you’ve installed on your iRobot, and how has it improved your experience?Parts Replacement
Discover solutions for replacing parts with the Global Irobot Com Manual Troubleshooting guide. Find easy-to-follow steps for fixing your robot. Ensure a smooth operation by understanding common replacement procedures clearly.
Parts replacement in your Global Irobot can be a simple task if you know where to start. Whether you’re dealing with a sluggish motor or an unresponsive sensor, replacing parts is often more economical than buying a new device. The process requires a bit of patience and a keen eye for detail. Replacing parts yourself can save time and money. But how do you know which part needs replacing?Identifying Faulty Parts
First, observe the behavior of your Irobot. Is it making unusual noises or not moving correctly? Such signs often indicate specific faulty parts. Check the user manual for a list of common issues and corresponding parts. If your Irobot struggles with navigation, the wheel module might be the culprit. Have you noticed a decrease in suction power? The motor or filter could be faulty. Identifying these issues early can prevent more significant problems.Replacement Process
Once you’ve identified the faulty part, gather the necessary tools. A screwdriver, replacement parts, and the manual should be on hand. Turn off your Irobot and unplug it from any power source. Safety first! Follow the steps outlined in the manual to remove the defective part. Install the new part securely, ensuring everything fits snugly. Reassemble your Irobot and test it to confirm the issue is resolved. Does replacing parts sound daunting? Remember, each successful fix boosts your confidence and extends the life of your Irobot. Why let a minor issue disrupt your cleaning routine when a quick replacement can have your device running like new?
Credit: device.report
User Support Resources
When your iRobot device acts up, it can be frustrating. But don’t worry, there are several user support resources designed to help you find solutions quickly and effectively. From direct support to community-driven forums, you’ll discover that help is just a click or call away.
Contacting Support
Getting in touch with iRobot’s support team is one of the most straightforward ways to resolve your issues. You can reach out via phone or email, providing your model number and a detailed description of the problem. This ensures that the support staff can guide you through troubleshooting steps efficiently.
Have you ever called support and felt like you were speaking a different language? iRobot’s team is trained to communicate clearly, breaking down technical jargon into simple terms you can understand. Don’t hesitate to ask questions; it’s their job to help you.
Online Community Forums
Sometimes, the best advice comes from other users who have experienced similar issues. iRobot’s online community forums offer a treasure trove of shared knowledge and troubleshooting tips. These forums are filled with discussions that can provide solutions you might not find anywhere else.
Imagine finding a tip that saves you hours of frustration. That’s the power of a user-driven community. You can even contribute your own experiences, helping others and building a supportive network of iRobot enthusiasts.
What if the answer to your issue is just a post away? Browsing through these forums can be as enlightening as it is engaging. Have you explored the community yet?

Credit: www.youtube.com
Conclusion
Understanding the Irobot manual is crucial for smooth operation. Troubleshooting becomes easier with clear steps. Remember to keep your device clean. Regular maintenance extends its life. Use the manual as your guide. Check for updates regularly. Stay informed about new features.
Always read instructions carefully. This helps prevent common issues. With patience, you can resolve most problems. Your Irobot will serve you well with care. Enjoy a cleaner home with less effort. Happy cleaning!
")