Harley-Davidson bikes are known for their power and style. But even the best machines can face starter problems.
Dealing with a Harley starter issue can be frustrating. You may find yourself stuck, unable to enjoy your ride. Understanding the common reasons behind these starter problems can save you time and stress. This guide will help you troubleshoot the issues with simple steps.
By the end, you will have a better grasp of what might be wrong and how to fix it. Let’s get your Harley back on the road!
Credit: www.youtube.com
Common Starter Issues
Harley riders often face starter problems. Identifying these issues can save time and money. Let’s explore some common starter issues and their solutions.
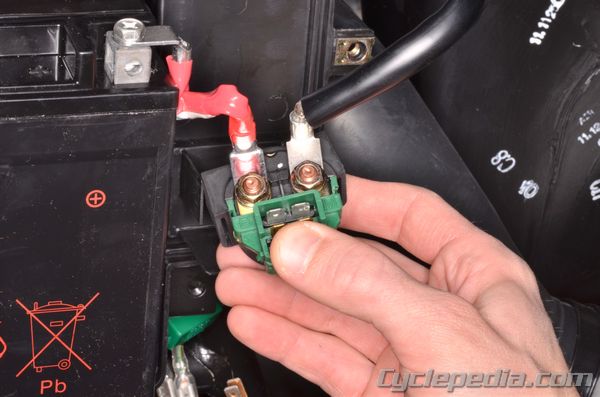
Battery Problems
The battery is the heart of your Harley’s starter system. A weak or dead battery can cause starter issues. Here are some common battery problems:
- Low Voltage: Check the battery voltage using a multimeter. It should be around 12.6 volts. A lower reading means the battery needs charging or replacement.
- Corroded Terminals: Inspect the battery terminals for corrosion. Clean them with a wire brush and apply dielectric grease to prevent future corrosion.
- Loose Connections: Ensure all battery connections are tight. Loose connections can prevent the starter from receiving enough power.
| Battery Issue | Solution |
|---|---|
| Low Voltage | Charge or replace the battery |
| Corroded Terminals | Clean and apply dielectric grease |
| Loose Connections | Tighten all connections |
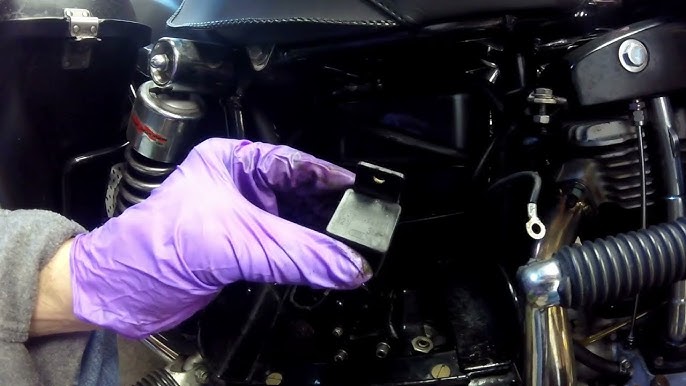
Solenoid Malfunctions
The solenoid acts as a bridge between the battery and the starter motor. A malfunctioning solenoid can prevent the starter from engaging. Common solenoid problems include:
- Stuck Plunger: The plunger inside the solenoid can get stuck. Tap the solenoid gently with a hammer to free it.
- Burnt Contacts: Inspect the solenoid contacts for burns or pitting. Replace the solenoid if the contacts are damaged.
- Faulty Wiring: Check the wiring connected to the solenoid. Replace any damaged wires to ensure proper current flow.
| Solenoid Issue | Solution |
|---|---|
| Stuck Plunger | Tap the solenoid gently |
| Burnt Contacts | Replace the solenoid |
| Faulty Wiring | Replace damaged wires |
Credit: www.cyclepedia.com
Diagnosing Starter Problems
Having trouble with your Harley’s starter? Diagnosing starter problems can save you time and money. This guide will help you understand the common issues and how to troubleshoot them.
Listening For Noises
First, listen for unusual noises when you try to start your bike. A clicking sound often means a weak battery. A grinding noise could indicate a worn-out starter motor. Silence may suggest electrical issues. Paying attention to these sounds can give clues about the problem.
Checking Connections
Next, check all electrical connections. Loose or corroded connections can prevent your starter from working. Inspect the battery terminals for corrosion. Clean them if needed. Ensure all wires are tight and secure. A loose wire can stop the starter from engaging.
| Connection | What to Check |
|---|---|
| Battery Terminals | Look for corrosion and clean if needed. |
| Starter Relay | Ensure it is properly connected and functioning. |
| Ground Wire | Check for tight and secure connections. |
Following these steps can help you identify starter problems. Pay attention to the noises and check all connections. This can often lead you to the root of the issue.
Battery Maintenance Tips
Regular battery maintenance can prevent many Harley starter problems. A well-maintained battery ensures your Harley starts smoothly every time. Follow these tips to keep your battery in top condition.
Cleaning Terminals
Dirty terminals can cause poor connections. This can lead to starter issues. Clean the terminals using a wire brush. Remove any corrosion or dirt. Make sure to wear gloves for safety.
Check for loose connections. Tighten any loose terminal connections. Apply a thin layer of petroleum jelly. This helps prevent future corrosion.
Testing Voltage
Test the battery voltage regularly. Use a voltmeter for accurate readings. A fully charged battery should read around 12.6 volts. If the voltage is low, recharge the battery.
Check the voltage while the engine is running. It should read between 13.7 and 14.7 volts. If not, there might be an issue with the charging system.
Inspecting The Solenoid
Inspecting the solenoid is crucial for troubleshooting Harley starter problems. The solenoid directs electrical current from the battery to the starter motor. If it fails, the starter motor won’t engage, leaving you stranded. Follow these steps to inspect the solenoid and identify any issues.
Locating The Solenoid
The solenoid is usually near the battery. It’s a small, cylindrical component. Check your Harley’s manual for the exact location. It often sits near the starter motor. Finding it is the first step in troubleshooting.
Signs Of Wear
Examine the solenoid for visible damage. Look for signs of wear like rust or corrosion. These can impede its function. Check the connections. Loose or frayed wires can cause problems. If you see any, they need fixing.
Listen for a clicking sound when you start your bike. If there’s no click, the solenoid might be faulty. A clicking sound means it’s trying to work but might still be weak. Both signs indicate a need for further inspection or replacement.
Starter Motor Troubleshooting
The starter motor is a vital part of your Harley’s ignition system. If your bike won’t start, the problem might be with the starter motor. This guide will help you inspect and replace the starter motor.
Motor Inspection
First, check the starter motor for any visible damage. Look for cracks or worn-out parts. Use a multimeter to test the motor’s voltage. Ensure the battery is fully charged before testing. The voltage should be within the range specified in the manual.
| Step | Description |
|---|---|
| 1 | Check for visible damage |
| 2 | Use a multimeter to test voltage |
| 3 | Ensure battery is fully charged |
| 4 | Compare voltage with manual |
Motor Replacement
If the starter motor is faulty, it might need replacement. Follow these steps to replace the motor:
- Disconnect the battery to avoid any electrical shocks.
- Remove the old starter motor. Use a wrench to unscrew the bolts.
- Install the new starter motor. Make sure it fits securely.
- Reconnect the battery and test the new motor.
Always refer to your manual for specific instructions. Use the correct tools to avoid damaging other parts.
Wiring And Connection Checks
When your Harley’s starter isn’t working, it can be frustrating. One common problem is wiring issues. Checking the wiring and connections can help you solve the problem quickly. This guide will help you inspect and secure the wiring connections.
Inspecting Cables
Start by inspecting the cables connected to the starter. Look for any signs of wear or damage. Broken or frayed cables can cause issues. Use a flashlight to get a clear view.
Pay attention to the battery cables. Ensure they are clean and free of corrosion. Corroded cables can hinder the flow of electricity. If you spot corrosion, clean it with a wire brush.
Also, check the ground cable. A faulty ground connection can prevent the starter from working. Ensure the ground cable is tightly connected to the engine.
Securing Loose Wires
Loose wires can cause intermittent problems. Check for any loose connections in the wiring harness. Ensure all connectors are tight and secure.
Use zip ties to secure any loose wires. This prevents them from moving and causing issues. Ensure wires are not near any hot surfaces. Heat can damage the insulation and cause shorts.
If you find any damaged wires, repair them immediately. Use electrical tape or heat shrink tubing for a secure fix. Always ensure your repairs are solid and safe.
A thorough check of the wiring and connections can often resolve starter problems. Keep your cables and connections in good condition to ensure reliable performance from your Harley.
Preventative Maintenance
Preventative maintenance keeps your Harley’s starter in top shape. Regular care prevents common issues and extends the life of your motorcycle. This proactive approach saves you time and money in the long run.
Regular Inspections
Regular inspections are crucial for your Harley’s starter. Check your motorcycle’s starter at least once a month. Look for any signs of wear or damage. Pay attention to unusual noises or slow starts. Early detection of issues can prevent bigger problems.
Scheduled Maintenance
Scheduled maintenance keeps your Harley’s starter running smoothly. Follow the maintenance schedule in your owner’s manual. This includes oil changes, battery checks, and cleaning connections. Regular maintenance ensures all parts work efficiently.
Stick to the recommended intervals for maintenance tasks. These tasks help prevent starter issues and other mechanical failures. Consistent care keeps your Harley reliable and ready for the road.
Credit: www.insurance.harley-davidson.com
When To Seek Professional Help
Troubleshooting a Harley starter problem can be simple. But, sometimes the issue is complex. Knowing when to seek professional help is important. This section will guide you on identifying these moments.
Identifying Complex Issues
Some starter problems are beyond basic troubleshooting. Here are a few signs of complex issues:
- Electrical faults: Frequent fuse blows or a persistent dead battery.
- Strange noises: Grinding or clicking sounds when starting.
- Starter motor issues: Motor turns but does not engage.
If you notice any of these, it is time to seek professional help. Professional mechanics have the tools and knowledge to fix these issues.
Finding A Qualified Mechanic
Finding the right mechanic is crucial. Here are some tips to ensure you choose a qualified one:
| Criteria | Description |
|---|---|
| Certifications | Ensure the mechanic is certified by a recognized institution. |
| Experience | Choose a mechanic with experience in Harley-Davidson motorcycles. |
| Reviews | Check online reviews to see what others say about their service. |
By following these tips, you can find a qualified mechanic who can help with your Harley starter problem. This ensures your bike gets the best care possible.
Frequently Asked Questions
Why Won’t My Harley Starter Engage?
A weak battery or damaged solenoid can cause this issue. Check connections and charge the battery.
How Do I Test My Harley Starter Relay?
Use a multimeter to check for voltage at the relay. It should read around 12 volts.
What Causes A Harley Starter To Click But Not Start?
This often means a weak battery or a faulty starter motor. Inspect both components.
Can A Bad Starter Drain My Harley’s Battery?
Yes, a failing starter can draw excess power and drain the battery. Test your starter if you notice this.
What Are Common Signs Of A Bad Harley Starter?
Common signs include clicking noises, slow cranking, or no response when you press the start button.
Conclusion
Fixing Harley starter issues can seem daunting, but it’s manageable. Start with basic checks. Inspect the battery, connections, and starter relay. Listen for unusual sounds. These can indicate deeper problems. If in doubt, consult a professional. Regular maintenance can prevent many of these issues.
Keep your bike in top shape. Enjoy smooth rides without starter hassles. Happy riding!
")


