Holiday lights bring joy and warmth to our celebrations. But sometimes, they can be tricky to manage.
Are your holiday lights not working? Don’t worry, you’re not alone. Many people face problems with their festive lights each year. From tangled wires to broken bulbs, there are several common issues that can arise. In this guide, we’ll help you troubleshoot your holiday lights.
Understanding these problems can save you time and keep your holiday spirits high. Whether you have a flickering strand or a completely dark display, we’ve got tips to fix it. Read on to learn how to keep your lights shining bright all season long.
Common Light Display Issues
Holiday light displays bring joy and festive spirit to many homes. Yet, they can sometimes cause frustration when issues arise. Here, we’ll address some common light display issues. These solutions can help keep your holiday lights shining bright.
Lights Not Turning On
First, check the power source. Ensure the plug is securely connected. Verify the outlet is working by plugging in another device. If the outlet is faulty, try a different one. Inspect the power cord for any visible damage. Replace it if necessary. Check the fuse in the plug. Many holiday lights have a small fuse inside the plug. Replace the fuse if it’s blown. Finally, make sure the timer or remote control is set correctly.
Partial Outages
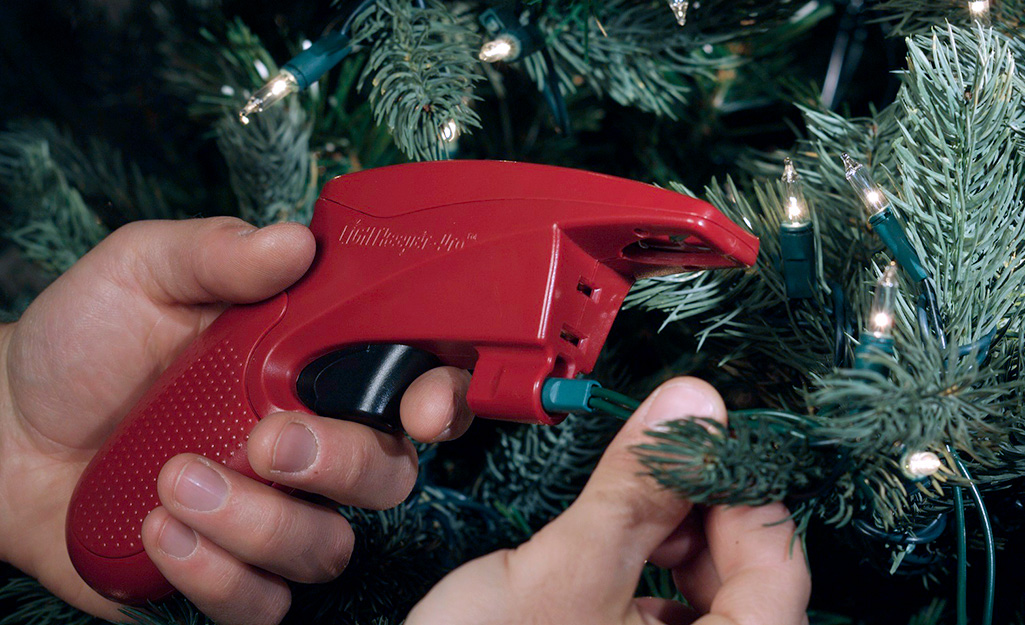
Partial outages occur when only some lights in the strand work. First, identify the section of the lights that are out. Examine each bulb in that section. A single burned-out bulb can cause a partial outage. Replace any faulty bulbs. Ensure each bulb is tightly connected. Loose bulbs can disrupt the circuit. Check for damaged wires or connectors. Repair or replace any damaged parts. Consider using a light tester tool. This device can help find the exact location of the problem.
Checking Power Sources
Holiday lights can bring joy, but they need power to shine. If your lights aren’t working, the first step is to check the power sources. This means inspecting plugs and testing outlets. Let’s dive into the details.
Inspecting Plugs
Plugs can sometimes be the culprit. Check if the plug is securely connected to the outlet. Look for any visible damage to the plug or the cord. Bent prongs can prevent the flow of electricity. Use a table like this to help you:
| Inspection Point | What to Look For |
|---|---|
| Plug Connection | Ensure it is firmly in the outlet |
| Visible Damage | Check for cuts or frays in the cord |
| Prongs | Ensure they are not bent |
Testing Outlets
Outlets can sometimes be at fault. Follow these steps to test them:
- Plug in a different device. A lamp works well.
- See if the device powers on.
- If not, check if the outlet has a reset button. Press it.
- If the outlet still doesn’t work, try a different outlet.
Here are a few quick tips:
- Make sure the circuit breaker is not tripped.
- Check if the outlet is controlled by a wall switch.
- Use a voltage tester for accurate results.
By inspecting plugs and testing outlets, you can often solve many holiday light issues. This ensures a bright and festive season.
Bulb Problems
During the holiday season, decorating with lights brings joy and festivity to many homes. But nothing dampens the holiday spirit quicker than strands of lights that suddenly stop working. One common issue is bulb problems. Let’s dive into identifying and replacing these problematic bulbs.
Identifying Burned-out Bulbs
Burned-out bulbs can cause an entire strand of lights to go dark. Here are some tips to identify them:
- Visual Inspection: Look for dark or broken filaments inside the bulb.
- Check for Blackened Bulbs: Bulbs with blackened bases are often burned out.
- Test Each Bulb: Use a bulb tester to determine if the bulb is dead.
By identifying burned-out bulbs, you can save time and avoid replacing the entire strand.
Replacing Bulbs
Once you’ve identified the burned-out bulbs, it’s time to replace them. Follow these steps:
- Unplug the Lights: Always unplug the lights before replacing any bulbs.
- Remove the Old Bulb: Gently twist and pull the old bulb from its socket.
- Insert the New Bulb: Push the new bulb into the socket until it clicks in place.
- Test the Strand: Plug the lights back in to ensure the new bulb works.
Remember, replacing bulbs promptly keeps your holiday lights shining brightly.
| Step | Description |
|---|---|
| 1 | Unplug the lights. |
| 2 | Remove the old bulb. |
| 3 | Insert the new bulb. |
| 4 | Test the strand. |
Wire And Connection Issues
Holiday lights bring joy and festivity to any home. But they can also be frustrating if they stop working. Often, the issue lies in the wires and connections. Addressing these problems can save you time and money. Let’s explore how to troubleshoot wire and connection issues effectively.
Inspecting For Frayed Wires
First, unplug the lights before inspection. Safety is important. Look closely at the entire length of the wire. Watch for any cuts, breaks, or exposed wires. Frayed wires can cause the lights to malfunction. They can also be a fire hazard.
If you find any damaged sections, you can repair them. Use electrical tape to cover small nicks or cuts. For more severe damage, consider replacing the whole string. Keeping wires in good condition ensures your lights work safely and efficiently.
Securing Loose Connections
Loose connections are another common issue. Check each bulb’s connection point. Make sure each bulb is firmly in its socket. A loose bulb can disrupt the entire string.
Also, examine the plugs and sockets. Ensure they fit tightly together. Wiggling the plugs slightly can reveal any loose connections. Tight connections help maintain a steady flow of electricity. This keeps your holiday lights shining bright.
Proper wire and connection maintenance can prevent many holiday light problems. By inspecting for frayed wires and securing loose connections, you ensure a bright and cheerful holiday season.
Fuse Troubles
Holiday lights add magic to any space. But fuse troubles can spoil the fun. Fuses are tiny, but they play a big role. They protect your lights from damage. If your lights go out, a blown fuse might be the cause. Let’s explore how to locate and replace fuses.
Locating Fuses
First, unplug your holiday lights. Safety first! Look for the plug’s small door. This door hides the fuses. Use a small screwdriver or your nails to open it. Inside, you’ll see two tiny fuses. One might be blown, causing your lights to go out.
Replacing Blown Fuses
To replace a blown fuse, pull it out gently. Use a small tool or your fingers. Check the new fuse. It should match the old one. Place the new fuse in the empty slot. Close the small door. Plug in the lights and see if they work. If they don’t, there might be another issue.

Credit: www.walmart.com
Timer And Control Malfunctions
Holiday lights bring joy and festivity to any home, but timer and control malfunctions can dampen the holiday spirit. These issues are common, yet often easy to fix. Understanding how to troubleshoot can save time and frustration. Here, we will guide you through checking timer settings and resetting controls.
Checking Timer Settings
First, ensure the timer is plugged in and receiving power. Verify the current time on the timer is accurate. If the timer is digital, double-check the AM/PM settings. For mechanical timers, check the pins or notches that indicate the on/off times. Adjust them if necessary. Make sure the timer is set to the correct mode, such as auto or timer mode. Sometimes, a simple adjustment can solve the problem.
Resetting Controls
Resetting the timer or control unit can often resolve malfunctions. For digital timers, locate the reset button. It is usually a small, recessed button. Use a paperclip to press it. Hold it down for a few seconds. This will reset the timer to its default settings. You will need to reprogram the settings afterward.
For mechanical timers, unplug the unit and let it sit for a few minutes. Plug it back in and set the time again. This can clear any internal glitches. If the timer has a battery backup, replace the batteries if they are old. Fresh batteries ensure the timer operates correctly.
Outdoor Light Problems
Outdoor light problems can spoil the holiday fun. When you set up your outdoor lights, issues can arise that may dampen your festive spirit. Understanding these problems helps you enjoy the beauty of your holiday decorations without hassle. This section explores common outdoor light problems and offers solutions.
Weather-related Issues
Bad weather can cause outdoor light problems. Rain, snow, and wind can damage lights. Water can seep into the lights, causing short circuits. Wind can blow decorations out of place or even break them.
Check your lights after a storm. Look for any damage. Replace broken bulbs and secure loose decorations. Use timers to save energy and prevent overheating.
Waterproof Solutions
Waterproofing is key to outdoor light safety. Use lights labeled for outdoor use. These lights are designed to withstand the elements. Waterproof connectors and covers protect your lights from rain and snow.
Apply a weatherproof sealant to connections. This adds an extra layer of protection. Keep extension cords off the ground to avoid water damage. Elevate them on bricks or use cord protectors.
Store your lights properly after the season. This prevents damage and extends their life. Keep them in a dry, cool place. Check them before use each year to ensure they are still safe.

Credit: www.homedepot.com
Preventative Maintenance
Preventative maintenance is key to ensuring your holiday lights shine bright every year. By performing some simple steps, you can avoid the frustration of untangling and fixing lights. This also helps prolong the life of your decorations. Let’s dive into some essential tips.
Regular Inspections
Check your holiday lights before hanging them. Look for any damaged bulbs or frayed wires. Replace any broken bulbs to maintain the light string’s integrity. Examine the plugs to ensure they are in good condition. This prevents any electrical hazards. A quick check can save you time and trouble later.
Proper Storage
Store your holiday lights properly after the season ends. Wrap them around a piece of cardboard or a spool. This keeps the wires from tangling. Place the wrapped lights in a sturdy container. Store the container in a cool, dry place. Avoid storing lights in areas with extreme temperatures. Proper storage keeps your lights safe and ready for next year.
:strip_icc()/BHG-How-to-Fix-Christmas-Lights-Primary-2iacu7LkqHF8WhZUNKSzN5-f44417d07385466ebc8554b975fd5e88.jpg)
Credit: www.bhg.com
Frequently Asked Questions
Why Are My Holiday Lights Not Working?
A loose bulb or faulty wire could be the issue. Check connections and replace any broken bulbs.
How Do I Fix A Broken Holiday Light?
Replace the broken bulb with a new one. Ensure it’s the correct size and type for your lights.
What Causes Holiday Lights To Flicker?
Flickering lights can be caused by loose bulbs or a weak electrical connection. Tighten bulbs and inspect the wiring.
Can I Repair A Frayed Holiday Light Cord?
It’s unsafe to use frayed cords. Replace the entire string of lights to avoid fire hazards.
Why Do My Holiday Lights Keep Tripping The Breaker?
Too many lights on one circuit can overload it. Spread lights across multiple outlets to prevent this.
Conclusion
Fixing holiday lights can be easy with the right steps. Inspect each bulb carefully. Replace any broken ones. Check the fuse in the plug. Use a multimeter for tricky issues. Keep your lights safe and stored properly. Enjoy your festive display without stress.
Happy holidays!


