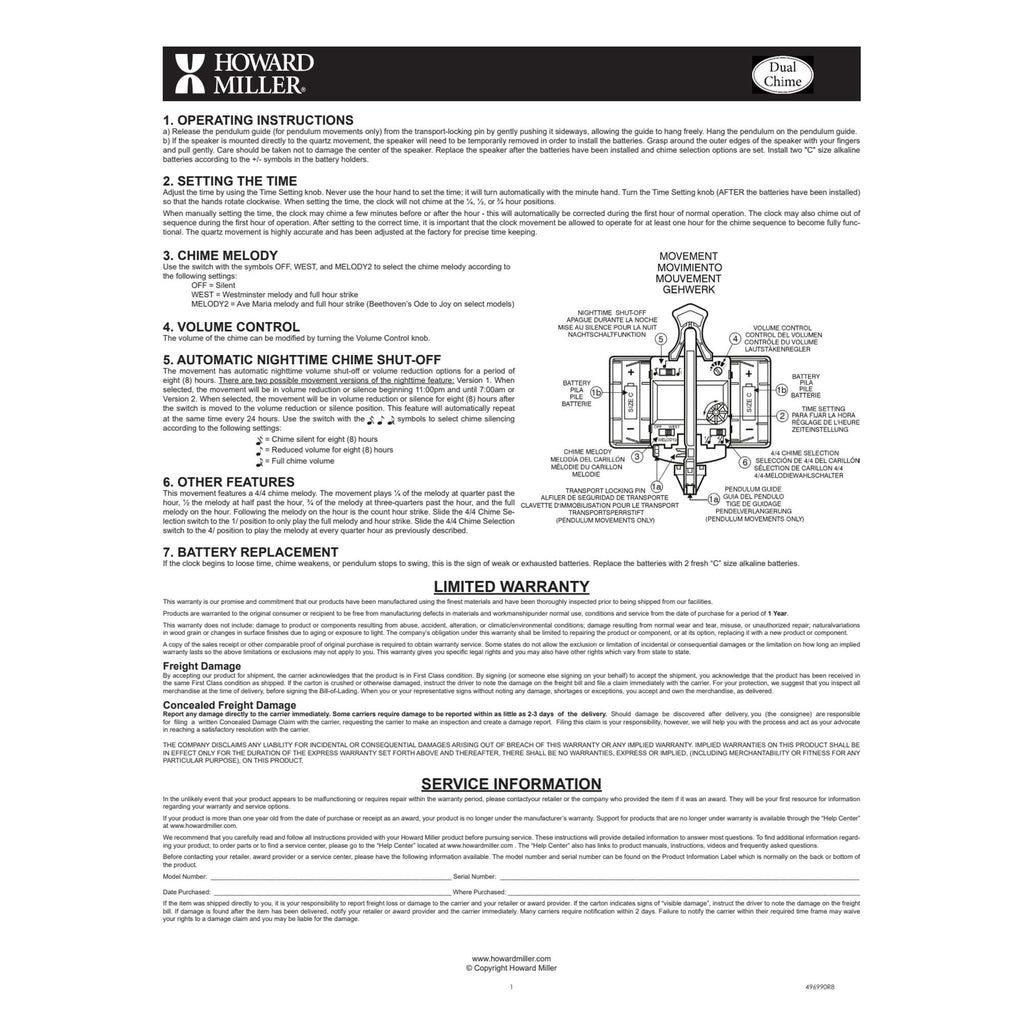
Is your Howard Miller battery clock giving you trouble? Don’t worry, you’re not alone.
Many clock owners face similar issues. Whether your clock has stopped ticking or it’s losing time, these problems can be frustrating. Howard Miller clocks are cherished for their craftsmanship and reliability. Yet, even the best clocks can encounter issues. Understanding common problems and their solutions can help you keep your clock running smoothly.
In this guide, we will walk you through practical troubleshooting tips. These steps are easy to follow and can save you time and money. Let’s get your Howard Miller clock back on track!

Credit: www.premierclocks.com
Common Issues
Howard Miller battery clocks are known for their reliability. But, like any clock, they can have problems. Here, we discuss some common issues and how to fix them.
Clock Not Running
Sometimes, the clock may stop running. This can happen due to several reasons:
- Dead Battery: Check if the battery is dead. Replace it with a new one.
- Battery Position: Ensure the battery is properly inserted. The “+” and “-” sides should align correctly.
- Dirty Contacts: Clean the battery contacts with a dry cloth. Dirt can prevent good contact.
- Mechanical Issues: Listen for ticking sounds. If there is none, the movement might be faulty.
Inaccurate Timekeeping
Sometimes, the clock may show the wrong time. Here are some reasons why:
- Low Battery: A weak battery can cause incorrect time. Replace it with a new one.
- Clock Hands: Make sure the clock hands are not touching each other. This can cause them to stick.
- Resetting the Time: Reset the time by turning the clock hands clockwise. Never turn them counter-clockwise.
- Environmental Factors: Extreme temperatures can affect timekeeping. Place the clock in a stable environment.
By following these simple steps, you can troubleshoot most issues with your Howard Miller battery clock. Always keep your clock clean and check the battery regularly.

Credit: howardmiller.com
Battery Problems
Howard Miller battery clocks are reliable. But, they can face issues. Battery problems are common. This guide helps you solve them.
Incorrect Battery Placement
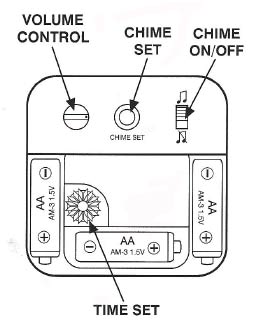
Check the battery placement first. The battery must be in the right position. The positive and negative ends should match the symbols inside the compartment. If the battery is inserted wrong, the clock won’t work. Fixing this is simple and quick.
Dead Or Weak Batteries
A dead or weak battery can cause problems. Clocks need strong batteries to run smoothly. Replace old batteries with new ones. Use fresh, high-quality batteries for the best results. If the clock still doesn’t work, the issue might be elsewhere.
Checking Connections
Checking connections is a crucial step in troubleshooting your Howard Miller battery clock. This simple check can often solve many issues. Ensure your clock functions correctly by focusing on the connections.
Loose Battery Contacts
Start by inspecting the battery contacts. Loose contacts can cause intermittent power issues. Gently press the contacts to ensure they touch the battery ends. This ensures a solid connection. If they seem loose, adjust them carefully. Use a small tool to bend the contacts slightly inward. This will improve the connection.
Corroded Terminals
Corroded terminals can also prevent your clock from working. Check for any white or greenish build-up on the terminals. This build-up is corrosion and can block the electrical flow. Clean the terminals using a cotton swab and vinegar. Rub gently until the corrosion is gone. Dry the terminals thoroughly before inserting a new battery.
Regular maintenance of these connections ensures your Howard Miller clock runs smoothly. Simple checks and cleaning can make a big difference. Keep your clock ticking without interruptions.
Resetting The Clock
If your Howard Miller battery clock is not showing the correct time, you might need to reset it. Resetting the clock can be simple and can ensure your clock functions accurately. Below, we will guide you through both manual and electronic reset procedures.
Manual Reset Steps
To manually reset your Howard Miller battery clock, follow these steps:
- Remove the clock from the wall or stand.
- Open the battery compartment and remove the batteries.
- Wait for at least 10 minutes before reinserting the batteries.
- Reinsert the batteries ensuring the correct polarity.
- Set the time using the time-setting knob or buttons.
After completing these steps, your clock should be reset and show the correct time.
Electronic Reset Procedures
For clocks with electronic settings, follow these electronic reset procedures:
- Locate the reset button on the back of the clock.
- Press and hold the reset button for 5 seconds.
- Release the button and wait for the clock to reset.
- Use the time-setting buttons to adjust the time.
Make sure to follow these steps carefully to ensure your clock resets properly.
Cleaning And Maintenance
Keeping your Howard Miller battery clock in top condition requires regular cleaning and maintenance. This helps ensure accuracy and longevity. Below are essential tips on maintaining your clock, focusing on dust removal and lubrication.
Dust And Debris Removal
Dust and debris can affect your clock’s performance. Cleaning these elements is crucial. Use a soft cloth to wipe the outer surfaces. For tight spots, use a soft brush. Avoid using water or harsh chemicals. These can damage the clock’s delicate parts.
For the interior, open the clock carefully. Use a can of compressed air to blow out dust. Hold the can upright to avoid moisture release. Clean the battery contacts gently. This ensures a good connection. Dust buildup can cause battery issues.
Lubrication Tips
Proper lubrication keeps your clock running smoothly. Use a light, high-quality oil. Apply a small amount to the moving parts. Avoid over-lubricating. Excess oil can attract more dust.
- Lubricate the gears sparingly.
- Focus on the pivot points.
- Check for signs of wear and tear.
Regular lubrication reduces friction. This extends the life of your clock. Remember to check the manufacturer’s guide for specific instructions.
| Component | Cleaning Method |
|---|---|
| Exterior | Soft cloth, soft brush |
| Interior | Compressed air, gentle brushing |
| Gears | Light oil, minimal application |
Environmental Factors
When troubleshooting your Howard Miller battery clock, considering environmental factors is essential. These factors can significantly affect your clock’s performance and accuracy. Understanding and mitigating these environmental influences can help keep your clock running smoothly.
Temperature And Humidity
Temperature and humidity levels can impact your clock. Extreme temperatures can cause the battery to lose power faster. High humidity can lead to internal corrosion, which affects the clock’s mechanism.
To ensure optimal performance, keep your clock in a room with stable temperature and humidity. Avoid placing the clock near windows, heaters, or air conditioners. Consistent conditions help maintain battery life and accuracy.
Magnetic Interference
Magnetic interference is another factor to consider. Devices with strong magnetic fields can disrupt your clock’s operation. These devices include speakers, radios, and even some electronic appliances.
Keep your clock away from these sources of interference. This will help ensure the clock operates without disruptions. If you notice erratic behavior, check for nearby magnetic fields.
By addressing these environmental factors, you can help your Howard Miller battery clock perform at its best. Regularly monitor the surroundings and make adjustments as needed.
Replacement Parts
Howard Miller battery clocks are known for their reliability. But over time, some components may need replacement. Ensuring you get the right parts is crucial. This section will guide you through sourcing and installing replacement parts.
Sourcing Compatible Parts
Finding the right parts for your Howard Miller battery clock is essential. Below are key tips:
- Check the Model Number: Always start with your clock’s model number. It’s usually found on the back or bottom of the clock.
- Visit Official Howard Miller Website: The official website offers a range of replacement parts. Use their search feature to find your specific model.
- Authorized Dealers: Purchase from authorized dealers to ensure compatibility. They often have a wider selection of parts.
- Online Marketplaces: Websites like eBay or Amazon may have what you need. Read reviews and check seller ratings before buying.
Installing New Components
Once you have the right parts, the next step is installation. Follow these steps for a smooth process:
- Gather Tools: You’ll need a screwdriver, pliers, and possibly a small hammer.
- Remove Old Parts: Carefully unscrew and remove the old components. Keep screws and small parts in a safe place.
- Install New Parts: Place the new components in the same position as the old ones. Secure them with screws.
- Test the Clock: Insert new batteries and set the time. Ensure the clock runs smoothly.
Proper installation ensures your clock works like new. Regular maintenance can extend its life.

Credit: clocks-blog.theclockdepot.com
Professional Help
Even the best battery clocks can encounter issues. When DIY methods fail, it may be time to seek professional help. Expert technicians can diagnose and fix complex problems, ensuring your Howard Miller clock works perfectly again.
When To Seek Expert Assistance
Not all clock issues are easy to fix at home. Sometimes, you need a professional. Here are a few signs:
- The clock doesn’t run at all, even with new batteries.
- The hands don’t move correctly, despite adjustments.
- The chimes are off or not working.
- Visible damage to the clock mechanism.
These issues often require specialized tools and knowledge. Attempting to fix them yourself could cause more harm.
Finding A Qualified Technician
Finding a good technician is crucial for clock repair. Here are some tips to help you:
- Check online reviews and ratings of local repair shops.
- Ask for recommendations from friends or family.
- Visit the Howard Miller website for a list of authorized repair centers.
It’s important to verify the technician’s experience with Howard Miller clocks. This ensures they have the specific skills needed for quality repair.
Don’t hesitate to ask questions about their experience and warranty on repairs. A good technician will be transparent and provide detailed information.
Frequently Asked Questions
Why Is My Howard Miller Battery Clock Not Working?
Check the battery first. Replace if needed. Ensure it’s inserted correctly.
How Do I Reset A Howard Miller Clock?
Remove the battery. Wait 10 seconds. Reinsert the battery. Set the time.
What Type Of Battery Does A Howard Miller Clock Use?
Most use AA batteries. Check your clock’s manual for specific details.
How Can I Fix A Slow Howard Miller Clock?
Replace the battery. Clean the clock hands. Adjust the time setting.
Why Is My Howard Miller Clock Making A Ticking Noise?
This is normal. If too loud, place the clock in a quieter area.
Conclusion
Fixing your Howard Miller battery clock can be simple. Follow the steps above. Regular maintenance helps too. Replace batteries and clean the clock often. Check the user manual for specific issues. Don’t hesitate to contact customer service if needed. A working clock keeps your home on time.
Troubleshooting saves money and time. Enjoy your reliable Howard Miller clock. Happy timekeeping!


