Is your Hunter PGV valve giving you trouble? You’re not alone.
These irrigation valves are built to last, but like any device, they can sometimes act up. Whether it’s a leak, low water pressure, or a valve that just won’t turn on, it can be frustrating when your sprinkler system isn’t working the way it should.
The good news? Most issues are fixable, and you don’t need to be a plumbing expert to troubleshoot them. In this guide, we’ll walk you through simple, step-by-step solutions to get your Hunter PGV valve back in action. If you’re tired of wasting water, dealing with uneven irrigation, or just feeling overwhelmed by the problem, stick around. You’ll gain the confidence to tackle the issue head-on and restore your system to peak performance. Let’s get started!
Common Issues With Hunter Pgv Valves
Hunter PGV valves are reliable, but they can develop issues over time. Regular wear, improper installation, or debris can cause malfunctions. Understanding common problems helps identify and resolve them quickly.
Below are some frequent issues users encounter with Hunter PGV valves.
Valve Not Opening
A valve that won’t open might block water flow to your sprinklers. This issue is often caused by a faulty solenoid or debris inside the valve. Inspect the solenoid for damage or loose wires. Clean the valve to remove dirt or debris. Also, check if the controller is sending power to the valve.
Valve Not Closing
If the valve doesn’t close, water might continuously flow through the system. This can waste water and increase bills. A damaged diaphragm or stuck debris is a common cause. Disassemble the valve and inspect the diaphragm for tears. Remove any debris and reassemble the valve securely.
Leaking Water
Leaks can occur around the valve or from the connections. This might be due to loose fittings or worn-out seals. Tighten all connections using the correct tools. Replace any damaged seals or O-rings to stop leaks. Ensure the valve is properly seated in its housing.
Low Water Pressure
Low pressure could affect the performance of your irrigation system. The issue may stem from a partially clogged valve or low incoming water supply. Clean the valve to remove blockages. Check your main water supply for adequate pressure. Ensure the valve size matches your system’s requirements.
Tools Needed For Troubleshooting
When your Hunter PGV valve is acting up, troubleshooting can save you time and money. But having the right tools in your toolbox is crucial. Without them, even the simplest fixes can become frustrating. Let’s dive into the essentials you’ll need to troubleshoot effectively.
Multimeter
A multimeter is your best friend when diagnosing electrical issues with the valve. Use it to test the solenoid’s voltage and continuity. If the solenoid isn’t receiving power, your valve won’t operate. A quick check with the multimeter can pinpoint the problem.
Flathead And Phillips Screwdrivers
Screwdrivers are essential for accessing parts of the valve. A flathead helps with opening the valve lid, while a Phillips screwdriver is handy for removing screws from the solenoid. Keep both types on hand to cover all bases.
Needle-nose Pliers
Needle-nose pliers are perfect for gripping and manipulating wires or small parts. If you need to remove or adjust wiring connections, these pliers make the job easier. They’re also great for pulling out stubborn debris stuck in the valve.
Garden Hose Or Bucket
A garden hose or bucket is necessary to flush out the valve during cleaning. Dirt and debris can block the valve’s operation, and a thorough rinse can often solve the issue. Make sure you have water nearby when troubleshooting.
Flashlight
Valves are often located in dark, tight spaces. A flashlight helps you see clearly during troubleshooting. It’s especially useful when inspecting for cracks or leaks in the valve body.
Wire Stripper
If you’re dealing with damaged wiring, a wire stripper is invaluable. It lets you remove insulation cleanly and reconnect wires securely. This tool ensures you maintain proper electrical contact.
Small Brush Or Toothbrush
A small brush helps scrub away dirt and debris from the valve’s components. Use it to clean the diaphragm, solenoid, and other internal parts. A clean valve is less likely to malfunction.
Do you already have some of these tools at home? If not, most are affordable and easy to find at hardware stores. Equipped with the right tools, you’ll troubleshoot your Hunter PGV valve like a pro!
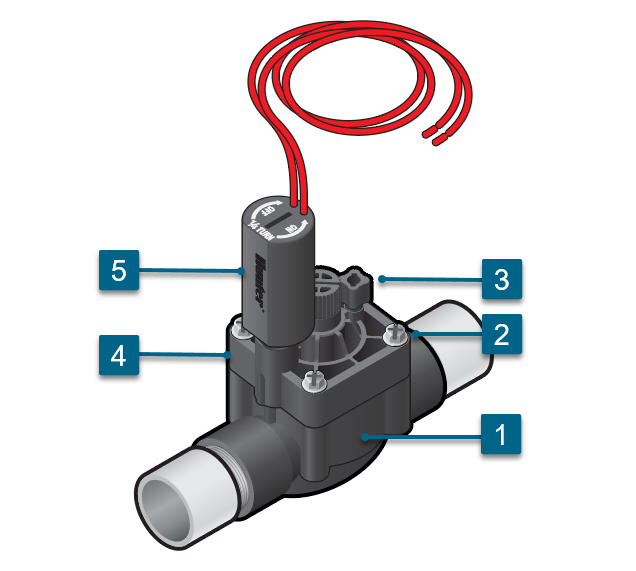
Inspecting The Valve Components
Hunter PGV valves are essential for maintaining an efficient irrigation system. When something goes wrong, inspecting the valve components is a great starting point. Each part of the valve plays a role, and identifying the problem can save you both time and money. Let’s break it down step by step.
Checking The Solenoid
The solenoid is the valve’s electrical heart. If your valve isn’t opening or closing, the solenoid might be the culprit. Start by unscrewing it carefully—no tools are needed, just your hands.
Look for damage like cracks or frayed wires. A common issue is dirt or debris stuck around the plunger. Clean the solenoid gently with a soft cloth, and test its movement by pressing the plunger in and out. Is it sticking? That could be your problem.
If cleaning doesn’t help, consider replacing the solenoid. It’s a simple fix that can make a big difference in restoring your irrigation system’s performance.
Examining The Diaphragm
The diaphragm is what allows the valve to control water flow. If your system is leaking or not shutting off, the diaphragm could be damaged or clogged.
Unscrew the valve lid to access the diaphragm. Inspect it for tears, holes, or wear. Even a tiny puncture can disrupt its function.
Rinse the diaphragm under running water to remove any debris. If you notice visible damage, replace the diaphragm. It’s usually an inexpensive part that’s easy to swap out.
Inspecting The Valve Body
The valve body houses all the components and ensures water flows properly. Over time, it can collect dirt, sediment, or even tiny rocks that block the flow.
After removing the lid and diaphragm, shine a flashlight into the valve body. Do you see any debris or buildup? Clean it thoroughly using a small brush or by flushing it with water.
Check for cracks in the plastic. A cracked valve body will need to be replaced, as it can cause significant leaks. While inspecting, ensure the O-ring is seated properly—it’s a small detail that often gets overlooked.
When was the last time you gave your valve components a close look? Regular inspections can prevent minor issues from turning into costly repairs. Take a few minutes today to check your Hunter PGV valve—it’s worth it.
Fixing Electrical Problems
Fixing electrical problems with your Hunter PGV valve can feel intimidating, but with the right steps, it’s manageable. Electrical issues are often the root cause of malfunctioning valves, and addressing them can save you from bigger headaches down the road. Let’s break down the process into simple, actionable steps to get your irrigation system back on track.
Testing The Power Supply
Before diving into repairs, check if the valve is receiving power. Use a multimeter to measure the voltage at the controller terminals. It should read between 24-28 volts AC.
If there’s no power, inspect the controller itself or ensure it’s plugged in and functional. Sometimes, a tripped circuit breaker or a blown fuse in the controller can be the culprit. Fixing the power supply might be all your valve needs to spring back to life.
Repairing Or Replacing The Solenoid
The solenoid is the heart of your valve’s electrical system. If it’s faulty, the valve won’t open or close properly. Unscrew the solenoid from the valve and test it with a multimeter—look for a resistance reading of 20 to 60 ohms.
A reading outside this range indicates a damaged solenoid. Replace it with a compatible Hunter solenoid, which is an easy and affordable fix. Always screw the new solenoid tightly to avoid leaks or future issues.
Addressing Wiring Issues
Wiring problems are common, especially if your system has been exposed to harsh weather or rodents. Inspect all wires leading to the valve for cuts, frays, or corrosion. Even a small nick can disrupt the electrical flow.
If you find damaged wires, splice them with waterproof connectors to ensure durability. Double-check that all connections are secure and match the color-coded wiring for your Hunter PGV valve. Do you know how much a loose wire can cost in wasted time and water? It’s worth double-checking every connection.
By methodically addressing these electrical issues, you can restore your valve’s functionality without needing expensive repairs or replacements. If you’ve ever been frustrated by a mysteriously malfunctioning sprinkler system, tackling these steps can make you feel like a true irrigation expert.
Clearing Blockages In The Valve
Blockages in your Hunter PGV valve can disrupt water flow and efficiency. Clearing these obstructions is crucial for proper irrigation system performance. Dirt, debris, or build-up inside the valve are common culprits. Regular maintenance and proper cleaning can prevent long-term damage.
This section explains simple steps to remove debris and flush the valve system. These methods ensure your valve operates smoothly without interruptions.
Removing Debris From The Diaphragm
The diaphragm is a key component inside the valve. It controls water flow and pressure. Debris trapped here can lead to leaks or irregular water flow. To clean the diaphragm, turn off the water supply first. Unscrew the valve bonnet carefully and remove the diaphragm.
Inspect the diaphragm for dirt or damage. Wipe it clean using a soft cloth or rinse with water. Be gentle to avoid tearing the material. Once cleaned, reassemble the valve and tighten it securely. Turn the water back on and test the valve for proper function.
Flushing The Valve System
Flushing the valve system removes dirt and particles that block water flow. Start by turning off the water supply. Remove the solenoid or valve bonnet to access the valve chamber. Check for any visible debris inside the chamber.
Run clean water through the valve to flush out particles. You can use a hose or bucket for this step. Ensure all debris is cleared before reassembling the parts. Tighten everything securely and restore the water supply. Test the valve to confirm smooth operation.

Credit: www.youtube.com
Adjusting Water Flow And Pressure
Adjusting the water flow and pressure in a Hunter PGV valve ensures efficient irrigation. It helps maintain even water distribution across your lawn or garden. Understanding how to fine-tune these settings can save water and prevent overwatering. Below, learn how to use the flow control feature and tackle pressure irregularities effectively.
Using The Flow Control Feature
The flow control knob is located on top of the valve. It allows you to adjust the water flow rate manually. Turn the knob clockwise to reduce the flow. This is useful for small zones or areas with low water requirements. Turn it counterclockwise to increase the flow for larger areas.
Make small adjustments and observe the sprinklers. Too much flow can cause misting, leading to water waste. Too little flow may cause incomplete coverage. Ensure a consistent spray pattern for optimal results.
Dealing With Pressure Irregularities
Uneven pressure can affect the performance of the valve. Start by inspecting the water supply. Low pressure may indicate clogged filters or pipes. Clean the filter and check for obstructions in the system.
For high pressure, consider installing a pressure regulator. This device helps maintain a steady pressure level. It prevents damage to the valve and ensures uniform water distribution.
Always monitor the system after adjustments. This ensures the pressure is within the recommended range. Proper pressure management extends the lifespan of your irrigation system.
When To Replace The Valve
The Hunter PGV valve is known for its durability and reliability. However, like all irrigation components, it may wear out over time. Knowing when to replace the valve is crucial for maintaining your irrigation system’s efficiency. Certain signs indicate that the valve has reached the end of its lifespan and needs a replacement.
Signs Of Irreversible Damage
Cracks or breaks in the valve body often signal permanent damage. These can occur due to freezing temperatures or physical impact. If the valve leaks water even after tightening connections, it may be irreparable. Internal components, like the diaphragm, can deteriorate beyond repair. A valve that fails to open or close despite troubleshooting also suggests irreversible damage. Discoloration or corrosion on the valve is another sign it might need replacing.
Choosing A Compatible Replacement
Selecting the right replacement ensures proper function and prevents future problems. Match the valve size with your irrigation system’s pipe diameter. Check the compatibility of the valve with your system’s pressure and flow requirements. Opt for a replacement from Hunter or a trusted brand with similar specifications. Verify that the new valve can integrate with your existing controller and wiring.
Credit: www.hunterirrigation.com
Preventive Maintenance Tips
Preventive maintenance can save you time, money, and frustration when dealing with your Hunter PGV valves. By taking small steps regularly, you can prolong the life of your system and avoid sudden breakdowns. Let’s dive into two key areas: cleaning and inspections, and winter protection.
Regular Cleaning And Inspections
It’s easy to overlook cleaning, but dirt and debris can clog your valves and reduce their efficiency. Make it a habit to inspect the valves every few months. Look for visible dirt buildup, leaks, or signs of wear.
A quick cleaning can make a big difference. Remove the valve cap and rinse it under running water to clear away grime. While you’re at it, check the filter for blockages—it’s often the culprit behind pressure issues.
Don’t wait until you notice problems to act. Regular cleaning keeps your system running smoothly and prevents costly repairs. Are you checking your valves as often as you should?
Protecting The System During Winter
Winter can be tough on irrigation systems. Freezing temperatures can cause water to expand and damage your valves. A little preparation can prevent costly damage.
Start by shutting off the water supply to your irrigation system before the first frost. Drain all water from the pipes and valves to ensure there’s no leftover moisture. This step is critical—trapped water can freeze and crack your components.
Consider using insulated covers for the valves if your system is exposed to the elements. These covers provide extra protection and are easy to install. Have you thought about how winter weather might impact your system?
Preventive maintenance doesn’t have to be complicated. With regular cleaning and winter prep, you can keep your Hunter PGV valves in top condition year-round. Take action now to save yourself headaches later.
Credit: www.hillsirrigation.com.au
Conclusion
Troubleshooting your Hunter PGV valve doesn’t have to feel overwhelming. Start by checking for common issues like debris or wiring problems. Regular maintenance helps avoid bigger problems down the road. Always consult the manual for specific guidance on your model.
If problems persist, reaching out to a professional can save time and effort. Keeping your irrigation system in good shape ensures a healthy, thriving lawn. With these tips, you’ll handle most valve issues with ease. Stay consistent with checks to extend your system’s lifespan.
A little attention now prevents costly repairs later.
")