Is your Insinkerator instant hot water dispenser acting up? Don’t worry—you’re not alone.
These handy devices make life so much easier, but when they stop working, it can feel like a major inconvenience. The good news is, many common issues can be resolved quickly with just a bit of troubleshooting. In this guide, we’ll walk you through simple steps to identify and fix the most frequent problems with your Insinkerator instant hot water dispenser.
Whether you’re dealing with no hot water, odd noises, or leaks, we’ve got you covered. Stick around, because by the end of this article, you’ll have the confidence and know-how to get your hot water dispenser back in action. Ready to save time, frustration, and maybe even some money? Let’s dive in!
Common Issues With Insinkerator Instant Hot Water Dispensers
Common Issues with Insinkerator Instant Hot Water Dispensers
Insinkerator instant hot water dispensers are a convenient addition to any kitchen. However, like any appliance, they can run into issues over time. Understanding these common problems can help you troubleshoot quickly and get your dispenser back to working order.
No Hot Water
If your dispenser isn’t producing hot water, it can be frustrating. Start by checking the power supply. Is the unit plugged in properly, and is the outlet working?
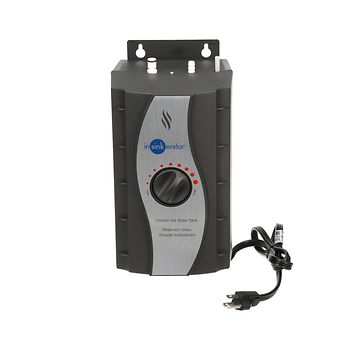
Next, inspect the thermostat. It might be set too low, preventing the water from heating adequately. Adjust the temperature knob and wait to see if that resolves the issue.
Still not working? It could be a faulty heating element. If that’s the case, you might need professional repair or a replacement part.
Water Tastes Strange
Does your hot water have an odd taste? This could be due to mineral buildup inside the tank. Regular cleaning can prevent this from happening.
Mix a solution of vinegar and water and run it through the dispenser. Rinse thoroughly to remove any residue. This simple step can make a noticeable difference in water quality.
If the taste persists, consider checking your water supply. Hard water can impact both the flavor and the health of your dispenser.
Leaking Water
A leaking dispenser can cause unnecessary mess and waste. Check the faucet for drips. Sometimes, tightening the connections can stop the leak.
If the leak is coming from the tank, inspect it for cracks or damage. A worn-out gasket might also be the culprit. Replacing damaged parts can often solve the problem.
Don’t forget to confirm that the water supply line is secure and properly connected. A loose connection could be causing the leak.
Unusual Noises
Hearing strange noises from your dispenser? That’s not normal. Gurgling or bubbling sounds could indicate air trapped in the system.
Try running the faucet to purge the air. If the noise persists, sediment buildup might be the issue. Flushing the tank can help eliminate the problem.
Keep in mind that persistent noises might be a sign of a larger issue. If cleaning doesn’t help, it’s worth consulting a professional.
Water Is Too Hot
If your water is scalding, it’s a safety concern. Check the thermostat setting. It might be turned up too high.
Reduce the temperature gradually and test the water until it reaches a safe level. If adjusting the thermostat doesn’t work, the thermostat might be faulty and need replacing.
Don’t ignore this issue—it’s not only inconvenient but also potentially dangerous, especially if you have children at home.
By addressing these common issues, you can extend the life of your Insinkerator and keep it running smoothly. Always take a moment to inspect the basics before jumping to conclusions. You might be surprised how often the simplest fixes are the most effective.
No Hot Water
Finding that your Insinkerator instant hot water dispenser isn’t delivering hot water can be frustrating. You rely on it for quick coffee, instant soups, or just speeding up kitchen tasks. If your dispenser isn’t heating up, don’t panic—there are simple troubleshooting steps you can take to figure out what’s wrong and fix it.
Checking The Power Connection
Start with the basics. Is your Insinkerator plugged in properly? Sometimes, the plug might get loose or accidentally unplugged during cleaning or other kitchen activities. Double-check that the power cord is securely connected to the outlet.
If the outlet has a reset button, press it and see if the device powers back on. You can also test the outlet with another appliance to ensure it’s working. If the outlet isn’t providing electricity, the issue might be with your kitchen wiring.
Inspecting The Heating Element
The heating element inside your Insinkerator is critical for warming the water. If it’s malfunctioning, you won’t get hot water. Open your unit (refer to your user manual for instructions) and visually inspect the heating element.
Look for signs of damage like corrosion or visible cracks. If you notice anything unusual, the heating element may need replacement. Contact Insinkerator’s customer support or a licensed technician for assistance.
Resetting The Thermostat
Sometimes, the thermostat might trip due to overheating or sudden power surges. Resetting it can bring your hot water dispenser back to normal functioning. Locate the reset button on your unit—it’s usually red and positioned at the bottom or back of the dispenser.
Press and hold the button for a few seconds. If the thermostat was the issue, your unit should start heating again. If it doesn’t, this could indicate a deeper problem requiring professional inspection.
Have you ever had to troubleshoot your Insinkerator? What did you find most challenging? Share your thoughts below!
Water Leaks
Dealing with water leaks from your Insinkerator Instant Hot Water Dispenser can be frustrating. Leaks not only waste water but can also cause damage to your cabinets and countertops if left unchecked. The good news? Most leaks are easy to identify and fix with a little troubleshooting.
Identifying Leak Sources
Start by inspecting the area around your Insinkerator unit. Is the water pooling under the sink or dripping from the faucet? Pinpointing the exact location of the leak will save you time and effort.
Check the connections where the water supply lines meet the unit. Loose connections are a common culprit. If the tank itself is leaking, look for rust or visible cracks—this might mean it’s time for a replacement.
Don’t forget to examine the faucet. A dripping faucet may indicate worn-out washers or seals. Keep a dry paper towel handy while inspecting; it can help you confirm leaks in hard-to-see spots.
Replacing Faulty Valves
A faulty valve can cause persistent leaks. If you notice water leaking from the pressure relief valve, it may be stuck or damaged. Shut off the water supply and remove the valve carefully to inspect it.
Replacement valves are affordable and easy to find at most hardware stores. Make sure to purchase one compatible with your Insinkerator model. After installing the new valve, reconnect everything and turn the water back on to check if the leak is resolved.
Still experiencing leaks? It’s worth checking the thermostat setting. Overheated water can increase pressure, triggering leaks through the valve.
Securing Loose Connections
Loose fittings between the water supply lines and the unit are another common source of leaks. Grab a wrench or pliers and gently tighten these connections. Don’t overtighten—this can damage the threads and make the problem worse.
Use Teflon tape to seal any joints that seem prone to leakage. Wrap the tape around the threaded connections before tightening. This can provide an extra layer of protection against drips.
After securing everything, run the system for a few minutes and check for any signs of moisture. A quick visual check can save you from bigger issues down the line.
Troubleshooting water leaks might feel daunting at first, but each small fix takes you closer to a fully functional dispenser. Have you tackled a leak before? Share your tips and experiences in the comments to help others in the community!
Unusual Noises
Unusual noises from your Insinkerator Instant Hot Water Dispenser can be frustrating. These sounds might signal a minor issue or a sign of maintenance. Addressing them quickly can help avoid more significant problems later. Let’s explore some common causes and solutions below.
Examining Air Trapped In The System
Air trapped in the system can cause strange gurgling sounds. This often happens after installation or a refill. Start by turning off the dispenser and allowing it to cool. Then, run the dispenser for a few minutes to release trapped air. Ensure the water flows smoothly without interruptions. If the noise persists, repeat the process to eliminate all air pockets.
Inspecting The Internal Components
Internal parts can loosen or wear out over time, leading to noises. Disconnect the power before inspecting the system for safety. Check for loose screws or damaged components inside the unit. Tighten any loose parts securely. Replace worn-out components with compatible parts from the manufacturer. Regular checks can prevent unnecessary noise issues.
Cleaning The Dispenser
Buildup of mineral deposits can create grinding or humming sounds. Clean the dispenser regularly to maintain its performance. Use a mixture of water and white vinegar to descale the unit. Turn off the dispenser and let the cleaning solution sit for 15 minutes. Rinse thoroughly with clean water afterward. This simple step can greatly reduce unwanted noises.
Low Water Pressure
Nothing disrupts your kitchen flow like low water pressure from your Insinkerator instant hot water system. You turn the handle expecting a steady stream, but instead, you’re met with a weak trickle. Before you start worrying about expensive repairs, let’s walk through some simple troubleshooting steps that could save you time and frustration.
Clearing Clogged Filters
Filters can easily get clogged with sediment or debris, especially if your home has hard water. Over time, this buildup restricts water flow and causes low pressure.
Start by locating the filter near the water tank or faucet. Carefully remove it and rinse it under running water to clear out any visible debris.
If the filter looks damaged or overly clogged, it’s worth replacing it. A clean filter can work wonders for restoring proper water pressure.
Checking For Blocked Lines
Blocked water lines are another common culprit of low pressure. Even small particles can obstruct the flow inside the tubing.
Disconnect the water lines and inspect them closely. If you spot any blockages, use a small brush or compressed air to remove them.
A quick flush with water can also help clear out buildup. Don’t forget to reconnect everything securely once you’re done.
Testing The Water Supply Valve
Sometimes, low pressure is simply a result of the water supply valve not being fully open. It’s an easy fix but often overlooked.
Locate the supply valve, typically found under the sink, and check if it’s fully open. Turn it counterclockwise to ensure maximum flow.
If the valve still doesn’t solve the issue, it might be faulty. Consider replacing it to eliminate any doubt about its performance.
Have you ever thought about how much time you lose waiting for hot water when the pressure is low? A few minutes of troubleshooting today can save you endless frustration tomorrow. Take a proactive approach, and your Insinkerator will thank you with smooth, reliable performance.

Credit: www.youtube.com
Water Temperature Issues
Water temperature issues in your Insinkerator Instant Hot Water Dispenser can be frustrating. Whether the water feels lukewarm or excessively hot, addressing the problem is essential. Common causes include incorrect thermostat settings, sediment accumulation, or a faulty heating element. Understanding these factors can help restore your dispenser’s performance.
Adjusting The Thermostat Settings
The thermostat controls your dispenser’s water temperature. Start by checking its current setting. Locate the adjustment dial, usually found beneath the dispenser. Turn it slightly towards the hotter or cooler direction, depending on your needs. Allow a few minutes for the water to stabilize at the new temperature. Test the water to ensure it’s at the desired level. Avoid turning the dial too far, as this could damage the unit.
Inspecting The Tank For Sediment Build-up
Over time, minerals from water can accumulate inside the tank. This sediment build-up can reduce heating efficiency and affect water temperature. Disconnect the unit from the power supply before inspecting the tank. Drain all water from the dispenser and remove the tank cover. Look for any visible debris or build-up inside. Clean the tank gently using a soft cloth and mild vinegar solution. Rinse thoroughly to remove all residue before reassembling the unit.
Replacing The Heating Element
A faulty heating element can cause inconsistent water temperatures. To check this, unplug the dispenser and let it cool down. Open the unit to access the heating element, usually located near the tank’s base. Inspect it for visible damage like cracks or corrosion. If damaged, replace it with a compatible part from the manufacturer. Follow the user manual for proper replacement steps. Ensure all connections are secure before testing the unit again.
Foul Odors Or Taste
Experiencing foul odors or strange tastes from your Insinkerator Instant Hot system can be frustrating. These issues often stem from residue buildup, old filters, or stagnant water. Addressing the problem promptly ensures your system delivers clean and refreshing hot water.
Flushing The System
Flushing the system removes trapped particles and old water that may cause bad smells or tastes. Turn off the unit and disconnect the power. Open the faucet to drain the water fully. Fill the tank with fresh water, reconnect the power, and let it heat. Drain and refill the tank a few times to clear any lingering residue.
Replacing The Filter Cartridge
A worn-out filter can affect the water’s taste and smell. Locate the filter cartridge and remove it by twisting or unlocking it. Install a new cartridge by following the manufacturer’s instructions. Ensure it fits securely to prevent leaks. Replacing the filter regularly keeps the water fresh and odor-free.
Cleaning The Tank
The tank can accumulate mineral deposits and bacteria over time. Turn off the system and unplug it. Drain the tank completely using the faucet. Use a soft cloth and a mild cleaning solution to wipe the interior. Avoid abrasive cleaners to prevent damage. Rinse thoroughly to remove cleaning residue before refilling the tank.

Credit: www.homedepot.com
Maintenance Tips For Long-term Performance
Regular maintenance can extend the life of your Insinkerator Instant Hot system. Simple care routines also help prevent unexpected issues and improve efficiency. Follow these maintenance tips to ensure smooth operation for years.
Regular Cleaning Schedule
Clean the system regularly to prevent mineral buildup and debris. Use a soft cloth to wipe the exterior and any accessible parts. Avoid harsh chemicals that may damage internal components. Flushing the unit occasionally with clean water can keep it running smoothly.
Inspecting Parts For Wear And Tear
Inspect parts for signs of wear or damage. Look for leaks around the faucet or tank. Check for corrosion on metal components. Replace worn-out parts immediately to avoid bigger problems. Regular inspections ensure the system stays in optimal condition.
Replacing Filters Periodically
Replace filters as recommended by the manufacturer. Clogged filters can reduce water flow and affect taste. Mark filter replacement dates on your calendar for consistency. Use high-quality filters for better performance and longer life.

Credit: www.insinkerator.com
Conclusion
Troubleshooting your Insinkerator instant hot water system doesn’t have to be difficult. Start with basic checks like power supply and water flow. Clean filters and inspect for leaks to ensure proper function. Regular maintenance helps prevent common issues and extends the unit’s life.
If problems persist, consider consulting the user manual or contacting customer support. A well-maintained system ensures hot water is always ready when you need it. Take small steps to keep your Insinkerator running smoothly and efficiently. A little care goes a long way in avoiding future headaches.


