Irrigation systems rely on solenoid valves for proper water flow. When these valves malfunction, it can disrupt your entire irrigation setup.
Understanding the basics of irrigation solenoid valve troubleshooting can save you time and money. These small devices control water flow in your irrigation system. A malfunction can lead to dry patches or overwatered areas in your garden. Common issues include valve not opening, leaks, or electrical problems.
Knowing how to diagnose and fix these problems is essential. This guide provides simple steps to identify and resolve common valve issues. With the right approach, you can ensure your irrigation system runs smoothly. Stay tuned to learn practical tips for keeping your garden healthy and well-watered.

Credit: tameson.com
Common Issues
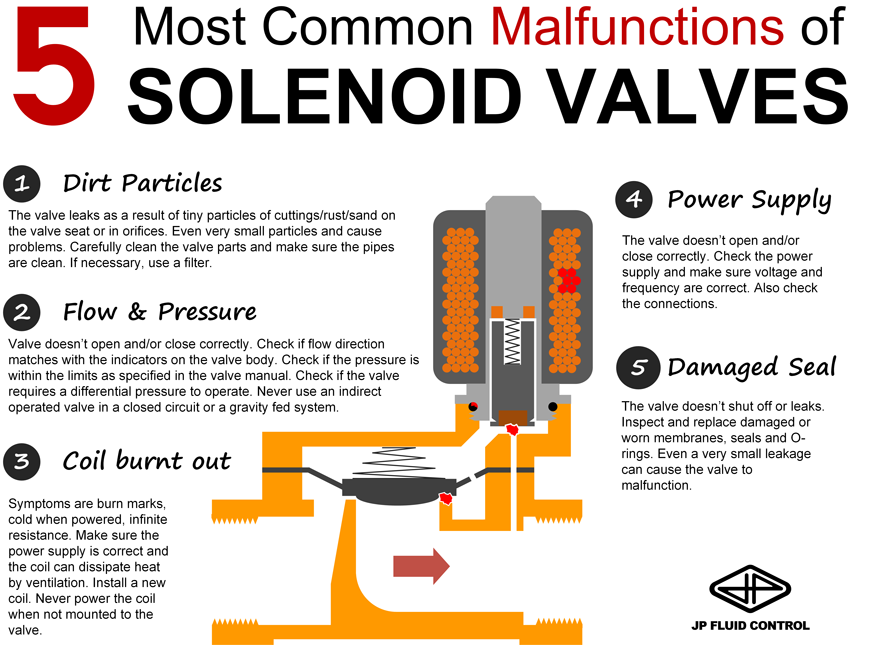
Irrigation solenoid valves are essential for efficient water management. Yet, like any mechanical device, they can face issues. Knowing common problems helps in maintaining your irrigation system. Here, we discuss the two most frequent issues: Valve Not Opening and Valve Not Closing.
Valve Not Opening
A valve that does not open can disrupt the entire irrigation process. Here are some common causes:
- Power Supply Issues: Check if the valve is receiving power. Use a voltmeter to test the solenoid.
- Clogged Valve: Dirt and debris can block the valve. Clean the valve thoroughly.
- Faulty Solenoid: Sometimes, the solenoid itself is defective. Replace it if necessary.
- Manual Override: Ensure the manual override is not engaged. It can prevent the valve from opening.
Addressing these issues can help restore normal function. Always start with the simplest solutions first.
Valve Not Closing
A valve that does not close can waste water and damage plants. Common causes include:
- Debris in Valve: Dirt can prevent the valve from sealing properly. Clean the valve to remove any debris.
- Damaged Diaphragm: The diaphragm can wear out or tear over time. Inspect and replace if needed.
- Electrical Problems: Ensure there is no continuous electrical signal keeping the valve open. Test the controller and wiring.
- Pressure Issues: Low water pressure can cause the valve to stay open. Check the pressure levels.
Quickly identifying and solving these problems ensures efficient irrigation. Regular maintenance can prevent many of these issues.
| Problem | Possible Causes | Solution |
|---|---|---|
| Valve Not Opening | Power Supply, Clogged Valve, Faulty Solenoid, Manual Override | Check Power, Clean Valve, Replace Solenoid, Disable Manual Override |
| Valve Not Closing | Debris in Valve, Damaged Diaphragm, Electrical Problems, Pressure Issues | Clean Valve, Replace Diaphragm, Test Controller, Check Pressure |
Basic Tools Needed
When dealing with irrigation solenoid valve troubleshooting, having the right tools is essential. A basic toolset helps identify and fix common issues quickly. This section covers the basic tools needed, focusing on the essential screwdriver set and the multimeter.
Screwdriver Set
A reliable screwdriver set is crucial for irrigation solenoid valve troubleshooting. Different valves may require different types of screwdrivers. Here are a few key points:
- Phillips screwdrivers for cross-head screws.
- Flathead screwdrivers for straight-head screws.
- Hex or Allen wrenches for specialized screws.
Using the correct screwdriver prevents stripping screws and ensures proper handling. Consider a set with ergonomic handles for better grip and control.
Multimeter
A multimeter is an essential tool for electrical troubleshooting. It measures voltage, current, and resistance. Here’s why it’s important:
- Check voltage to ensure the valve receives power.
- Measure resistance to test the coil.
- Identify continuity to detect open circuits.
Using a multimeter helps diagnose electrical issues accurately. It’s a versatile tool that ensures your irrigation system works efficiently.
To sum up, a screwdriver set and a multimeter are indispensable. They help with quick and effective troubleshooting of irrigation solenoid valves.
Initial Checks
Before diving into complex solutions, start with basic checks. These initial steps often resolve many issues with irrigation solenoid valves. Let’s go through the primary checks: power supply and wiring connections.
Power Supply
First, ensure the solenoid valve receives power. Check the power source for any disruptions. Use a multimeter to verify the voltage. The reading should match the valve’s requirements. If the power supply is faulty, the valve won’t function.
Wiring Connections
Next, inspect the wiring connections. Loose or damaged wires can cause problems. Ensure all wires are securely connected. Look for signs of wear or damage. Replace any faulty wires immediately. Proper connections ensure the valve operates smoothly.
Cleaning The Valve
Regular maintenance of your irrigation solenoid valve ensures efficient operation. Cleaning the valve is a crucial part of this process. Over time, dirt and debris can accumulate, causing the valve to malfunction. This guide will help you clean the valve effectively.
Debris Removal
First, turn off the water supply to the irrigation system. This prevents any accidental flooding. Next, locate the solenoid valve and remove the top cover. You may need a screwdriver for this step.
Once the cover is off, inspect the valve for debris. Small stones, dirt, and plant material often get stuck inside. Use a soft brush or cloth to gently remove any visible debris. Be thorough but careful not to damage any components.
For stubborn debris, a gentle rinse with water can help. Avoid using any harsh chemicals. They can damage the valve’s material. After cleaning, reassemble the valve and secure the cover tightly.
Cleaning Solenoid
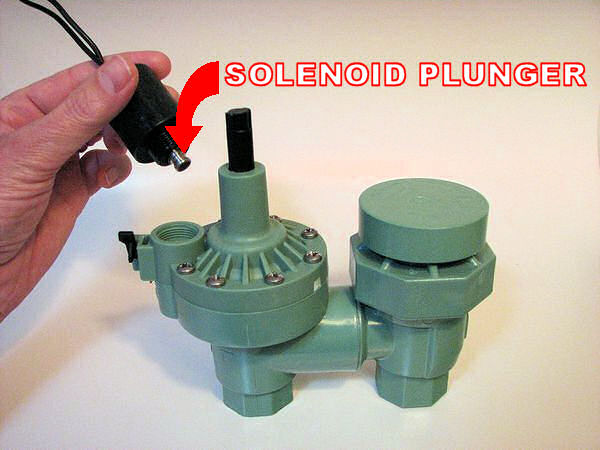
The solenoid is a key part of the valve. It controls the water flow. To clean it, first unscrew the solenoid from the valve body. Inspect it for any dirt or grime.
Use a damp cloth to wipe the solenoid clean. Ensure you remove all dirt. A toothbrush can help clean hard-to-reach areas. If the solenoid has any rust, consider replacing it. Rust can impede its function.
After cleaning, reattach the solenoid to the valve body. Make sure it is tightly secured. Test the valve by turning on the water supply. Check for any leaks or irregularities.
Regular cleaning of the solenoid valve can extend its life. It ensures your irrigation system runs smoothly. Keep a regular maintenance schedule to avoid major issues.
Testing The Solenoid
Testing the solenoid valve in your irrigation system is crucial. It helps ensure the system operates smoothly. A faulty solenoid can lead to many issues. These include water not flowing or the system not turning on. Below, we will cover methods to test the solenoid.
Using A Multimeter
First, you need a multimeter to check the solenoid. Set the multimeter to the resistance (ohms) setting. Follow these steps:
- Turn off the power supply to the irrigation system.
- Locate the solenoid on the valve.
- Disconnect the wires from the solenoid.
- Connect the multimeter probes to the solenoid terminals.
Read the multimeter display. A functioning solenoid usually reads between 20-60 ohms. If the reading is outside this range, the solenoid may be faulty. Replace it if necessary.
Manual Activation
Manual activation is another way to test the solenoid. This method helps you see if the valve responds to commands. Follow these steps:
- Locate the manual bleed screw or lever on the valve.
- Turn the screw or lever to the “on” position.
- Observe if water flows through the valve.
- Return the screw or lever to the “off” position.
If water flows when manually activated, the valve works. If not, check for blockages or replace the solenoid.
Testing the solenoid is essential for a healthy irrigation system. Use these methods to keep your system running smoothly.
Replacing The Solenoid
Replacing the solenoid in your irrigation system can seem daunting. With simple steps, you can easily handle it. Follow the guide below to replace the solenoid successfully.
Removing Old Solenoid
First, turn off the water supply. Locate the valve box and open it. Identify the solenoid that needs replacement. Unscrew the solenoid carefully. Disconnect the wires attached to the solenoid. Take note of how the wires are connected for the new solenoid.
Installing New Solenoid
Unpack the new solenoid. Check it for any damage. Align the new solenoid with the valve body. Screw the new solenoid into place. Reconnect the wires according to your notes. Make sure the connections are secure. Turn the water supply back on. Test the new solenoid to ensure it works properly.
Checking For Leaks
Ensuring your irrigation solenoid valve is leak-free is critical. Leaks can cause water waste and damage. Here are steps to help you check for leaks effectively.
Inspecting Seals
The seals in your solenoid valve are crucial for preventing leaks. Follow these steps to inspect them:
- Turn off the water supply.
- Remove the solenoid valve.
- Check the seals for any visible damage or wear.
- Feel the seals with your fingers to detect any tears or rough spots.
If the seals are damaged, replace them with new ones. This ensures a tight seal and prevents leaks.
Tightening Fittings
Loose fittings can cause leaks. Check and tighten them to stop leaks:
- Locate the fittings on your solenoid valve.
- Use a wrench to tighten each fitting.
- Be careful not to over-tighten, which can cause damage.
After tightening, turn the water supply back on and check for leaks again. Properly tightened fittings ensure your system runs smoothly.
| Step | Description |
|---|---|
| Turn off water | Prevent water flow before inspection |
| Inspect seals | Look for visible damage or wear |
| Feel seals | Check for tears or rough spots |
| Replace seals | Use new seals if damaged |
| Locate fittings | Find all fittings on the valve |
| Tighten fittings | Use a wrench to tighten |
| Check for leaks | Turn water on and observe |
By following these steps, you can effectively check for leaks in your irrigation solenoid valve. This ensures efficient water usage and prevents potential damage.

Credit: www.youtube.com
Preventive Maintenance
Preventive maintenance is key to ensuring your irrigation solenoid valves work efficiently. Regular care can prevent costly repairs and ensure your system runs smoothly. By conducting routine inspections and seasonal maintenance, you can extend the life of your irrigation system.
Regular Inspections
Regular inspections are crucial for the longevity of your irrigation solenoid valves. Check for any visible wear and tear. Look for signs of leakage around the valve. A small leak can turn into a bigger problem if not addressed.
Inspect the electrical connections. Ensure that wires are securely connected. Loose connections can cause the valve to malfunction. Use a multimeter to check the voltage. The correct voltage is vital for the valve to operate correctly.
Test the valve manually. Turn it on and off to see if it responds properly. If the valve does not open or close fully, it may need cleaning or replacement.
Seasonal Maintenance
Seasonal maintenance is essential to prepare your irrigation system for different weather conditions. Before winter, drain the system. Remove any water to prevent freezing, which can damage the valves.
In spring, inspect the valves for any damage caused by cold weather. Clean the valves to remove any dirt or debris. Debris can clog the valves and affect their performance.
Lubricate the valve components. Proper lubrication ensures smooth operation. Check the valve settings and adjust them for the new season.
By following these preventive maintenance tips, you can keep your irrigation solenoid valves in top condition. Regular inspections and seasonal maintenance are simple steps that go a long way in ensuring the efficiency of your irrigation system.

Credit: irrigationtutorials.com
Frequently Asked Questions
What Causes An Irrigation Solenoid Valve To Fail?
Several reasons can cause failure. Common ones include dirt blockage, electrical issues, or worn-out parts.
How Do I Test An Irrigation Solenoid Valve?
Use a multimeter to check resistance. If the reading is out of range, the solenoid might be faulty.
Can A Solenoid Valve Be Repaired?
Yes, some issues like dirt blockage can be fixed. Others might require replacing the solenoid or valve.
Why Is My Solenoid Valve Not Closing?
This can be due to debris in the valve, a damaged diaphragm, or electrical problems.
How Often Should Irrigation Solenoid Valves Be Maintained?
Regular inspection twice a year is good. Clean and check for any signs of wear or damage.
Conclusion
Solving issues with irrigation solenoid valves ensures a well-functioning system. Always start by checking the basics. Clean and replace parts as needed. Regular maintenance prevents many problems. A reliable irrigation system saves water and money. Follow these tips for a hassle-free garden.
Troubleshooting becomes easier with practice. Keep your garden healthy and green. Enjoy the benefits of a well-maintained irrigation system. Thank you for reading!


