Is your irrigation system not working the way it should? Maybe some zones won’t turn on, or you notice dry patches in your lawn despite running the sprinklers.
These issues can be frustrating, especially when you rely on your irrigation system to keep your garden green and healthy. But don’t worry—you don’t have to call a professional right away. With a little guidance, you can troubleshoot common irrigation problems yourself and save time and money.
You’ll discover simple, step-by-step tips to identify and fix the most frequent issues with your system. Keep reading to take control of your irrigation and enjoy a thriving yard all season long.
Credit: sportsfieldmanagementonline.com
Common Irrigation Problems
Irrigation systems often face common problems that reduce their efficiency. These issues can waste water and harm your plants. Knowing these problems helps you fix them quickly. Here are the most frequent irrigation troubles you may see.
Broken Sprinkler Heads
Sprinkler heads can crack or break from impact or weather. Broken heads cause uneven watering or dry patches. Check for missing or damaged nozzles. Replace or repair them to restore proper spray patterns.
Leaks Near Valves
Leaks around valves waste water and increase your bill. Dirt or debris can prevent valves from closing tightly. Inspect valves for cracks or worn seals. Tighten connections and replace faulty parts to stop leaks.
Unresponsive Zones
Some irrigation zones may not turn on at all. This happens due to electrical issues or valve problems. Test the wiring and solenoids with a multimeter. Fix broken wires or replace defective valves to reactivate zones.
Low Water Pressure
Low pressure reduces sprinkler reach and coverage. Clogged filters or pipes often cause this issue. Clean filters and remove blockages in pipes. Also, check your main water supply for restrictions or leaks.
Incorrect Sprinkler Height
Sprinkler heads set too high or low affect watering patterns. Too low heads get damaged by lawn mowers or foot traffic. Too high heads cause water to drift in the wind. Adjust sprinkler height to match the landscape for best results.
:max_bytes(150000):strip_icc()/irrigation-troubleshooting-bad-valve-symptoms-2718892-07-593cf88e8ed243efb5f5d9fdb3bcd198.jpg)
Credit: www.thespruce.com
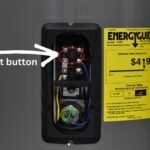
Signs Of Solenoid Issues
Testing solenoids with a multimeter is a key step in irrigation system troubleshooting. Solenoids control water flow in sprinkler valves. A multimeter helps check their electrical function. This testing detects faults that cause zones not to activate or stop watering.
Using a multimeter is simple and fast. It measures voltage and resistance to find problems. This section explains how to test solenoids clearly and safely.
Checking Controller Power
First, verify the irrigation controller supplies power to the solenoid. Turn off the controller before disconnecting wires. Set the multimeter to AC volts. Connect the probes to the solenoid wires. The multimeter should show voltage when the zone is active. No voltage means a controller or wiring issue.
Measuring Solenoid Resistance
Next, test the solenoid coil resistance. Set the multimeter to ohms (Ω). Touch the probes to the solenoid wires. A normal solenoid reads between 20 and 60 ohms. Infinite or zero resistance indicates a broken or shorted coil. Replace the solenoid if readings are outside this range.
Identifying Faulty Readings
Watch for unstable or fluctuating resistance values. These suggest a bad solenoid or loose connections. Also, check for no voltage at the solenoid when the controller calls for watering. This points to wiring faults. Consistent, correct readings mean the solenoid works properly.
Testing Solenoids With A Multimeter
Manual solenoid tests help find irrigation system problems fast. These tests check if the solenoid valve works properly. A solenoid controls water flow to sprinkler zones. When it fails, watering stops or leaks happen.
Testing manually shows if the solenoid opens or closes the valve. It avoids guesswork and saves time. Two main steps include using the manual bleed screw and watching water flow. Both are simple and need no special tools.
Using Manual Bleed Screw
Start by finding the manual bleed screw on the solenoid valve. Turn it slowly to open the valve by hand. Water should flow through the valve once the screw opens.
This step confirms the valve can open mechanically. If water flows, the valve is not stuck. The problem might be electrical or with the solenoid coil. If no water comes out, check for clogs or broken parts inside the valve.
Observing Water Flow
After opening the bleed screw, watch the water flow carefully. Steady water means the valve opens well. Weak or no flow shows a blockage or damage inside the valve.
Strong water flow also means the solenoid is controlling the valve correctly. If water flows without power, the solenoid may be stuck open. This causes water waste and soggy lawn areas.
Manual solenoid tests help fix irrigation issues quickly. They show if valves work and guide what to repair next.

Credit: www.youtube.com
Manual Solenoid Tests
Sprinkler heads play a crucial role in watering your lawn evenly. Problems with these heads can cause dry spots or water waste. Troubleshooting sprinkler heads helps maintain a healthy garden and saves water. Identifying and fixing common issues quickly keeps your irrigation system efficient.
Fixing Heads That Don’t Pop Up
Sprinkler heads that fail to rise can block water flow. Dirt, grass, or debris often trap the head underground. Gently clean around the head to free it. Check if the riser is broken or stuck. Replace any damaged parts to restore smooth movement. Testing the system after fixing ensures proper operation.
Clearing Clogs And Debris
Clogs reduce water pressure and disrupt spray patterns. Remove the sprinkler head to inspect for dirt or mineral buildup. Use a soft brush or water to clear the nozzle and filter screen. Avoid sharp tools that can damage components. Reinstall the head and run the system to check water flow.
Replacing Damaged Heads
Cracked or broken heads waste water and cause uneven coverage. Turn off the irrigation system before replacement. Unscrew the damaged head and remove it from the riser. Match the new head to the old one for size and spray type. Attach the replacement securely and test for leaks or blockages.
Troubleshooting Sprinkler Heads
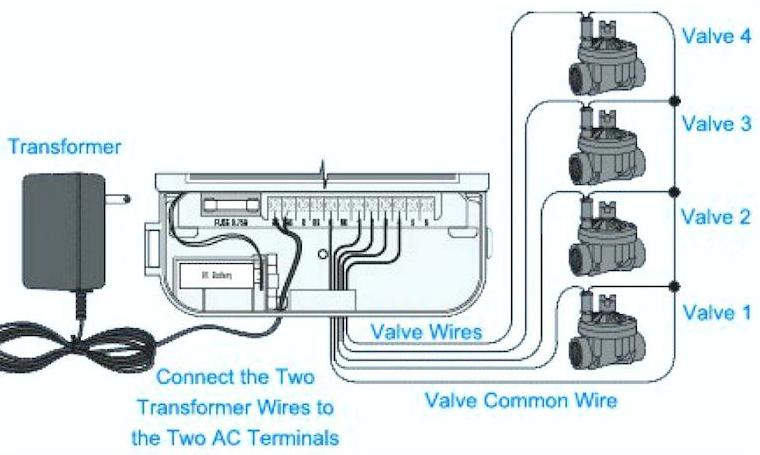
The controller and wiring are critical parts of any irrigation system. Problems here often cause zones not to water or run improperly. Checking these components helps find electrical faults early. This ensures the system runs smoothly and saves water and money.
Controllers manage watering schedules and signals to valves. Wiring connects the controller to valves and sensors. Faulty wiring or a bad controller will stop the system from working.
Verifying Power Supply
Start by making sure the controller has power. Check the outlet and power cord for damage. Use a voltage tester to confirm electricity reaches the controller. Without power, the system cannot operate or respond to commands.
Resetting And Testing Schedules
Clear all current schedules from the controller. Enter a simple test schedule for a short watering cycle. Watch if the zones activate at the set times. This step confirms the controller can send signals properly.
Inspecting Wiring Continuity
Use a multimeter to test wiring continuity between the controller and valves. Disconnect wires before testing to avoid damage. Good continuity means no breaks or open circuits in the wiring. Broken wires need replacement or repair to restore function.
Identifying Wiring Shorts
Check for wiring shorts by measuring resistance between wires. Shorts cause valves to malfunction or prevent zones from activating. Look for frayed wires or exposed copper touching other wires or metal. Fix any short circuits to ensure reliable irrigation operation.
Controller And Wiring Checks
Valve issues often cause irrigation system failures. Knowing the right troubleshooting steps saves time and water. Follow these steps to diagnose and fix valve problems effectively. Start with simple checks before moving to replacements.
Manually Bleeding The Valve
Locate the manual bleed screw or solenoid cap on the valve. Turn it slowly to let water flow manually. This helps check if the valve is stuck closed. If water flows, the valve may need electrical or solenoid repair. If no water comes out, the valve or pipes might be blocked.
Cleaning Valve Components
Turn off the water supply before opening the valve box. Remove the valve cover and inspect internal parts. Dirt and debris can block the diaphragm or solenoid. Clean these components gently with water and a soft brush. Avoid harsh chemicals that could damage parts. Reassemble and test the valve for proper operation.
Replacing Faulty Valves
Identify valves that do not open or close after cleaning and manual bleeding. Shut off the main water supply before removing the valve. Disconnect wiring and pipes carefully to avoid damage. Install a new valve matching your system’s specifications. Reconnect wires and pipes, then turn water back on. Test the new valve to ensure proper function.
Valve Troubleshooting Steps
Water supply and pressure are vital for an irrigation system’s performance. Without steady water flow and proper pressure, sprinklers cannot distribute water evenly. Problems here cause dry patches or flooding in your landscape. Identifying supply or pressure issues quickly helps keep your system running smoothly.
Ensuring Main Valve Is Open
The main valve controls water flow to the entire irrigation system. Sometimes it stays closed after maintenance or repairs. Check this valve first if your sprinklers do not activate. Open it fully to allow maximum water flow. A partially closed valve restricts water and lowers pressure. Confirm the valve handle is turned in the correct direction. Small mistakes here cause big watering problems.
Checking Backflow Preventers
Backflow preventers stop dirty water from entering your clean water supply. These devices can become clogged or stuck over time. Inspect the backflow preventer for debris or damage. Clean or replace parts if you notice any blockages. A faulty backflow preventer reduces water pressure in your irrigation system. It may also cause water to stop flowing altogether. Regular checks keep water flowing freely and safely.
Addressing Low Pressure Causes
Low water pressure can come from many sources. Pipe leaks reduce pressure by letting water escape. Broken or cracked pipes need fixing to restore flow. Clogged sprinkler heads block water and lower pressure at the outlet. Clean or replace these heads to improve spray patterns. Pressure regulators set too low can also limit water force. Adjust them to the recommended level for your system. Confirm the water source itself delivers enough pressure daily. Monitoring pressure avoids uneven watering and system damage.
Frequently Asked Questions
What Is The Most Common Issue Of The Irrigation System?
The most common irrigation system issue is faulty or broken sprinkler heads causing leaks and uneven water distribution.
How To Tell If An Irrigation Solenoid Is Bad?
A bad irrigation solenoid causes valves not to open or close, constant water flow, leaks, no clicking sound, or a hot solenoid. Test with a multimeter for power and resistance; infinite or fluctuating readings indicate failure. Manual bleed test also helps identify solenoid issues.
Why Are My Sprinklers Not Coming On?
Sprinklers may not come on due to low water pressure, clogged nozzles, broken heads, faulty valves, or leaks in the system. Check the controller, wiring, and solenoids for power and damage. Cleaning filters and repairing broken parts often restores proper function.
What Does A Flashing Sprinkler Icon Mean?
A flashing sprinkler icon means the system is active or running a watering cycle. It signals irrigation in progress.
What Are Common Irrigation System Problems?
Common issues include broken sprinkler heads, leaks near valves, low water pressure, and zones not activating. These problems affect watering efficiency and lawn health.
Conclusion
Troubleshooting irrigation systems helps keep your lawn healthy and green. Check for leaks, broken heads, or electrical issues regularly. Simple tools like a multimeter can identify solenoid problems fast. Fixing small issues early saves water and money. Stay consistent with maintenance to avoid major repairs.
Clear filters and adjust sprinkler heads for best coverage. Remember, a well-working system means a thriving garden year-round. Don’t ignore dry spots or constant water flow—they signal problems. A little attention goes a long way in irrigation care.
")