Is your KitchenAid ice maker giving you trouble? You’re not alone.
There’s nothing more frustrating than expecting a fresh batch of ice, only to find your ice maker isn’t working as it should. But don’t worry—most problems are easier to fix than you might think. In this guide, we’ll help you uncover what’s going wrong and show you simple steps to get your ice maker back in action.
Stick around, because by the end of this article, you’ll feel confident troubleshooting your KitchenAid ice maker like a pro. Let’s get started!
Common Ice Maker Issues
Kitchenaid ice makers are convenient, but they can develop problems over time. Understanding common issues helps you fix them quickly. This section outlines typical ice maker issues and possible solutions.
Ice Maker Not Producing Ice
If your ice maker isn’t making ice, check the water supply line. Ensure it’s connected and not clogged. Look at the ice maker’s settings to confirm it is turned on. Examine the freezer temperature; it should be below 5°F (-15°C). A blocked or frozen water line can also stop ice production. Thaw the line carefully or call a technician if needed.
Ice Maker Making Noise
Unusual noises can indicate mechanical problems. Clicking sounds may mean a stuck part. Grinding or humming noises could signal motor issues. Inspect the ice maker for jammed ice cubes or debris. Clean the unit thoroughly to remove any obstructions. Persistent noise may require professional servicing.
Ice Tastes Or Smells Strange
Bad-tasting or smelly ice often results from dirty filters or water lines. Replace the water filter if it’s old or overdue for a change. Clean the ice bin and ice maker components with warm water and mild detergent. Flush the water line to remove impurities. Avoid storing strong-smelling food near the ice maker to prevent odor absorption.
Ice Cubes Are Too Small Or Hollow
Small or hollow ice cubes can indicate water flow issues. Check the water inlet valve and ensure it’s fully open. Inspect the water pressure; low pressure affects cube size. Clean any clogs in the water line or filter. Adjust the freezer temperature to maintain consistent ice cube formation.
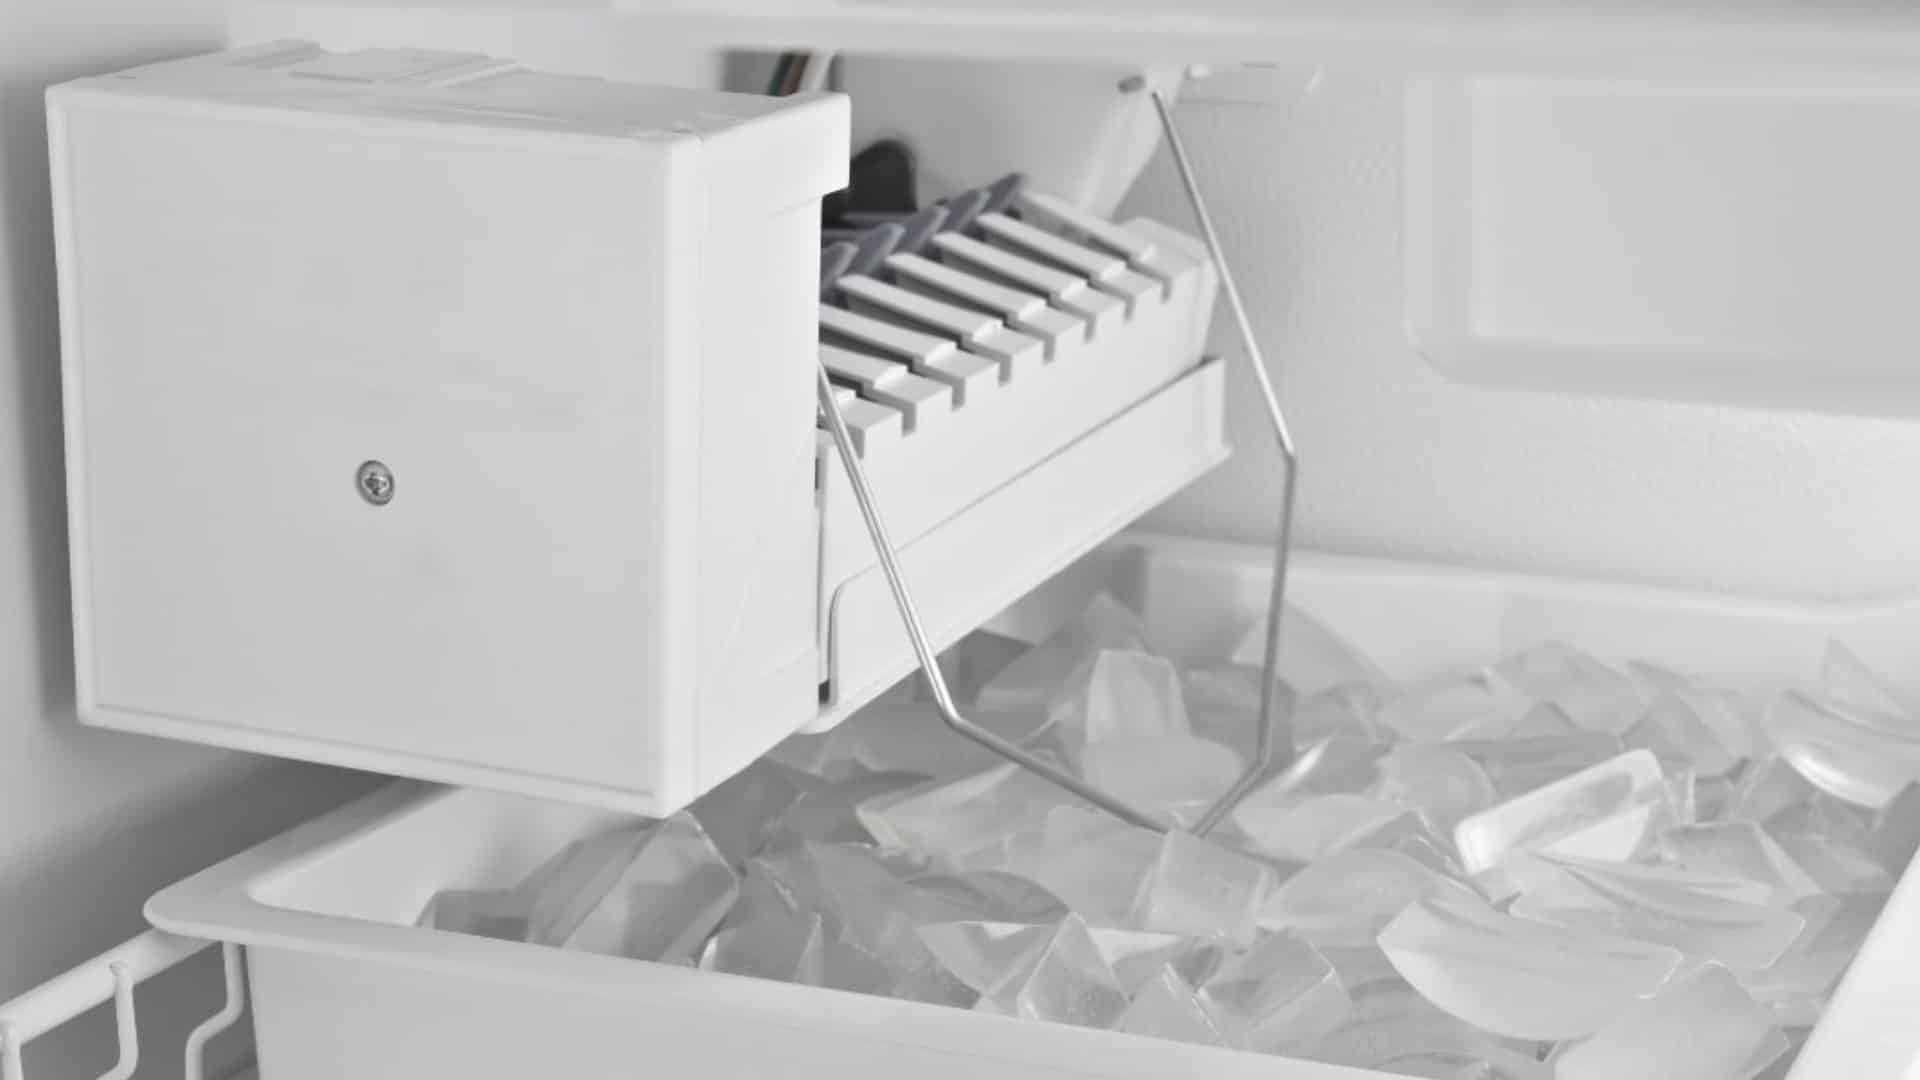
Credit: viaappliance.com
Checking Power And Water Supply
If your KitchenAid ice maker isn’t working, the first step is often the simplest—checking the power and water supply. These two elements are the backbone of your ice maker’s operation, and any issues here can lead to frustrating downtime. Let’s dive into how you can troubleshoot this efficiently, saving both time and stress.
Ensuring Proper Plug Connection
Is your ice maker plugged in correctly? A loose or disconnected plug might be the reason your machine isn’t working. Double-check by gently pulling the plug and reconnecting it securely. If the outlet doesn’t seem to work, test it with another appliance like a toaster or a phone charger.
Sometimes, your ice maker may appear dead simply because the circuit breaker has tripped. Check your home’s breaker box and reset it if necessary. These small adjustments can save you a costly repair call.
Inspecting Water Line For Blockages
A clogged water line can halt ice production completely. Disconnect the water line from the back of your ice maker and inspect it for any visible blockages. Common culprits include mineral buildup or debris in the hose.
Run water through the disconnected line to check for proper flow. If the water struggles to pass, you may need to clean or replace the line. Keep an eye out for kinks or bends in the hose that could restrict water movement.
Verifying Water Pressure
Your ice maker requires sufficient water pressure to function correctly. Low water pressure can lead to smaller, misshapen ice cubes—or no ice at all. Use a pressure gauge to measure your home’s water supply pressure.
If the reading is below 20 psi, that’s likely the issue. You can try adjusting your water regulator or contacting your local water provider for assistance. Have you noticed slower water flow in your kitchen lately? That could be another sign of pressure problems.
Remember, troubleshooting doesn’t have to be intimidating. By addressing these basics first, you might fix the issue without needing professional help. What’s stopping your ice maker from working? It could be something as simple as a loose plug or a blocked water line.
Cleaning The Ice Maker
A clean ice maker isn’t just about shiny looks—it’s about better-tasting ice and preventing breakdowns. Over time, your KitchenAid ice maker can accumulate mineral deposits, bacteria, and other debris that affect performance. Regular cleaning keeps things running smoothly and ensures every cube is as fresh as it can be.
Removing Mineral Buildup
Mineral buildup can clog your ice maker, reducing its efficiency. Start by unplugging your unit and removing any ice. Use a soft cloth soaked in warm water and vinegar to wipe down the inside walls, focusing on areas with visible residue.
For stubborn spots, a bit of baking soda mixed with water works wonders. Scrub gently with a non-abrasive sponge. Rinse thoroughly to avoid leaving any cleaning residue behind.
Sanitizing The Ice Bin
Your ice bin can harbor bacteria if not cleaned regularly. Remove the bin and wash it with warm, soapy water. Don’t forget to rinse well—soap-flavored ice is a definite no-go!
To sanitize, mix one tablespoon of bleach with a gallon of water. Wipe down the bin with this solution, let it sit for five minutes, then rinse and dry completely before reinstalling it.
Flushing The Water Lines
Dirty water lines can lead to unpleasant-tasting ice and potential clogs. Disconnect the water supply and flush the lines with a mixture of water and vinegar. Let the solution sit for 10 minutes to break down any buildup.
Run clean water through the lines to rinse out any debris. Reconnect everything and run a test cycle to ensure the water flows smoothly. Have you noticed how much clearer your ice looks now?
Cleaning your KitchenAid ice maker doesn’t take hours—it just takes consistency. The payoff? Ice that’s clean, fresh, and ready to cool your favorite drinks without a hint of worry.
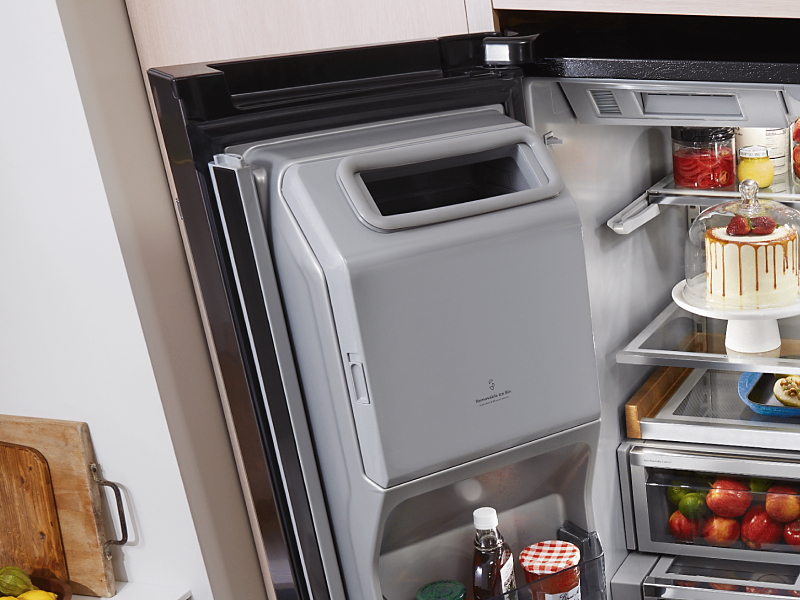
Credit: www.kitchenaid.com
Adjusting Settings
Adjusting the settings on your KitchenAid ice maker can solve many problems. It ensures the machine works efficiently and produces the ice you want. From ice cube size to thermostat calibration, small changes can make a big difference. Let’s explore the key adjustments you can make to keep your ice maker running smoothly.
Changing The Ice Cube Size
The size of your ice cubes can impact cooling efficiency. To adjust the cube size, locate the control knob inside the ice maker. Turn the knob clockwise for larger cubes or counterclockwise for smaller ones. Make small adjustments and test the results. This ensures you get the right size without overloading the system.
Resetting The Ice Maker
Resetting the ice maker can fix minor glitches. First, unplug the appliance or turn off the power supply. Wait for about five minutes before restoring power. Press and hold the reset button, usually located near the control panel. Release the button after a few seconds. This simple step often resolves common issues.
Calibrating The Thermostat
A properly calibrated thermostat prevents temperature-related ice problems. Start by checking the current temperature setting. It should be between 0°F and 5°F for optimal performance. Adjust the thermostat dial to the correct range if needed. Wait a few hours and monitor ice production. Consistent results indicate the thermostat is calibrated correctly.
Replacing Key Components
When your KitchenAid ice maker stops working, it can disrupt your daily routine, especially if you rely on it for entertaining or keeping drinks chilled. The good news is, fixing it doesn’t always mean calling a professional. Sometimes, replacing a few key components can get your ice maker back to producing those perfect cubes. Let’s break it down step-by-step.
Switching Out The Water Filter
A clogged or worn-out water filter is often the silent culprit behind a malfunctioning ice maker. If your ice cubes are smaller than usual or you’re noticing strange tastes, it’s time to check the filter. Replace it every six months to ensure smooth operation.
- Locate the water filter – usually found at the front or bottom of the unit.
- Twist or pull the old filter out, depending on the model.
- Insert the new filter securely, ensuring it clicks or locks into place.
Think of the water filter as your ice maker’s “nutrition system.” If it’s clogged, your ice maker can’t perform at its best. Are you replacing yours regularly?
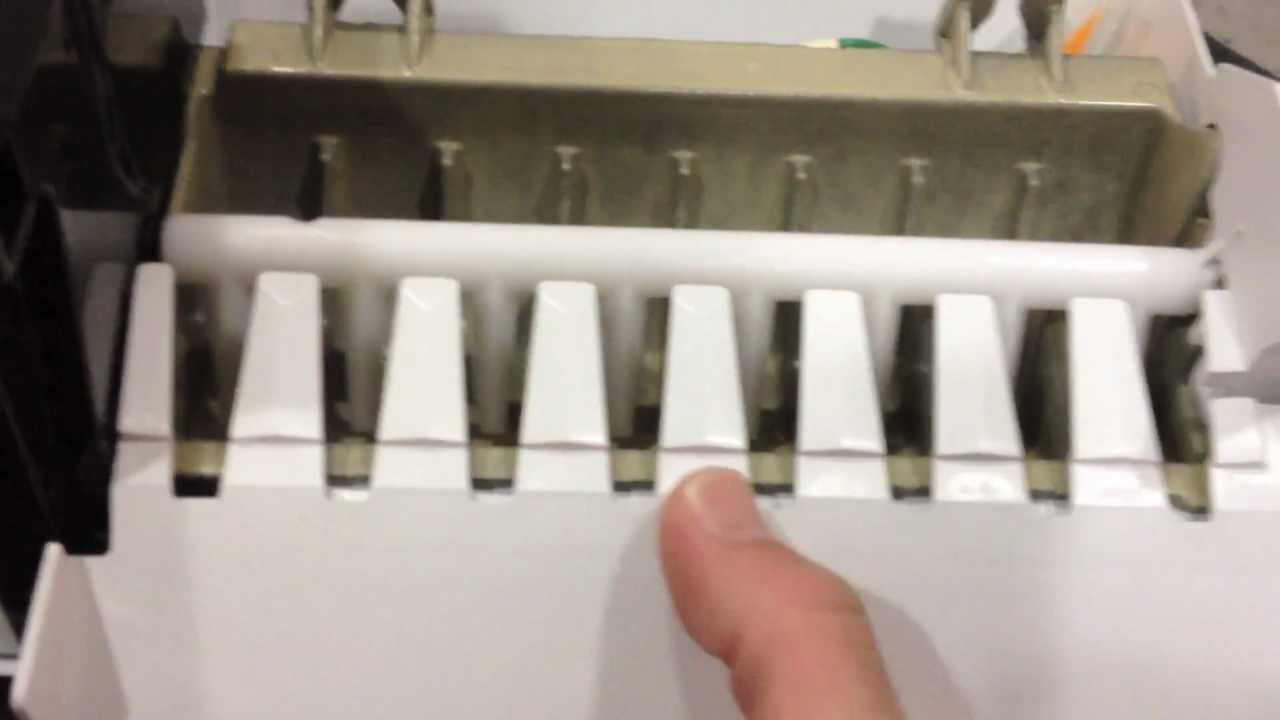
Inspecting And Replacing The Ice Maker Motor
The ice maker motor is like the heart of the machine—it drives the ice production process. If your ice maker isn’t producing ice at all, the motor might be damaged. But don’t worry, replacing it is easier than you might think.
- Unplug the ice maker to avoid electrical accidents.
- Remove the ice bin and locate the motor assembly behind it.
- Unscrew the faulty motor and disconnect the wiring.
- Install the new motor by attaching the wires and securing it with screws.
After replacing the motor, test your ice maker to see if it’s back in action. A faulty motor can halt ice production entirely, so this step is crucial.
Addressing A Faulty Control Module
The control module acts as the brain of your ice maker. If the machine isn’t responding to commands or behaving erratically, the module might be to blame. Luckily, replacing it doesn’t require advanced technical skills.
- Power off the ice maker and unplug it.
- Locate the control module—usually behind the front panel.
- Disconnect the module’s wiring and remove it carefully.
- Install the new control module, ensuring all connections are secure.
Replacing the control module can resolve many unpredictable issues. Have you noticed your ice maker freezing up or refusing to start? This might be your fix.
Remember, troubleshooting doesn’t mean you need to be an expert technician. With these steps, you’re not just repairing your ice maker—you’re saving money and avoiding unnecessary frustration. Which component will you tackle first?
Credit: www.youtube.com
Preventative Maintenance Tips
Preventative maintenance is the secret to keeping your KitchenAid ice maker running smoothly. A few small habits can save you from dealing with unexpected breakdowns or subpar ice production. Let’s look at some actionable tips to keep your ice maker in top shape.
Regular Cleaning Schedule
Cleaning your ice maker isn’t just about aesthetics—it’s essential for performance. A dirty ice maker can lead to clogs, strange-tasting ice, or even bacterial growth. Aim to clean it every three to six months, or more frequently if you notice any buildup.
Start by unplugging the unit and removing all ice from the bin. Use a mix of warm water and mild dish soap to wipe down the interior and exterior. Don’t forget to clean the water filter if your model has one. A clean machine makes better ice, and it’s worth the effort.
Monitoring Water Quality
Ever had cloudy ice or a weird taste in your drink? Poor water quality could be to blame. Ice makers rely on clean, filtered water to produce crystal-clear ice cubes.
Install a water filter if your home doesn’t already have one. This small step can prevent hard water buildup and mineral deposits in your machine. Check the filter regularly and replace it as needed to ensure your ice stays pure and fresh.
Avoiding Overloading The Ice Bin
It’s tempting to let the ice bin fill to the brim during a party or busy day. But overloading can strain the motor and reduce efficiency. Your ice maker is designed to work best with a manageable load.
When the bin is full, pause and empty some ice into a separate container. This prevents the machine from overworking and ensures a steady flow of ice production. Plus, you’ll always have extra ice on hand when you need it.
With these simple tips, you can keep your KitchenAid ice maker running smoothly for years. What’s your favorite maintenance hack? Share it in the comments below!
Conclusion
Troubleshooting your Kitchenaid ice maker doesn’t have to feel overwhelming. Start by checking basic issues like power, water supply, and filters. Clean your machine regularly to prevent clogs or buildup. Replace faulty parts when needed to keep it running smoothly.
Always consult your manual for specific guidance. If problems persist, professional service may be required. A well-maintained ice maker ensures fresh ice whenever you need it. Follow these steps to save time and avoid frustration. Remember, small fixes can often solve big problems.
Keep your ice maker in top shape with regular care and attention.
")


