Your KitchenAid refrigerator is a crucial part of your daily life, keeping your food fresh and your beverages chilled. But what happens when it stops working as it should?
The culprit might be the control board, a critical component that manages the refrigerator’s functions. If you’re facing issues like fluctuating temperatures or unresponsive settings, you’re not alone. Many homeowners encounter these problems, and the good news is, there are solutions.
In this guide, you’ll learn how to troubleshoot your KitchenAid refrigerator’s control board and potentially save time and money. Imagine the relief of fixing the issue yourself without having to call a technician. You’ll gain confidence and peace of mind knowing you can handle these challenges. Dive in, and discover the steps that could bring your refrigerator back to optimal performance.
Identifying Control Board Issues
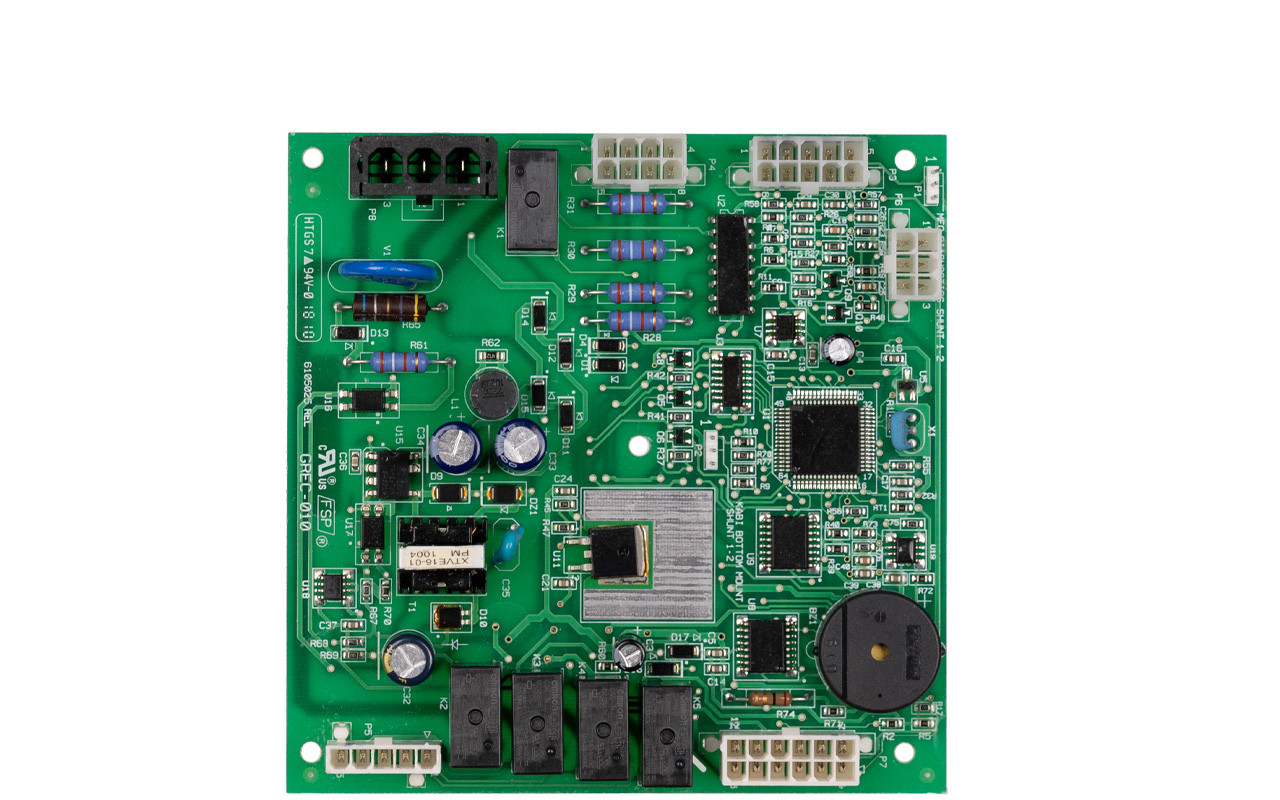
The control board in a Kitchenaid refrigerator acts as its brain. It manages vital functions like temperature regulation and defrost cycles. Identifying issues with this component is crucial. It ensures your refrigerator operates efficiently and reliably.
Common Symptoms
Is your refrigerator not cooling properly? This might indicate a control board problem. Sometimes, the lights may flicker or stay off. Another symptom is the erratic operation of fans or compressors. Notice any unusual noises? These could signal a malfunction. A faulty control board can also cause temperature inconsistencies. Food might freeze or spoil unexpectedly.
Causes Of Malfunctions
Several factors can affect the control board. Power surges are a common cause. They can damage sensitive electronic components. Moisture can infiltrate the board, leading to corrosion. Age and wear also play a role. Over time, components may degrade. This affects the board’s functionality. Dirt accumulation can obstruct connections. This leads to poor performance and errors.

Credit: circuitboardmedics.com
Basic Troubleshooting Steps
Understanding the basic troubleshooting steps for your Kitchenaid refrigerator control board can save time and effort. These steps help diagnose the problem and ensure your refrigerator runs smoothly. Before diving into complex repairs, start with simple checks. This can often resolve issues without professional help. Here, we’ll cover two fundamental steps: checking the power supply and inspecting connections. These are essential for identifying potential problems early on.
Checking Power Supply
Ensure the refrigerator is plugged into a working outlet. Check for any tripped circuit breakers in your electrical panel. Sometimes, power fluctuations cause the control board to stop working. If the refrigerator is not receiving power, it won’t function properly. Use a multimeter to check the outlet’s voltage. This confirms if the issue lies with the power source.
Inspecting Connections
Loose or disconnected wires can cause control board problems. First, unplug the refrigerator to ensure safety. Then, access the control board area. Look for any loose or damaged wires. Securely reconnect any loose connections. Inspect the wires for signs of wear or damage. Replace any damaged wires to restore proper function. Ensuring tight and clean connections can prevent many issues.
Advanced Diagnostic Techniques
Kitchenaid refrigerator control board troubleshooting involves identifying and fixing issues for optimal performance. Advanced diagnostic techniques help pinpoint faults quickly. This ensures efficient repair and extends the appliance’s lifespan.
Advanced diagnostic techniques are essential for identifying issues with your KitchenAid refrigerator’s control board. These methods go beyond basic troubleshooting, allowing you to pinpoint specific problems with precision. By understanding and applying these techniques, you can save time and avoid unnecessary expenses. One of the most effective ways to diagnose control board issues is by using a multimeter.Using A Multimeter
A multimeter is your best friend when tackling control board problems. It measures voltage, current, and resistance, helping you identify faulty components. You might ask, “How do I use it effectively?” Start by setting your multimeter to the appropriate function. If you’re checking voltage, set it to volts. Ensure your refrigerator is unplugged before testing to avoid electric shock. Next, locate the control board inside your fridge—usually found behind a panel. Use the multimeter probes on the control board terminals to check for continuity. A reading of zero indicates a broken circuit, while a normal reading means the circuit is intact.Testing Circuit Components
Testing individual circuit components can give you deeper insights into what might be wrong. You can test capacitors, resistors, and other elements individually. How do you test these components? First, remove them carefully from the board. Use the multimeter to measure their resistance or capacitance. If the readings don’t match the specifications, the component is likely faulty. Imagine finding a capacitor with double the expected resistance. This could be causing erratic temperature control in your fridge. Replacing it could solve the problem and restore your fridge’s functionality. Being thorough in testing components can prevent you from replacing the entire board unnecessarily. It’s all about efficiency and effectiveness. Why should you care about these techniques? They empower you to handle complex issues with confidence. They save you from the hassle of calling a technician for every minor issue. Have you ever wondered if you could fix your fridge yourself? With these advanced techniques, you might just surprise yourself.Resetting The Control Board
Resetting the control board can solve many issues with your Kitchenaid refrigerator. Simply unplug the fridge, wait a few minutes, and plug it back in to reset. This simple step can help restore normal function.
Resetting the control board on your KitchenAid refrigerator can solve a variety of issues, from erratic temperature readings to mysterious beeping sounds. Before you think about calling in a professional, it’s worth trying a reset. You might be surprised at how this simple step can restore your fridge to its optimal performance. Let’s explore how you can execute a reset and when it’s most effective.Steps For A Soft Reset
If your KitchenAid refrigerator is acting up but still running, a soft reset may do the trick. Start by unplugging your refrigerator from the power outlet. Wait about five minutes before plugging it back in. This brief pause allows the system to clear any minor glitches. Once you’ve plugged it back in, check the control board for any error messages or lights. Often, this simple act of disconnecting and reconnecting power can resolve minor software issues. It’s like giving your fridge a quick nap to clear its head. Keep an eye on how it behaves afterward, and you’ll quickly know if the reset worked.When To Perform A Hard Reset
A hard reset is more involved but can be crucial for more persistent problems. If your refrigerator isn’t cooling properly or the control board is completely unresponsive, it’s time to consider this step. A hard reset can address deeper technical issues that a soft reset might not fix. To perform a hard reset, first, unplug the refrigerator. Then, locate the circuit breaker that supplies power to it and turn it off. Wait at least ten minutes before turning the breaker back on and plugging the fridge back in. This process ensures that all electrical components fully reset. Before you proceed, ask yourself: Is this the right time for a hard reset? Make sure you’ve ruled out other potential causes like a tripped breaker or a clogged condenser. By doing so, you ensure that the hard reset is genuinely necessary and not just a shot in the dark.Replacing The Control Board
Fixing a Kitchenaid refrigerator’s control board can resolve cooling issues. Ensure safety by unplugging the appliance first. Replace the faulty board by following the manufacturer’s instructions carefully.
Replacing the control board in your KitchenAid refrigerator can breathe new life into your appliance. This component acts as the brain of your fridge, and when it malfunctions, it can disrupt the entire cooling system. Whether your fridge is not cooling properly or making unusual noises, changing the control board might be the solution you’re looking for. Let’s walk through the key steps for replacing the control board, ensuring you get your refrigerator back to optimal performance.Finding The Right Replacement
Before you start the installation, you need to find the correct control board for your specific KitchenAid model. Check your refrigerator’s model number, usually found inside the fridge or on the back. Use this number to search for compatible parts online or at a local appliance store. Manufacturers and retailers often list compatibility in their product descriptions. Double-check to avoid ordering the wrong part. Consider reading reviews or forums where other users might share insights about their experiences with replacement parts.Installation Tips
Once you have the right control board, gather your tools: a screwdriver set, a pair of gloves, and possibly a flashlight if the area is dimly lit. Unplug your refrigerator to ensure safety while working on the electrical components. Remove the screws from the back panel to access the old control board. Carefully unplug the wires connected to the board, remembering their positions or snapping a quick photo with your phone for reference. Install the new board by reversing these steps. Take your time to make sure each wire is securely connected. You wouldn’t want to finish the job only to find out something was missed. After reassembling and plugging the fridge back in, monitor its performance for the next few days. Notice any improvements? This could be a great sign that you’ve successfully tackled the problem. Replacing a control board might seem daunting, but with the right information and a little patience, it’s a task you can accomplish. How has tackling this type of DIY repair empowered you in managing your appliances?Preventive Maintenance
Troubleshooting the Kitchenaid refrigerator control board involves preventive maintenance to ensure smooth operation. Regular checks can help spot issues early, preventing costly repairs. Keep an eye on error codes and unusual behavior for efficient performance.
Preventive maintenance is key to keeping your Kitchenaid refrigerator running smoothly. It’s like giving your fridge a regular health check-up, ensuring it stays efficient and prolongs its lifespan. By focusing on simple tasks, you can avoid costly repairs and keep your appliance in top shape.Regular Cleaning
Cleanliness plays a significant role in your refrigerator’s performance. Dust and dirt can accumulate around the coils, causing your fridge to work harder and potentially overheat. Make it a habit to dust the coils every few months with a vacuum or a coil brush. Inside the refrigerator, spills and stains are inevitable. Regularly wiping down the shelves and drawers prevents bacteria build-up. Plus, a clean fridge makes finding your food easier and more pleasant. Don’t forget the door seals. They keep the cold air in, so wipe them clean to ensure a tight seal. A simple mixture of baking soda and water can do wonders.Avoiding Overloading
Overloading your fridge can lead to uneven cooling and stress the compressor. Keep an eye on how much you’re storing. If your shelves are packed, air can’t circulate properly, and your food might not stay as fresh. Think of your fridge as a dance floor; it needs space for everyone to move. Leave some room between items for air to flow freely. This way, your fridge can maintain a consistent temperature. Ask yourself: do I really need all this in my fridge? Regularly check for expired items and things you no longer need. Keeping only the essentials can improve efficiency and make your fridge’s job much easier. By implementing these simple preventive maintenance tips, you can save time, money, and energy. Your Kitchenaid refrigerator will thank you with years of reliable service. So, why wait for a problem to arise when you can prevent it?When To Call A Professional
Sometimes, fixing a Kitchenaid refrigerator’s control board requires expert help. Attempting repairs alone can lead to more problems. Knowing when to call a professional can save time and money.
Signs Of Severe Issues
Some signs suggest the control board has major problems. If your refrigerator stops cooling, it might need a professional touch. Flickering lights or strange noises can be warning signs too. These issues often require specialized tools and knowledge.
If the refrigerator displays error codes, it could mean electrical problems. These codes are complex and need professional interpretation. Attempting to fix them without help may cause more damage.
Choosing A Reliable Technician
Finding the right technician is crucial for effective repairs. Look for someone with experience in Kitchenaid appliances. Check reviews and ask for recommendations from friends or neighbors. A reliable technician should have certification and proper training.
Ask the technician about their approach to solving the issue. A skilled professional will explain the problem clearly. They should offer a detailed plan for repairs. Trustworthy technicians provide estimates before starting work.
Credit: circuitboardmedics.com
Credit: www.youtube.com
Frequently Asked Questions
How Do I Reset The Kitchenaid Refrigerator Control Board?
To reset, unplug the fridge for 5 minutes. Then plug it back in. Easy fix.
What Are Common Control Board Issues?
Frequent issues: temperature problems, strange noises, and power failures. Check connections and settings.
Can I Replace The Control Board Myself?
Yes, if you’re handy. Follow instructions carefully. Safety first.
Why Is My Kitchenaid Fridge Not Cooling?
Check the control board. It might be faulty. Ensure settings are correct.
How Do I Test A Kitchenaid Control Board?
Use a multimeter to check voltage. Look for burnt parts. Follow safety guidelines.
Conclusion
Troubleshooting a Kitchenaid refrigerator control board can seem tricky. Yet, with clear steps, it becomes manageable. Start with basic checks. Look for power issues. Inspect connections. Examine the control board for visible damage. Replace faulty components if needed. Use a multimeter for testing.
Always ensure safety first. Consult the manual for guidance. Seek professional help if unsure. Regular maintenance helps prevent problems. Keeping your refrigerator in top shape extends its life. A well-functioning fridge ensures fresh food. Happy troubleshooting!
")


