Having issues with your Liftmaster keypad? You’re not alone.
Many people face challenges with their garage door keypads. Liftmaster keypads are convenient, but sometimes they stop working. It can be frustrating when your keypad won’t respond or won’t open your garage door. Troubleshooting these problems is easier than you might think.
This blog post will guide you through simple steps to fix common issues with your Liftmaster keypad. Whether it’s a battery problem or a programming glitch, we’ve got you covered. With a bit of patience, you can get your keypad working again. Read on to learn how to troubleshoot your Liftmaster keypad effectively.
Credit: aaagds.com
Common Issues
Liftmaster keypads are known for their reliability. But sometimes, they can face issues. Understanding these common problems can help you fix them easily.
Unresponsive Keypad
An unresponsive keypad can be frustrating. First, check the batteries. Dead batteries are a common cause. Replace them with new ones.
If the keypad still doesn’t work, ensure it’s clean. Dirt can interfere with the keys. Use a soft cloth to wipe it down. If the issue persists, try reprogramming the keypad. Follow the user manual for steps.
Stuck Keys
Stuck keys can make the keypad unusable. This problem often occurs due to dirt or debris. Gently clean the keypad with a soft brush. Be careful not to press too hard.
If cleaning doesn’t help, inspect for physical damage. Sometimes, a key might be broken. In this case, you may need a replacement keypad.
Initial Checks
Having trouble with your Liftmaster keypad? Start with the initial checks. These are simple steps to solve common problems. They save time and effort before deeper troubleshooting.
Battery Status
Check the battery first. A weak or dead battery can cause keypad issues. Open the battery compartment. Inspect the battery for corrosion or leakage. Replace it with a new one if needed. Use the recommended battery type. Test the keypad after replacement.
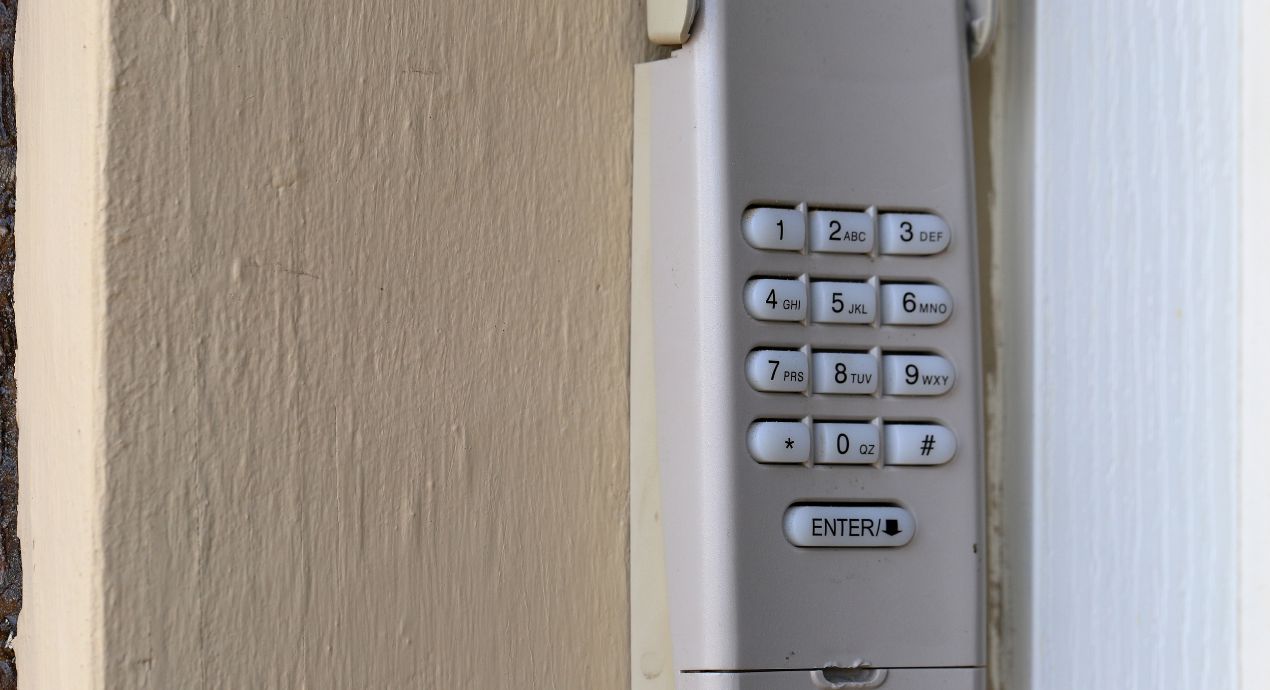
Keypad Cleanliness
Dust and dirt can affect the keypad’s performance. Clean the keypad regularly. Use a soft, dry cloth to wipe the surface. Avoid using water or cleaning solutions. Dirt can block the buttons. Check for any stuck buttons. Press each button to ensure smooth operation.
Resetting The Keypad
The Liftmaster Keypad is a crucial component of your garage door system. Sometimes, it needs a reset to function properly. This guide covers both soft and hard resets. Follow these simple steps to ensure your keypad works efficiently.
Soft Reset
A soft reset is the first step in troubleshooting your Liftmaster Keypad. This method is quick and easy. It often resolves minor issues.
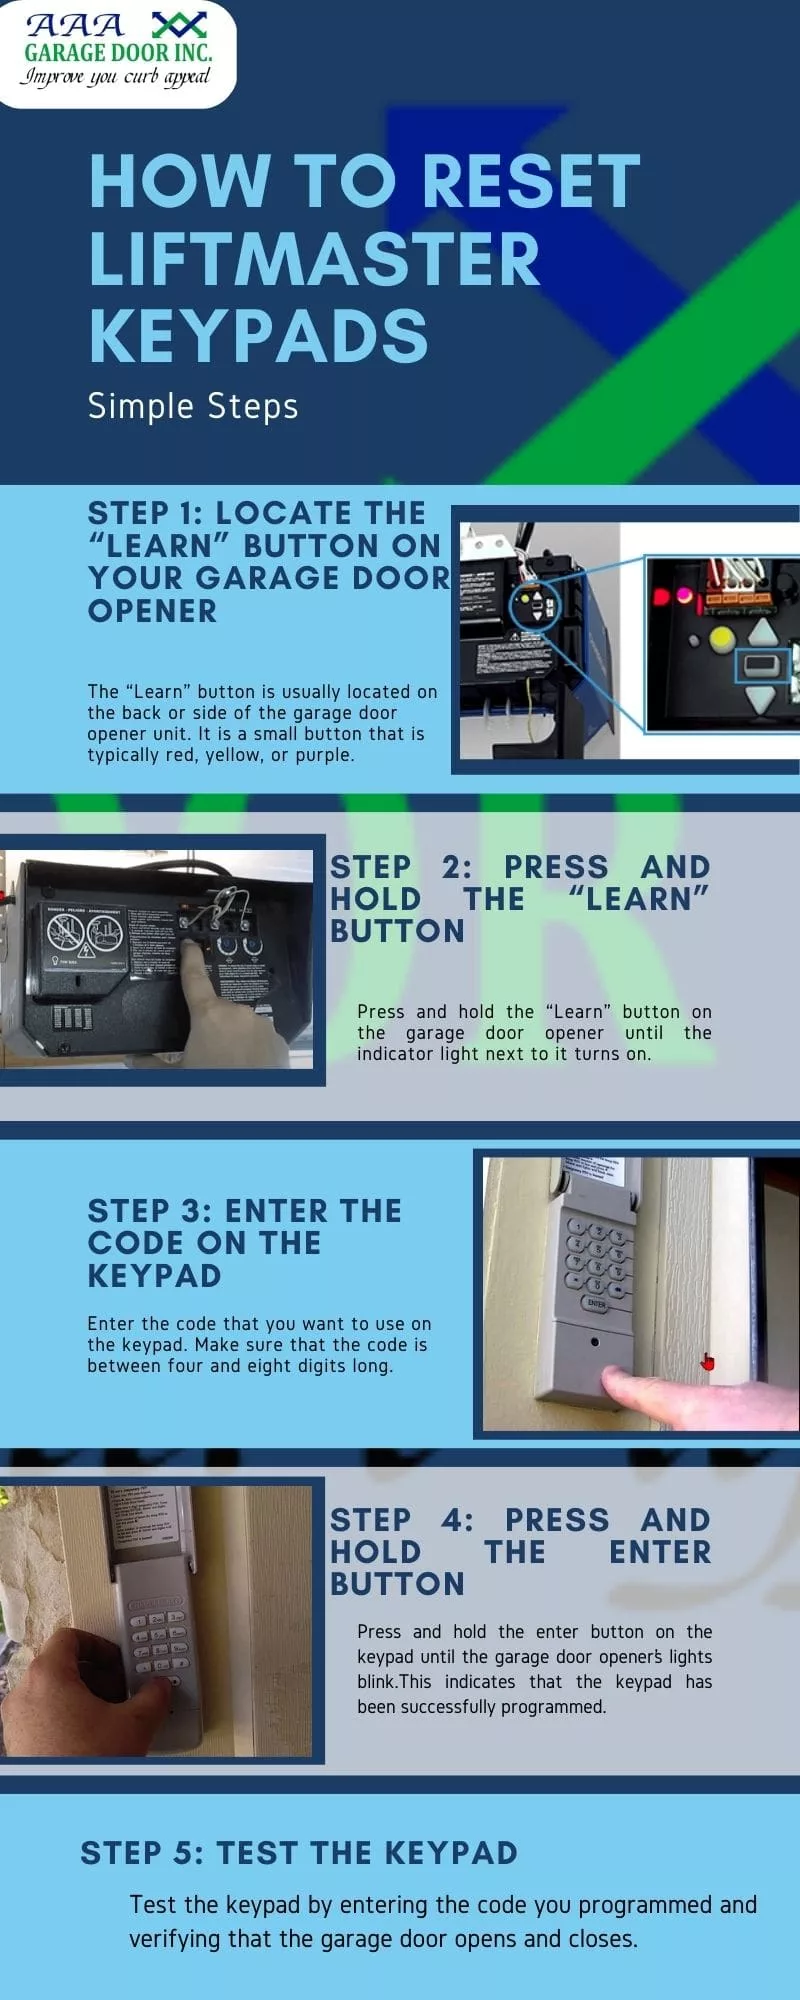
- Locate the “Learn” button on your garage door opener.
- Press and hold the “Learn” button until the LED light turns off.
- Release the “Learn” button. The keypad is now reset.
Test the keypad by entering your PIN and pressing the Enter button. If it works, the soft reset was successful.
Hard Reset
A hard reset is more comprehensive. It clears all previous settings and codes. Use this method if a soft reset does not work.
- Disconnect the power to your garage door opener.
- Locate the “Learn” button on the opener unit.
- Press and hold the “Learn” button for about 10 seconds.
- Reconnect the power to the opener.
- Reprogram the keypad with your new PIN.
To reprogram, follow these steps:
- Enter a four-digit PIN on the keypad.
- Press and hold the Enter button.
- Release when the garage door opener lights blink.
The hard reset clears all old codes. Ensure you reprogram the keypad immediately.
Reprogramming Steps
Reprogramming your Liftmaster keypad can solve many common issues. Follow these steps to ensure your keypad works smoothly with your garage door opener. Each step is simple and requires no special tools. Let’s get started.
Enter Master Code
First, locate your Liftmaster keypad. Enter the current master code. If you don’t know it, check your manual. Press the “Enter” button. The keypad should light up. This means it is ready for the next step.
Sync With Garage Door Opener
Next, find the “Learn” button on your garage door opener. It is usually near the antenna. Press and release the “Learn” button. Quickly return to the keypad. Enter your new master code. Press the “Enter” button again. Wait for the garage door opener to blink or make a sound. This signals that the syncing process is complete.
Test the new code by entering it on the keypad. Your garage door should respond. If not, repeat the steps. Make sure to follow each step carefully. This should resolve most keypad programming issues.
Signal Interference
Signal interference can cause your Liftmaster keypad to malfunction. This issue can be frustrating. Understanding the sources of interference can help fix the problem.
Nearby Electronic Devices
Electronic devices can interfere with your Liftmaster keypad. Devices like routers, baby monitors, or even microwaves. These devices send signals that can disrupt your keypad.
Move these devices away from the keypad. This simple step can improve performance. Ensure there’s enough distance between your keypad and other electronics.
Physical Barriers
Physical barriers can also cause signal interference. Walls, metal doors, or large furniture can block the signal. This can make the keypad unresponsive.
Reposition the keypad or remove the obstacles. Place the keypad in a clear line of sight to the garage door opener. This can boost the signal strength and reduce interference.
Replacing The Keypad
Replacing the keypad on your Liftmaster garage door opener can improve its functionality. This guide will help you choose a compatible model and install it correctly. Follow these steps to ensure a smooth process.
Choosing A Compatible Model
First, check your Liftmaster garage door opener model. Different openers need different keypads. Look for the model number on the back of the opener or its manual. Once you know the model number, search for keypads compatible with it. Many online retailers provide compatibility information.
Consider buying from authorized dealers. They often offer guarantees and better customer support. Read user reviews before purchasing. This helps ensure you’re getting a reliable product. A compatible keypad will work seamlessly with your existing system.
Installation Tips
Start by gathering all necessary tools. You’ll need a screwdriver, drill, and batteries. Read the instructions that come with the keypad. Each model might have slight differences.
First, remove the old keypad. Use a screwdriver to take it off the wall. Check the wires and connections. Make sure they are not damaged.
Next, install the new keypad. Position it where the old one was. Use the screws provided to secure it to the wall. Connect any necessary wires following the instructions.
Finally, test the new keypad. Enter the code and check if the door opens. If it works, you’ve successfully replaced your Liftmaster keypad.
Professional Assistance
Sometimes, troubleshooting your Liftmaster Keypad can be challenging. You might find yourself in a situation where professional help is necessary. Here, we discuss when to seek professional assistance and what to keep in mind about warranty considerations.
When To Call A Technician
Calling a technician can save time and effort. Here are scenarios where professional help is essential:
- Repeated Failures: If your Liftmaster Keypad repeatedly fails to work despite trying several troubleshooting steps.
- Electrical Issues: When there are signs of electrical problems such as sparks or power surges.
- Complex Problems: If the problem seems too complex and beyond basic troubleshooting.
- Safety Concerns: When there are safety risks involved, like exposed wiring.
Warranty Considerations
Understanding your warranty can save costs. Here are key points to consider:
| Aspect | Details |
|---|---|
| Coverage | Check if your issue is covered under warranty. |
| Claim Process | Understand the steps to file a claim. |
| Valid Warranty | Ensure your warranty is still valid and not expired. |
| Authorized Technicians | Use authorized technicians to avoid voiding your warranty. |
Knowing when to seek professional help and understanding your warranty can make a huge difference. It ensures your Liftmaster Keypad functions smoothly and saves money.
Credit: www.libertyhomeguard.com
Preventive Maintenance
Maintaining your Liftmaster keypad can prevent many common issues. Regular upkeep ensures smooth operation and extends the device’s life. Preventive maintenance involves simple steps you can do yourself. Let’s explore some key practices for keeping your Liftmaster keypad in good shape.
Regular Cleaning
Dirt and grime can affect your keypad’s performance. Use a soft, dry cloth to wipe the keypad regularly. Avoid using water or chemicals that might damage the device. If the keypad is outdoors, clean it more often. This helps prevent dust and debris from accumulating.
Routine Testing
Testing your keypad ensures it works correctly. Enter your code to see if the gate or door responds. If not, check the batteries and replace them if needed. Test each button to make sure they press smoothly. Routine testing can catch problems early, keeping your keypad reliable.

Credit: www.youtube.com
Frequently Asked Questions
How Do I Reset My Liftmaster Keypad?
To reset your Liftmaster keypad, press and hold the “Learn” button until the LED light turns off.
Why Is My Liftmaster Keypad Not Working?
Your keypad might not work due to dead batteries, signal interference, or incorrect PIN entry.
How Do I Change The Code On My Liftmaster Keypad?
Press the “Learn” button, enter a new code, and press the “Enter” button.
Can A Liftmaster Keypad Work With Any Garage Door Opener?
Liftmaster keypads are compatible with most Liftmaster and Chamberlain garage door openers.
How Do I Replace The Battery In My Liftmaster Keypad?
Slide open the keypad cover, remove the old batteries, and insert new ones.
Conclusion
Troubleshooting your Liftmaster keypad can be simple. Follow the steps mentioned. Check batteries and connections first. Resetting the keypad often helps. Refer to the manual for specific issues. Seek professional help if problems persist. Regular maintenance keeps your keypad working smoothly.
Understanding these basics ensures your garage door operates efficiently. Keep this guide handy for future reference. Happy troubleshooting!
")


