Dealing with a Liftmaster Professional 1/3 HP garage door opener can be frustrating. Issues can pop up unexpectedly, disrupting your daily routine.
Understanding common problems and their solutions can save you time and money. The Liftmaster Professional 1/3 HP is a reliable garage door opener. Yet, like any machine, it can encounter issues. From motor problems to remote control failures, troubleshooting these common issues is essential.
This guide will help you identify and fix typical problems with your Liftmaster opener. Whether your door is not closing properly or the remote isn’t working, we’ll provide simple, effective solutions. Stay with us to learn how to keep your garage door opener running smoothly.
Identifying Problems
Facing issues with your Liftmaster Professional 1/3 Hp garage door opener? Identifying the problems early can save time and money. This section will guide you through common issues and their solutions.
Unresponsive Opener
If your garage door opener is unresponsive, start by checking the power source. Ensure the opener is plugged in and the outlet is working.
- Check the circuit breaker and ensure it hasn’t tripped.
- Inspect the remote control batteries. Replace them if necessary.
- Verify if the wall switch is functional. If not, inspect its wiring.
If the power source and switches are working, the issue could be with the logic board. This might need professional repair or replacement.
Noisy Operation
A noisy garage door opener can be annoying. It may indicate a need for maintenance or repair.
| Problem | Possible Causes | Solution |
|---|---|---|
| Grinding Noise | Worn out gears | Replace the gears |
| Squeaking | Lack of lubrication | Lubricate the moving parts |
| Rattling | Loose hardware | Tighten the screws and bolts |
Regular maintenance can prevent most noise issues. Lubricate the chain and rollers twice a year. Tighten any loose hardware.
Basic Troubleshooting Steps
Dealing with Liftmaster Professional 1/3 Hp issues? Start with basic troubleshooting. These steps can help identify and fix common problems. Follow this guide to get your garage door opener working smoothly.
Checking Power Source
First, check the power source. Ensure the opener is plugged in. Look for any tripped breakers or blown fuses. Reset them if needed. Sometimes, a simple power issue causes the problem.
Inspecting Remote Batteries
Next, inspect the remote batteries. Dead batteries can prevent the remote from working. Replace old batteries with new ones. Check if the remote works now. If not, consider reprogramming the remote.
Sensor Issues
Dealing with Liftmaster Professional 1/3 Hp garage door opener issues can be frustrating. One common problem is sensor issues. The sensors ensure the door does not close on anything in its path. If the sensors are not working, the door may not close properly. This can cause inconvenience and safety concerns.
Aligning Sensors
First, check the alignment of the sensors. These sensors are usually placed on either side of the garage door. They need to face each other directly. If they are misaligned, the door may not close. Adjust the sensors until both are facing each other. You can use a level to make sure they are aligned correctly. A steady green light on both sensors means they are aligned.
Cleaning Sensor Lenses
Dirt or debris on the sensor lenses can also cause issues. Clean the lenses with a soft, dry cloth. Be gentle to avoid scratching the lenses. Clean lenses help the sensors to work properly. Regular cleaning can prevent many problems. If the sensors are clean and aligned but still not working, it may be a wiring issue.

Credit: community.garadget.com
Track And Chain Maintenance
Maintaining the track and chain of your Liftmaster Professional 1/3 Hp is crucial. A well-maintained system ensures smooth operation and extends the life of your garage door opener. Regular maintenance can prevent common issues and keep your garage door running efficiently.
Lubricating The Chain
Proper lubrication of the chain is essential. Use a high-quality lubricant designed for garage door openers. Apply the lubricant to the entire length of the chain. Avoid using too much; a thin layer works best. This reduces friction and wear on the chain.
Lubricate the chain every six months. If you hear squeaking or grinding, check the lubrication. This simple step can prevent bigger problems and maintain smooth operation.
Aligning The Track
Proper track alignment is key for smooth door movement. Check the tracks for any bends or damage. Use a level to ensure they are straight. If the tracks are not aligned, the door may not open or close properly.
To adjust the tracks, loosen the mounting brackets. Gently tap the tracks into position with a rubber mallet. Tighten the brackets securely. Regularly check the alignment to prevent issues and ensure smooth operation.
Motor And Gear Problems
Having trouble with your Liftmaster Professional 1/3 Hp opener? Motor and gear problems are common issues that can affect the performance of your garage door opener. These issues can cause the door to operate slowly, make strange noises, or stop working altogether. Addressing these problems quickly ensures your opener runs smoothly.
Testing The Motor
To begin, test the motor to determine if it is functioning correctly. Follow these steps:
- Disconnect the opener from the power source.
- Remove the cover to access the motor unit.
- Check for any visible damage or burnt components.
- Reconnect the power and listen for any unusual sounds.
A humming or buzzing sound might indicate a faulty motor. Inspect the wiring connections and ensure they are secure. Use a multimeter to check the motor’s resistance. If the readings are abnormal, it may be time to replace the motor.
Replacing Worn Gears
Worn gears can cause the opener to malfunction. Follow these steps to replace them:
- Disconnect the opener from the power source.
- Remove the cover to access the gears.
- Identify the worn gears. They may appear stripped or damaged.
- Remove the old gears using a screwdriver.
- Install the new gears, ensuring they are properly aligned.
- Reassemble the unit and test the opener.
Regular maintenance and timely replacement of worn gears can extend the life of your garage door opener. Using compatible parts ensures the opener functions efficiently.
| Component | Signs of Wear | Action Required |
|---|---|---|
| Motor | Humming, buzzing, no movement | Test or replace motor |
| Gears | Stripped teeth, grinding noise | Replace gears |
By addressing motor and gear problems promptly, you can ensure the smooth operation of your Liftmaster Professional 1/3 Hp opener. Regular checks and maintenance can prevent major issues, saving you time and money.
Remote And Keypad Issues
Experiencing troubles with your Liftmaster Professional 1/3 Hp remote and keypad? These issues can interrupt your daily routine. But don’t worry, you can resolve them easily. This guide will help you troubleshoot common problems with your Liftmaster remote and keypad.
Reprogramming The Remote
Sometimes, the remote stops working because it needs reprogramming. Follow these steps to reprogram your Liftmaster remote:
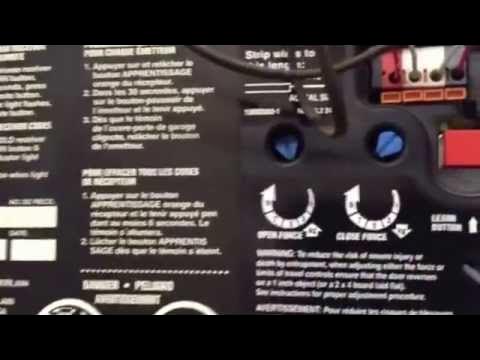
- Locate the “Learn” button on your garage door opener.
- Press and release the “Learn” button. The LED light will turn on.
- Within 30 seconds, press and hold the button on your remote.
- When the lights on the opener blink, release the remote button.
Your remote should now be reprogrammed and ready to use. If it still doesn’t work, try replacing the batteries.
Resetting The Keypad
Resetting the keypad can resolve many issues. Follow these steps to reset your Liftmaster keypad:
- Press and hold the “Learn” button on the garage door opener.
- Wait until the LED light turns off (about 6 seconds).
- Release the “Learn” button.
- Enter your new 4-digit PIN on the keypad.
- Press and hold the “Enter” button on the keypad.
- Release the “Enter” button when the garage door opener lights blink.
Your keypad should now be reset and ready to use. Make sure to test it to confirm it works.
If these steps don’t resolve your issues, consult the user manual. It might have specific instructions for your model. Remember, regular maintenance can prevent most of these problems.
Professional Help
Sometimes, troubleshooting the Liftmaster Professional 1/3 Hp garage door opener can be challenging. You might try a few fixes but still face issues. In such cases, seeking professional help ensures your garage door functions safely and properly.
When To Call A Technician
If your garage door opener makes unusual noises, call a technician. Strange sounds can indicate a serious problem. Also, if the door does not open or close fully, this needs expert attention.
Another sign is if the remote control stops working. This might seem simple, but it could be a sign of a bigger issue. Lastly, if you notice the door moves unevenly or gets stuck, do not try to fix it yourself. It is best to call a professional.
Choosing The Right Service
Choosing the right service for your Liftmaster Professional 1/3 Hp is crucial. First, look for certified technicians. This ensures they have the proper training and knowledge.
Next, check reviews and ratings online. Good reviews are a sign of reliable service. Also, ask for a quote before they start the work. This helps avoid any surprise costs.
Finally, find a service that offers a warranty. This shows they stand by their work. It also gives you peace of mind in case issues arise later.
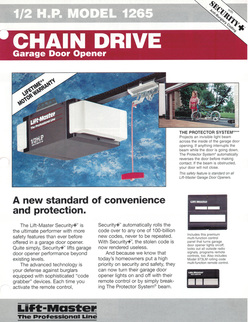
Credit: support.garagedoorzone.com
Preventative Measures
Taking preventative measures is key to ensuring your Liftmaster Professional 1/3 Hp garage door opener runs smoothly. Regular checks and timely maintenance can prevent potential issues and extend the lifespan of your device.
Regular Inspections
Regular inspections can catch problems before they become serious. Check the garage door opener and its components every few months.
- Inspect the tracks for any debris or damage.
- Ensure the rollers are in good condition and roll smoothly.
- Listen for unusual noises during operation.
- Check the cables and pulleys for wear and tear.
Pay attention to any signs of wear. Early detection can save you from costly repairs.
Scheduled Maintenance
Scheduled maintenance keeps your Liftmaster Professional 1/3 Hp working efficiently. Follow a routine to maintain its performance.
- Lubrication: Apply lubricant to the moving parts every six months.
- Balance Test: Disconnect the opener and manually lift the door. It should stay open at waist height.
- Safety Test: Test the auto-reverse feature by placing an object in the door’s path.
- Battery Check: Replace the remote batteries annually.
Create a maintenance schedule and stick to it. Consistent care can prevent unexpected breakdowns.
Credit: www.youtube.com
Frequently Asked Questions
Why Is My Liftmaster 1/3 Hp Not Working?
Check the power source. Ensure it’s plugged in. Verify the circuit breaker isn’t tripped.
How Do I Reset My Liftmaster 1/3 Hp?
Press and hold the “Learn” button until the LED light goes out. This resets the opener.
What Does A Blinking Light On My Liftmaster Mean?
A blinking light usually indicates an obstruction. Check for objects blocking the sensor path.
How Do I Lubricate Liftmaster Garage Door Parts?
Use a silicone-based lubricant. Apply on the hinges, rollers, and tracks for smooth operation.
Why Is My Liftmaster Remote Not Responding?
Replace the batteries first. Reprogram the remote if needed by following the manual instructions.
Conclusion
Troubleshooting your Liftmaster Professional 1/3 Hp can seem challenging. But with these tips, you can resolve most issues. Always check the power source first. Then, inspect the remote and sensors. Regular maintenance keeps your opener running smoothly. If problems persist, consider calling a professional.
A well-functioning garage door opener brings peace of mind. Follow these steps to keep it reliable. Your Liftmaster will stay in top shape for years. Remember, a little effort goes a long way. Happy troubleshooting!
")