Is your LiftMaster garage door opener acting up, flashing mysterious lights, or refusing to respond? You’re not alone—and you don’t have to stay stuck wondering what those blinking codes mean.
Understanding LiftMaster troubleshooting codes can save you time, avoid costly repairs, and get your door working smoothly again. In this guide, you’ll learn how to decode those signals quickly, identify common problems, and apply simple fixes you can do yourself.
Keep reading to take control of your LiftMaster and end the frustration today.
Diagnostic Codes
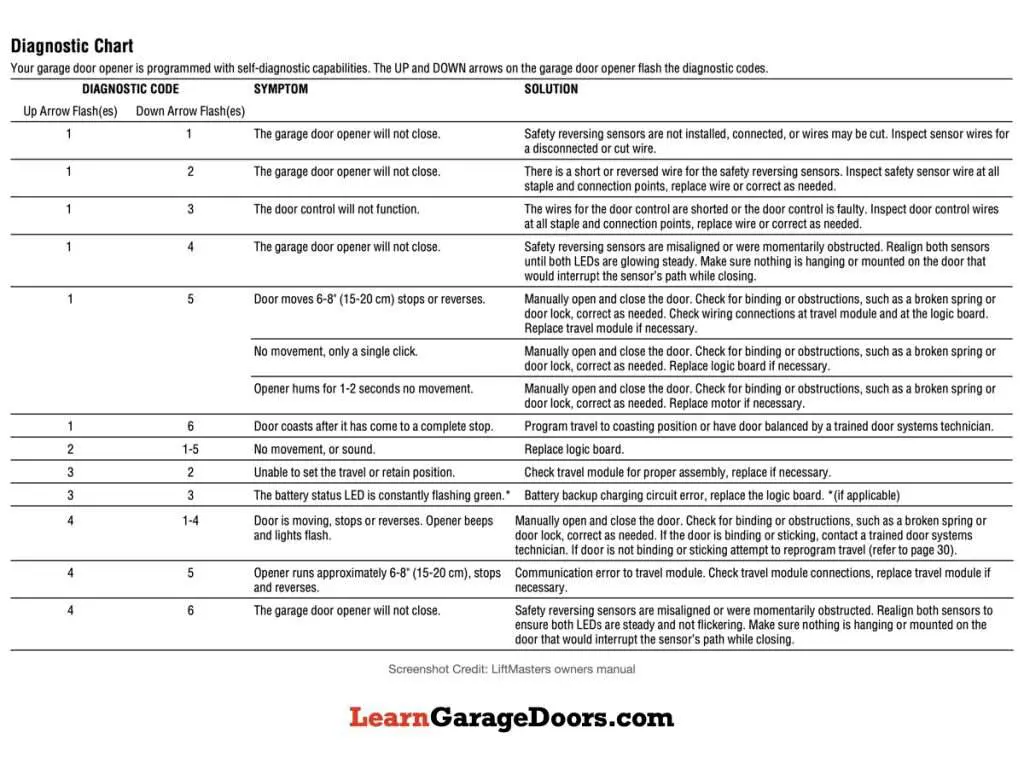
Diagnostic codes help identify problems with your LiftMaster garage door opener quickly. These codes show through blinking lights on the device. Understanding these codes saves time and avoids unnecessary repairs. You can troubleshoot issues by decoding the light patterns and error signals.
Diagnostic codes point out specific errors inside the opener system. They guide users to fix issues like sensor misalignment, wiring problems, or motor resistance. Reading these codes is simple once you know what each pattern means. This knowledge helps keep your garage door working smoothly and safely.
Blinking Light Patterns
Blinking lights on your LiftMaster signal different error conditions. Each pattern has a unique meaning. For example, three quick blinks might show a sensor problem. Five blinks could indicate a motor issue. The speed and number of blinks tell you what part needs attention.
Watch the light closely to count the blinks. Pause between blinking sets also matters. This pattern repeats until you fix the problem. Use the number of blinks to find the right solution in your manual or online guide.
Locating Error Signals
Error signals can appear on the motor head or the wall control panel. Check both places if your door is not working properly. The motor head usually shows blinking lights for hardware faults. The wall control may flash when the lock feature is active or sensors fail.
Also, inspect the safety sensors near the door bottom. They have small lights that must stay steady. A blinking or no light means a blockage or misalignment. Fixing these error signals involves cleaning, realigning, or checking wiring connections.
Credit: aaagds.com
Safety Sensors
Safety sensors are crucial for your LiftMaster garage door. They stop the door from closing if something blocks the path. This feature protects people, pets, and objects from injury or damage. If your door does not close or reverses suddenly, sensor issues could be the cause. Understanding common problems and fixes will help you maintain safe operation.
Common Sensor Issues
Sensors may fail due to dirt, misalignment, or obstructions. Dirt on the sensor lenses blocks the infrared beam. Misaligned sensors do not face each other correctly. Objects like leaves or debris can block the sensors. These issues cause the door to reverse or not close fully. Checking sensors regularly prevents most problems.
Cleaning And Alignment
Clean sensor lenses with a soft cloth and mild cleaner. Avoid harsh chemicals that could damage the sensors. After cleaning, check the sensor lights. Both sensors should show a steady light. If one light blinks, the sensors need adjustment. Move sensors gently until both lights stay solid. Keep the sensors aligned to ensure proper function.
Wiring Inspection
Wiring problems often cause sensor failure. Check wires for cuts, corrosion, or loose connections. Loose staples can cause wires to disconnect from the opener or sensors. Inspect wires along the door track and near the opener motor. Repair or replace damaged wires promptly. Secure all connections tightly to maintain reliable sensor signals.
Power Problems
Power problems are common issues that cause LiftMaster garage door openers to stop working. These problems often result in error codes or blinking lights on the opener. Understanding power issues helps you quickly fix the problem and get your garage door running again.
Sometimes, the opener does not get enough electricity due to simple power interruptions. Other times, internal components may need a reset to clear temporary errors. Checking power sources and trying basic resets often solves these problems.
Breaker And Outlet Check
Start by checking the circuit breaker connected to the garage. A tripped breaker cuts power to the opener. Flip the breaker off and on to reset it.
Next, test the outlet where the opener plugs in. Use a lamp or a small device to confirm the outlet works. If the outlet has no power, check for loose wiring or call an electrician.
Ensure the power cord of the opener is firmly plugged into the outlet. Loose plugs cause intermittent power and error codes.
Power Cycling Tips
Power cycling means turning the opener off and on to reset its system. Unplug the opener from the outlet.
Wait 30 seconds before plugging it back in. This pause clears temporary faults in the opener’s circuit board.
After plugging back in, test the opener by pressing the remote or wall control. If the problem stays, repeat the cycle once more.
Power cycling often fixes minor glitches that cause error codes or blinking lights.
Credit: learngaragedoors.com
Remote Control Issues
Remote control issues are common with LiftMaster garage door openers. These problems often cause frustration because the door does not respond to commands. Identifying the cause quickly helps restore proper function. The remote might not work due to weak batteries, signal interference, or feature settings. Understanding the basic troubleshooting steps can save time and effort.
Battery Replacement
Remote controls use small batteries that lose power over time. A weak battery reduces signal strength and range. Replace the battery if the remote stops working or acts erratically. Use the correct battery type, usually a 3V lithium coin cell. Open the remote case carefully and swap the old battery for a new one. Test the remote after replacement to confirm the issue is fixed.
Reprogramming Remotes
Sometimes, the remote loses connection to the garage door opener. This happens after power outages or system resets. Reprogram the remote by following the opener’s manual instructions. Usually, press the “Learn” button on the motor unit, then press a button on the remote. This process syncs the remote with the opener. Repeat for additional remotes if needed. Proper programming ensures reliable operation.
Lock Feature Effects
The wall control has a lock feature that disables remote controls. This prevents unwanted use of the garage door. Check if the lock feature is active when remotes do not work. Press the lock button on the wall control to turn it off. After disabling the lock, remotes should work normally again. This feature protects your garage but can cause confusion if forgotten.
Mechanical Troubleshooting
Mechanical issues often cause LiftMaster garage door problems. Checking the mechanical parts can solve many errors. Simple steps like testing door balance and clearing obstructions help the door work smoothly. These checks prevent motor strain and error codes. Regular mechanical troubleshooting keeps the opener reliable and safe.
Door Balance Checks
Start by disconnecting the opener from the door. Manually lift the door halfway. It should stay in place without moving. If it falls or rises, the door is unbalanced. An unbalanced door strains the motor and causes error codes. Adjust the springs or call a professional for help. Proper balance improves door performance and extends opener life.
Lubrication And Obstruction Removal
Check all moving parts for dirt and rust. Hinges, rollers, and tracks need regular lubrication. Use a silicone-based lubricant for smooth operation. Avoid grease that attracts dust. Remove any debris or objects blocking the door path. Obstructions cause the door to stop or reverse unexpectedly. Clean and lubricate parts to reduce friction and noise. This simple care prevents many mechanical errors.

Credit: www.youtube.com
Wiring And Connections
The wiring and connections in your LiftMaster system play a key role in its smooth operation. Faulty or loose wiring can trigger error codes and disrupt the door’s function. Checking these connections helps identify common issues fast.
Wires can wear out, get damaged, or become loose over time. Ensuring all wiring is intact and secure prevents many problems. Proper wiring also keeps safety sensors and controls working properly.
Inspecting Loose Or Damaged Wires
Start by unplugging the opener from power for safety. Look closely at all wires connected to the opener and sensors. Check for breaks, frays, or burnt spots on wires. Tug gently to see if any wires feel loose.
Loose wires cause intermittent signals or no signal at all. Damaged wires can short circuit the system, triggering error codes. Replace or repair any wires with visible damage to restore normal function.
Securing Staples And Connectors
Check the staples holding wires along the door track. Staples that are too tight can cut the wires, while loose staples allow wires to move and wear. Adjust staples so they hold wires firmly but gently.
Inspect all connectors and terminals for corrosion or looseness. Clean corroded contacts with a dry cloth and tighten loose connections. Secure wiring prevents errors caused by poor electrical contact.
Reset And Memory Clear
Reset and memory clear are crucial steps in solving LiftMaster troubles. These actions help fix errors and restore normal function. They remove any stored faults that stop the opener from working well. Performing a reset or clearing memory can often solve common problems quickly.
Knowing how to reset the opener and clear its memory can save time and avoid service calls. This guide explains simple steps to do both safely and easily.
Resetting The Opener
Start by disconnecting the power to the LiftMaster opener. Unplug it or turn off the circuit breaker. Wait for about 30 seconds. This pause lets the system fully power down.
Next, reconnect power to the opener. The unit will reboot and clear temporary glitches. Press and hold the “Learn” button on the motor. Hold it until the indicator light turns off, usually 6 seconds. This step resets the opener’s settings.
Release the button and test the opener. It should work normally now. Resetting clears minor errors and refreshes the system’s memory.
Clearing Memory
Clearing memory removes all programmed remotes and codes. Use this if remotes do not respond or codes conflict. Press and hold the “Learn” button on the motor head. Hold for about 10 seconds. The indicator light will turn off, signaling memory erase.
Release the button. All remote codes are now deleted from the opener. You must reprogram remotes and keypads after this step. This process removes old or corrupted signals that cause problems.
Clear memory only when needed. It is a strong reset and deletes all stored settings. Use it to fix serious communication errors between the opener and remotes.
Wi-fi And Server Alerts
LiftMaster garage door openers use Wi-Fi and server alerts to keep you informed. These alerts help diagnose connection issues and system errors. Understanding these alerts helps maintain smooth operation. You can quickly address problems affecting your door opener’s performance.
Interpreting Beep Signals
LiftMaster devices use beep signals to communicate errors and statuses. Different beep patterns mean different issues. One beep might indicate a weak Wi-Fi signal. Multiple beeps can signal server connection failures.
Listen closely to the number and length of beeps. Note if they repeat or stop suddenly. This helps identify if the problem is with your network or the device itself. Keep your user manual handy to match beep codes with issues.
Troubleshooting Connectivity
Start by checking your Wi-Fi network’s strength near the garage. Weak signals cause frequent disconnections and alerts. Move your router closer or use a Wi-Fi extender.
Restart your LiftMaster opener and router. Power cycling can fix temporary glitches. Ensure your Wi-Fi password is correct in the app settings. Update the opener’s firmware regularly to avoid server issues.
Check for interference from other devices. Cordless phones and microwaves can disrupt the signal. If problems persist, reset the opener’s Wi-Fi connection and reconfigure it through the app.
Video Guides And Resources
Video guides and resources offer clear, step-by-step help for LiftMaster troubleshooting codes. These tools make it easier to understand error messages and fix common problems quickly. Visual aids improve learning and reduce confusion for users.
Whether you prefer watching tutorials or reading manuals, there are many options available. These resources cover general troubleshooting and detailed information about specific LiftMaster models.
Visual Troubleshooting Tutorials
Video tutorials show each troubleshooting step clearly. You can see exactly where to check sensors and how to interpret blinking lights. These videos guide you through common fixes like realigning safety sensors or resetting the system.
Watching a video helps users follow along easily. It reduces guesswork and speeds up the repair process. Many official LiftMaster videos and user-created guides are free and accessible online.
Model-specific Manuals
Manuals designed for specific LiftMaster models provide precise instructions. They explain error codes unique to your model and offer tailored solutions. These documents help identify wiring issues or motor problems accurately.
Using the correct manual ensures you follow safe and effective troubleshooting steps. Most manuals are downloadable from the LiftMaster website or included with your product. Always check your model number before searching for a manual.
Frequently Asked Questions
What Do The Blinking Lights Mean On A Liftmaster Garage Door Opener?
Blinking lights on a LiftMaster garage door opener signal issues like misaligned safety sensors, active lock feature, wiring problems, or motor resistance. Check sensor alignment, clear obstructions, inspect wires, and press the lock button to resolve common errors. Power cycling often resets the system.
How To Troubleshoot Common Issues With Liftmaster Garage Door Openers?
Check power supply and remote batteries. Clean and align safety sensors. Inspect wires and remove obstructions. Use the ‘Learn’ button to reprogram remotes. Reset the opener by power cycling. Refer to blinking LED codes for specific errors. Consult manuals or videos for model-specific guidance.
How To Reset Liftmaster Error Code?
To reset a LiftMaster error code, power off the opener for 30 seconds. Check and realign safety sensors. Clear any obstructions. Press the wall control’s lock button if active. Restore power and test the door. Repeat if the error persists.
What Does It Mean When One Garage Door Sensor Is Green And One Is Yellow?
A green sensor light means it works properly. A yellow light indicates misalignment, dirt, or obstruction. Clean and realign both sensors.
What Do Liftmaster Blinking Lights Mean During Operation?
Blinking lights indicate specific error codes or issues with the garage door opener. They help identify problems like sensor misalignment or motor resistance. Checking the light pattern guides you to the right fix.
Conclusion
Knowing LiftMaster troubleshooting codes saves time and frustration. Check sensor alignment and clean lenses regularly. Inspect wires for damage or loose connections. Remember to reset the system by power cycling if needed. Keep the lock feature off when using remotes.
Small steps often fix common blinking light issues. Understanding these codes helps maintain smooth garage door operation. Stay calm and follow each troubleshooting step carefully. Your LiftMaster can work properly with simple attention and care.
")


