Are you struggling to get your Miller Bobcat 250 running smoothly? Don’t worry—you’re not alone.
Whether you’re dealing with performance hiccups, unexpected shutdowns, or issues with welding output, troubleshooting can feel overwhelming. But here’s the good news: most problems have simple fixes. With the right guidance, you can save time, avoid frustration, and get your machine back to work in no time.
In this guide, we’ll walk you through common Miller Bobcat 250 issues and how to resolve them step-by-step. Stick with us, and you’ll be ready to tackle any challenge with confidence. Let’s get started!
Common Issues With Miller Bobcat 250
The Miller Bobcat 250 is a reliable welding machine and generator. Yet, like any equipment, it may encounter issues over time. Knowing common problems helps users identify and fix them faster. This section highlights frequent troubles and their possible causes.
Engine Starting Problems
Engine starting issues are a common concern with the Miller Bobcat 250. These may occur due to a weak or dead battery. Dirty or corroded battery terminals can also interrupt the connection. Inspect the fuel system for clogs or old fuel, as this can affect starting. A malfunctioning starter motor or ignition switch may also be responsible.
Low Power Output
Low power output can disrupt both welding and generator functions. This often happens when the air filter is clogged, reducing engine efficiency. Old or low-quality fuel may also lead to power issues. Check for loose or damaged electrical connections. Worn-out brushes in the alternator can reduce output as well.
Overheating Concerns
Overheating can harm the Miller Bobcat 250’s components. Blocked or dirty cooling fins often cause this issue. Low oil levels or poor oil quality may increase engine temperature. Ensure the fan is working properly to maintain airflow. Running the machine for extended periods without breaks can also lead to overheating.
Irregular Welding Arc
An inconsistent welding arc can frustrate operators during jobs. Damaged or worn-out welding leads are a common cause. Check the ground clamp for a secure connection to the workpiece. Incorrect voltage settings may also disrupt the arc. Inspect the electrode for wear or contamination, as this can affect performance.
Engine Troubleshooting Tips
The Miller Bobcat 250 is a reliable welding machine with a powerful engine. Like any machinery, it may encounter issues that need troubleshooting. Addressing engine problems can keep your machine running smoothly and prevent downtime. Below are tips to help you identify and resolve common engine-related issues.
Checking Fuel And Oil Levels
Low fuel can cause the engine to stall or fail to start. Ensure the fuel tank is full and the fuel is clean. Contaminated fuel can affect engine performance. Check the oil level using the dipstick. Low oil levels can lead to overheating and damage. Refill oil if it’s below the recommended level, using the appropriate type for your machine.
Inspecting The Spark Plug
A faulty spark plug can prevent the engine from starting or running smoothly. Remove the spark plug and inspect it for dirt, damage, or wear. Clean the spark plug with a wire brush if it’s dirty. Replace it if it shows signs of wear or corrosion. Use the correct type of spark plug specified in the manual.
Air Filter Maintenance
A clogged air filter can restrict airflow to the engine, reducing performance. Remove the air filter and check for dirt or debris. Clean the filter with compressed air if it’s reusable. Replace it if it’s too dirty or damaged. Regular air filter maintenance ensures the engine receives adequate airflow.
Electrical System Fixes
When your Miller Bobcat 250 isn’t working as it should, the electrical system is often the first place to check. Faulty wiring, a drained battery, or a struggling alternator can bring your machine to a halt. Let’s get into some practical fixes that can save you time and frustration.
Battery Inspection And Replacement
The battery is the heart of your electrical system. Start by checking for visible signs of wear—corrosion on the terminals, cracks, or swelling. A simple cleaning with a wire brush can often restore proper contact if corrosion is the issue.
Use a multimeter to test the battery’s voltage. If it’s below 12.4 volts, it might need charging or replacing. Don’t hesitate to replace an aging battery; it’s a small investment compared to downtime on the job.
Pro tip: Always disconnect the negative terminal first to avoid short circuits. Ever accidentally caused a spark while working on a battery? That’s a lesson you only want to learn once!
Testing The Alternator
A weak alternator can drain your battery, leaving you stranded. With the machine running, measure the voltage at the battery terminals. A healthy alternator should show a reading between 13.8 and 14.5 volts.
If the voltage is too low or fluctuates, the alternator might be faulty. Listen for unusual noises—squealing belts or grinding sounds can also be a sign of trouble.
Think about it: How often do you assume it’s the battery when it’s actually the alternator? Testing saves you from unnecessary replacements.
Inspecting Wiring Connections
Loose or damaged wires can disrupt the entire electrical system. Carefully inspect all connections, especially around the battery, alternator, and control panel. Look for frayed wires, melted insulation, or loose terminals.
Secure any loose connections and replace damaged wires immediately. Even a small crack in insulation can lead to bigger problems down the road.
Here’s a tip: Keep a set of zip ties and electrical tape in your toolbox. They’re lifesavers for quick fixes while you wait to replace parts.
Troubleshooting the electrical system doesn’t have to be overwhelming. With these steps, you can identify and address issues quickly. What’s the first thing you’ll check on your Bobcat 250? Let me know in the comments!
Credit: www.youtube.com
Welding Performance Adjustments
Fine-tuning your Miller Bobcat 250 is essential for maintaining optimal welding performance. Small adjustments can make a big difference in the quality of your welds. Whether you’re addressing voltage calibration, electrode wear, or surface cleanliness, taking the time to troubleshoot ensures smoother, stronger welds.
Calibrating Voltage Settings
Getting the voltage settings right is key to achieving clean, consistent welds. Too high, and you risk burn-through; too low, and your welds won’t penetrate properly. Start by checking the machine’s manual for the recommended voltage range based on your material thickness.
Perform a test weld on scrap material to see how the arc behaves. Adjust the settings incrementally, watching for a stable, crackling arc. If you hear popping or see uneven beads, tweak the voltage slightly and test again until it’s just right.
Replacing Worn Electrodes
Worn electrodes can sabotage even the best welding setup. They degrade over time, leading to unstable arcs and poor weld quality. Inspect your electrodes regularly for wear, cracks, or signs of oxidation.
If the tip looks uneven or heavily used, swap it out for a new one. Using a fresh electrode not only enhances performance but also reduces frustration during long projects. Remember, a good electrode is like a reliable partner—it makes the job easier.
Cleaning The Workpiece Surface
A clean workpiece is non-negotiable for strong welds. Dirt, rust, or paint can interfere with the electrical connection and lead to weak joints. Before starting, use a wire brush or grinder to remove any surface contaminants.
If you’re dealing with oily or greasy metal, wipe it down with a degreaser or acetone. Think about it—would you paint on a dusty canvas? The same principle applies here. A clean surface ensures the weld adheres properly and lasts longer.
Taking these steps not only improves your welding results but also saves you time in the long run. Which adjustment do you think could have the biggest impact on your next project?
Preventive Maintenance Tips
Preventive maintenance is key to keeping your Miller Bobcat 250 running smoothly. Regular care reduces unexpected breakdowns and ensures optimal performance. Simple upkeep steps can save time, money, and effort in the long run.
Regular System Inspections
Inspect your machine for loose wires, worn parts, and visible damages. Check hoses for cracks or leaks. Ensure connections are secure and free from corrosion. Look for signs of wear on the engine belts and filters. Replace damaged components to prevent further issues. Use a flashlight to check hard-to-reach areas for dirt buildup.
Proper Storage Practices
Store the Miller Bobcat 250 in a dry, clean location. Avoid areas with high humidity or extreme temperatures. Cover the unit with a tarp to protect it from dust. Ensure the storage area is well-ventilated to prevent moisture buildup. Disconnect the battery before long-term storage to preserve its lifespan. Keep the machine away from direct sunlight or harsh weather.
Scheduling Routine Service
Set reminders for routine maintenance based on the manual guidelines. Schedule oil changes, filter replacements, and spark plug checks regularly. Keep track of service dates to avoid delays. Contact a qualified technician for complex issues. Ensure the machine undergoes professional servicing at recommended intervals.

Credit: www.reddit.com
When To Seek Professional Help
Sometimes, troubleshooting your Miller Bobcat 250 can feel overwhelming. While many issues can be resolved with basic checks, others may require expert assistance. Knowing when to seek professional help can save time and prevent further damage. Below, we’ll explore key signs and factors to consider before calling a technician.
Identifying Complex Problems
Some issues are too complex for DIY fixes. For instance, if the machine won’t start despite checking fuel and connections, it might involve internal electrical components. Persistent error codes or unusual noises may also signal deeper issues. These cases often need specialized tools and knowledge.
Attempting to fix such problems without expertise can worsen the situation. It’s better to consult a professional for a safe and accurate diagnosis.
Warranty Considerations
Check if your Miller Bobcat 250 is still under warranty. Many manufacturers void warranties if unauthorized repairs are made. Attempting certain fixes yourself could lead to unexpected costs later.
Review the warranty terms to understand what’s covered. If your issue qualifies, contact an authorized repair center for assistance.
Finding Certified Technicians
Certified technicians have the skills to handle Miller Bobcat 250 repairs. They are trained to diagnose issues and provide reliable solutions. Search for technicians approved by Miller Electric to ensure quality service.
To locate a certified repair center, visit the official Miller Electric website. You can also ask local welding shops for recommendations.
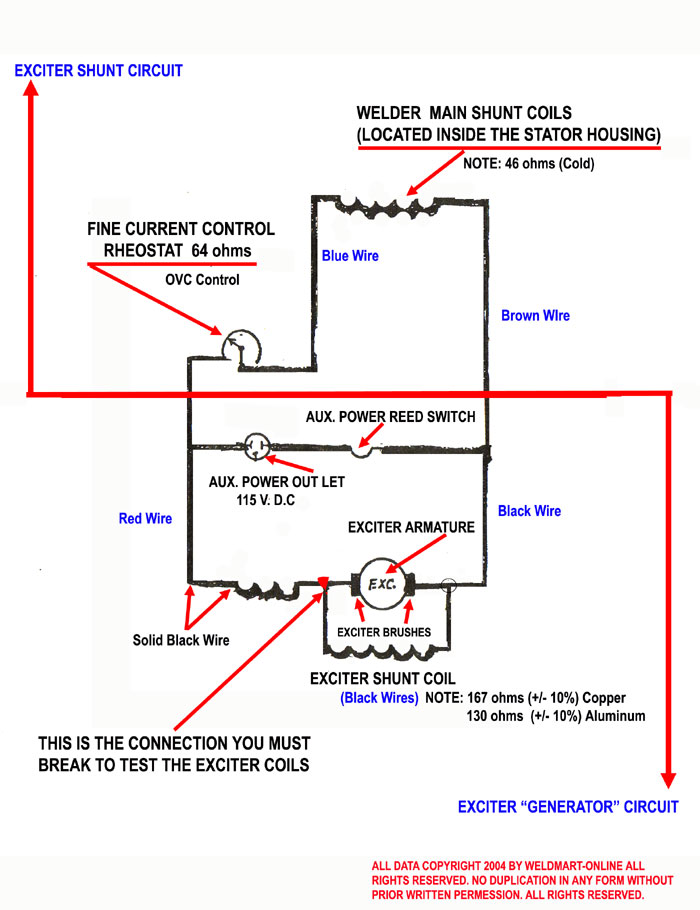
Credit: www.weldmart.com
Conclusion
Troubleshooting the Miller Bobcat 250 doesn’t have to feel overwhelming. Start by understanding common issues and checking basic components. Regular maintenance can prevent many problems before they occur. Always follow the user manual for safe and accurate guidance. If problems persist, contacting a professional may be necessary.
Keeping your equipment in good condition ensures reliability and longer lifespan. Take your time, stay patient, and tackle one issue at a time. With consistent care, your Miller Bobcat 250 will remain a dependable tool for your projects.
")


