If you’re dealing with issues while using your Millermatic 211, you’re not alone. Whether it’s inconsistent welds, wire feeding problems, or error codes flashing on the screen, troubleshooting can feel frustrating.
But here’s the good news—most problems have simple fixes, and you don’t have to be a welding expert to get your machine back on track. We’ll guide you step by step through the most common Millermatic 211 issues and how to solve them.
By the end, you’ll feel confident diagnosing problems and making adjustments to keep your welder running smoothly. Ready to save time, avoid headaches, and get back to creating those clean, precise welds? Let’s dive in.
Common Startup Issues
The Millermatic 211 is a reliable welding machine. Yet, like any equipment, it can face startup issues. These problems can disrupt your workflow and cause frustration. Understanding the common startup issues helps you resolve them quickly. Below are some frequent problems and their solutions.
Machine Not Powering On
If the machine does not power on, check the power source first. Ensure the plug is firmly connected to the outlet. Verify the outlet is supplying electricity using another device. Examine the power cord for any visible damage or wear. A tripped circuit breaker could also be the cause. Reset the breaker and try powering on the machine again.
Error Codes And What They Mean
The Millermatic 211 displays error codes for specific issues. Each code points to a problem needing attention. For example, Err1 often signals a short in the gun cable. Err2 could indicate a thermal overload. Always refer to the user manual for a detailed explanation of codes. Understanding these codes helps in diagnosing the problem faster.
Resetting The System
Sometimes, resetting the system solves startup issues. Turn the machine off and disconnect it from the power source. Wait for a few minutes before reconnecting it. Power it back on and check if the issue persists. A reset clears minor glitches and restores normal operation. For persistent problems, consider seeking professional help.
Wire Feed Problems
Wire feed problems can quickly disrupt your welding process, leaving you frustrated and your project unfinished. If your Millermatic 211 isn’t feeding wire properly, you’re not alone—this is one of the most common issues users face. The good news? Most wire feed problems can be solved with simple adjustments and regular maintenance.
Wire Not Feeding Properly
When the wire isn’t feeding smoothly, it can result in inconsistent welds or no weld at all. Start by checking the spool. Is it loaded correctly? Ensure the wire spool isn’t tangled or overly tight. A misaligned spool can prevent the wire from feeding evenly.
Inspect the drive rolls next. If they are dirty or worn out, they can’t grip the wire effectively. Clean them with a wire brush or replace them if needed. Finally, check the wire liner for any blockages—it could be dirt or debris obstructing the feed.
Have you ever noticed wire feeding issues after switching wire types? Different wire gauges may require a specific drive roll size. Make sure you’re using the correct roll for your wire diameter.
Adjusting Feed Tension
Feed tension is crucial for smooth wire flow. Too much tension will crush the wire, while too little will cause slipping. Adjust the tension knob on your Millermatic 211 until the wire feeds consistently without slipping or bending.
Here’s a simple test: manually pull the wire through the nozzle while the drive rolls are engaged. If it’s overly hard to pull, reduce the tension. If it slips easily, increase it slightly until it grabs firmly.
Don’t forget to test your adjustments by running the welder at a low speed. A consistent feed rate indicates proper tension. Did you know adjusting tension regularly prevents long-term damage to the drive system?
Fixing Wire Jamming
A jammed wire is both annoying and time-consuming to fix. Start by cutting off the jammed section near the drive rolls. Don’t force the wire out—it can damage the internal components.
Remove the gun assembly and check the liner for any kinks or blockages. A bent liner can cause repeated jams. Replace it if necessary. Also, make sure the tip of your welding gun isn’t clogged or worn out—it’s a common cause of wire jams.
Have you ever wondered why jams happen more often with rusty wire? Rust creates friction, making the wire harder to feed. Keep your wire in a dry, clean environment to avoid this issue altogether.
If jams persist despite troubleshooting, it might be a sign of deeper mechanical issues. Consider consulting a technician if you’re stuck.
Wire feed issues don’t have to derail your welding projects. With a few practical tweaks, you can keep your Millermatic 211 running smoothly and avoid costly downtime. What’s your go-to method for dealing with wire feed problems?
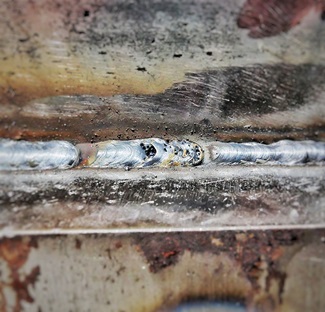
Inconsistent Welding Arc
Inconsistent welding arcs can disrupt the quality of your work. If your Millermatic 211 is experiencing this issue, it may indicate underlying problems. Understanding the causes and fixing them can save time and effort. Let’s explore common reasons and solutions to stabilize the arc.
Causes Of Arc Fluctuation
Arc fluctuation often occurs due to inconsistent power flow. Loose connections in the machine can disrupt the current. Damaged cables may also cause interruptions in the power supply. Dirt or debris on the contact tip or nozzle can affect the arc’s stability. Incorrect wire speed or voltage settings can lead to irregular performance. Identifying the root cause is the first step to fixing the issue.
Checking Ground Connections
A poor ground connection can weaken the arc. Inspect the ground clamp for secure attachment to the workpiece. Ensure the surface is clean and free of paint, rust, or grease. A firm and clean connection ensures steady power flow. Replace worn or damaged ground cables to avoid interruptions.
Cleaning The Nozzle And Contact Tip
Spatter buildup on the nozzle can block the flow of shielding gas. This can result in an unstable arc. Remove the nozzle and clean it thoroughly with a wire brush. Check the contact tip for debris or wear. Replace it if it’s damaged or clogged. Regular cleaning keeps the equipment running smoothly and improves arc stability.
Credit: www.millerwelds.com
Overheating Issues
Overheating is a common issue with the Millermatic 211, especially during long welding sessions. When your machine gets too hot, it can shut down unexpectedly, disrupt your work, or even damage internal components. Understanding how to address overheating can save you time, money, and frustration.
Cooling System Maintenance
A well-maintained cooling system is your first line of defense against overheating. Regularly inspect the fan to ensure it’s running smoothly and not obstructed by dust or debris. A clogged fan can drastically reduce airflow, trapping heat inside the unit.
Use compressed air to clean the vents and fan blades periodically. Make this a habit, especially if you work in dusty or dirty environments. Ignoring this simple task could lead to unnecessary downtime.
Have you noticed unusual noises from the fan? This could indicate a problem requiring immediate attention. Replace a faulty fan promptly to avoid further complications.
Recognizing Thermal Overload
The Millermatic 211 is equipped with a thermal overload protection system. This feature automatically shuts down the machine when it gets too hot to prevent permanent damage. If your machine suddenly stops working, this safety mechanism might have been triggered.
Look for the indicator light on your welder to confirm a thermal overload. It’s not a malfunction—it’s a warning sign. Treat it as a reminder to give your machine a break.
Running your welder at high settings for too long can easily activate thermal overload. Are you pushing your machine beyond its duty cycle? Check the manual to ensure you’re operating within safe limits.
Allowing Proper Cool-down Time
Patience goes a long way in preventing overheating. After heavy use, allow the Millermatic 211 to cool down naturally before starting another project. Ignoring this step can shorten the lifespan of your machine.
Place your welder in a well-ventilated area during breaks. Proper airflow speeds up the cooling process. Avoid enclosing the machine in tight spaces where heat can accumulate.
Think about this: Are you rushing through your projects without giving your equipment a breather? Taking a few extra minutes to cool down your welder can save you hours of repairs later.
Gas Flow Troubles
Gas flow troubles can be a real headache when working with your Millermatic 211. Poor gas flow can lead to weak welds, excessive spatter, and even visible porosity in your work. If you’ve ever found yourself frustrated, wondering why your welds aren’t turning out as expected, tackling gas flow issues might be the key to solving your problem.
Detecting Leaks In The Gas Line
Leaks in the gas line can cause inconsistent gas coverage, impacting your weld quality. Start by inspecting the gas hoses and connections for visible cracks or loose fittings. A quick test involves applying soapy water to the suspected areas—bubbles will form where leaks are present.
Pay attention to the regulator and fittings as these are common trouble spots. Tighten any loose connections using a wrench, but avoid over-tightening, which can damage the fittings. If leaks persist, consider replacing worn-out hoses or faulty connectors.
Have you ever ignored a small hiss from the gas line? Those tiny leaks can add up over time, wasting gas and affecting weld performance. Address them promptly to save time and resources.
Adjusting Gas Flow Settings
Incorrect gas flow settings can lead to weld defects. Check your flow meter or regulator to ensure the gas is set within the recommended range for your material and wire. Typically, 20-30 cubic feet per hour (CFH) works well for most projects.
If you’re unsure about the proper setting, refer to the Millermatic 211 user manual for guidance. Adjust the flow knob gently while observing the gauge to avoid sudden spikes or drops. A steady gas flow is crucial for consistent weld quality.
Have you ever set the gas flow too high, thinking it’d improve coverage? Excess gas can create turbulence, pulling oxygen into the weld area. Keep the flow balanced to prevent this issue.
Ensuring Proper Gas Cylinder Connection
A poorly connected gas cylinder can disrupt flow entirely. Double-check that the cylinder valve is securely attached to the regulator. Look for signs of wear on the threads or seals, which can lead to gas escaping.
Make sure the cylinder valve is fully open but not over-tightened. Partial openings can restrict gas flow, while over-tightening can damage the valve. Use a proper wrench to tighten connections snugly without forcing them.
Have you ever wondered why your gas runs out faster than expected? A loose connection might be the culprit. Ensure all fittings are secure to avoid unnecessary gas loss.
Fixing gas flow issues might seem tedious, but every adjustment brings you closer to flawless welds. What’s your go-to trick for handling gas flow troubles? Share your experience below!

Credit: www.youtube.com
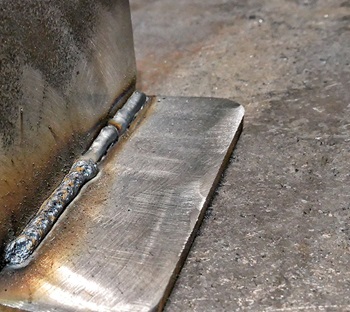
Poor Weld Quality
Experiencing poor weld quality with your Millermatic 211 can be frustrating. It often leads to weak welds, excessive spatter, or uneven bead appearance. These issues usually stem from incorrect settings, unsuitable materials, or contamination. Addressing these factors can significantly improve your welding results.
Adjusting Voltage And Amperage
Incorrect voltage and amperage settings can affect weld quality. Too much voltage can create excessive spatter and a flat bead. Too little voltage can cause poor penetration and uneven welds. Use the Millermatic 211’s chart or manual to match settings with material thickness. Make small adjustments during test welds to find the perfect balance.
Choosing The Right Wire And Gas Combination
The wrong wire or gas combination can weaken your weld. For mild steel, use solid wire with a shielding gas like C25 (75% argon, 25% CO2). Aluminum welding requires aluminum wire with 100% argon gas. Ensure the wire size matches the material thickness. Using the right combination ensures clean, strong welds with minimal defects.
Addressing Contaminated Materials
Contaminated surfaces can ruin weld quality. Dirt, grease, rust, or paint on the material can cause porosity and weak joints. Always clean the metal before welding. Use a wire brush, grinder, or chemical cleaner to remove contaminants. Proper preparation ensures a smooth and consistent weld bead.
Routine Maintenance Tips
Maintaining your Millermatic 211 isn’t just about fixing problems—it’s about preventing them. Regular upkeep keeps your welder running smoothly and extends its lifespan. Let’s dive into some practical tips that’ll make troubleshooting less frequent and welding more efficient.
Inspecting Cables And Connections
Loose or damaged cables can disrupt your welding performance. Make it a habit to visually inspect all cables and connections before each use. Look for frayed wires, cuts, or bent connectors, and replace or repair anything that looks worn.
Pay close attention to the ground clamp. A weak or dirty clamp connection can lead to inconsistent arcs. Clean it regularly and ensure it’s tight to the workpiece. Have you checked the cable insulation lately? Even minor cracks can lead to unsafe conditions.
Cleaning The Drive Rolls
Dirty drive rolls can cause wire feeding issues, which means uneven welds. Use a soft brush or a clean cloth to remove any debris or buildup on the drive rolls. Don’t forget to unplug your welder before cleaning to avoid accidents.
Are your drive rolls too worn to clean? If the grooves are smooth or rounded, it’s time for a replacement. Keeping them in good shape ensures consistent wire tension and better weld quality.
Replacing Worn-out Consumables
Consumables like contact tips and nozzles wear down over time, affecting your arc stability. Regularly inspect these parts and replace them as needed. A worn contact tip can make your wire feeding erratic, so don’t ignore signs like irregular arcs or spatter.
Keep spare consumables on hand to avoid downtime during critical projects. Is your nozzle clogged or damaged? Clean it frequently, but replace it if damage impacts your weld shielding.
What’s your go-to strategy for keeping your consumables in check? Having a system in place helps you stay ahead of wear and tear.
Routine maintenance isn’t complicated, but skipping it can lead to frustrating troubleshooting sessions. Take care of your Millermatic 211, and it’ll take care of your welding projects.
Credit: www.millerwelds.com
Frequently Asked Questions
Why Won’t My Millermatic 211 Turn On?
Check the power cord and outlet. Inspect the fuse and circuit breaker for possible issues.
Why Is My Millermatic 211 Not Feeding Wire?
Verify the spool tension. Check the drive rolls and ensure the wire is not tangled.
How Do I Fix Poor Weld Quality On Millermatic 211?
Check the gas flow, wire speed, and voltage settings. Inspect for dirty or damaged tips and liners.
Why Does My Millermatic 211 Keep Overheating?
Ensure proper ventilation. Clean the cooling fan and avoid prolonged use at high amperage settings.
What Should I Do If Millermatic 211 Displays An Error Code?
Refer to the user manual for the code’s meaning. Reset the machine and inspect for faults.
Conclusion
Troubleshooting the Millermatic 211 doesn’t have to be overwhelming. Start by identifying common issues like wire feeding problems or overheating. Always check connections, settings, and components for wear or damage. Regular maintenance can prevent many problems and keep your welder running smoothly.
If issues persist, consult the user manual or contact professional support. Taking small steps to resolve problems ensures better performance and longer equipment life. Stay patient and focused while addressing each issue carefully. A well-maintained welder saves time and effort in the long run.
Keep learning, and you’ll handle troubleshooting with confidence.
")


