Motherboard issues can be frustrating. But don’t worry, you’re not alone.
Motherboards, often called “mobos,” are the heart of any computer system. They connect all the crucial components, ensuring everything works in harmony. But what happens when your mobo starts acting up? Troubleshooting a motherboard can seem daunting, especially for beginners.
Yet, with the right guidance and a bit of patience, you can identify and resolve many common issues. In this guide, we’ll walk you through essential steps to diagnose and fix your motherboard problems. Whether you’re dealing with power issues, beeping sounds, or connectivity problems, we’ve got you covered. Dive in to get your computer back on track.
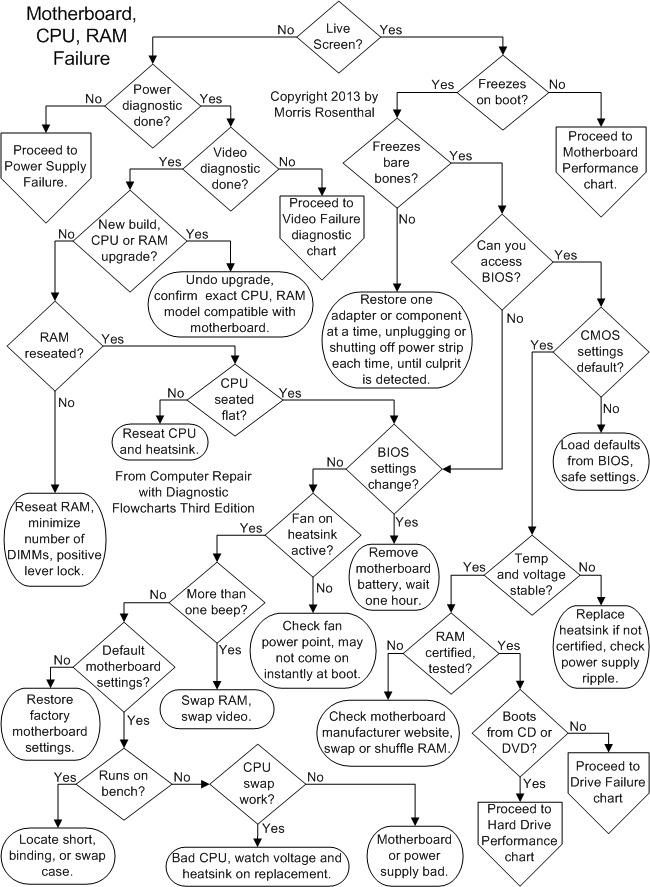
Credit: www.fonerbooks.com
Introduction To Motherboard Issues
Motherboards are the backbone of any computer. They connect all the critical parts of your system. But, like any hardware, they can fail. Recognizing motherboard issues early can save time and money.
Common Symptoms
How do you know if your motherboard has problems? Here are some common symptoms:
- Computer won’t start – Pressing the power button does nothing.
- Random shutdowns – The computer turns off without warning.
- Blue screen errors – Frequent blue screen of death (BSOD) errors.
- No sound – Audio stops working suddenly.
- Unusual beeping – Hearing unusual beeps during startup.
Initial Diagnosis
Before replacing your motherboard, perform an initial diagnosis. Follow these steps:
- Check power supply – Ensure the power supply is working.
- Inspect connections – Verify all cables are properly connected.
- Test memory – Remove and reseat RAM sticks.
- Look for damage – Inspect the motherboard for burnt or damaged parts.
Use these steps to identify potential issues quickly. It helps in troubleshooting and fixing the problem.
Additional Tips
Here are some extra tips to help with troubleshooting:
| Tip | Description |
|---|---|
| Use BIOS | Access BIOS to check hardware status. |
| Swap Components | Try swapping components with known working ones. |
| Seek Help | Consult forums or professionals for complex issues. |
Follow these tips to ensure a smooth troubleshooting process. Remember, patience is key.
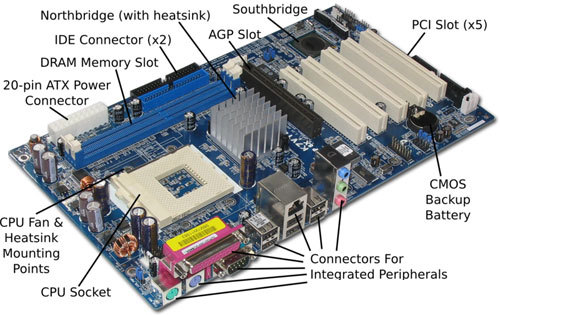
Credit: www.laptopmd.com
No Power Or Boot Issues
Facing no power or boot issues with your motherboard can be frustrating. Your PC might not turn on at all, or it might power up but fail to boot. These problems can arise from various sources, but don’t worry. We’ll walk you through some essential steps to diagnose and fix the issue.
Power Supply Check
The first step is to check your power supply unit (PSU). Ensure the power cable is securely plugged into the wall socket and the PSU. Confirm that the switch on the back of the PSU is turned on.
Next, test the PSU itself. Use a PSU tester or another working PSU to verify it’s delivering power. If the PSU is faulty, replace it with a new one.
Motherboard Connections
Double-check all motherboard connections. Ensure the 24-pin ATX and 8-pin CPU power connectors are firmly in place.
Inspect the RAM sticks. Remove and reseat them to ensure they are properly connected. Check for any loose cables, especially those connecting to the power button.
Look for any signs of damage or burn marks on the motherboard. These could indicate a short circuit or other issues requiring professional repair.
Bios And Firmware Problems
BIOS and firmware problems can be very frustrating. They can stop your computer from booting. They can also cause random crashes. Fixing these issues is often simpler than you think. Let’s explore common solutions to these problems.
Bios Update
Updating the BIOS can solve many issues. Always check the manufacturer’s website first. Download the latest BIOS version for your motherboard. Follow the instructions carefully. Wrong steps can damage your system. Ensure your computer is plugged in during the update. Power loss can be risky.
Resetting Bios
Sometimes, resetting the BIOS can help. It restores default settings. This can fix many problems. Turn off your computer first. Unplug it for safety. Open the case and find the CMOS battery. It looks like a coin. Remove it for a few minutes. Put it back in. Close the case and plug in your computer. Turn it on. The BIOS should be reset.
Overheating And Cooling Solutions
Overheating is a common issue with motherboards. It can lead to system instability and damage. Effective cooling solutions are vital to maintain optimal performance. This section will explore two critical aspects: inspecting the heat sink and fan, and applying thermal paste.
Heat Sink And Fan Inspection
Proper cooling begins with the heat sink and fan. These components dissipate heat from the CPU.
- Check for Dust: Dust can clog the heat sink and fan. This reduces their efficiency. Use compressed air to clean them.
- Ensure Proper Installation: Make sure the heat sink and fan are securely attached. Loose components can’t cool effectively.
- Fan Operation: Verify that the fan is spinning correctly. A faulty fan can lead to overheating.
Thermal Paste Application
Thermal paste plays a crucial role in heat transfer. It fills microscopic gaps between the CPU and heat sink.
- Clean the Surface: Remove old thermal paste from the CPU and heat sink. Use isopropyl alcohol and a lint-free cloth.
- Apply New Thermal Paste: Place a small amount of thermal paste on the center of the CPU. A pea-sized drop is sufficient.
- Spread Evenly: Spread the paste evenly using a flat tool. Ensure a thin, even layer.
- Reattach the Heat Sink: Carefully place the heat sink back on the CPU. Secure it firmly to avoid any gaps.
Effective cooling solutions prevent overheating. This ensures your system runs smoothly. Regular maintenance can prolong the life of your components.
Memory (ram) Issues
Memory (RAM) issues can cause a range of problems in your computer. Slow performance, random crashes, and boot failures are common symptoms. Understanding and troubleshooting RAM problems is crucial for a smooth computing experience.
Ram Compatibility
Not all RAM works with every motherboard. Check your motherboard’s manual or manufacturer’s website. Ensure the RAM’s specifications match the motherboard’s requirements. Look at the type, speed, and capacity. Installing incompatible RAM can prevent your computer from booting.
Testing And Replacing Ram
If you suspect RAM issues, start by testing your current modules. Use software like MemTest86. It runs thorough checks and identifies faulty memory. If errors appear, try reseating the RAM. Remove and reinsert it firmly. Still having problems? Swap out the suspect module with a known good one.
Replacing RAM is straightforward. Power down your system and unplug it. Open the case and locate the RAM slots. Press down on the clips to release the old module. Align the new module with the slot. Press it down until it clicks into place. Close your case and power up your computer.
Peripheral And Port Problems
Peripheral and port problems can disrupt your computer use. Knowing how to troubleshoot these issues can save time and frustration. This section covers common problems with USB ports and peripheral connectivity.
Usb Port Failures
USB ports are essential for connecting many devices. Sometimes, they stop working. First, check if the device works on another port. If it does, the issue is likely with the original port.
Dust can block USB connections. Use a can of compressed air to clean the port. Also, update your motherboard drivers. Outdated drivers can cause USB ports to fail.
Sometimes, the USB port may have power issues. Check the power settings in the BIOS. Ensure USB ports are enabled and receiving enough power.
Peripheral Connectivity
Peripheral devices include keyboards, mice, and printers. Connection issues are common. Start by checking the cables. Ensure they are firmly connected and not damaged.
Next, restart your computer. Sometimes, a simple reboot can fix connectivity problems. If the problem persists, update the device drivers. Outdated drivers can cause peripherals to stop working.
If your peripheral is wireless, check the battery. A low battery can cause connection issues. Also, try reconnecting the device. For Bluetooth devices, remove and re-pair them in the settings.
Ensure your operating system is up-to-date. Updates often include fixes for connectivity issues. Keeping your system current can prevent many problems.
Graphics And Display Issues
Experiencing graphics and display issues can be frustrating. A malfunctioning display can disrupt your work or gaming session. This section will guide you through solving common graphics and display issues on your motherboard (mobo).
Gpu Connection
Ensure your GPU is securely connected. Loose connections can cause display problems.
- Turn off your computer.
- Open the case carefully.
- Check if the GPU is firmly seated in the PCIe slot.
- Ensure all power cables are connected to the GPU.
If the GPU is not secure, reseat it. Push it gently back into the slot.
Close the case and turn on your computer. Check if the display works properly.
Driver Updates
Outdated drivers can also cause display issues. Keeping your GPU drivers updated is crucial.
- Visit the GPU manufacturer’s website.
- Navigate to the drivers section.
- Download the latest driver for your GPU model.
- Install the new driver following the on-screen instructions.
After installation, restart your computer. This ensures the new driver is fully functional.
Sometimes, installing the latest drivers does not solve the problem. In such cases, try rolling back to a previous driver version. This might resolve compatibility issues.
Sound And Audio Problems
Sound and audio problems on a computer can be very frustrating. Whether you are trying to watch a video or listen to music, no audio can ruin the experience. There are several common issues that can cause sound problems. Let’s explore some solutions to these problems.
Audio Driver Update
An outdated or corrupted audio driver can cause sound issues. It’s important to keep your audio drivers up to date. Check the manufacturer’s website for the latest driver updates. Download and install the updates carefully.
Sometimes, Windows Update may also provide the needed audio driver updates. Go to Settings, then Update & Security, and click on Windows Update. Check for updates and install any available audio driver updates.
Onboard Sound Chip Check
Your motherboard’s onboard sound chip might be the issue. First, verify that the onboard sound is enabled in the BIOS settings. Restart your computer and enter the BIOS setup. Look for the audio settings and ensure the onboard sound is enabled.
Next, check if the onboard sound chip is working properly. Open the Device Manager in Windows and expand the ‘Sound, video and game controllers’ section. Look for any yellow exclamation marks or red Xs. If there are any, this could indicate a problem with the sound chip.
Try disabling and then re-enabling the onboard sound device in Device Manager. Right-click on the device and select ‘Disable device’, then right-click again and select ‘Enable device’.
Networking And Connectivity Issues
Networking and connectivity issues can be frustrating. These problems can prevent you from accessing the internet or connecting to other devices. Understanding how to troubleshoot these issues can save you time and stress. Below, we explore two common methods for diagnosing and fixing these problems: Ethernet Port Test and Wi-Fi Card Troubleshooting.
Ethernet Port Test
The ethernet port is a crucial component for wired internet connections. If you face connectivity issues, start with these steps:
- Ensure the ethernet cable is securely connected to the port.
- Check the cable for any visible damage or wear.
- Use a different ethernet cable to rule out cable faults.
- Connect your device to a different port on the router.
If the problem persists, test the ethernet port itself:
- Connect a different device to the same port.
- Check if the new device connects to the internet.
- Update the network drivers on your computer.
- Restart your router and modem to reset the connection.
If none of these steps work, the port may be faulty. Consider contacting a professional for further assistance.
Wi-fi Card Troubleshooting
Wi-Fi cards allow your device to connect to wireless networks. Issues with the Wi-Fi card can disrupt your internet access. Follow these steps to troubleshoot:
- Ensure the Wi-Fi is enabled on your device.
- Check if your device is within range of the router.
- Restart your device to refresh the network connection.
- Update the Wi-Fi driver software.
If the issue persists, check the Wi-Fi card:
- Open the device manager on your computer.
- Locate the network adapters section.
- Right-click the Wi-Fi card and select “Properties”.
- Check for any error messages or status issues.
If there are issues, try these solutions:
- Disable and then enable the Wi-Fi card.
- Uninstall and reinstall the Wi-Fi driver.
- Replace the Wi-Fi card if necessary.
These steps can help identify and fix common Wi-Fi card issues.
Preventive Maintenance
Preventive maintenance is crucial for the longevity of your motherboard. Regular care can help avoid common issues and ensure smooth performance. Taking simple steps can make a significant difference.
Regular Cleaning
Dust and debris can accumulate inside your computer. This buildup can cause overheating and other problems. Regular cleaning helps keep your motherboard in good condition. Use compressed air to blow out dust. Make sure your PC is turned off and unplugged before cleaning. Clean your computer every few months to keep it in top shape.
Avoiding Electrical Surges
Electrical surges can damage your motherboard. They can occur due to lightning strikes or power outages. Use a surge protector to safeguard your computer. A good quality surge protector can prevent damage. It is a small investment that can save you from costly repairs.
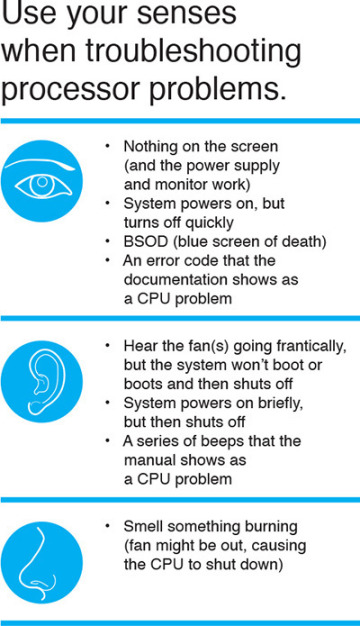
Credit: www.pearsonitcertification.com
Frequently Asked Questions
What Are Common Motherboard Issues?
Common issues include no power, random restarts, and failure to boot.
How Can I Diagnose A Faulty Motherboard?
Check for visible damage, listen for beeps, and test with known good components.
Why Is My Motherboard Not Detecting Ram?
Ensure RAM is seated properly, try different slots, and check compatibility.
How Do I Fix A Motherboard Not Powering On?
Check power connections, test power supply, and look for signs of damage.
What Causes A Motherboard To Overheat?
Poor ventilation, dust buildup, and failing fans can cause overheating.
Conclusion
Fixing motherboard issues can seem daunting, but it’s manageable. Start with basic checks. Ensure connections are secure. Test components one by one. Use troubleshooting tools and consult the manual. Don’t hesitate to seek help from forums or professionals. Regular maintenance helps prevent future problems.
Stay patient and systematic, and you’ll likely find the solution. Your motherboard will run smoothly again. Happy troubleshooting!
")


