A malfunctioning shower can be a real headache. Moen shower valves are known for their durability, but issues can still arise.
In this post, we will guide you through troubleshooting common problems with Moen shower valves. Whether it’s a leak, temperature control issue, or low water pressure, understanding how to address these problems can save you time and money. With our clear instructions, you’ll be able to identify and fix the most common issues yourself.
Let’s dive into the basics of Moen shower valve troubleshooting, ensuring your shower runs smoothly once again.
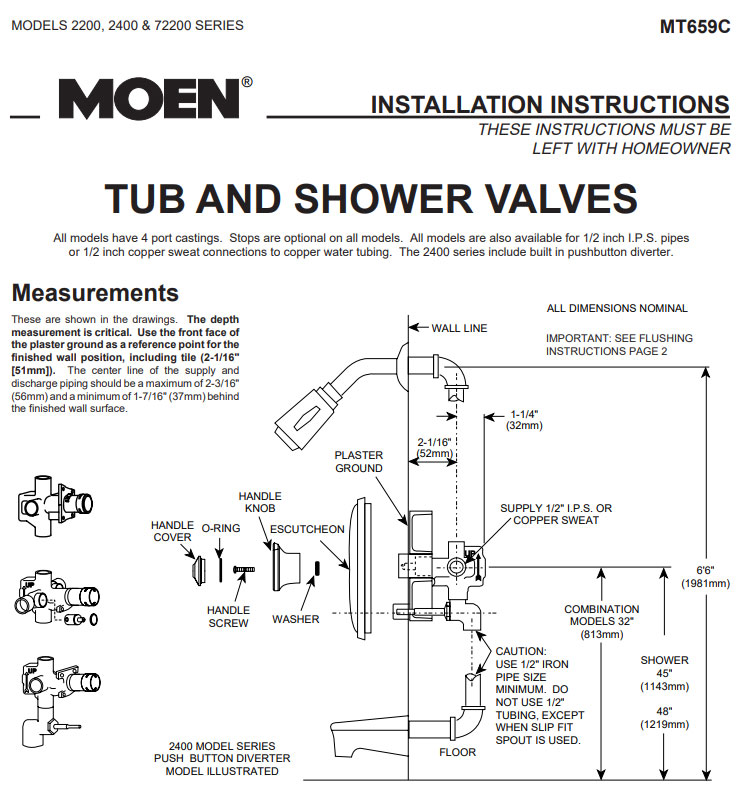
Credit: terrylove.com
Common Issues
Moen shower valves are reliable, but problems can arise. Understanding common issues helps in quick troubleshooting. Let’s explore the most frequent problems users face.
Low Water Pressure
Low water pressure can be frustrating. It often indicates a blockage or buildup.
- Check the showerhead for mineral deposits. Clean or replace if needed.
- Inspect the valve for debris. Remove any visible obstructions.
- Ensure the main water supply valve is fully open.
Regular maintenance helps prevent pressure issues. Clean your showerhead monthly.
Temperature Fluctuations
Temperature fluctuations can make your shower uncomfortable. It’s usually a sign of a faulty valve.
- Inspect the cartridge for wear and tear. Replace if necessary.
- Ensure the hot and cold water supply lines are clear.
- Check the thermostatic control settings. Adjust to your preference.
If problems persist, consider consulting a professional plumber. Consistent water temperature is key to a comfortable shower experience.
Tools Needed
Troubleshooting a Moen shower valve can be a simple task with the right tools. Having the correct tools on hand makes the job easier and faster. In this section, we will outline the essential and optional tools needed for this task.
Essential Tools
These tools are necessary for troubleshooting and repairing a Moen shower valve:
- Adjustable Wrench: Useful for tightening and loosening nuts and bolts.
- Screwdrivers: Both flathead and Phillips screwdrivers are needed to remove screws.
- Allen Wrench Set: Often required to remove set screws in the handle.
- Needle Nose Pliers: Ideal for gripping small parts and components.
- Plumber’s Tape: Ensures a tight seal and prevents leaks.
Optional Tools
These tools are not mandatory but can be helpful:
- Cartridge Puller: Makes it easier to remove the old cartridge.
- Silicone Lubricant: Helps in reinstalling parts smoothly.
- Bucket: Useful for catching water and keeping the work area clean.
- Flashlight: Helps you see in dark or tight spaces.
- Safety Glasses: Protects your eyes from debris.
Having these tools ready will make troubleshooting your Moen shower valve a breeze.
Identifying The Problem
Having issues with your Moen shower valve can be frustrating. Before fixing it, you need to identify the problem. This involves a few simple steps: a visual inspection and listening for noises.
Visual Inspection
Start with a visual inspection. Look closely at the shower valve and surrounding area. Check for leaks or drips. A small puddle or wet spot may indicate a problem.
Inspect the valve handle. Is it loose or hard to turn? A loose handle may need tightening. A hard-to-turn handle might suggest an internal problem.
Examine the showerhead. Is there water coming out when the valve is off? This could mean the valve is not sealing properly.
Listening For Noises
Next, listen for noises. Turn on the shower and listen. Do you hear any strange sounds?
Common noises include:
- Hissing – Could mean a leak in the valve.
- Banging – Often referred to as water hammer, may indicate pressure problems.
- Whistling – Could suggest debris inside the valve.
If you hear any of these noises, it’s a sign something is wrong. Each noise can point to a different issue.
By conducting a visual inspection and listening for noises, you can identify the problem with your Moen shower valve. These steps help you know what needs fixing.
Fixing Low Water Pressure
Experiencing low water pressure in your Moen shower can be frustrating. It affects your overall shower experience. Fortunately, there are some troubleshooting steps to help you fix this issue. Below, we will guide you through the process.
Cleaning The Showerhead
Sometimes, low water pressure is due to a clogged showerhead. Mineral deposits can build up over time. Cleaning the showerhead is a simple solution.
- Remove the showerhead from the pipe.
- Soak it in a bowl of vinegar overnight.
- Use a brush to scrub off any remaining deposits.
- Rinse thoroughly with water.
- Reattach the showerhead to the pipe.
Test the water pressure to see if it improves.
Checking The Valve
If cleaning the showerhead does not help, the issue may be with the valve. The valve controls the flow of water. Here’s how to check it:
- Turn off the water supply to the shower.
- Remove the handle and trim plate from the valve.
- Inspect the valve for any visible debris or damage.
- Clean the valve with a soft brush and vinegar.
- Reassemble the valve and turn on the water supply.
Check the water pressure again. If it is still low, you may need to replace the valve.
Resolving Temperature Issues
Experiencing temperature issues with your Moen shower valve can be frustrating. Water may be too hot or too cold. This can disrupt your shower experience. Resolving these problems often involves simple troubleshooting steps.
Here, we will discuss key areas to address. Let’s start with adjusting the cartridge. Then, we will inspect the thermostat. These actions can help you restore the desired water temperature.
Adjusting The Cartridge
The cartridge controls water flow and temperature. Over time, it may need adjustment. First, turn off the water supply. Then, remove the handle and trim plate. You will see the cartridge inside the valve.
Check for any damage or blockage. Clean the cartridge if necessary. Reinstall it, making sure it is seated properly. Turn the water supply back on. Test the water temperature. Adjust the cartridge if needed until you achieve the right temperature.
Inspecting The Thermostat
The thermostat regulates water temperature. If it malfunctions, you may experience temperature issues. To inspect the thermostat, first, turn off the water supply. Remove the handle and trim plate.
Locate the thermostat inside the valve. Check for any signs of wear or damage. If the thermostat appears faulty, consider replacing it. Follow the manufacturer’s instructions for replacement. Once done, reassemble the handle and trim plate. Turn the water supply back on and test the water temperature.
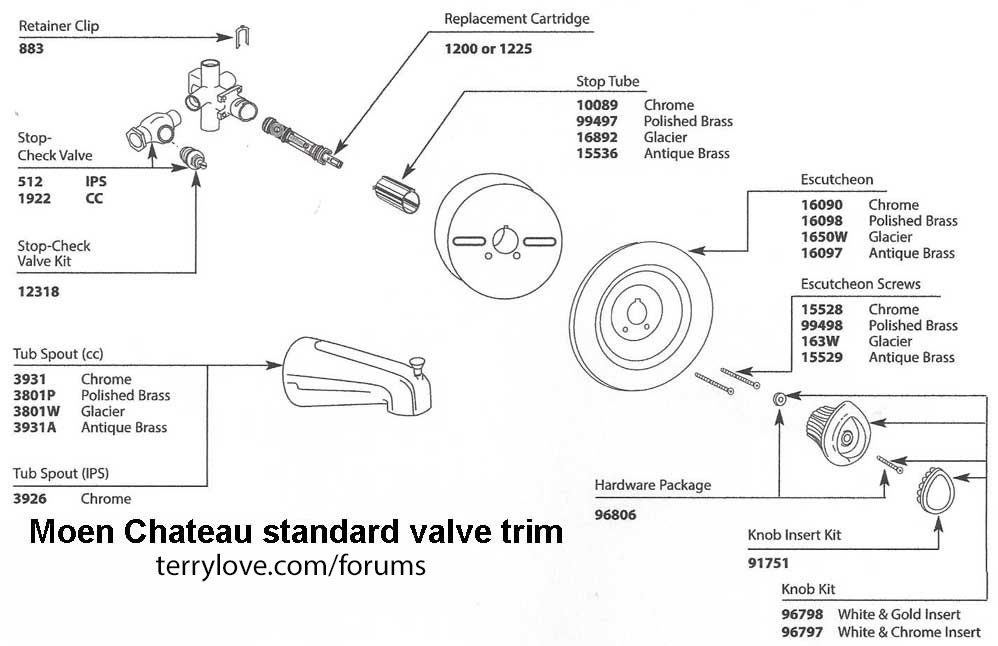
Credit: terrylove.com
Replacing The Cartridge
Replacing the cartridge in your Moen shower valve can solve many issues. This process helps in fixing leaks, temperature problems, and water pressure issues. Follow these steps for a smooth replacement.
Removing The Old Cartridge
First, turn off the water supply to your shower. This prevents any water damage. Next, remove the shower handle. Usually, this involves unscrewing a screw located under a cap on the handle. Use a flathead screwdriver to pry off the cap and expose the screw.
Once the handle is off, remove the escutcheon plate. This is the decorative plate behind the handle. It is usually held in place with screws. After removing the plate, you will see the cartridge. Use pliers to pull out the retaining clip that holds the cartridge in place.
You may need a cartridge puller to remove the old cartridge. Insert the puller and twist it to loosen the cartridge. Once it is loose, pull it out carefully.
Installing The New Cartridge
Before installing the new cartridge, make sure it matches the old one. This ensures proper fit and function. Apply a small amount of plumber’s grease to the O-rings on the new cartridge. This helps in easy installation and prevents leaks.
Insert the new cartridge into the valve. Make sure it is aligned correctly. You can refer to the instructions that come with the cartridge for alignment details. Once it is in place, reinsert the retaining clip to secure it.
Reattach the escutcheon plate and the shower handle. Turn the water supply back on and check for leaks. Run the water to ensure the cartridge is working correctly.
Here’s a summary table for quick reference:
| Step | Description |
|---|---|
| Turn off water supply | Prevent water damage |
| Remove shower handle | Unscrew and remove handle |
| Remove escutcheon plate | Unscrew and remove plate |
| Remove retaining clip | Use pliers to pull out clip |
| Use cartridge puller | Loosen and remove old cartridge |
| Apply plumber’s grease | Grease O-rings on new cartridge |
| Insert new cartridge | Align and insert into valve |
| Reinsert retaining clip | Secure the new cartridge |
| Reattach handle and plate | Reassemble and test for leaks |
Preventive Maintenance
Preventive maintenance is essential for keeping your Moen shower valve in top condition. Regular care can help avoid costly repairs and maintain optimal performance. By following a few simple steps, you can extend the life of your shower valve and ensure a reliable shower experience.
Regular Cleaning
Regular cleaning is crucial for your Moen shower valve. Wipe down the valve with a damp cloth to remove dirt and grime. Use a mild soap solution for stubborn stains. Rinse thoroughly to ensure no soap residue remains. This simple routine keeps your valve operating smoothly.
Annual Inspections
Annual inspections can prevent major issues with your Moen shower valve. Check for leaks around the valve and connections. Look for any signs of wear or corrosion. Test the valve to ensure it opens and closes smoothly. Address any minor issues before they become major problems. Regular inspections can save you from unexpected repairs.
When To Call A Professional
Dealing with a malfunctioning Moen shower valve can be frustrating. Sometimes, the issue is minor and can be fixed with simple DIY steps. But other times, you need to call a professional. Knowing when to call a plumber can save you time, money, and stress.
Signs You Need Help
Certain signs indicate you need professional help. Here are some common indicators:
- Persistent Leaks: If your shower leaks even after tightening parts, it needs a pro.
- Low Water Pressure: Low pressure can signal a deeper issue in the valve.
- Inconsistent Water Temperature: If the water temperature fluctuates, it could be a valve problem.
- Strange Noises: Unusual noises like whistling or banging need expert attention.
- Visible Corrosion: Corrosion on the valve or pipes can lead to bigger problems.
Finding A Qualified Plumber
Finding the right plumber is crucial for effective repairs. Here are some tips to help you:
- Check Credentials: Ensure the plumber is licensed and insured.
- Read Reviews: Look for reviews and testimonials from previous clients.
- Get Estimates: Obtain written estimates from several plumbers to compare prices.
- Ask About Experience: Choose a plumber who has experience with Moen products.
- Verify Warranty: Ensure the plumber offers a warranty on their work.
Calling a professional can make a big difference. It ensures the problem is resolved efficiently and safely. Don’t hesitate to seek help when needed.

Credit: www.youtube.com
Frequently Asked Questions
How Do I Fix A Leaking Moen Shower Valve?
Check the cartridge. Replace if worn or damaged. Tighten connections to stop leaks.
Why Is My Moen Shower Valve Not Turning Off?
A faulty cartridge may cause this issue. Replace the cartridge to fix the problem.
What Causes Low Water Pressure In Moen Shower Valves?
Clogged cartridge or debris in the valve can cause low water pressure. Clean or replace the cartridge.
How Do I Adjust The Temperature On A Moen Shower Valve?
Turn the temperature limit stop on the valve. Adjust until you reach the desired temperature.
Why Is My Moen Shower Valve Hard To Turn?
Mineral buildup or a worn cartridge can cause stiffness. Clean or replace the cartridge.
Conclusion
Fixing a Moen shower valve can be straightforward. Follow the steps we’ve outlined. Troubleshooting saves time and money. Regular maintenance keeps your shower working smoothly. Remember to turn off the water supply first. Use the right tools for the job.
If problems persist, consult a professional. A well-functioning shower enhances your daily routine. Enjoy a relaxing and reliable shower experience. Stay informed, and your plumbing issues will be easier to handle. Your shower will thank you!
")


