The Noco Genius 10 is a popular battery charger. It’s reliable but can sometimes face issues.
Experiencing problems with your Noco Genius 10 can be frustrating. Whether it’s not turning on, failing to charge, or showing error messages, these issues can disrupt your plans. This guide aims to help you troubleshoot common problems with the Noco Genius 10.
Understanding the device better can save you time and stress. We will explore practical solutions for various issues, ensuring your charger works efficiently again. Stay with us to learn how to resolve these problems and get your Noco Genius 10 back in action.
Credit: no.co
Introduction To Noco Genius 10
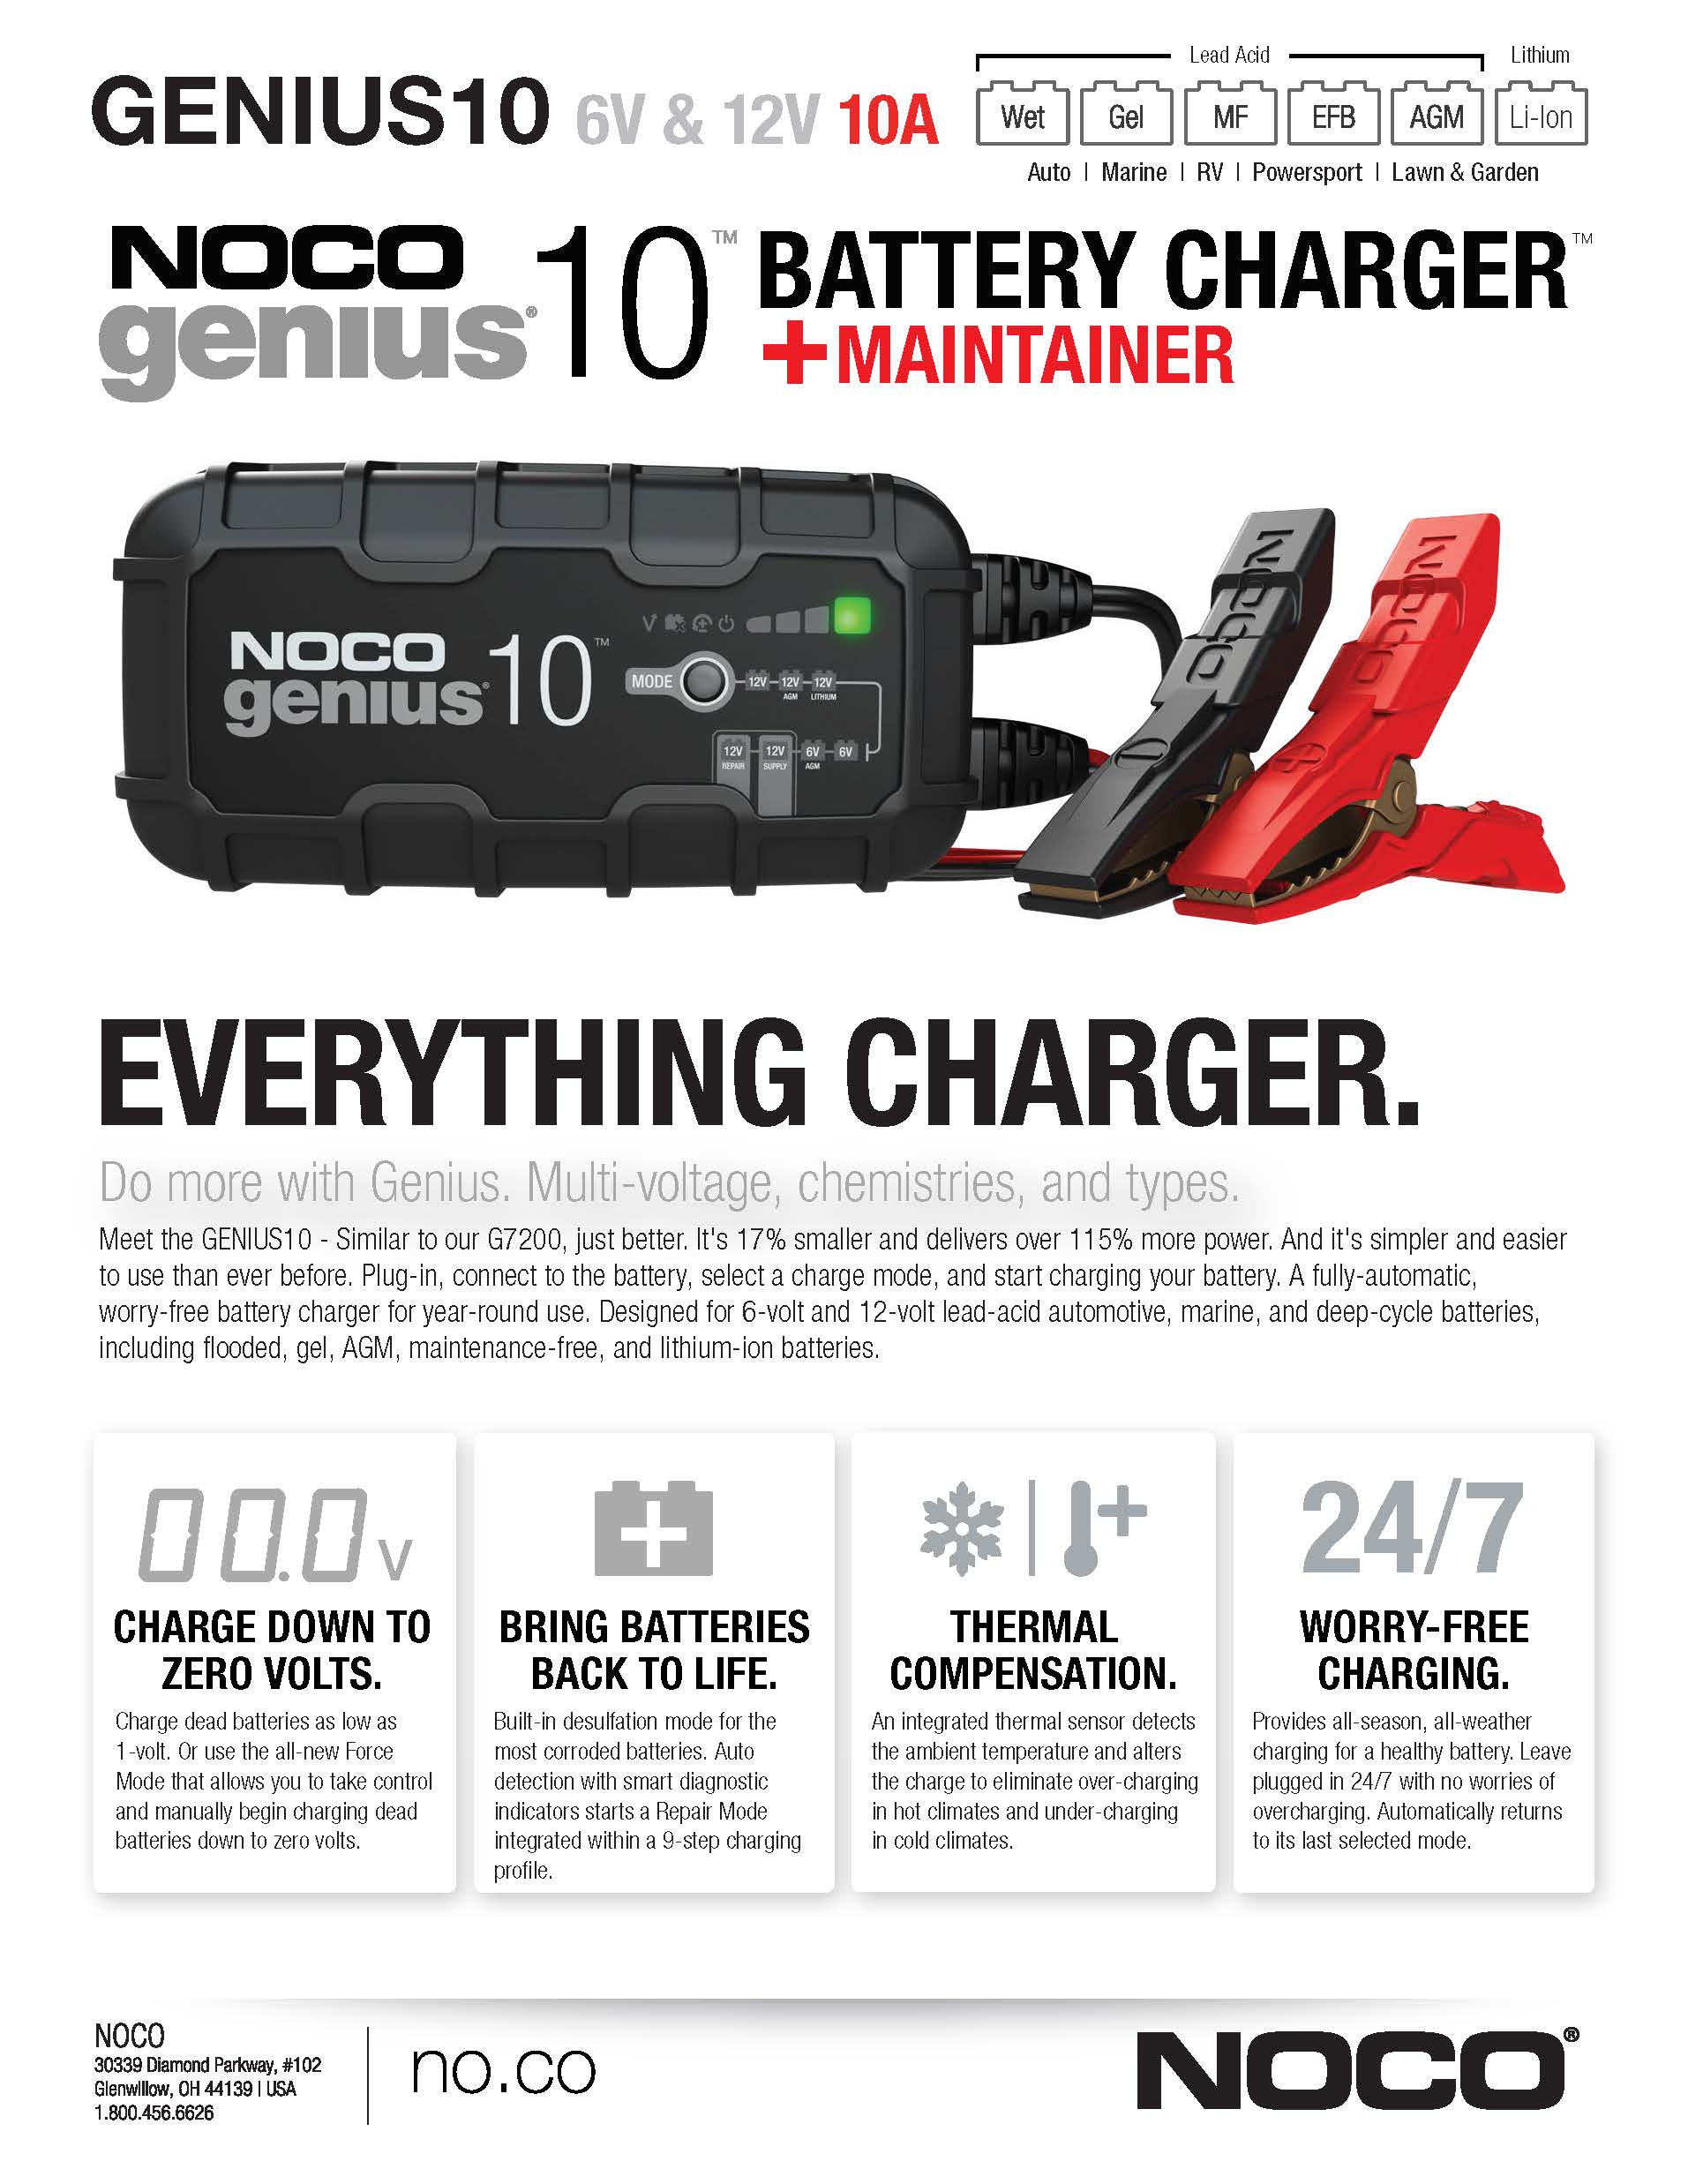
The Noco Genius 10 is a popular battery charger and maintainer. It is known for its efficiency and reliability. Many users prefer it for keeping their vehicle batteries in top condition.
Key Features
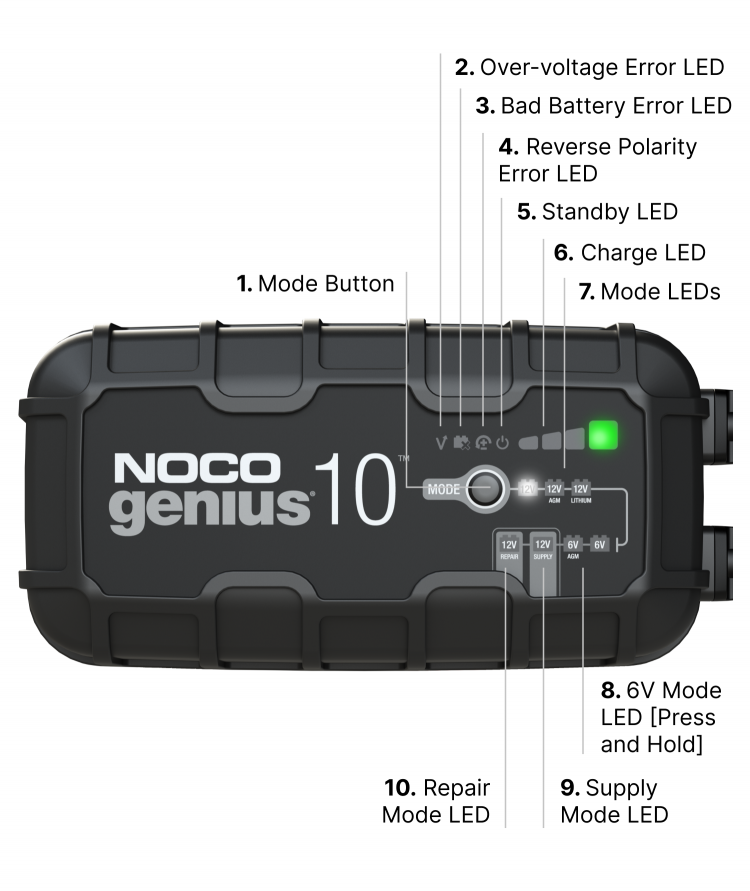
The Noco Genius 10 offers several key features. One standout feature is its versatility. It can charge different types of batteries including lead-acid and lithium-ion. Another feature is its advanced charging technology. This ensures faster charging and better battery health. The device also has safety features. These include spark-proof technology and reverse polarity protection. The compact design makes it easy to store and transport. Users also appreciate its user-friendly interface.
Common Issues
Even the best devices can face issues. The Noco Genius 10 is no exception. One common problem is the device not powering on. This can be due to a faulty power source or damaged cables. Another issue is the charger not recognizing the battery. This may happen with severely discharged batteries. Users sometimes report error codes on the display. These codes indicate various problems such as overheating or connection issues. Knowing these common issues can help in troubleshooting and maintaining the device effectively.
Credit: batteryhq.com.au
Understanding Error Codes
Having trouble with your Noco Genius 10? Understanding error codes is vital. These codes provide insights into what might be wrong with your device. By interpreting these codes correctly, you can address issues quickly and effectively.
Interpreting Codes
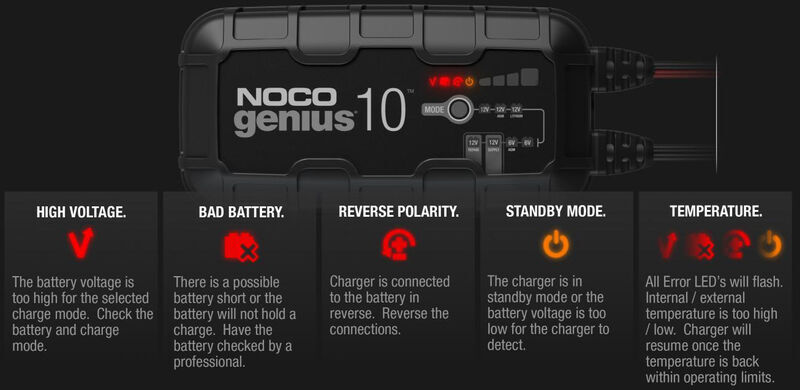
Each error code on your Noco Genius 10 has a specific meaning. These codes help you diagnose the problem. The device displays these codes through flashing lights or messages. Let’s break down how to interpret these codes.
- Red Light Flashing: This usually means there is a serious issue.
- Green Light Flashing: Indicates that the battery is charging normally.
- Yellow Light Flashing: Suggests the battery is almost fully charged.
Refer to the user manual for more details. Each light pattern represents a different error code.
Common Error Codes
Some error codes are more common than others. Here are a few you might encounter:
| Error Code | Description | Action |
|---|---|---|
| E1 | Battery not detected | Check battery connections |
| E2 | Over-voltage protection | Ensure correct voltage setting |
| E3 | Temperature too low | Warm the battery |
| E4 | Temperature too high | Cool the battery |
Understanding these codes can save you time and effort. Always consult your manual for detailed instructions.
Power Supply Problems
Experiencing power supply problems with your Noco Genius 10 can be frustrating. These issues often stem from simple connection errors or battery voltage problems. This section will guide you through identifying and resolving these common issues.
Checking Connections
Ensure all cables are connected properly. A loose or disconnected cable can prevent the charger from working. Follow these steps:
- Check the connection at the battery terminals.
- Inspect the connection at the power source.
- Look for any visible damage on the cables.
Even a small disconnection can cause major issues. Ensure everything is secure and in good condition.
Battery Voltage Issues
Sometimes, battery voltage can affect the charger’s performance. Here’s how to check:
- Use a voltmeter to measure the battery voltage.
- Ensure the voltage matches the charger’s requirements.
- If the voltage is too low, the charger may not start.
A battery with too low voltage might need a jump start. Ensure the voltage is within the required range for proper charging.
By following these steps, you can resolve many power supply issues with your Noco Genius 10. Regular checks and maintenance can prevent most problems.
Charging Issues
Experiencing charging issues with your Noco Genius 10 can be frustrating. The Noco Genius 10 is a reliable battery charger. But like any electronic device, it can encounter problems. This section will help you troubleshoot common charging issues.
Slow Charging
Slow charging can be a common problem. First, ensure that the battery connections are secure. Loose connections can cause slow charging. Inspect the battery terminals for corrosion. Clean them if necessary. The ambient temperature can also affect charging speed. Cold or extremely hot temperatures can slow down the process. Finally, check the power source. Make sure it provides a stable voltage.
Not Charging At All
If your Noco Genius 10 is not charging at all, start by checking the power outlet. Ensure it has power. Plug in another device to test. Next, inspect the charger’s cables for any damage. Damaged cables can prevent charging. Verify the battery’s health. A completely dead or damaged battery may not charge. Lastly, check the charger’s indicator lights. They can provide clues about the issue. If all else fails, consult the user manual or contact customer support.
Temperature Sensor Concerns
The Noco Genius 10 is a popular battery charger known for its efficiency. However, users sometimes face issues related to its temperature sensor. Understanding these concerns can help in troubleshooting and maintaining the charger’s performance. Two main areas of concern are overheating issues and cold weather performance.
Overheating Issues
Overheating can be a common problem with the Noco Genius 10. The temperature sensor plays a crucial role in preventing this. If the charger gets too hot, the sensor will trigger a shutdown to protect the device. This ensures safety and prevents damage. Regular checks can help identify overheating early. Clean the charger to avoid dust buildup. Ensure the device is placed in a well-ventilated area. Avoid using the charger in direct sunlight. This helps maintain a safe temperature.
Cold Weather Performance
Cold weather can impact the Noco Genius 10’s performance. The temperature sensor adjusts the charging rate based on the ambient temperature. This ensures efficient charging even in cold conditions. However, extremely low temperatures can slow down the charging process. This is a protective measure. It prevents damage to both the charger and the battery. Store the charger in a moderate temperature environment. This improves its efficiency. If possible, charge batteries indoors during very cold weather. This helps maintain optimal performance.
Maintaining The Noco Genius 10
Proper maintenance of your Noco Genius 10 ensures it remains reliable and efficient. By conducting regular inspections and keeping it clean, you extend its lifespan. Let’s dive into the key steps for maintaining your Noco Genius 10.
Regular Inspection
Inspect your Noco Genius 10 regularly to spot any potential issues early. Check the cables and connectors for signs of wear or damage. Ensure all connections are secure and free of corrosion. Look for any visible cracks or breaks on the device. If you notice anything unusual, address it immediately to prevent further damage.
Cleaning Tips
Keeping your Noco Genius 10 clean is essential for optimal performance. Start by unplugging the device from any power source. Use a soft, dry cloth to wipe down the exterior. Avoid using water or cleaning solutions, as they can damage the electronics. For stubborn dirt, use a slightly damp cloth, but ensure the device is completely dry before using it again.
Advanced Troubleshooting
Advanced troubleshooting for the Noco Genius 10 can be crucial. Sometimes, basic steps don’t fix the issue. That’s where advanced methods come in. These methods may seem complex, but they are manageable. We will cover firmware updates and factory resets. These steps can help resolve persistent problems.
Firmware Updates
Firmware updates can improve the performance of your Noco Genius 10. They often fix bugs and add new features. To update the firmware, connect the charger to your computer. Visit the Noco website and download the latest firmware. Follow the instructions on the screen. This process takes a few minutes. Ensure the charger stays connected during the update. Interrupting the process can cause errors.
After updating, check if the issues are resolved. If not, proceed to the next step. Firmware updates are a simple way to keep your charger running smoothly.
Factory Reset
A factory reset can resolve stubborn issues. It restores the Noco Genius 10 to its original settings. To perform a factory reset, disconnect the charger from any power source. Press and hold the mode button. While holding, reconnect the charger to the power source. Continue holding the mode button for 10 seconds. Release the button when the lights on the charger flash.
The charger will restart with default settings. Test the charger to see if the issue persists. Factory resets can clear glitches and software errors. They are a useful tool for advanced troubleshooting.
Expert Tips And Best Practices
Using the Noco Genius 10 charger can be straightforward. But sometimes, issues arise. Expert tips and best practices can help you troubleshoot and maintain peak performance. This guide provides practical advice for optimizing your charger’s efficiency and longevity.
Optimizing Performance
To get the best out of your Noco Genius 10, ensure all connections are secure. Loose connections can cause poor charging. Use the correct mode for your battery type. Each mode is designed for different batteries. Check the manual for details.
Keep the charger clean. Dust and dirt can interfere with its functions. Wipe it with a dry cloth regularly. Monitor the charging process. Notice any irregularities? Address them immediately to prevent bigger issues.
Preventive Measures
Store the charger in a cool, dry place. High temperatures can damage electronic components. Avoid moisture exposure. Water can cause short circuits. Regularly inspect cables for wear and tear. Replace damaged cables promptly.
Use the charger within its specifications. Exceeding limits can cause malfunctions. Follow the user manual for safe operations. Proper handling can prevent many common issues. Regular maintenance ensures a longer lifespan for your charger.
Credit: www.etrailer.com
Frequently Asked Questions
What Does The Red Light On Noco Genius 10 Mean?
The red light indicates a problem. Check the battery connection and charge status.
How Do I Reset My Noco Genius 10 Charger?
Disconnect the charger from the battery. Unplug it from the power source for a minute. Reconnect and try again.
Why Is My Noco Genius 10 Not Charging?
Ensure the battery is properly connected. Check for any loose or corroded terminals. Verify power supply.
Can Noco Genius 10 Charge A Completely Dead Battery?
Yes, the charger can revive dead batteries. Use the Force Mode for extremely low voltage batteries.
How Long Does It Take To Charge A Battery With Noco Genius 10?
Charging time depends on battery size and condition. Generally, it takes between 3 to 12 hours.
Conclusion
Troubleshooting the Noco Genius 10 can be simple with the right steps. Always check connections and ensure the battery is compatible. Follow the manual’s guidelines for best results. Regular maintenance can prevent many issues. Remember, safety first when dealing with batteries.
Proper troubleshooting saves time and keeps your charger in good shape. Stay patient and methodical. Happy charging!
")