Orbit solenoid valves play a vital role in irrigation systems. They control the flow of water with precision.
However, they can sometimes malfunction, causing issues in your watering schedule. Understanding how to troubleshoot these valves is essential for maintaining a healthy garden or lawn. In this guide, we will explore common problems and their solutions. Knowing how to fix these issues can save time and money.
You don’t need to be an expert to follow these steps. With a bit of patience, you can get your irrigation system running smoothly again. Let’s dive in and learn how to solve these common valve problems effectively.
Orbit Solenoid Valve Common Problems
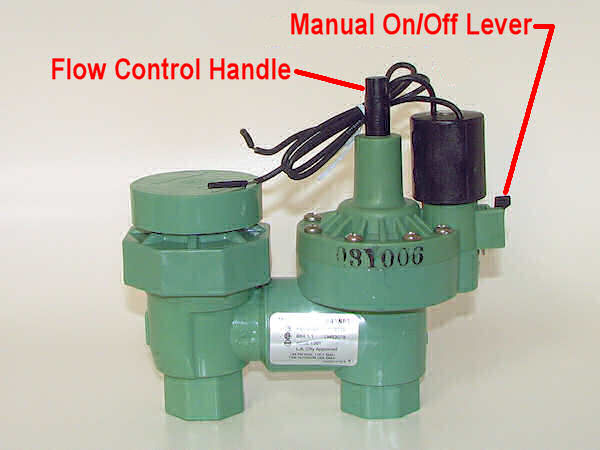
Orbit solenoid valves are essential in many irrigation systems. But like any mechanical device, they can face issues. Understanding common problems can help you troubleshoot effectively. Here are some frequent issues you might encounter with Orbit solenoid valves.
Valve Not Opening
One common issue is the valve not opening. This can cause water flow problems. The first thing to check is the power supply. Ensure the solenoid is receiving power. Sometimes, a loose wire can disrupt the connection.
Another cause could be a clogged valve. Debris can block the valve, preventing it from opening. Cleaning the valve can often solve this. If the valve remains closed, the solenoid might be faulty. Replacing the solenoid can fix this issue.
Valve Not Closing
Another frequent problem is the valve not closing. This can lead to continuous water flow, wasting water. Check if the solenoid is stuck. A damaged solenoid can fail to close the valve. Replacing it might be necessary.
Debris can also cause the valve to stay open. Small particles can prevent the valve from sealing properly. Cleaning the valve can help. If cleaning does not work, the diaphragm might be damaged. Replacing the diaphragm can resolve this issue.
Diagnostic Tools For Orbit Solenoid Valve
Proper diagnostic tools are vital for troubleshooting Orbit solenoid valves. They help identify issues quickly and accurately. This section will cover two essential tools: the multimeter and the pressure gauge.
Multimeter Use
A multimeter is a versatile tool that measures electrical properties. To use it, set the multimeter to measure resistance (ohms). Disconnect the solenoid from the power source first. Place the multimeter probes on the solenoid terminals. Check the reading on the multimeter. A good solenoid typically shows a resistance of 20 to 60 ohms. If the resistance is too high or low, the solenoid might be faulty.
Pressure Gauge
A pressure gauge measures the water pressure within the valve system. Attach the gauge to the valve’s inlet. Turn on the water supply. Observe the pressure reading on the gauge. Proper valve function should reflect stable pressure. If the pressure fluctuates or shows zero, there might be a blockage. Low pressure could indicate a leak. High pressure might suggest a clog.
Orbit Solenoid Valve Electrical Problems

Electrical problems in orbit solenoid valves can disrupt normal operations. These issues might cause the valve to malfunction. Two main areas to check are the wiring and the solenoid coil. Addressing these can help restore proper function. Let’s explore how to troubleshoot these areas.
Wiring Inspection
Start by turning off the power. Safety comes first. Next, inspect the wires connected to the solenoid valve. Look for any visible damage. Frayed or broken wires can cause electrical issues. Ensure all connections are secure. Loose connections can lead to intermittent problems. Use a multimeter to check for continuity. This will confirm if the wires are intact. Replace any damaged wires immediately. Proper wiring ensures a stable power supply.
Solenoid Coil Testing
The solenoid coil is a crucial component. It converts electrical energy into motion. Testing the coil can reveal if it’s faulty. Begin by disconnecting the coil from the power source. Use a multimeter set to the resistance (ohms) setting. Measure the resistance across the coil terminals. A good coil shows a specific resistance range. Refer to the manufacturer’s specifications for the exact range. If the reading is too high or low, the coil might be defective. Replace a faulty coil to restore function. Regular testing can prevent unexpected failures.
Orbit Solenoid Valve Mechanical Failures
Mechanical failures in Orbit solenoid valves can lead to disrupted operations. These issues often arise from debris blockage or damaged components. Understanding and addressing these problems ensures smooth functioning.
Debris Blockage
Debris can clog the valve, causing it to malfunction. Small particles like dirt or rust can block the valve’s internal passages. This blockage prevents the valve from opening or closing properly.
To troubleshoot:
- Turn off the water supply.
- Disassemble the valve carefully.
- Inspect for debris in the valve body.
- Clean all parts with water or a suitable cleaner.
- Reassemble the valve and test it.
Damaged Components
Worn out or broken parts can hinder the valve’s performance. Commonly affected parts include the diaphragm, solenoid coil, and springs.
To identify damaged components:
- Turn off the power supply.
- Remove the valve cover.
- Check the diaphragm for tears or holes.
- Test the solenoid coil for continuity with a multimeter.
- Inspect springs for signs of wear or breakage.
Replacing damaged parts restores the valve’s functionality. Always use compatible parts for replacements.
Orbit Solenoid Valve Hydraulic Concerns
Dealing with hydraulic concerns in an orbit solenoid valve can be challenging. These issues can lead to major system failures. Addressing them early ensures optimal performance and longevity of your valve system.
Pressure Loss
One common issue is pressure loss. This can occur due to blockages in the hydraulic lines. Debris or buildup can restrict fluid flow. Regular cleaning of the lines can prevent this.
Another cause could be worn-out seals. Seals prevent fluid from escaping. Over time, they wear out and cause leaks. Replacing seals regularly can maintain proper pressure levels.
Fluid Leaks
Fluid leaks are another frequent problem. Leaks can be due to damaged hydraulic lines. Inspect these lines for cracks or punctures. Replace any damaged sections immediately.
Poor connections can also lead to leaks. Ensure all fittings are tight and secure. Use a wrench to check connections periodically.
| Issue | Possible Cause | Solution |
|---|---|---|
| Pressure Loss | Blockages in hydraulic lines | Regular cleaning |
| Pressure Loss | Worn-out seals | Replace seals |
| Fluid Leaks | Damaged hydraulic lines | Inspect and replace |
| Fluid Leaks | Poor connections | Tighten fittings |
Maintenance Tips
Proper maintenance of your Orbit solenoid valve ensures smooth operation. Neglecting it can lead to malfunction or failure. Below are some maintenance tips to keep your valve in top condition.
Regular Cleaning
Regular cleaning prevents debris buildup in your solenoid valve. Follow these steps:
- Turn off the water supply.
- Remove the valve cover.
- Inspect the interior for dirt and debris.
- Use a soft brush to clean the parts.
- Reassemble the valve and turn on the water supply.
Clean the valve at least once a year. This reduces blockages and ensures smooth water flow.
Component Lubrication
Lubrication helps the solenoid valve parts move freely. Here’s how to lubricate your valve:
- Disassemble the valve carefully.
- Apply a small amount of silicone-based lubricant to the moving parts.
- Ensure not to over-lubricate, as excess can attract dirt.
- Reassemble the valve, ensuring all parts fit snugly.
Lubricate the valve components every six months. This prolongs the life of the valve and maintains efficiency.
Use these tips to keep your Orbit solenoid valve functioning optimally. Regular cleaning and lubrication are simple tasks that prevent major issues.
Replacement Guidelines
Replacing an Orbit solenoid valve can be easy. Follow these guidelines to ensure a smooth and effective replacement. Proper replacement can extend the life of your irrigation system.
Choosing Compatible Parts
Selecting the right parts is crucial. Ensure the replacement solenoid valve is compatible with your existing system. Check the model number of your current valve. Match it with the new part.
You can find this information on the valve itself or in the user manual. Compatibility ensures proper function and prevents future issues. Use the table below to compare key specifications.
| Specification | Old Valve | New Valve |
|---|---|---|
| Model Number | XXXXX | XXXXX |
| Voltage | 24V | 24V |
| Flow Rate | 1.0 GPM | 1.0 GPM |
Installation Steps
Follow these steps for a successful installation. Gather all necessary tools before starting. This will save time and effort.
- Turn off the water supply. This prevents water from flowing while you work.
- Disconnect the old solenoid valve. Use a wrench to remove it carefully.
- Clean the area around the valve. Remove any debris or buildup.
- Install the new solenoid valve. Ensure it fits snugly.
- Reconnect the wires. Match them according to the color code.
- Turn on the water supply. Check for leaks and proper operation.
Proper installation is key. Take your time and follow each step carefully. This ensures a long-lasting and efficient irrigation system.
Professional Help
Having trouble with your Orbit solenoid valve? Sometimes, the issue goes beyond DIY solutions. Knowing when to seek professional help can save you time and money. This section will guide you on when to call an expert and how to find a qualified technician.
When To Call An Expert
Not every problem can be fixed on your own. If the solenoid valve stops responding, it might need expert attention. Another sign to call a professional is if there are continuous leaks. Leaks can indicate deeper issues that require specialized tools.
Frequent electrical problems also need expert intervention. You might notice the valve not opening or closing correctly. This could be due to wiring issues or internal failures. These are best handled by someone with proper training.
Finding A Qualified Technician
Finding the right technician is crucial. Start by looking for local HVAC or plumbing experts. They often have experience with solenoid valves. Check online reviews and ask for recommendations from friends.
Ensure the technician is certified and insured. This protects you from any potential damages. Ask about their experience with Orbit products. A technician familiar with these specific valves will likely troubleshoot more effectively.
Lastly, compare quotes from multiple technicians. This helps you get the best service at a fair price. Quality service doesn’t always mean the highest cost. Choose a technician who offers a balance of experience and affordability.
Frequently Asked Questions
What Causes An Orbit Solenoid Valve To Fail?
A common cause is dirt or debris blocking the valve. Check for and clean any blockages.
How Can I Tell If My Solenoid Valve Is Bad?
Listen for a clicking sound. No click might mean the solenoid valve is faulty.
Why Is My Solenoid Valve Not Closing?
A damaged diaphragm or debris can stop the valve from closing properly. Inspect and clean it.
How Do You Test An Orbit Solenoid Valve?
Use a multimeter to check for electrical continuity. No continuity means the solenoid is bad.
Can A Solenoid Valve Be Repaired?
Yes, often it can. Clean the valve and replace any worn parts to fix the issue.
Conclusion
Troubleshooting your Orbit solenoid valve can seem challenging at first. Follow the steps mentioned and you will solve most issues. Regular maintenance helps prevent future problems. Clean and inspect parts regularly. Replace worn or damaged components. This keeps your valve working efficiently.
Always consult your manual for guidance. With patience and care, you can maintain a functional valve. Remember, a little effort now saves big repairs later. Keep your irrigation system running smoothly. Happy gardening!


