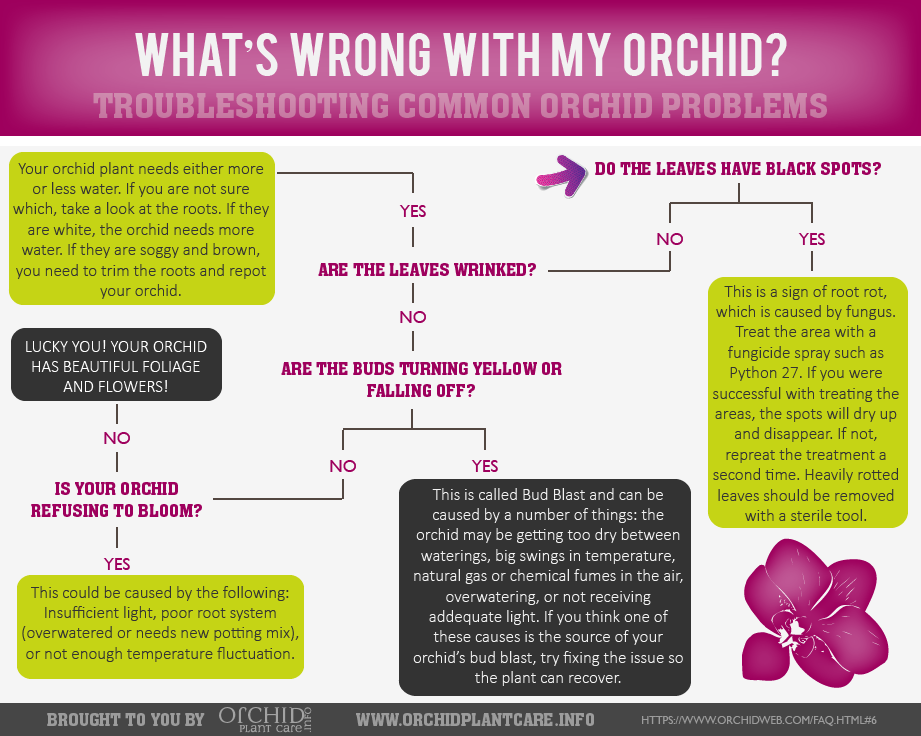
Orchids are beautiful, but they can be tricky to care for. Many orchid enthusiasts face common issues with their plants.
Whether you’re a seasoned gardener or a beginner, understanding how to troubleshoot orchid problems is essential. Orchids can show signs of distress, and knowing what to look for can save your plant. From yellowing leaves to lack of blooms, these issues can be frustrating.
But don’t worry! This guide will help you identify and fix common orchid problems. With a little knowledge and care, you can keep your orchids healthy and thriving. Let’s dive into the world of orchid troubleshooting and ensure your plants stay vibrant and beautiful.
Credit: www.orchidplantcare.info
Common Orchid Problems
Orchids are beautiful and exotic flowers, but they can be tricky to maintain. Many orchid growers face common problems that can affect their plant’s health and beauty. Understanding these issues can help you keep your orchids thriving. Below, we will explore two frequent problems: yellow leaves and dropping buds.
Yellow Leaves
Yellow leaves on orchids often signal trouble. One common cause is overwatering. Orchids need well-draining soil and should not sit in water. Too much moisture can lead to root rot, causing leaves to turn yellow.
Another reason for yellow leaves is inadequate light. Orchids require bright, indirect light. If placed in low light, the leaves can turn yellow. Ensure your orchid gets the right amount of light each day.
Lastly, temperature fluctuations can stress orchids. Sudden changes in temperature can cause leaves to yellow. Keep your orchid in a stable environment, away from drafts and direct heat sources.
Dropping Buds
Orchid buds dropping before they bloom is a common issue. One cause is insufficient humidity. Orchids thrive in humid conditions. Low humidity can cause buds to fall off. Use a humidifier or place a tray of water near the plant to boost humidity.
Another factor is temperature stress. Orchids prefer consistent temperatures. Extreme hot or cold can cause buds to drop. Keep your orchid in a stable, moderate environment.
Lastly, pests can affect orchid buds. Insects like aphids or mites can damage buds, causing them to drop. Regularly inspect your orchid for pests and treat any infestations promptly.
Watering Issues
Watering issues are common with orchids. Knowing how much water your orchid needs can be tricky. Too much or too little water can harm your plant. The key is to find the right balance. In this section, we will look at the symptoms of overwatering and the signs of underwatering. This will help you keep your orchids healthy and happy.
Overwatering Symptoms
Overwatering is a common mistake. Orchids do not like to sit in water. This can cause root rot. Look for yellowing leaves. If the leaves feel soft and mushy, it is a sign of too much water. The roots may turn black or brown. They can also become slimy. Check the pot. If the soil stays wet for days, you may be overwatering.
Underwatering Signs
Underwatering can also be a problem. Orchids need water to thrive. Dry, shriveled roots are a sign of underwatering. The leaves may become dry and wrinkled. They may also turn brown at the tips. Your orchid may drop its buds or flowers. Check the soil. If it feels dry and crumbly, your orchid needs water.
Light Requirements
Orchids are beautiful and delicate plants that require the right amount of light to thrive. Understanding their light needs is crucial for healthy growth. Too much or too little light can lead to various issues. Let’s explore how to troubleshoot these common light-related problems.
Insufficient Light
Orchids need sufficient light to bloom. Without enough light, they may struggle to produce flowers. Here are some signs of insufficient light:
- Dark green leaves
- Slow growth
- No blooms
If you notice these signs, consider adjusting your orchid’s light exposure. Place them near a window with indirect sunlight. You can also use grow lights if natural light is scarce.
Here is a simple table to guide you on the ideal light levels:
| Orchid Type | Light Level |
|---|---|
| Phalaenopsis | Low to Medium |
| Cattleya | Medium to High |
| Dendrobium | High |
Ensure your orchids get at least 6 hours of indirect light daily. This helps in maintaining their health and promoting blooms.
Too Much Light
Excessive light can also harm your orchids. Signs of too much light include:
- Yellow or brown leaves
- Burnt leaf tips
- Wilted appearance
If you see these symptoms, move your orchid to a shadier spot. Use curtains or blinds to filter direct sunlight. This helps protect the plant from intense light.
Avoid placing orchids in direct midday sun. Morning or late afternoon light is gentler and preferred. Adjusting light exposure can save your orchids from damage and help them flourish.
Remember, light balance is key to healthy orchids. Monitor your plants and adjust their light conditions as needed.
Temperature Concerns
Orchids are delicate plants that require specific care to thrive. One of the key aspects of their care involves maintaining the correct temperature. Temperature concerns are crucial for the health of your orchids. If the temperature is not right, your orchids can suffer from various issues. Understanding the ideal temperature range and recognizing signs of cold damage can help keep your orchids healthy.
Ideal Temperature Range
The ideal temperature range for orchids varies based on the type of orchid. Most orchids prefer temperatures between 65°F and 80°F (18°C and 27°C) during the day. At night, they thrive in slightly cooler temperatures, ranging from 55°F to 65°F (13°C to 18°C). These temperature ranges help simulate their natural environment, promoting healthy growth and blooming.
| Orchid Type | Day Temperature | Night Temperature |
|---|---|---|
| Phalaenopsis | 70°F to 80°F (21°C to 27°C) | 60°F to 65°F (16°C to 18°C) |
| Cattleya | 75°F to 85°F (24°C to 29°C) | 55°F to 60°F (13°C to 16°C) |
| Dendrobium | 70°F to 85°F (21°C to 29°C) | 60°F to 65°F (16°C to 18°C) |
Cold Damage
Cold damage in orchids can occur if they are exposed to temperatures below their preferred range. Orchids are sensitive to cold, and extended exposure can lead to various problems. Look for these signs of cold damage:
- Yellowing leaves
- Soft, mushy spots on leaves
- Drooping or wilted appearance
- Blackened leaf tips
If you notice any of these symptoms, move your orchid to a warmer location immediately. Protect your orchids from drafts, especially during winter. Use a thermometer to monitor the temperature around your orchids regularly. This helps ensure they stay within the ideal range.
By understanding the importance of temperature and recognizing cold damage signs, you can provide the best care for your orchids. Keeping them within their preferred temperature range will help them thrive and bloom beautifully.
Humidity Levels
Orchids are beautiful and delicate plants. They need specific care to thrive. One crucial aspect is maintaining the right humidity levels. Orchids originate from tropical climates. These areas have high humidity. To keep your orchids healthy, you must replicate these conditions indoors.
Maintaining Humidity
Orchids need a humidity level of 40-60%. To maintain this, use a humidity tray. Fill a shallow tray with water and pebbles. Place the orchid pot on top. Ensure the pot does not touch the water. This setup creates a humid micro-environment around your orchid.
A humidifier can also help. It adds moisture to the air. Place it near your orchid but not too close. Monitor the humidity with a hygrometer. This tool measures the humidity levels in your home.
Signs Of Low Humidity
Orchids show signs of low humidity through their leaves and flowers. Wrinkled leaves indicate a lack of moisture. The leaves might also turn yellow or brown. Flowers will drop prematurely. Buds may fail to open. These are clear signs your orchid needs more humidity.
Another sign is the appearance of dry, brittle roots. Healthy orchid roots are firm and green. If you see dry, shriveled roots, increase the humidity around your plant. Regularly check your orchid for these signs. Adjust humidity levels as needed to keep your orchid thriving.

Credit: www.reddit.com
Pest Control
Orchids are beautiful, but pests can harm them. Keeping pests away is crucial for healthy orchids. This section will guide you on common pests and natural remedies.
Common Pests
Orchids often attract various pests. The most common ones are spider mites, aphids, and mealybugs. Spider mites are tiny and create fine webs. Aphids are small and green, black, or red. Mealybugs are white and cotton-like.
These pests feed on orchid leaves and stems. They cause damage and can spread disease. Regular checks can help you spot them early. Early detection makes treatment easier.
Natural Remedies
Using natural remedies can control pests effectively. Neem oil is a popular choice. Mix it with water and spray on affected areas. It repels many pests without harming the plant.
Soap water is another option. Mix mild soap with water and spray it on the pests. Ensure you rinse the plant after a few hours. This prevents soap residue from building up.
Introducing beneficial insects can also help. Ladybugs and lacewings eat harmful pests. They are a natural way to keep your orchids healthy.
Nutrient Deficiencies
Orchids are beautiful and delicate plants. They need proper care and attention to thrive. One common issue orchid growers face is nutrient deficiencies. Identifying and addressing these deficiencies early can help your orchids stay healthy and vibrant.
Recognizing Deficiencies
Nutrient deficiencies can show in various ways. Yellowing leaves often signal a lack of nitrogen. If your orchid’s leaves turn purple, it may need more phosphorus. Brown leaf tips can indicate potassium deficiency. Watch for these signs to keep your orchids healthy.
A lack of calcium can cause weak, deformed leaves. Magnesium deficiency often results in yellow bands around the leaves. Iron deficiency might cause new leaves to turn yellow while veins remain green. Recognizing these symptoms helps address nutrient issues promptly.
Fertilizer Tips
Using the right fertilizer is key. Orchids need a balanced mix of nutrients. Choose a fertilizer with a ratio like 20-20-20. This ensures your orchids get all essential nutrients.
Always dilute the fertilizer. Use half the recommended strength. Over-fertilizing can harm your orchids. Fertilize every two weeks during the growing season. Reduce feeding in winter when growth slows.
Consider using a specialized orchid fertilizer. These are designed to meet specific needs of orchids. Look for one with micronutrients like calcium and magnesium. These help prevent common deficiencies.
Regularly flush the potting medium with water. This removes any salt buildup from fertilizers. Salt buildup can damage orchid roots. Flushing helps keep the roots healthy and the plant thriving.

Credit: shoploveplants.com
Repotting Techniques
Repotting orchids is crucial for their health and growth. Orchids need a fresh environment and space to thrive. Improper repotting can harm the plant, while proper techniques can help it flourish.
When To Repot
Knowing when to repot your orchid is essential. Here are some signs:
- The roots are growing out of the pot.
- The potting medium has broken down.
- The orchid looks unhealthy or is not blooming.
- It’s been over two years since the last repotting.
Proper Repotting Method
Follow these steps for the proper repotting method:
- Choose the right pot: Select a pot that is one size larger than the current one.
- Prepare the new pot: Add fresh orchid potting mix to the new pot. Ensure good drainage.
- Remove the orchid from the old pot: Gently remove the orchid. Be careful with the roots.
- Trim the roots: Cut away any dead or rotting roots with sterilized scissors.
- Place the orchid in the new pot: Position the orchid in the center of the new pot. Add potting mix around the roots.
- Water the orchid: Water the orchid lightly to settle the potting mix.
Following these techniques will help your orchid stay healthy and beautiful. Regular repotting ensures a fresh environment for root growth.
Frequently Asked Questions
Why Are My Orchid Leaves Turning Yellow?
Yellow leaves can signal too much water or poor drainage. Ensure proper watering and good airflow.
What Causes Orchid Buds To Drop?
Bud drop often occurs due to temperature changes, low humidity, or insufficient light. Maintain stable conditions.
How Do I Revive A Wilting Orchid?
Check for root rot or dehydration. Trim dead roots and repot in fresh medium. Water appropriately.
Why Are My Orchid Roots Rotting?
Root rot is usually caused by overwatering or poor drainage. Use a well-draining potting mix and water less.
How To Treat Orchid Pests?
Identify the pest first. Use insecticidal soap or neem oil. Isolate the plant to prevent spreading.
Conclusion
Caring for orchids can be challenging, but it is rewarding. By identifying common issues, you can keep your orchids healthy. Follow these simple tips to ensure proper light, water, and care. Remember, every orchid is unique and may need different attention.
Observe your plant regularly for signs of trouble. With patience and care, your orchids will thrive and bloom beautifully. Keep learning and enjoy the journey of orchid care. Happy gardening!
")