Reversing valves play a crucial role in HVAC systems. They control the direction of refrigerant flow.
Having issues with a reversing valve can disrupt your heating and cooling. It’s essential to understand common problems and how to fix them. Troubleshooting these valves might seem tricky at first. But with a bit of guidance, you can handle it.
This guide will help you identify issues and provide simple solutions. Whether you’re a homeowner or a technician, this information is valuable. Stay comfortable all year round by ensuring your HVAC system runs smoothly. Let’s dive into the basics of reversing valve troubleshooting.

Credit: www.youtube.com
Introduction To Reversing Valves
Reversing valves play a crucial role in HVAC systems. They help control the flow of refrigerant. Understanding their function is key to troubleshooting problems. Let’s explore their purpose and common applications.
Purpose And Function
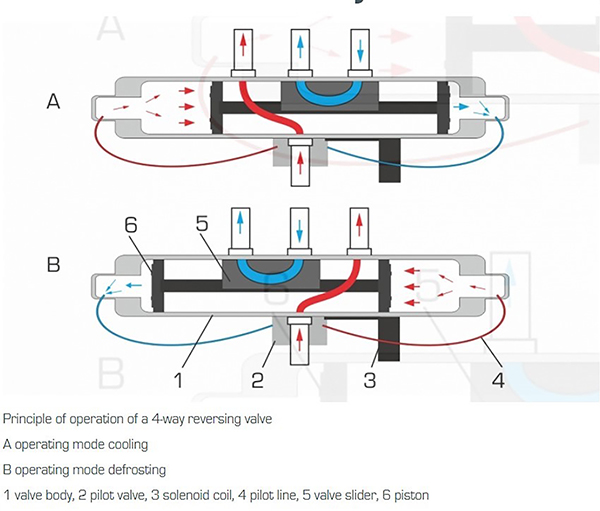
A reversing valve is essential for heat pumps. It changes the direction of refrigerant flow. This allows the system to switch between heating and cooling modes.
The valve consists of a slide mechanism. When actuated, it redirects the refrigerant. This helps maintain the desired temperature in a space. Proper function ensures efficiency and comfort.
| Component | Function |
|---|---|
| Slide Mechanism | Redirects refrigerant |
| Actuator | Controls the slide |
| Ports | Pathways for refrigerant |
Common Applications
Reversing valves are used in various HVAC systems. Primarily, they are found in heat pumps. These systems are common in both residential and commercial settings.
Heat pumps use reversing valves to switch between heating and cooling. They are efficient and versatile. Understanding their application helps in diagnosing issues.
- Residential Heat Pumps
- Commercial HVAC Systems
- Geothermal Systems
In geothermal systems, reversing valves are crucial. They help manage the transfer of heat from the ground. This ensures efficient heating and cooling.
Signs Of Reversing Valve Issues
Recognizing the signs of reversing valve issues is essential for maintaining your HVAC system. The reversing valve is crucial in switching between heating and cooling modes. Knowing the symptoms of a malfunction can help you address problems early. This can save you from costly repairs and discomfort.
Unusual Noises
Strange sounds can be a clear indicator of reversing valve problems. Listen for hissing, buzzing, or clicking noises. These sounds often suggest internal issues with the valve.
Hissing might indicate a refrigerant leak. Buzzing could signal electrical problems. Clicking noises often mean the valve is struggling to switch positions.
System Inefficiency
Another sign of reversing valve issues is a drop in system efficiency. You might notice your HVAC system struggles to maintain the desired temperature. This inefficiency can lead to higher energy bills.
The system may run longer than usual. It may also cycle on and off more frequently. Both of these issues point to a possible reversing valve problem.
Initial Inspection Steps
Reversing valve issues can disrupt the efficiency of your HVAC system. Proper troubleshooting starts with a thorough initial inspection. This step ensures that you identify obvious problems before delving deeper. Follow these initial inspection steps to quickly diagnose reversing valve issues.
Visual Examination
Begin with a visual examination of the reversing valve. Look for any visible damage or wear. Check for signs of corrosion or leaks. Ensure that the valve is clean and free from debris. Any dirt or blockages can impact its function.
Checking Connections
Next, check all electrical and mechanical connections. Ensure that wires are securely connected. Loose wires can cause the valve to malfunction. Tighten any loose connections carefully. Also, inspect the refrigerant lines. Confirm that they are properly connected and not kinked.
Testing The Reversing Valve
Testing the reversing valve is essential for maintaining your HVAC system. This valve switches the flow of refrigerant. It allows the system to change between heating and cooling modes. If the reversing valve fails, the system might not work properly. We will focus on two main methods for testing the reversing valve.
Using A Multimeter
Begin by turning off the power to the HVAC unit. Safety first. Next, locate the reversing valve’s solenoid. It usually has two wires connected to it. Set your multimeter to measure resistance (ohms). Place the multimeter probes on the solenoid terminals. A functional solenoid typically shows a reading between 10 and 50 ohms. If the reading is outside this range, the solenoid might be faulty. Replace it if necessary.
Performing A Pressure Test
Ensure the system is off and safely depressurized. Locate the service ports on the HVAC unit. Attach a pressure gauge to the high and low-side ports. Turn the system on and switch it to cooling mode. Record the pressure readings. Then, switch to heating mode and record the new readings. The pressure should change significantly between modes. If there is little to no change, the reversing valve could be stuck or faulty.
Common Problems And Solutions
Reversing valves are crucial components in HVAC systems, but they can encounter issues. Understanding common problems and their solutions can help maintain system efficiency. Below are some typical problems and how to address them.
Stuck Valve
A stuck valve can disrupt the proper functioning of your HVAC system. This problem often occurs due to dirt or debris blocking the valve mechanism. Sometimes, a faulty solenoid can also be the culprit.
- Symptoms:
- Unit not switching between heating and cooling
- Reduced system efficiency
- Solutions:
- Turn off the system and remove power.
- Check and clean the valve and surrounding areas.
- Inspect the solenoid for any signs of damage. Replace if necessary.
- Reassemble and test the system to ensure the valve operates smoothly.
Leaking Valve
A leaking valve can lead to refrigerant loss and system inefficiency. Leaks are typically caused by worn-out seals or improper installation.
- Symptoms:
- Low refrigerant levels
- Poor heating or cooling performance
- Solutions:
- Turn off the system and remove power.
- Inspect the valve for visible leaks.
- Replace worn-out seals and ensure all connections are tight.
- Recharge the system with the correct amount of refrigerant.
Regular maintenance can prevent these issues and keep your HVAC system running efficiently. Always consult a professional for complex repairs.
Replacing A Faulty Reversing Valve
Replacing a faulty reversing valve is a crucial task for HVAC systems. This component is key to the heating and cooling process. A malfunctioning valve can lead to inefficient temperature control and system failure. To ensure your HVAC system runs smoothly, replacing the faulty reversing valve promptly is essential.
Selecting The Right Valve
Choosing the correct reversing valve is vital. First, check the model and specifications of your current valve. Make sure to match these details with the new valve. This helps avoid compatibility issues. Look for valves from reputable manufacturers. This ensures durability and performance. Consider the valve’s size and connection type. Ensure it fits your system perfectly.
Step-by-step Replacement
Replacing a reversing valve involves a few critical steps. Start by turning off the power to the HVAC system. This ensures safety during the process. Next, locate the faulty valve. It is usually near the compressor. Carefully disconnect the refrigerant lines. Use a wrench to loosen the connections. Take note of the orientation and position of the old valve.
Remove the old valve from the system. Be cautious not to damage surrounding components. Clean the connections to remove any debris. Prepare the new valve for installation. Align it correctly with the system. Reconnect the refrigerant lines securely. Tighten the connections with a wrench. Make sure there are no leaks.
Finally, restore power to the HVAC system. Test the new valve to ensure it works properly. Check for any unusual sounds or issues. Monitor the system for a while to confirm the successful replacement. This ensures efficient heating and cooling performance.
Preventive Maintenance Tips
Regular preventive maintenance is crucial for keeping your reversing valve in top condition. Proper care can prevent costly repairs and ensure efficient operation. Follow these simple tips to maintain your reversing valve effectively.
Regular Inspections
Conduct regular inspections to identify any potential issues early. Check for signs of wear and tear on the valve. Look for any unusual noises or vibrations. Inspect the connections and ensure there are no leaks. Regular checks help you catch problems before they escalate.
Proper System Usage
Ensure that your system operates within recommended parameters. Avoid overloading the system to prevent undue stress on the reversing valve. Follow the manufacturer’s guidelines for usage. Proper usage extends the life of your reversing valve and maintains its efficiency.
Credit: www.hpacmag.com
When To Call A Professional
Reversing valve troubleshooting can be a tricky task. While some issues can be resolved with basic knowledge, there are times when you should call a professional. Knowing when to seek expert help can save you time and prevent further damage.
Complex Repairs
Some reversing valve issues are too complex for DIY fixes. If you face intricate problems, it is best to consult a professional. They have the necessary tools and skills.
Experts can quickly diagnose and fix complex issues. This ensures your system runs smoothly. Avoid making the problem worse by attempting a repair you’re unsure of.
Safety Concerns
Dealing with HVAC systems can be dangerous. There are risks of electric shocks and gas leaks. If you are not trained, you might face serious safety hazards.
A professional knows how to handle such risks safely. They follow safety protocols to protect you and your home. Calling an expert ensures the job is done without any danger to you.

Credit: www.youtube.com
Frequently Asked Questions
What Is A Reversing Valve In Hvac Systems?
A reversing valve switches the direction of refrigerant flow. It enables both heating and cooling in heat pumps.
How Do I Know If My Reversing Valve Is Bad?
Signs include no heating or cooling, unusual noises, or stuck valve. Check for these symptoms.
Why Is My Heat Pump Not Switching Modes?
A malfunctioning reversing valve could be the cause. It may be stuck or damaged, needing replacement.
Can A Reversing Valve Be Repaired?
Yes, but it’s often more practical to replace it. Consult an HVAC professional for advice.
How Often Should A Reversing Valve Be Checked?
Regular maintenance every year is recommended. This ensures the valve functions correctly and avoids major issues.
Conclusion
Understanding and fixing reversing valve issues can save time and money. Regular checks and maintenance ensure smooth operation. Keep an eye on common problems like leaks or blockages. Addressing these early prevents larger issues. Remember, a well-maintained system works efficiently.
Troubleshooting doesn’t have to be hard. Follow these tips to keep your system in top shape. Happy troubleshooting!
")


