Is your reverse osmosis (RO) system not working the way it should? Maybe the water flow is slower than usual, or you’ve noticed strange tastes or leaks.
If you’ve faced any of these problems, you’re not alone—and the good news is that most RO system issues have simple fixes. Understanding how to troubleshoot your RO system can save you time, money, and frustration. You’ll learn easy-to-follow steps to identify common problems and get your system back to producing clean, fresh water quickly.
Keep reading, and take control of your water quality today!
Credit: axeonsupply.com
Common Flow Issues
Common flow issues in a Reverse Osmosis (RO) system often cause frustration. These problems reduce water output and affect system efficiency. Understanding the causes helps in quick troubleshooting and restoration. The most frequent flow problems involve filters, membranes, water pressure, and storage tanks. Addressing each part ensures smooth water flow and proper system function.
Clogged Filters
Filters trap dirt and particles to protect the RO system. Over time, they collect debris and become clogged. A clogged filter slows down water flow and lowers water quality. Replace filters regularly to maintain good flow and clean water. Check both pre-filters and post-filters for blockages.
Membrane Problems
The RO membrane is key to filtering impurities. If it gets fouled or damaged, water flow drops sharply. A clogged membrane limits water output and wastes energy. Clean or replace the membrane based on the manufacturer’s instructions. Testing the membrane’s condition helps detect flow issues early.
Low Water Pressure
RO systems need enough water pressure to push water through filters and membranes. Low pressure reduces flow and causes poor filtration. Check the feed water pressure with a gauge. Increase pressure using a booster pump if needed. Make sure supply valves are fully open and tubing is not kinked.
Storage Tank Malfunctions
The storage tank holds filtered water ready for use. If the tank’s air bladder fails or pressure drops, water flow slows. Test the tank pressure with a pressure gauge. Re-pressurize the tank or replace it if needed. A faulty tank can cause continuous draining or low water flow.
Filter And Membrane Care
Proper care of filters and membranes is essential for a reverse osmosis (RO) system’s efficiency. Filters block dirt, sediment, and particles before water reaches the membrane. The membrane removes dissolved solids and contaminants from the water. Regular maintenance keeps the system working well and extends its life. Understanding filter and membrane care helps prevent common issues and ensures clean water flow.
Identifying Clogged Pre-filters
Pre-filters catch large debris to protect the membrane. Signs of clogging include slow water flow and low pressure. Check the filter housing for dirt buildup or discoloration. A clogged pre-filter reduces water quality and system performance. Replace pre-filters every 6 to 12 months or as needed. Clean filters improve water taste and system lifespan.
Replacing Post-filters
Post-filters polish the water before it reaches the faucet. They remove any remaining tastes or odors. Replace post-filters every 12 months or when taste changes occur. Regular replacement prevents bacteria growth and maintains fresh water. Always shut off the water supply before replacing filters. Follow manufacturer instructions for correct installation.
Detecting Fouled Membranes
The membrane filters out harmful contaminants and dissolved solids. A fouled membrane causes low water output and poor water quality. Watch for a salty or strange taste in the water. Check water pressure before and after the membrane. High pressure drop means membrane fouling. Test the water for total dissolved solids (TDS) regularly. Early detection avoids costly repairs or replacements.
Membrane Replacement Tips
Replace membranes every 2 to 3 years, depending on water quality. Use membranes compatible with your RO system model. Handle membranes carefully to avoid damage. Flush the system after installing a new membrane. This removes any preservatives and activates the membrane. Keep track of replacement dates for timely maintenance. Proper care ensures clean and safe drinking water.
Air In The System
Air trapped inside a reverse osmosis (RO) system can cause several problems. It may lead to noise, reduced water flow, or improper system function. Removing this air ensures smooth operation and better water quality. Understanding how to find and release air is crucial for effective troubleshooting.
Locating Air Relief Valve
Many RO systems include an air relief valve. This valve helps remove trapped air easily. Typically, it is on the top or side of the filter housing. Look for a small button or knob. The system manual can also guide you to the valve’s exact spot.
Releasing Trapped Air
After finding the air relief valve, prepare to release air safely. Place a towel or container underneath to catch any water. Press the valve gently to let air escape. You may hear a hissing sound as air leaves the system. Continue until water flows steadily without bubbles.
Bleeding Air Steps
- Turn off the water supply to the RO system.
- Open the faucet connected to the system to release pressure.
- Locate and press the air relief valve to release trapped air.
- Keep the valve pressed until water flows without air bubbles.
- Close the air relief valve and turn the water supply back on.
- Check the system for normal operation and no air noise.

Credit: www.youtube.com
Water Flow Problems
Water flow problems in a reverse osmosis (RO) system reduce the amount of clean water. These issues cause frustration and may affect daily use. Diagnosing the root cause helps restore proper water flow quickly. Simple checks often resolve common flow issues and avoid costly repairs.
Inspecting Supply Valve And Tubing
Start by checking the supply valve. Make sure it is fully open to allow water flow. A partially closed valve restricts water pressure and volume. Next, examine the tubing connecting the valve to the RO system. Look for any damage or loose connections that can reduce flow. Tighten fittings and replace damaged tubing as needed.
Checking For Kinks
Kinks in the tubing block water flow and lower pressure. Trace all tubing lines carefully and smooth out any bends or twists. Use gentle pressure to straighten tubing without causing damage. Replace sections if tubing is brittle or cracked. Clear tubing ensures smooth water movement through the system.
Tank Pressure Issues
The RO storage tank uses air pressure to push water out. If the tank pressure is too low, water flow slows down. Check the tank’s air pressure using a pressure gauge. The ideal pressure is usually between 5 and 7 psi when the tank is empty. Add air with a pump if pressure is low. If the tank bladder is damaged, replace the tank to restore proper flow.
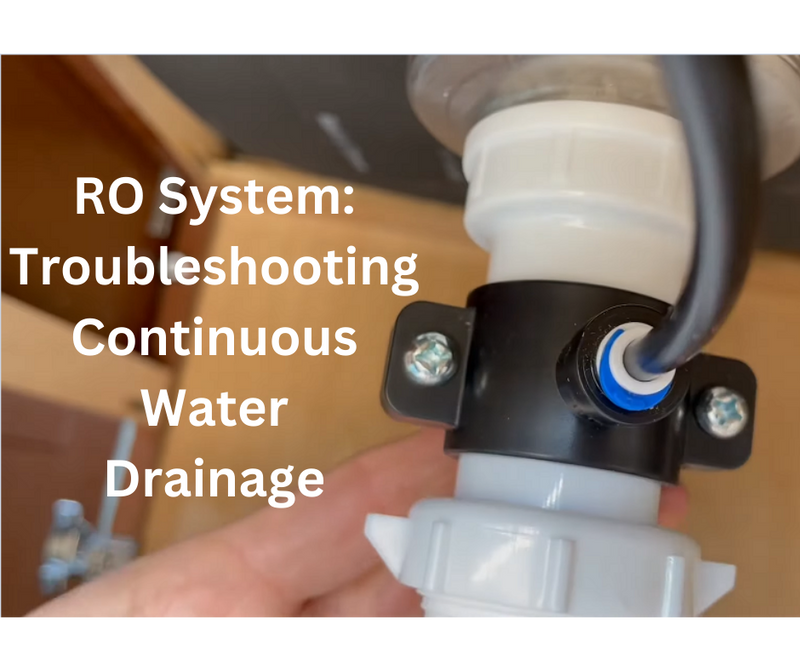
Continuous Draining Solutions
Continuous draining in a reverse osmosis (RO) system wastes water and reduces efficiency. This problem often signals issues with key components like the tank valve, ASO valve, or check valve. Fixing these parts can stop the water from draining nonstop and help your system work properly again.
Isolating The Tank Valve
Start by closing the tank valve to stop water flow into the storage tank. Watch the drain line carefully. If the draining stops, the tank valve may leak or fail to seal. Check the valve for damage or dirt. Clean or replace it to fix the leak. A properly sealed tank valve keeps water from draining continuously.
Testing Aso Valve
The Automatic Shut-Off (ASO) valve controls water flow to the drain. A faulty ASO valve allows water to flow even when the tank is full. Test it by turning off the feed water valve and watching the drain line. If water still drains, the ASO valve might be stuck open. Clean or replace the valve to restore normal operation.
Checking The Check Valve
The check valve prevents water from flowing backward in the system. A broken or worn check valve lets water drain continuously. Inspect the check valve for cracks or debris. Remove and clean it carefully. Replace it if damaged. A good check valve ensures water flows only in one direction, stopping unwanted draining.
Credit: nuaquasystems.com
Leak Fixes
Leaks in a reverse osmosis (RO) system cause water waste and reduce system efficiency. Fixing leaks quickly prevents damage and saves water. Common leak points include filter housings, tubing connections, and seals. Addressing these issues requires simple steps anyone can follow. Below are key methods to stop leaks and keep your RO system working well.
Tightening Filter Housings
Loose filter housings often cause leaks in RO systems. Check each housing by hand. Turn it clockwise to tighten gently. Do not overtighten, as this can crack the housing. Use a filter wrench if needed for a firmer grip. Tightening the housings seals the filters and stops leaks around them.
O-ring Maintenance
O-rings form a watertight seal inside filter housings. Inspect each O-ring for cracks, dirt, or wear. Remove it carefully and clean with a damp cloth. Apply a small amount of silicone lubricant to keep the ring soft and flexible. Replace any damaged O-rings to prevent leaks around filter caps.
Securing Tubing Connections
Tubing connections can loosen and cause leaks over time. Push each tube firmly into its fitting. Check for any cracks or damage on the tubes. If a tube slips out easily, push it back in until it clicks. Use tubing clips or clamps to hold tubes tightly in place. Properly secured tubing stops leaks at joints and fittings.
Replacing Damaged Parts
Damaged parts cause persistent leaks that tightening cannot fix. Inspect filter housings, O-rings, tubing, and fittings for cracks or breaks. Order replacement parts from your RO system brand. Install new parts following the manual’s instructions. Replacing worn or broken components restores your system’s seal and stops leaks completely.
Taste And Odor Troubleshooting
Unpleasant taste and odor in water from a reverse osmosis (RO) system signals a need for troubleshooting. These issues often arise due to filter wear or bacterial growth. Addressing these problems quickly keeps your water fresh and safe to drink.
Proper maintenance of the filters and system cleanliness plays a vital role. The following sections guide you on replacing the post-filter and sanitizing the system to solve taste and odor concerns effectively.
Replacing Post-filter
The post-filter removes any remaining tastes or smells after the water passes through the RO membrane. Over time, it can become saturated and less effective. Change the post-filter every 6 to 12 months to maintain water quality.
Turn off the water supply and release pressure before removing the old filter. Install the new filter according to the manufacturer’s instructions. Flushing the system after replacement helps clear any loose carbon particles that may cause taste issues.
Sanitizing The System
Bacterial growth inside the system can cause bad odors and tastes. Sanitizing your RO system every 6 to 12 months prevents this problem. Use a food-grade sanitizer or a mild bleach solution specifically designed for water systems.
Drain the system completely, then add the sanitizer to the storage tank. Allow it to sit for the recommended time, usually 15 to 30 minutes. Flush the system thoroughly with fresh water to remove all sanitizer before use.
No Water Flow On New Systems
New reverse osmosis (RO) systems sometimes show no water flow at the faucet. This issue causes worry but often has simple fixes. Understanding the basics helps solve the problem quickly. Two main checks are important for new RO units with no water flow.
Allowing Tank Filling Time
New RO systems need time to fill the storage tank. Water flows slowly through the membrane. The tank fills gradually, often taking several hours. Without enough time, the faucet may show no water flow. Patience is key for the first use. Checking the tank pressure after filling helps ensure proper operation.
Checking Automatic Shut-off
Most RO systems include an automatic shut-off valve. This valve stops water flow when the tank is full. Sometimes, it may stick or malfunction. A stuck valve blocks water flow even if the tank is empty. Check the valve for proper movement. Resetting or replacing the shut-off valve may restore water flow. Regular inspection prevents long-term issues.
Key Parts To Inspect
Identifying problems in a reverse osmosis (RO) system starts with inspecting its key parts. Each component plays a vital role in ensuring clean water flow. Faults in these parts often cause common issues like low water flow or poor water quality. Checking them regularly helps maintain system efficiency and extends its life.
Pre-filters And Post-filters
Pre-filters remove dirt and particles before water reaches the RO membrane. Over time, these filters get clogged, reducing water flow. Post-filters polish the water after filtration. Clogged post-filters affect taste and clarity. Replace both filters according to the manufacturer’s schedule or if you notice reduced flow or bad taste.
Ro Membrane Condition
The RO membrane is the core of the system. It removes dissolved solids and contaminants. A fouled or damaged membrane lowers water quality and flow. Test water quality or pressure to check membrane health. Replace the membrane if water tastes strange or flow is very low.
Aso And Check Valves
Automatic Shut-Off (ASO) valves control water flow to save water and energy. Check valves prevent water from flowing backward. Faulty valves cause leaks or constant draining. Inspect valves for cracks or blockages. Replace any valve that does not function properly to avoid water waste.
Fittings And O-rings
Fittings connect tubes and parts, while O-rings create watertight seals. Loose or damaged fittings cause leaks and pressure loss. Worn O-rings lead to drips and contamination. Regularly check for tight connections and intact O-rings. Replace faulty parts to keep the system sealed and efficient.
Step-by-step Troubleshooting
Troubleshooting your reverse osmosis (RO) system can seem difficult. Follow simple steps to find and fix common problems. This guide helps you check key parts and understand what needs attention.
Each step focuses on a different part of the system. This clear approach saves time and avoids confusion. Start with the tank, then test the faucet, and finally check pressure and valves.
Checking Tank Water Level
First, look at the water tank. It stores filtered water for use. A low water level may mean a problem with filling.
Close the faucet and wait 30 minutes. Then open the faucet and see if water flows easily. If the tank feels light, it might need air or have a leak.
Use a pressure gauge to check the tank pressure. It should be around 5-7 psi when empty. Adjust pressure if it is too low or too high.
Testing Faucet Flow
Next, test the flow from your RO faucet. A slow flow can signal filter clogs or other issues.
Turn the faucet on fully and observe the water stream. Weak flow suggests clogged filters or a faulty membrane.
Replace pre-filters and post-filters if needed. Check the membrane for damage or buildup. Clean or change parts to restore flow.
Assessing Pressure And Valves
Finally, check system pressure and valves. Low pressure can reduce water output and cleaning power.
Inspect the feed water valve to ensure it is fully open. Look for kinks or blockages in tubing that slow flow.
Test all valves for proper operation. Replace any that leak or stick. Proper pressure and valve function keep your RO system working well.
Frequently Asked Questions
What Are The Common Faults In Reverse Osmosis Systems?
Common faults in reverse osmosis systems include clogged filters, fouled membranes, low water pressure, leaking connections, and faulty storage tanks. These issues reduce water flow, cause continuous draining, bad taste, or no water output. Regular filter replacement and system inspection ensure optimal performance and water quality.
How To Troubleshoot Your Reverse Osmosis System?
Check and replace clogged pre/post-filters and RO membrane. Ensure feed water valve is open and tubing is kink-free. Inspect tank pressure and valves for leaks or drainage issues. Sanitize system if taste or odor appears. Wait for tank to fill on new systems before use.
How Do I Know If My Ro Membrane Is Clogged?
A clogged RO membrane causes low water flow and poor taste. Check for reduced pressure and slower output. Replace the membrane if flow stays low after filter changes.
How To Bleed Air From Ro System?
Locate the air relief valve on your RO system. Press it gently to release trapped air. Open faucet to flush system. Repeat if needed until water flows smoothly.
What Causes Low Water Flow In An Ro System?
Low water flow often happens due to clogged filters or a fouled membrane. Check if the pre-filters or post-filters need replacement. Also, ensure the water supply valve is fully open and tubing has no kinks.
Conclusion
Troubleshooting an RO system can save time and money. Start by checking filters and membranes regularly. Keep an eye on water flow and pressure for early signs. Fix leaks and valve issues promptly to avoid bigger problems. Simple steps often restore your system’s performance quickly.
Stay patient and follow each step carefully. A well-maintained RO system ensures clean, safe water every day.
")


