Is your RV’s air conditioner failing to keep you cool during your adventures? You’re not alone.
When your RV AC stops blowing cold air or behaves strangely, it can quickly turn a relaxing trip into a frustrating experience. But before you call for expensive repairs, there are simple troubleshooting steps you can take to diagnose and fix common issues on your own.
In this guide, you’ll learn easy, practical tips to get your RV AC back to working efficiently—without needing specialized tools or costly technicians. Keep reading, and you’ll discover how to protect your compressor, avoid short cycling, and restore cool comfort to your RV in no time. Your perfect road trip deserves a perfectly cool ride!
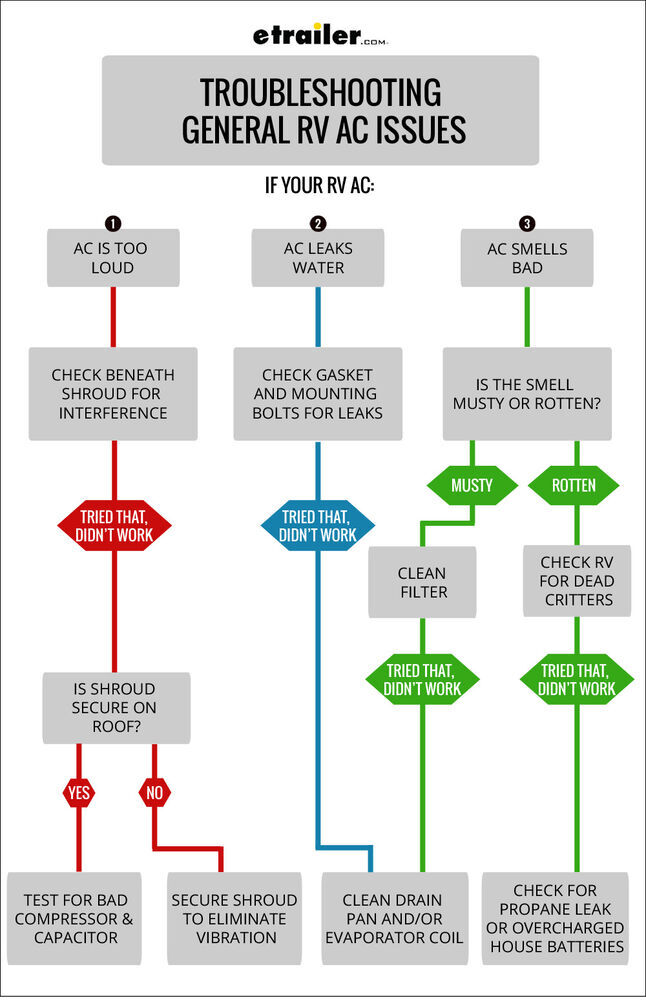
Common Rv Ac Issues
RV air conditioners often face issues that reduce comfort during travel or camping. Knowing common problems helps fix them quickly. This saves time and keeps your RV cool and pleasant.
No Cooling Air
No cold air from the AC is a frequent complaint. This can happen due to dirty filters blocking airflow. Check and clean or replace filters regularly.
Low refrigerant levels also cause no cooling. Leaks or improper charging reduce cooling power. A certified technician should handle refrigerant issues.
Another cause is a faulty compressor. The compressor pumps refrigerant through the system. If it fails, the AC cannot cool air properly.
Ac Turns On And Off
The AC turning on and off repeatedly is called short cycling. This wastes energy and strains the unit. A common reason is a thermostat issue.
High pressure in the system can cause short cycling. Let the AC rest for about three minutes before restarting. This helps pressure stabilize and protects the compressor.
Electrical problems or a dirty condenser coil may also cause the unit to cycle frequently. Regular maintenance can prevent these issues.
Weak Airflow
Weak airflow means the AC does not blow enough air inside. Clogged air filters or blocked vents often cause this. Clean or replace filters and clear vents for better airflow.
Blower fan problems can reduce airflow. The fan might be dirty, damaged, or its motor failing. Check the fan and fix any issues found.
Duct leaks or obstructions inside the RV can also lower airflow. Inspect ducts and seal any leaks for improved air delivery.
Strange Noises
Unusual sounds from the AC usually signal a problem. Rattling noises may come from loose parts or debris inside the unit. Tighten screws and remove debris.
Squealing or grinding sounds often indicate worn fan belts or motor bearings. These parts may need replacement or lubrication.
Buzzing or humming noises can point to electrical issues. Inspect wiring and connections carefully to ensure safety and proper function.

Credit: www.youtube.com
Quick Basic Checks
Before diving into complex fixes, start with quick basic checks for your RV AC. These simple steps often solve common problems fast. They help avoid unnecessary repairs and get your unit cooling again.
Circuit Breaker And Power Supply
Check the circuit breaker first. A tripped breaker can stop your AC from working. Flip it off and on to reset. Confirm the RV is plugged into a stable power source. Unstable power can cause your AC to fail.
Air Filter Cleaning
Dirty air filters block airflow and reduce cooling. Remove the air filter and inspect it. Clean it gently with water or replace it if very dirty. Clean filters improve AC efficiency and air quality.
Vent Blockages
Blocked vents restrict airflow and cause uneven cooling. Look inside vents for dust or debris. Clear any blockages carefully. Keep furniture or curtains away from vent openings for free air circulation.
Thermostat Settings
Check your thermostat settings. Ensure it is set to “cool” mode and the temperature is lower than the current room temperature. Replace batteries if the thermostat is battery-powered. Incorrect settings often cause no cooling.
Refrigerant And Coils
Refrigerant and coils play a key role in your RV air conditioner’s performance. Proper refrigerant levels and clean coils ensure efficient cooling. Problems with either can cause poor cooling or system failure. Regular checks and maintenance help keep your RV AC working well.
Checking Refrigerant Levels
Low refrigerant means your RV AC cannot cool properly. Use a gauge to measure pressure in the system. If pressure is below recommended levels, it may need a recharge. Avoid adding refrigerant without professional help to prevent damage.
Cleaning Condenser Coils
Condenser coils release heat from inside your RV. Dirt and debris block airflow, reducing cooling power. Use a soft brush or coil cleaner to remove buildup. Clean coils improve efficiency and prevent overheating.
Inspecting Evaporator Coils
Evaporator coils absorb heat from the air inside your RV. Dust and mold on coils reduce cooling and air quality. Gently clean coils with a soft cloth or coil cleaner. Check for frost or ice, which indicates other problems.
Sealing Ductwork Leaks
Leaky ducts waste cooled air and increase energy use. Inspect ducts for holes or loose connections. Use foil tape or duct mastic to seal leaks. Proper sealing improves airflow and cooling performance.
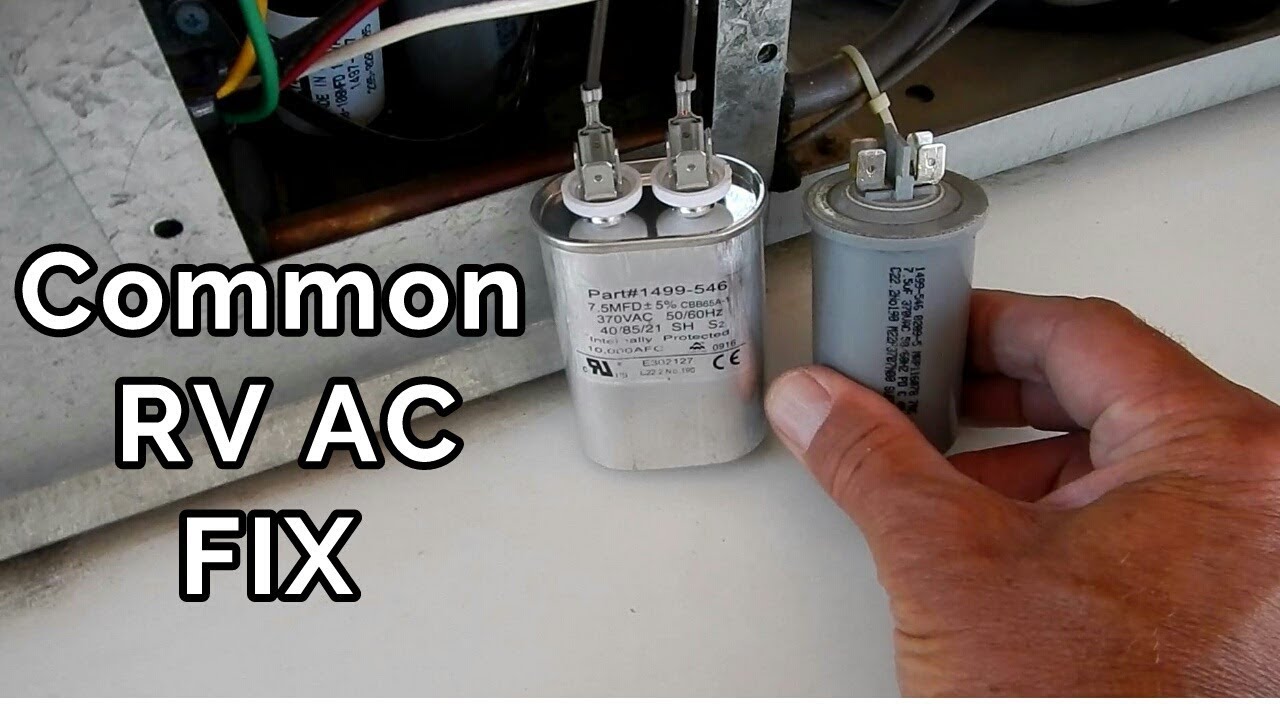
Capacitor And Relay Troubleshooting
Troubleshooting the capacitor and relay in your RV air conditioner helps fix common cooling issues. These parts control the compressor and fan motor. Faulty capacitors or relays can stop the AC from starting or running properly. Checking these components is a key step in diagnosing problems.
Signs Of A Bad Capacitor
A bad capacitor often shows clear symptoms. The AC may fail to start or run slowly. You might hear a humming sound without the fan spinning. The unit could also turn on and off quickly. Bulging or leaking capacitors are physical signs to watch for. These indicate the capacitor needs replacement.
Testing The Compressor Relay
The compressor relay controls the power to the compressor. Testing it requires a multimeter to check for continuity. First, turn off power to the AC unit. Remove the relay and test the coil and switch terminals. No continuity or an open circuit means the relay is faulty. Replacing a bad relay can restore compressor function.
Replacing Faulty Components
Always disconnect power before replacing parts. Remove the faulty capacitor or relay carefully. Match the new component’s specifications exactly. Secure the new capacitor or relay in place. Reconnect wiring following the original setup. After replacement, test the AC to confirm proper operation. Replacing these parts can save costly repairs.
Preventing Short Cycling
Short cycling is a common issue in RV air conditioners that can cause damage and reduce cooling efficiency. Preventing short cycling helps your RV AC run smoothly and last longer. It means avoiding frequent on and off cycles that put stress on the system. Simple steps can keep your AC from short cycling and save repair costs.
Why Wait Before Restarting
Always wait at least three minutes after turning off your RV AC before restarting. This pause allows the system to settle. It prevents the compressor from starting under high pressure. Starting too soon can cause damage and reduce the compressor’s lifespan. Waiting protects your AC and keeps it running well.
Pressure Equalization Benefits
During the wait time, pressure inside the AC system equalizes. High-pressure refrigerant stabilizes, making it easier for the compressor to start again. This reduces the strain on the compressor. Equalized pressure helps the AC work efficiently and prevents sudden stops. It supports longer AC life and better cooling.
Manual Restart Timing Tips
Use a timer or count to three minutes before turning your AC back on. Avoid rushing the restart even if it feels hot inside. Consistent timing protects the compressor and reduces repair chances. If your AC short cycles often, check the thermostat and filters too. Proper timing and maintenance keep your RV AC reliable.
Credit: www.youtube.com
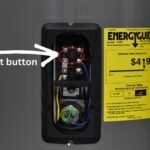
Thermostat And Reset Tips
The thermostat controls the temperature inside your RV. It tells the air conditioner when to cool or stop. Sometimes the thermostat can cause issues. Resetting it often solves common problems quickly.
Knowing when and how to reset your RV AC thermostat helps keep your unit running well. Some models have built-in delays to protect the compressor. Understanding these features prevents damage and extends the life of your AC.
Resetting The Rv Ac Thermostat
Start by turning off the air conditioner and thermostat. Wait a few minutes to let the system fully power down. This clears any errors and resets the controls. Turn the thermostat back on and set your desired temperature. This simple step often fixes temperature sensing or cycling problems.
When To Reset
Reset the thermostat if your RV AC won’t cool properly or runs nonstop. Also reset if the unit won’t start or behaves oddly. Frequent cycling on and off can mean the thermostat needs a reset. If you change batteries in a digital thermostat, reset it to update settings.
Using Built-in Delays
Many RV AC units include a delay to protect the compressor. This delay lasts about three minutes after turning off the AC. It prevents the compressor from starting against high pressure. Waiting stops damage and reduces short cycling. Always wait the full delay time before restarting your AC.
Maintenance For Long-term Cooling
Proper maintenance keeps your RV air conditioner running cool and efficient. Regular care prevents breakdowns and extends the unit’s life. Simple tasks help avoid costly repairs and keep your RV comfortable. Focus on key maintenance steps for long-term cooling performance.
Regular Filter Replacement
Change the air filter every one to two months. A clean filter improves airflow and cooling efficiency. Dirty filters block air, causing the AC to work harder. This can lead to higher energy use and wear on parts. Always use the correct filter size for your unit.
Seasonal Coil Cleaning
Clean the evaporator and condenser coils each season. Dust and debris reduce heat transfer and cooling power. Use a soft brush or coil cleaner for gentle cleaning. Avoid bending the coil fins during cleaning. Clean coils help your AC cool faster and use less energy.
Inspecting Electrical Connections
Check all electrical connections for corrosion or looseness. Faulty connections can cause the AC to stop working or short cycle. Turn off power before inspecting wires and terminals. Tighten loose connections and replace damaged wires. Good electrical contact ensures safe and reliable operation.
When To Call A Professional
Knowing when to call a professional for RV AC troubleshooting saves time and money. Some issues need expert care to avoid damage. Simple problems you can fix yourself. Others require special tools and knowledge.
Complex Compressor Issues
The compressor is the heart of your RV air conditioner. Problems like strange noises or failure to start need a pro. They have the tools to test compressor pressure and function. Trying to fix it alone can lead to costly damage.
Refrigerant Leak Repairs
Refrigerant leaks cause poor cooling and can harm the environment. Detecting and fixing leaks requires special equipment. A professional can find leaks and recharge the system safely. Avoid handling refrigerant yourself due to health and legal risks.
Electrical System Diagnosis
Electrical problems cause AC failures and safety hazards. Issues like blown fuses or wiring faults need expert diagnosis. Professionals use meters to check voltage and current accurately. Incorrect repairs can cause fires or damage other components.
Credit: www.etrailer.com
Frequently Asked Questions
How To Reset An Rv Air Conditioner?
To reset an RV air conditioner, turn it off and wait at least three minutes before turning it back on. This pause protects the compressor and allows the system to stabilize. Use the thermostat or manual switch to restart the unit after the delay.
How To Tell If An Rv Ac Capacitor Is Bad?
Check for a swollen or leaking capacitor, unusual humming, or if the AC won’t start. Use a multimeter to test capacitance.
What Is The 3 Minute Rule For Ac?
The 3-minute rule for AC means waiting three minutes after turning off the unit before restarting. This protects the compressor from pressure damage and prevents short cycling, ensuring efficient operation and longer AC lifespan. Always wait to allow system pressure to equalize before switching the AC back on.
Why Is My Rv Ac Running But Not Cooling?
Your RV AC may run but not cool due to dirty air filters, low refrigerant, or clogged condenser coils. Check and clean these parts.
How Do I Fix An Rv Ac Not Cooling Properly?
Check if the air filter is clean and replace if dirty. Ensure the thermostat is set correctly. Inspect the condenser coils for dirt or damage.
Conclusion
Troubleshooting your RV AC can save time and money on repairs. Regular checks help spot issues early. Simple fixes often restore cooling quickly. Always wait a few minutes before restarting the unit. This protects the compressor and ensures proper function.
Keep your RV comfortable during trips by staying alert to signs of trouble. With basic knowledge, you can handle many common problems yourself. Stay calm, follow steps carefully, and enjoy a cool ride.
")