Are you struggling with uneven stitches, thread loops, or puckered fabric every time you use your serger? If your serger tension isn’t set just right, it can turn a simple sewing project into a frustrating experience.
But don’t worry—getting your serger tension balanced is easier than you think. In this guide, you’ll learn how to spot common tension problems, understand what causes them, and quickly fix them so your stitches look professional every time. Keep reading, and you’ll master serger tension troubleshooting—no more guesswork, just smooth sewing ahead!
Credit: mellysews.com
Common Serger Tension Problems
Serger machines rely on correct thread tension for perfect stitches. Common tension problems cause uneven seams and thread issues. Understanding these problems helps fix tension quickly. Below are some typical tension troubles and their effects.
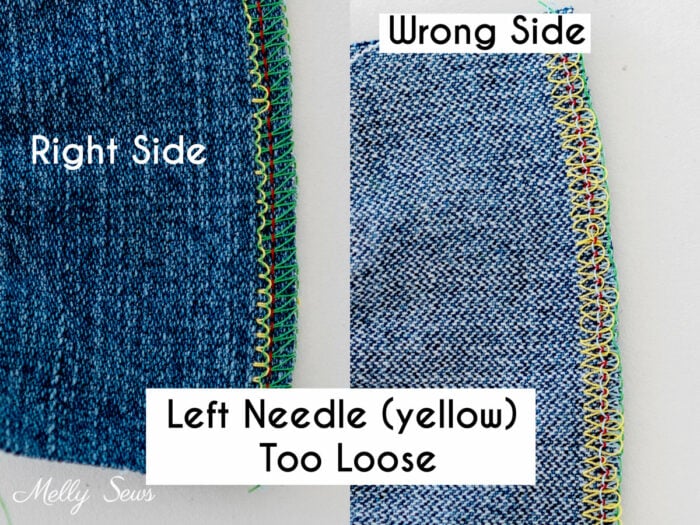
Loose Needle Thread Effects
Loose needle thread causes loops on fabric’s underside. Stitches look messy and uneven. Thread may pull out easily, reducing seam strength. The needle thread does not hold fabric layers together well. This issue often needs tightening of the needle tension dial.
Tight Needle Thread Issues
Tight needle thread pulls bobbin thread to fabric surface. Stitches may pucker or cause fabric to gather. Thread can break more often under high tension. The seam loses elasticity and can weaken. Adjusting needle tension slightly looser usually fixes this problem.
Looper Thread Tension Mistakes
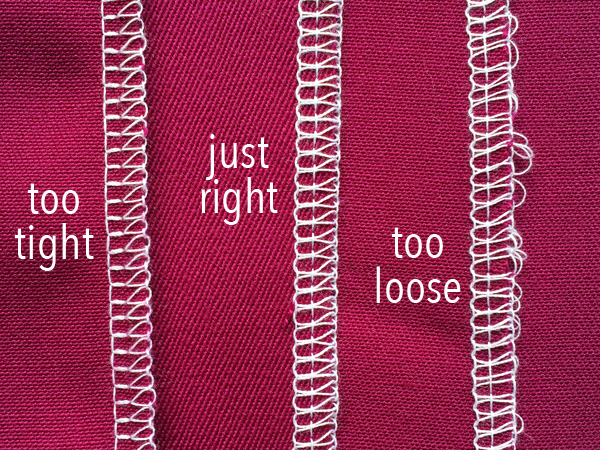
Looper threads form the overlock stitch’s loops on edges. Too tight looper tension causes fabric to pucker at edges. Too loose tension leads to loops hanging off fabric. Incorrect looper tension weakens the stitch and seam durability. Balance between upper and lower looper tension is key.
Thread Jamming Causes
Thread jams stop stitching and damage thread or machine parts. Common causes include incorrect tension, wrong threading, or dirty tension discs. Thread that is too tight often breaks or jams. Regular cleaning and correct tension settings prevent jams. Check threading path carefully to avoid this issue.

Credit: mellysews.com
Signs Of Incorrect Tension
Incorrect tension on your serger can cause many sewing problems. It affects the stitch quality and the fabric’s look. Recognizing signs of wrong tension helps fix issues fast. Watch for these common signs during your sewing projects.
Looping Stitches
Looping stitches happen when the thread forms loops on the fabric’s edge. This usually means the tension is too loose. The loops can snag easily and ruin the seam. Tightening the tension can help remove these loops.
Skipped Stitches
Skipped stitches occur when the needle misses the fabric or thread. Loose tension often causes this problem. Skipped stitches weaken seams and make the project look unfinished. Adjusting the tension improves stitch consistency and strength.
Fabric Puckering
Fabric puckering appears as wrinkles or gathers along the seam. It happens if the tension is too tight. The tight thread pulls the fabric, distorting the design. Loosening the tension smooths the fabric and creates neat seams.
Visible Bobbin Thread
Visible bobbin thread on the top side shows unbalanced tension. It means the top thread is too loose or the bobbin thread too tight. The stitches do not lock correctly, causing weak seams. Balancing the tension hides bobbin thread and strengthens stitches.
Balancing Serger Threads
Balancing serger threads is key to neat, strong seams. Proper tension prevents loose loops and thread breakage. It ensures the stitches lock perfectly at the fabric edge. Understanding how to adjust each thread helps fix common serger tension issues. This guide covers the main thread settings to check and adjust for smooth sewing.
Upper Looper Adjustment
The upper looper thread forms loops on the fabric’s top edge. If too tight, the fabric puckers. If too loose, loops hang off the edge. Turn the upper looper tension dial in small steps. Watch the stitches as you sew to find the balance. The loops should sit just at the fabric edge without pulling.
Lower Looper Adjustment
The lower looper thread works with the upper looper to lock stitches. Tight lower looper tension causes fabric pulling and thread breakage. Loose tension makes loose loops and weak seams. Adjust the lower looper dial slowly. Aim for loops that meet the upper looper loops evenly at the cut edge.
Needle Thread Settings
Needle threads hold the seam together tightly. If needle tension is too loose, loops appear on the fabric underside. Too tight needle tension pulls the looper threads to the surface. Adjust needle tension dials gradually. Balanced needle tension keeps stitches flat and even on both fabric sides.
Using Tension Dials
Tension dials control the tightness of each thread. Small dial changes can fix many tension problems. Start with dials set to the machine’s manual recommendation. Test stitch on scrap fabric. Adjust one dial at a time, noting changes. Balanced tension shows even, secure stitches without puckering or loops.
Credit: www.craftsy.com
Step-by-step Tension Fixes
Fixing serger tension problems starts with a clear, simple process. Follow these steps carefully to get smooth, even stitches. Each step helps narrow down the exact issue. Take your time and adjust methodically for best results.
Resetting Tension To Midpoint
Start by setting all tension dials to the middle number. This gives a neutral base for adjustments. Turning dials too tight or loose can cause thread loops or puckered fabric. Resetting helps find a balanced starting point.
Testing On Scrap Fabric
Use a piece of fabric similar to your project to test stitches. Sew several lines to see how threads behave. Look for loops, uneven stitches, or puckering. Testing saves fabric and lets you adjust tensions safely.
Fine-tuning Each Thread
Adjust one tension dial at a time to see its effect. Tighten or loosen slowly and retest. Focus on upper looper, lower looper, and needle threads separately. Small changes often fix the problem without overcomplicating.
Checking Thread Seating
Inspect the thread paths and make sure threads sit properly in tension discs. Incorrect threading causes uneven tension and thread breaks. Rethread if necessary, following your serger’s manual exactly. Proper seating ensures smooth thread flow.
Tips To Prevent Tension Issues
Preventing tension issues on your serger saves time and improves stitch quality. Simple habits help keep tension balanced and stitches neat. Understanding key tips reduces frustration and thread problems.
Proper Threading Techniques
Always follow the threading path exactly. Use the serger’s threading guides and diagrams. Pull thread evenly through tension discs. Avoid skipping any guides or loops. Incorrect threading causes uneven tension and thread breakage.
Choosing Correct Thread Type
Select thread made for sergers and your fabric type. Lightweight fabrics need fine thread. Heavy fabrics require stronger thread. Using wrong thread causes tension problems and weak stitches. Match thread type to avoid puckering and loops.
Regular Machine Maintenance
Clean your serger after every few uses. Remove lint and dust from tension discs and threading paths. Oil moving parts as per manual instructions. Check blades and needles regularly. Maintenance prevents tension slipping and thread jams.
Adjusting For Fabric Types
Change tension settings based on fabric thickness and stretch. Light fabrics need lower tension. Thick fabrics need higher tension. Test on fabric scraps before sewing. Adjust tension slowly to find the right balance. Proper tension prevents puckers and uneven stitches.
Frequently Asked Questions
What Happens If Tension Is Too Loose?
Loose tension causes messy, looping stitches, visible bobbin thread on top, skipped stitches, and weak seams that pull apart easily.
What Should The Tension Be On A Serger?
Set serger tension so upper and lower loops meet evenly at fabric edge. Adjust dials to balance stitch without puckering or loose loops.
How To Get Overlocker Tension Right?
Set all tension dials to the midpoint first. Adjust each thread tension gradually while sewing test fabric. Aim for balanced stitches with loops meeting at the fabric edge. Tighten or loosen the needle and looper threads to eliminate loops or puckering.
Repeat until stitches look even and secure.
What Are Common Tension Mistakes?
Common tension mistakes include needle thread too loose or tight, looper tension imbalance, and incorrect dial settings causing loops or puckering.
What Causes Uneven Stitches On A Serger Machine?
Uneven stitches often happen due to incorrect thread tension settings. Check if the upper and lower loopers have balanced tension. Also, inspect threading to make sure threads are correctly placed.
Conclusion
Serger tension issues can be fixed with careful adjustments. Check each thread’s tension one by one. Small changes make a big difference in stitch quality. Balanced tension creates neat, strong seams without loops or puckers. Keep your serger clean and threads properly threaded.
Practice and patience help you understand your machine better. Regular troubleshooting saves time and improves sewing results. Stay calm and adjust slowly for best results. Troubleshooting serger tension becomes easier with experience.
")


