Do you love creating beautiful garments with your serger but find yourself frustrated by tension issues? You’re not alone.
Tension problems can turn your sewing adventures into a headache, making your stitches uneven and your projects less than perfect. Imagine the satisfaction of solving these common issues and getting back to what you enjoy most—sewing with ease and precision.
This article is your guide to understanding and troubleshooting serger tension, empowering you to regain control and confidence. Stay with us, and discover how simple adjustments can transform your sewing experience and unleash your creativity.
Common Tension Issues
Serger machines are fantastic for creating professional seams. Yet, tension issues often frustrate users. Understanding common tension problems can ease the sewing process.
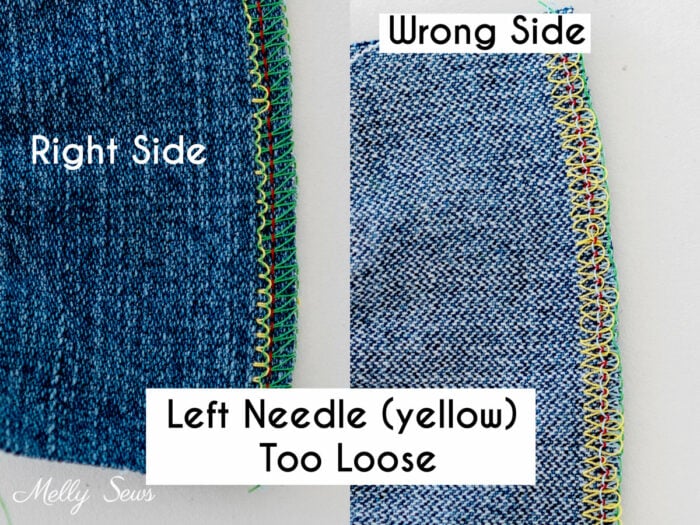
Loose Stitches
Loose stitches occur when thread tension is too low. Stitches might look sloppy or uneven. Check if the thread is properly threaded through the machine. Ensure the tension dial is set correctly. Adjust the tension dial gradually to see improvements.
Tight Stitches
Tight stitches pull fabric together. This happens when tension is too high. Stitches can cause puckering or rippling. Examine the threading path for obstructions. Lower the tension setting slowly. This can help achieve smoother results.
Uneven Stitches
Uneven stitches disrupt fabric flow. Threads might vary in tightness along the seam. Ensure all threads are correctly positioned. Check if the needle or looper is worn. Adjust tension settings for more uniform stitching.
Diagnosing Tension Problems
Diagnosing tension problems in a serger can be a bit like detective work. You’ve got to look at every aspect of your sewing setup to find the culprit. Sometimes, it’s the threads that are out of sync, or maybe the fabric isn’t cooperating. The key is to systematically check each element involved in the process. Let’s dive into identifying these factors to keep your sewing project smooth and frustration-free.
Identifying Threads And Fabric
Start by examining the threads you’re using. Are they all the same type and weight? Mixing different thread types can cause uneven tension and unpredictable results. Check if the threads are properly wound around their respective cones.
Next, consider the fabric. Is it stretchy or thick? Fabrics with unique characteristics often require special attention to tension settings. Test on a scrap piece to see how the serger handles it. This simple step can prevent many headaches.
Examining Needle And Thread Compatibility
Needles matter more than you think. Are you using the right needle size for your thread and fabric? A mismatch can lead to skipped stitches or thread breaks. Refer to your serger’s manual for guidance.
Think about the thread itself. Is it suitable for the needle you’re using? A thicker thread may need a larger needle eye to pass through smoothly. Experiment with different combinations to find the perfect match.
Checking Thread Paths
Trace the thread paths carefully. Are they correctly threaded through each guide and tension disc? Even a slight misalignment can throw off the tension. Keep your serger’s threading diagram handy for reference.
Sometimes, threads can get caught or tangled along the path. Check for any blockages or knots that might be disrupting the flow. Small adjustments here can make a big difference in performance.
Have you ever thought about how much your sewing setup influences your creativity? With these troubleshooting tips, you’ll spend less time fixing and more time sewing. What’s your biggest tension challenge with your serger? Share your thoughts in the comments!
Adjusting Tension Settings
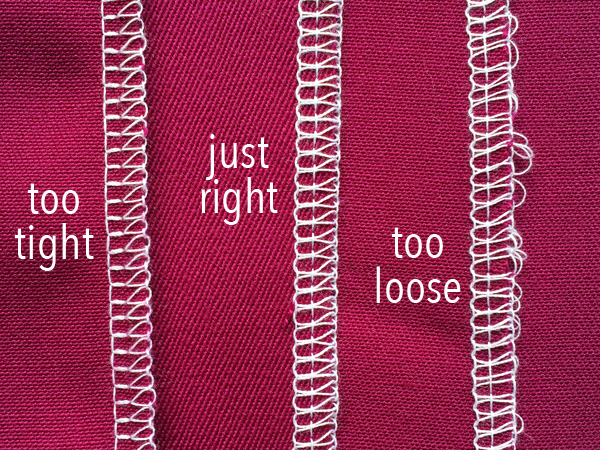
Serger tension settings can seem puzzling at first. Getting them right ensures neat and professional seams. Correct tension prevents thread loops and puckered fabric. This section will explore adjusting tension settings for optimal results.
Using Tension Dials Effectively
Tension dials adjust the thread tightness. Each dial controls a different thread. Turn the dial slowly to find the right tension. Observe how the fabric reacts with each adjustment. This practice helps in achieving smooth stitches.
Balancing Upper And Lower Tension
Upper and lower tension must balance for perfect stitches. Uneven tension can cause looping or breaking threads. Adjust upper tension first, then check the lower. Small changes can make a big difference. Always test on a scrap piece first.
Customizing For Different Fabrics
Each fabric type requires unique tension settings. Lightweight fabrics need lighter tension. Heavyweight fabrics may need tighter tension. Adjust the dials according to the fabric’s weight and type. Testing on scraps helps find the best settings.

Credit: mellysews.com
Preventive Maintenance
Preventive maintenance of sergers ensures smooth operation and avoids tension issues. Regular cleaning and adjusting tension settings can prevent stitch inconsistencies. Proper threading and checking needle alignment are essential steps in troubleshooting tension problems effectively.
Preventive maintenance is essential for keeping your serger in top shape. Regular upkeep prevents tension issues and extends the machine’s lifespan. Addressing minor problems before they escalate saves time and reduces frustration. It ensures your serger runs smoothly, delivering consistent results with every project.Regular Cleaning
Dust and lint accumulate quickly in a serger. Regular cleaning keeps it functioning well. Use a small brush or vacuum to remove debris. Focus on the feed dogs and the area around the loopers. A clean machine avoids thread tension problems. It also improves stitch quality significantly.Replacing Needles
Old needles can cause tension issues. They can damage fabric or thread. Replace needles after every project or after eight hours of use. Always use the right needle type for your fabric. A new needle ensures smooth, even stitches. It reduces skipped stitches and thread breakage.Lubrication Tips
Lubrication is vital for a serger’s moving parts. Use only serger-specific oil. Apply oil to the recommended spots in the manual. Avoid over-oiling to prevent residue buildup. Lubrication reduces friction and wear. It keeps the machine running quietly and efficiently. Regular oiling extends the life of your serger.Expert Tips For Consistent Tension
Serger machines can sometimes be challenging, especially with tension settings. Achieving consistent tension is crucial for neat and professional sewing results. Here are expert tips to help maintain perfect tension on your serger. These tips focus on threads, practice, and record-keeping.
Using Quality Threads
Quality threads reduce tension issues significantly. Cheap threads often break or tangle. This affects the tension consistency. Choose threads made from strong fibers. Polyester and cotton are excellent choices. They glide smoothly through the serger, maintaining even tension. Investing in high-quality threads saves time and frustration.
Practicing On Test Fabrics
Before starting a project, practice on scrap fabric. This helps in adjusting tension settings. Use fabrics similar to your project material. It ensures that tension is set correctly for the actual sewing. Practicing on test fabrics can save you from costly mistakes. It helps in understanding your serger better.
Keeping A Tension Log
Maintain a tension log for your serger projects. Record tension settings for different fabrics and threads. This reference helps in future projects. It saves time and ensures consistency. A tension log is a valuable resource. It provides insights into what works best for your serger. This simple habit leads to smoother sewing experiences.
Credit: mellysews.com
Credit: www.craftsy.com
Conclusion
Fixing serger tension can feel daunting. Yet, with patience, it’s doable. Start by checking threads and needles. Adjust settings slowly. Test on scrap fabric. Notice changes. Small tweaks can solve big issues. Regular maintenance prevents future problems. Keep your serger clean and oiled.
Understand your machine’s manual. It’s a helpful guide. Practice makes troubleshooting easier. Each fix builds confidence. Enjoy smoother sewing sessions. Happy serging!
")


