Are you struggling with uneven stitches, puckering fabric, or loose loops while sewing? These common issues often come down to one simple culprit: your sewing machine tension.
Mastering tension troubleshooting is key to achieving smooth, professional-looking seams every time you sew. In this guide, you’ll learn straightforward steps to identify tension problems and fix them quickly, so you can save time, avoid frustration, and enjoy your sewing projects even more.
Keep reading to discover how small adjustments can make a big difference and get your machine stitching perfectly balanced stitches on any fabric.
Credit: www.sewschool.co.uk
Common Tension Issues
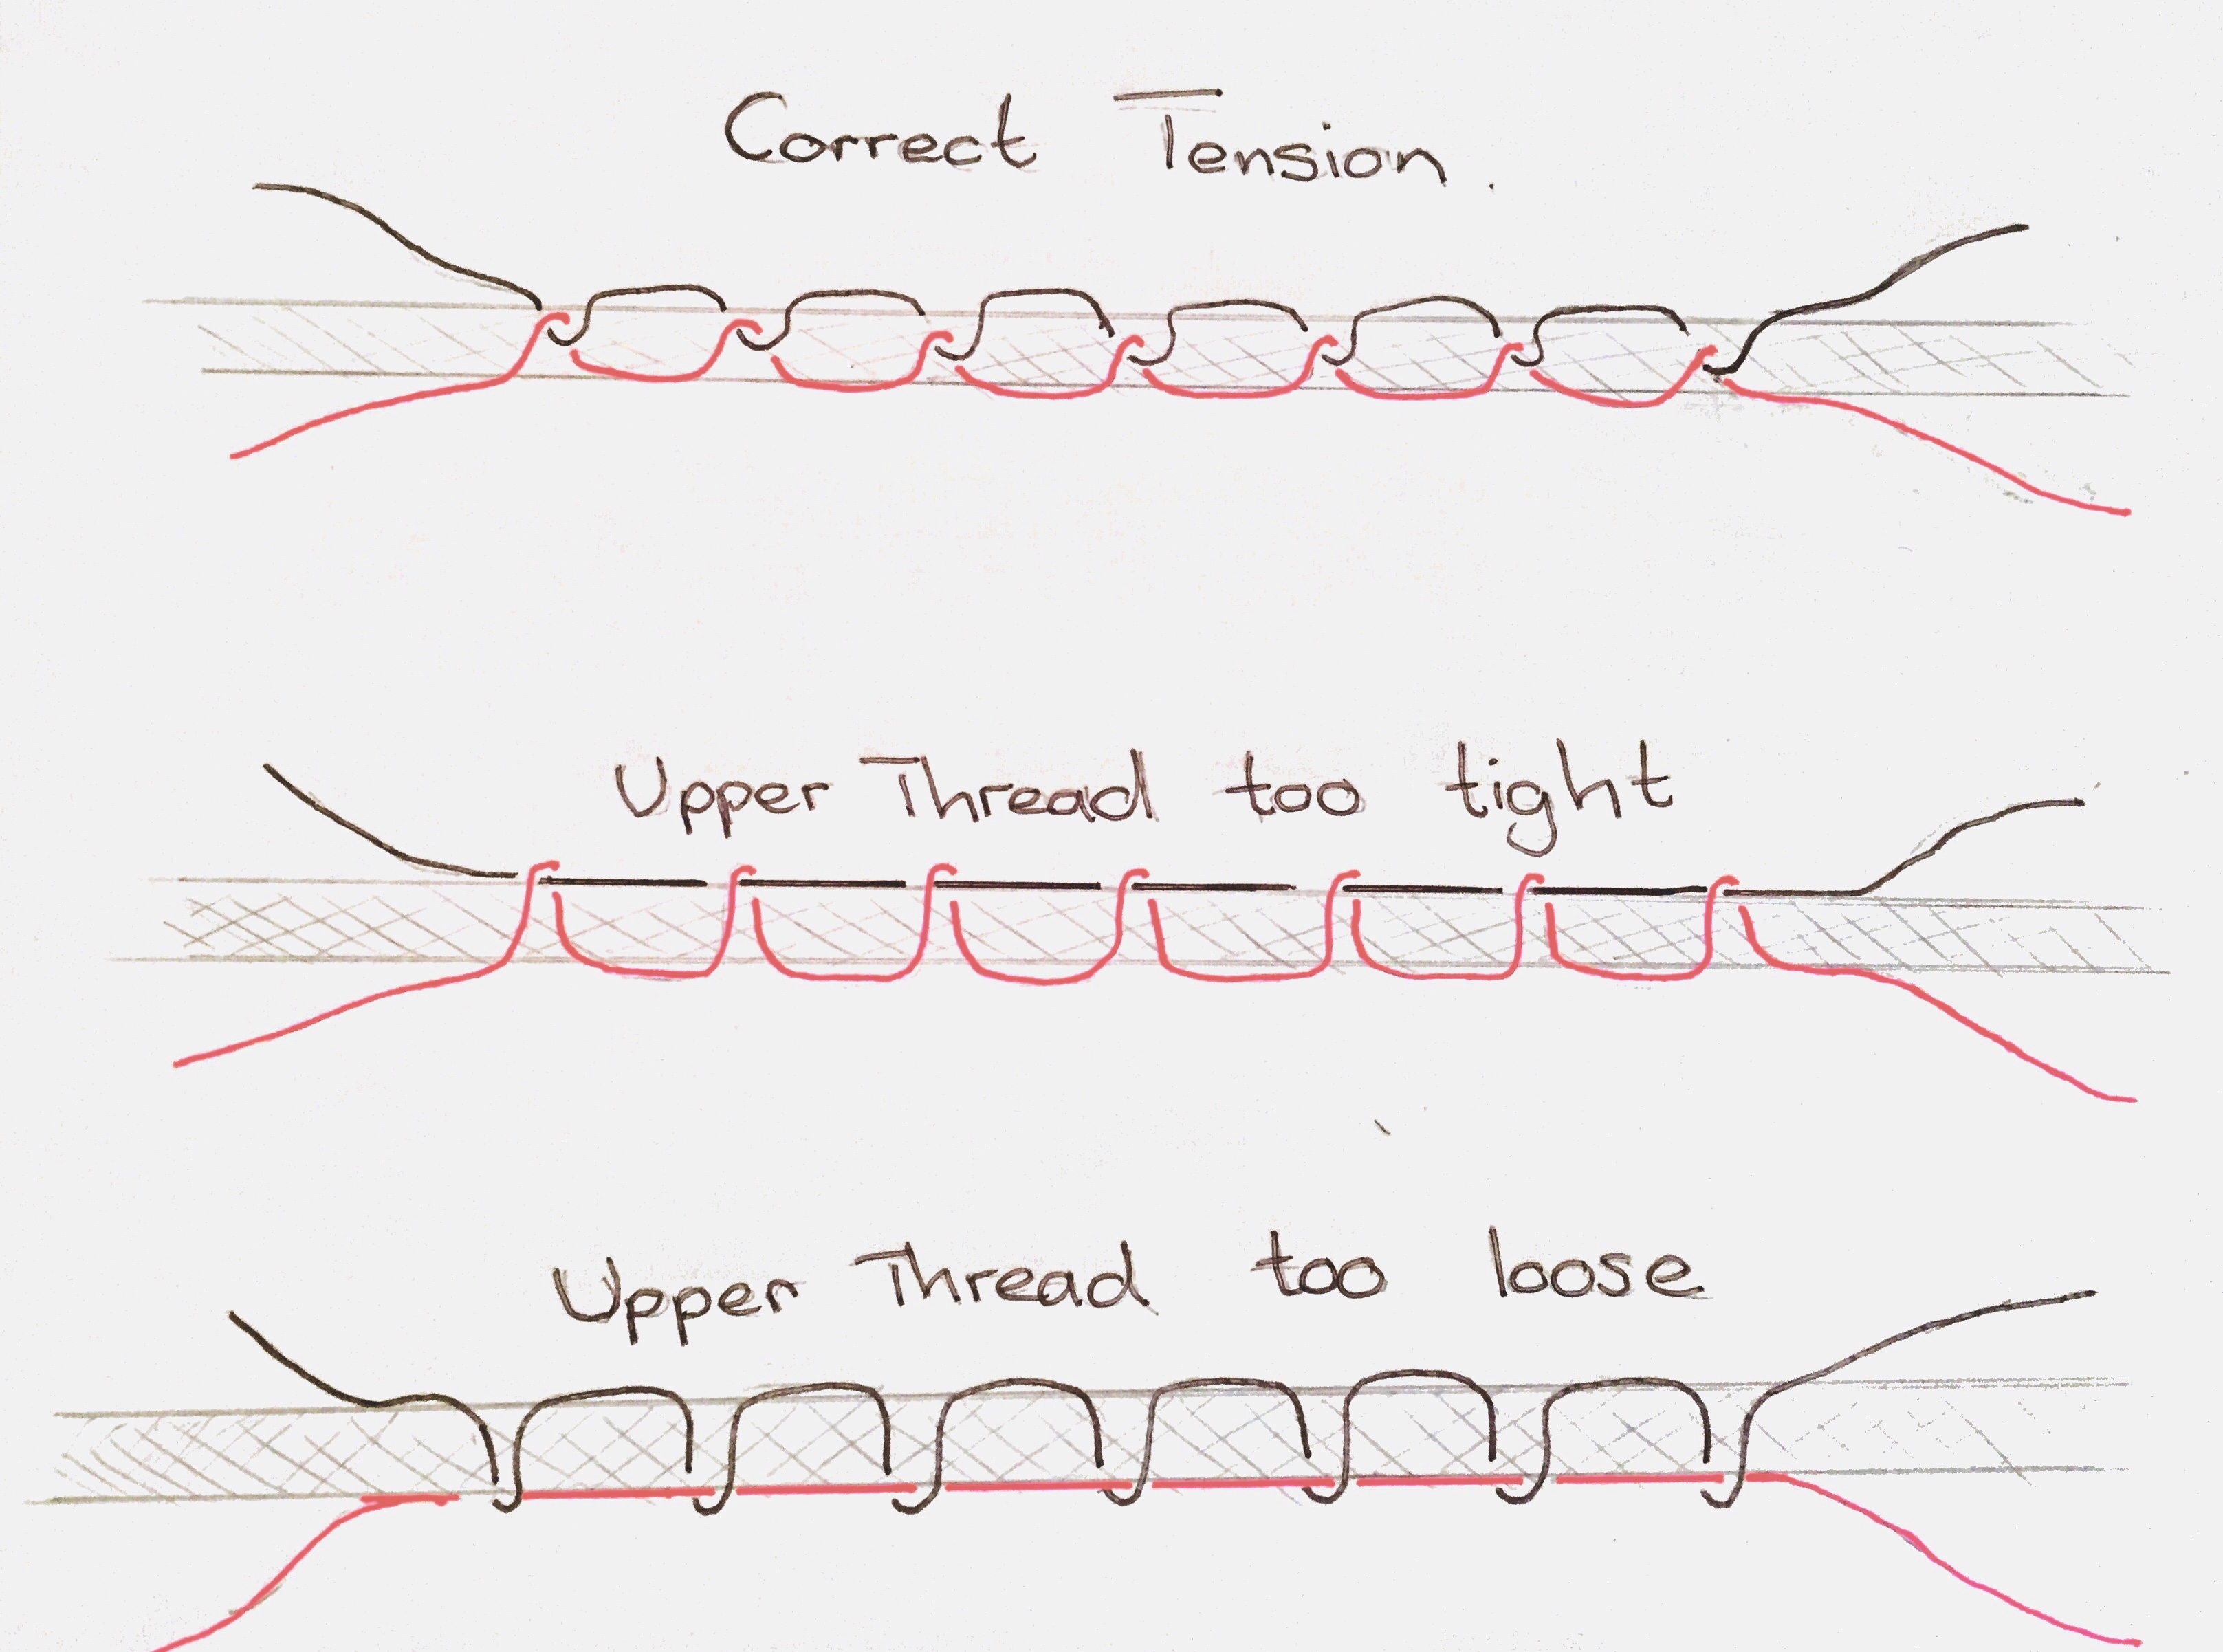
Common tension issues disrupt smooth sewing and stitch quality. These problems often cause visible stitch flaws. Recognizing the signs helps fix tension quickly. Adjusting tension restores balanced stitches and neat fabric appearance.
Loops On Bottom
Loops on the bottom of fabric mean upper thread tension is too loose. The top thread does not pull the bobbin thread tight enough. Increase the upper tension dial by one number. Test again on fabric scraps. Repeat until loops disappear and stitches look even.
Puckering Fabric
Puckering happens when upper tension is too tight. The thread pulls the fabric too hard. Lower the upper tension dial slowly. Sew a test seam after each change. Stop adjusting when fabric lies flat and stitches are smooth.
Uneven Stitches
Uneven stitches show inconsistent tension between upper and bobbin threads. Check if the machine is threaded correctly. Rewind or replace the bobbin if needed. Adjust upper tension in small steps. Test on fabric scraps until stitches are uniform and balanced.
Upper Thread Tension
Upper thread tension controls how tightly the top thread pulls during stitching. Proper tension keeps stitches even and prevents thread loops or puckering. If tension is too tight, fabric may gather or thread could break. If too loose, loops appear on the underside. Balancing upper thread tension is key for smooth sewing.
Locating The Tension Dial
The tension dial usually sits on the front or top of your sewing machine. It often has numbers ranging from 0 to 9. Higher numbers tighten the thread, and lower numbers loosen it. Find your machine’s manual for exact location if unsure.
Adjusting In Small Steps
Change the tension dial by one number at a time. Small adjustments help avoid over-tightening or loosening the thread too much. After each change, sew a few stitches to see how the tension looks. This method saves time and reduces frustration.
Testing On Fabric Scraps
Always test tension settings on fabric scraps that match your project. Sew a short line and check the stitch quality. Look for balanced stitches with no loops or puckers. Adjust the tension dial slightly, then test again. Repeat until the stitch looks perfect.
Bobbin Tension Adjustments
Bobbin tension adjustment is key for smooth sewing. It controls how tightly the bobbin thread pulls during stitching. Incorrect bobbin tension causes uneven stitches, loops, or thread bunching. Adjusting it carefully helps create balanced, neat seams.
This section explains how to adjust bobbin tension step-by-step. Follow these simple actions to check and fix bobbin tension on your machine.
Removing The Bobbin Case
First, turn off your sewing machine for safety. Open the bobbin cover plate. Gently pull out the bobbin case from its compartment. Hold it carefully to avoid dropping the bobbin or loosening the thread.
Finding The Tension Screw
Look closely at the bobbin case. Find a small screw on its side or front. This is the bobbin tension screw. It controls how tight or loose the bobbin thread feeds during sewing.
Tightening And Loosening
Use a small screwdriver to turn the tension screw. Turn clockwise to tighten the bobbin tension. Turn counterclockwise to loosen it. Make small adjustments, about a quarter turn at a time.
Testing Bobbin Tension
After adjusting, place the bobbin back in the case. Hold the bobbin thread and let it hang freely. The thread should unwind with slight resistance. Too loose means it pulls out easily. Too tight means it barely moves. Sew a test stitch on scrap fabric. Check if stitches look balanced with no loops or puckers.
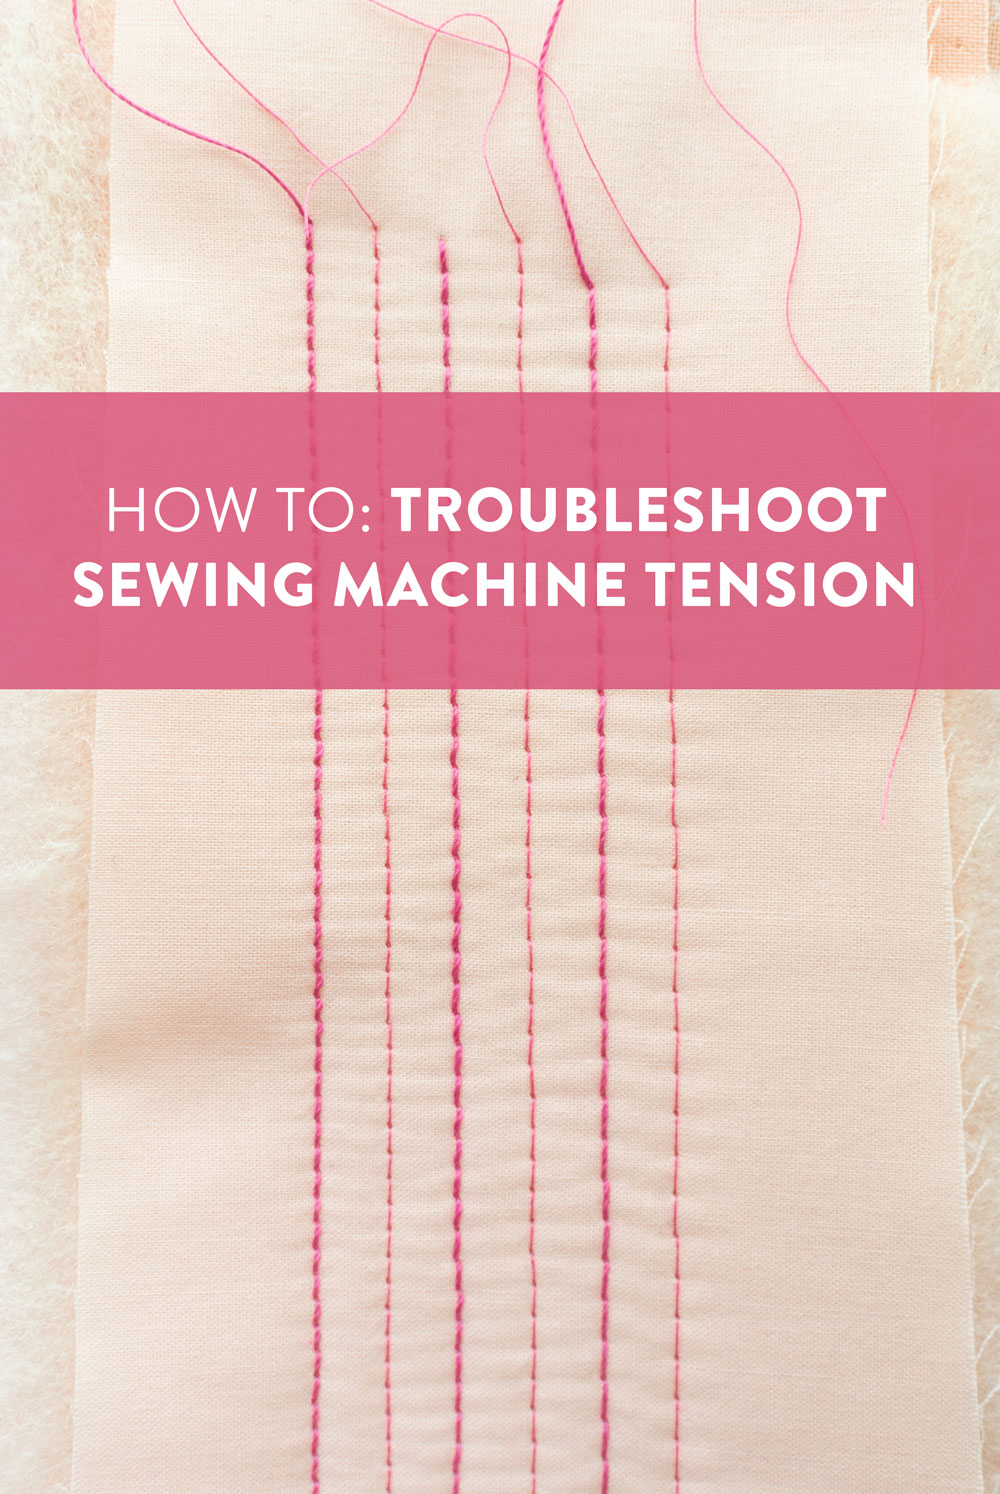
Step-by-step Troubleshooting
Fixing sewing machine tension problems starts with clear, simple steps. These steps guide you through the most common issues. Follow each one carefully to find the source of the trouble. Take your time with each task. Small details make a big difference in stitch quality.
Re-threading The Machine
Incorrect threading is a common cause of tension issues. Remove the thread completely. Then, thread the machine again from the spool to the needle. Follow the machine’s threading path exactly. Make sure the thread passes through all guides and tension discs. Pull the thread gently to check it moves smoothly.
Cleaning The Machine
Dust and lint can block tension discs. Open the machine’s covers to access the tension area. Use a small brush or compressed air to clean out debris. Avoid using liquids that may damage parts. Clean the bobbin case and feed dogs too. Regular cleaning keeps tension working properly.
Checking Needle And Thread
Wrong needles or thread can cause tension problems. Match the needle size to your fabric and thread type. Replace bent or dull needles immediately. Use good quality thread free from knots. Avoid mixing thread brands or thicknesses. A clean needle and correct thread help create balanced stitches.
Balancing Both Tensions
Upper and lower tensions must work together. Adjust the upper tension dial in small steps. Test stitch on fabric scraps after each change. If stitches loop on the underside, increase upper tension. If loops show on top, decrease it. Check bobbin tension by turning its screw slightly. The goal is smooth stitches with no loops or puckers.
Fabric And Thread Tips
Proper fabric and thread choices affect sewing machine tension greatly. Using the right materials helps prevent tension issues and improves stitch quality. Understanding fabric types and matching thread can save frustration. Regular needle changes also keep tension consistent and protect your fabric.
Adjusting For Fabric Types
Different fabrics need different tension settings. Thick fabrics like denim require higher tension to hold stitches tight. Thin fabrics such as silk need lower tension to avoid puckering. Test on fabric scraps before sewing your project. This avoids damage and uneven stitches.
Choosing The Right Thread
Thread type matters for tension balance. Use polyester thread for most fabrics because it is strong and flexible. Cotton thread suits natural fabrics but may break if tension is too tight. Avoid mixing heavy thread with lightweight fabric. Match thread weight to fabric weight for smooth sewing.
Changing Needles Regularly
Dull or bent needles cause tension problems. Change needles after every 8 hours of sewing or when fabric snags. Use the correct needle size and type for your fabric. Sharp needles pass through fabric cleanly and keep stitches even. Regular needle changes protect your machine and project quality.
Maintenance For Smooth Tension
Maintaining smooth tension in a sewing machine is key to stitching success. Tension issues often result from dirt, lack of lubrication, or worn parts. Regular maintenance keeps your machine running well and prevents thread tension problems. Simple care steps save time and improve stitch quality.
Regular Cleaning
Remove lint and dust from tension discs and feed dogs. Use a small brush or compressed air for cleaning. Clean the bobbin area thoroughly to avoid thread jams. Frequent cleaning stops buildup that affects thread tension.
Lubrication Points
Apply sewing machine oil to moving parts that need lubrication. Check the manual for exact oil spots. Proper lubrication reduces friction and helps tension parts work smoothly. Avoid over-oiling, as excess oil attracts dirt and dust.
Replacing Worn Parts
Inspect tension discs and springs for wear or damage. Replace any frayed or stretched springs to maintain proper tension. Worn parts cause uneven tension and poor stitches. Regularly changing these parts ensures consistent sewing performance.
Quick Fixes For Common Problems
Quick fixes for common sewing machine tension problems save time and frustration. Many issues arise from incorrect tension settings or simple threading mistakes. Before making complex adjustments, try these easy solutions. They often restore smooth stitching quickly. Test each fix on fabric scraps to avoid damaging your project.
Fixing Thread Bunching
Thread bunching happens when the upper tension is too loose. Rethread the machine carefully, making sure the thread passes through all guides. Clean the tension discs to remove lint or dust. Increase the upper tension dial slightly and sew a test seam. Repeat until the stitch looks balanced and smooth.
Resolving Skip Stitches
Skip stitches usually occur from a dull or bent needle. Replace the needle with a new one suitable for your fabric. Check that the needle is inserted correctly and fully tightened. Use the correct thread type and weight. Adjust the upper tension if stitches still skip. Test on scrap fabric to confirm.
Dealing With Thread Breakage
Thread breakage can result from too tight tension or poor-quality thread. Lower the upper tension dial gradually while sewing on a test piece. Inspect the thread path for rough spots or sharp edges causing friction. Replace old or weak thread with good quality thread. Clean the machine’s tension discs and bobbin case regularly to prevent damage.

Credit: mellysews.com
Credit: suzyquilts.com
Frequently Asked Questions
How To Fix Tension Problems On A Sewing Machine?
Fix tension issues by rethreading the machine and cleaning it first. Adjust the upper tension dial in small steps. Tighten for loose bottom loops, loosen for puckering. If needed, adjust the bobbin case screw clockwise to tighten or counter-clockwise to loosen.
Test stitches on fabric scraps until balanced.
Why Is My Thread Looping Underneath?
Thread loops underneath when upper thread tension is too loose. Tighten the upper tension dial slightly and test again. Ensure correct threading and a properly inserted bobbin to prevent looping.
What Are Common Tension Mistakes?
Common tension mistakes include incorrect threading, ignoring bobbin placement, over-tightening upper tension, neglecting bobbin tension, and skipping test stitches on fabric scraps.
What Happens If Tension Is Too Loose?
Loose tension causes thread loops on the fabric’s underside, weak stitches, and uneven seams. It may lead to fabric puckering and poor stitch quality.
What Causes Uneven Stitches In Sewing Machines?
Uneven stitches often happen from incorrect thread tension settings. Check if the upper and bobbin threads are balanced and properly threaded.
Conclusion
Sewing machine tension issues can feel tricky but are fixable. Start by checking your threading and bobbin placement. Adjust the upper tension dial slowly, testing on scrap fabric each time. Look for balanced stitches where threads meet evenly without loops or puckers.
Small changes make a big difference in stitch quality. Keep your machine clean to avoid tension problems. With practice, you will sew smooth, even stitches every time. Don’t rush—patience helps you find the perfect tension setting. Happy sewing and enjoy your creative projects!
")


