Sourdough bread has a unique texture and flavor. But, achieving the perfect crumb can be tricky.
Many bakers struggle with sourdough crumb issues. The crumb is the inside of the bread, and it should be open, airy, and full of holes. If your sourdough bread crumb is dense or gummy, you are not alone. This blog post will help you troubleshoot common problems.
We will explore why these issues happen and how to fix them. Whether you are a beginner or an experienced baker, understanding these tips will improve your sourdough bread. Let’s dive into the world of sourdough crumb troubleshooting and make your bread even better.
Credit: www.reddit.com
Common Crumb Issues
Baking sourdough bread can be a fulfilling experience. Yet, sometimes, the crumb doesn’t turn out as expected. Understanding common crumb issues can help improve your sourdough results.
Dense Crumb
A dense crumb often stems from insufficient fermentation. If the dough hasn’t risen enough, the crumb will be tight. Use a consistent room temperature for fermentation. Warmer environments speed up the process. Cooler environments slow it down.
Another reason for a dense crumb is insufficient kneading. Kneading helps develop gluten. Gluten gives the bread its structure. Knead the dough until it becomes elastic and smooth.
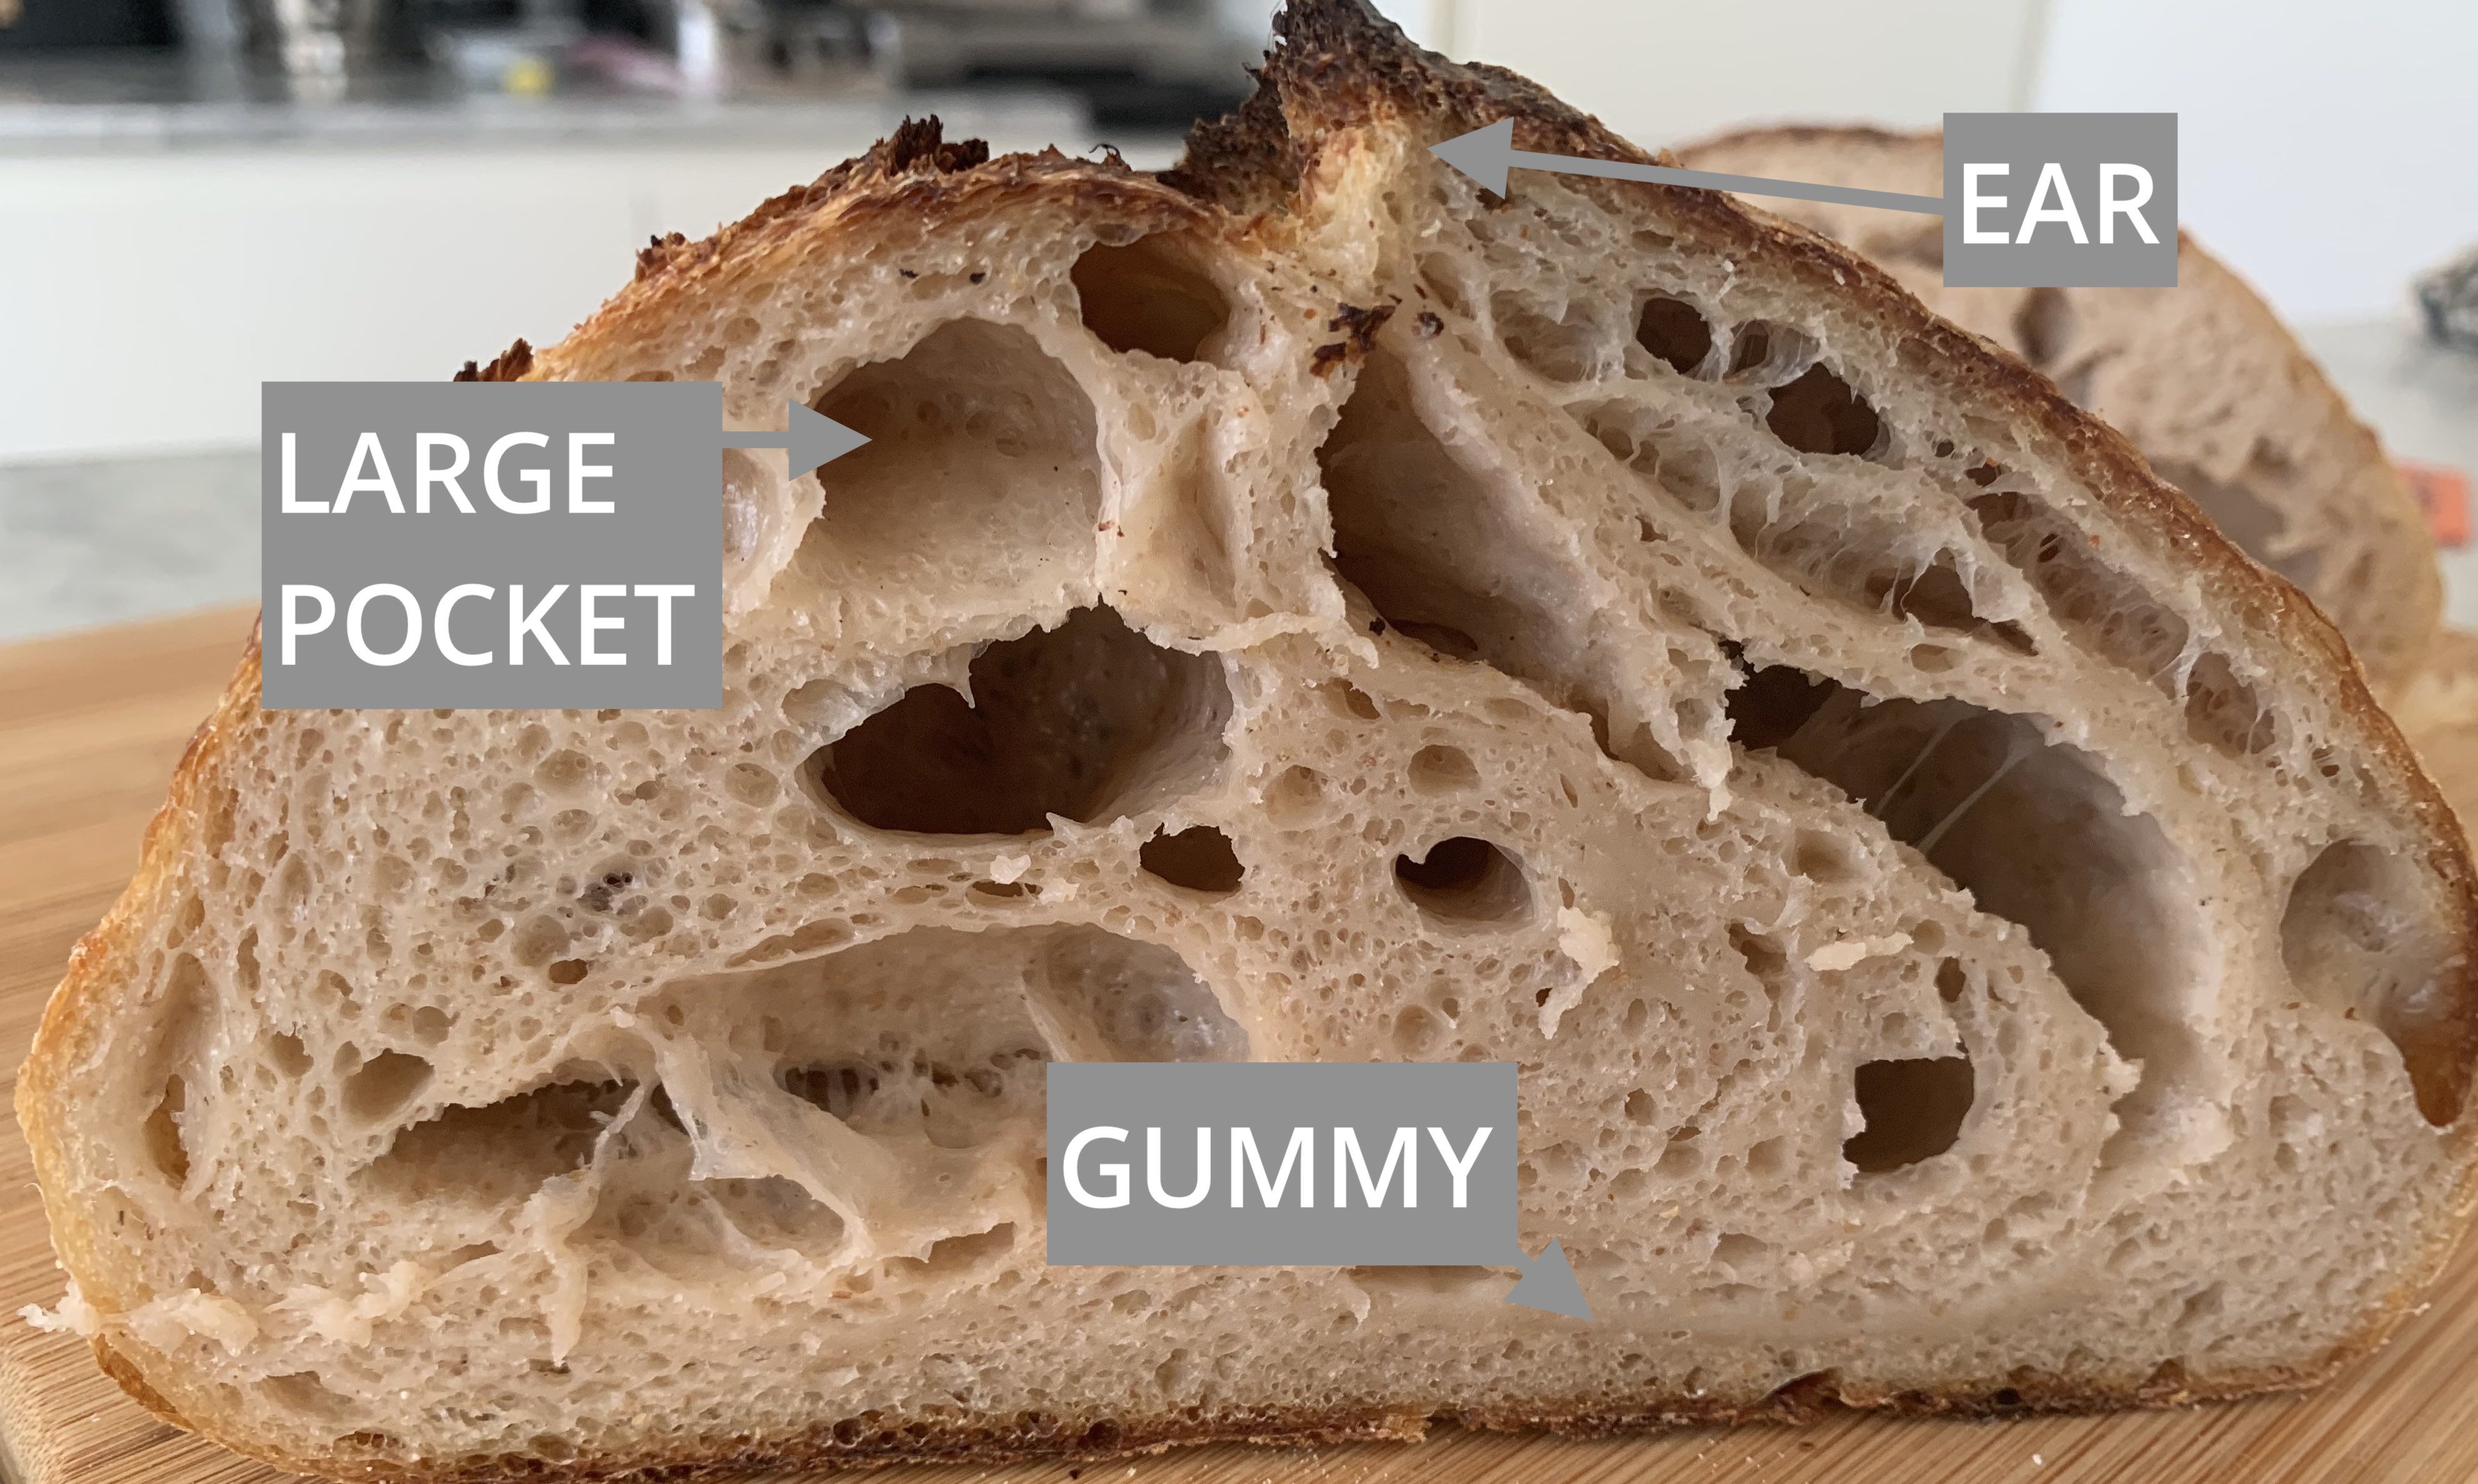
Gummy Texture
A gummy texture is frustrating. It usually means the bread is undercooked. Use a thermometer to check the internal temperature. Bread should reach at least 200°F (93°C).
Another cause is excess moisture in the dough. This often happens with high-hydration doughs. Reduce the water content slightly. Also, ensure proper cooling before slicing. Cutting too soon traps steam inside, making it gummy.
Lastly, overproofing can also lead to a gummy texture. Overproofed dough loses its strength. It collapses during baking. Watch the dough during the final rise. It should double in size but not go beyond that.
Achieving Open Crumb
Achieving an open crumb in sourdough can be tricky. The open crumb has large, irregular holes. It makes the bread light and airy. To get this texture, you must focus on key factors. These include hydration levels and proper kneading. Understanding these factors will help you improve your sourdough.
Hydration Levels
Hydration levels play a crucial role in sourdough. More water in the dough can create bigger holes. Aim for a hydration level of 70% to 75%. This means using 70 to 75 grams of water for every 100 grams of flour. Adjust the water based on your flour type. Wetter doughs are harder to handle. They can be sticky and tricky. But they are worth the effort.
Proper Kneading
Kneading helps develop gluten. Gluten gives the dough structure. With good structure, your dough can trap air. This leads to an open crumb. Use the stretch and fold method. It is less intense than traditional kneading. Stretch the dough and fold it over itself. Do this every 30 minutes for 2 hours. This technique helps build gluten without overworking the dough.
Balancing Hydration
Hydration is key for achieving the perfect sourdough bread. Too much or too little water can affect the crumb. Understanding how to balance hydration will help you make better bread. Let’s dive into the details of achieving the right hydration level.
Optimal Water Ratio
The optimal water ratio depends on the type of flour and the desired crumb texture. Generally, a hydration level between 65-75% is ideal. This means for every 100 grams of flour, you should use 65-75 grams of water.
To make it clearer:
| Flour (grams) | Water (grams) | Hydration (%) |
|---|---|---|
| 100 | 65 | 65% |
| 100 | 70 | 70% |
| 100 | 75 | 75% |
High-gluten flour absorbs more water, so adjust the ratio accordingly. Experiment with different ratios to find the perfect balance for your sourdough.
Signs Of Overhydration
Overhydration can lead to a sticky dough that is hard to handle. Here are some signs to look for:
- The dough feels excessively sticky and wet.
- It spreads out instead of holding its shape.
- The crumb is dense and gummy after baking.
If you notice these signs, reduce the water content in your next batch. Try decreasing the hydration level by 5-10%. This can help achieve a dough that is easier to work with and produces a better crumb.
Balancing hydration is crucial for perfect sourdough. Follow these guidelines to improve your bread-making skills.
Fermentation Techniques
Fermentation is a key step in achieving the perfect sourdough crumb. It influences the flavor, texture, and rise of your bread. Understanding fermentation techniques can help address common issues like dense or gummy crumb. Let’s dive into two crucial aspects: bulk fermentation and proofing time.
Bulk Fermentation
Bulk fermentation is the first rise of the dough. It usually lasts between 3 to 5 hours at room temperature. The dough should double in size during this time. If the dough doesn’t rise well, it could be under-fermented. This results in a dense crumb. Conversely, over-fermentation can cause a weak dough structure. The dough may collapse and create a gummy texture.
Temperature plays a significant role in bulk fermentation. Warmer temperatures speed up fermentation, while cooler temperatures slow it down. Aim for a consistent temperature around 75°F (24°C). Keep an eye on the dough’s volume and texture. It should be airy and bubbly, indicating proper fermentation.
Proofing Time
Proofing time, or the second rise, is equally important. It usually ranges from 1 to 4 hours, depending on the dough and environment. The dough should be slightly jiggly and puffed up. If under-proofed, the dough will lack volume and oven spring. This results in a dense crumb.
Over-proofing leads to a weakened dough structure. The dough will deflate easily, creating a gummy crumb. A good indicator of proper proofing is the “poke test.” Gently press the dough with your finger. It should slowly spring back but still show an indentation. This means the dough is ready for baking.
Both bulk fermentation and proofing time are critical for a perfect sourdough crumb. Pay attention to these stages to achieve a light, airy, and delicious sourdough bread.
Starter Health
Starter health is crucial for achieving the perfect sourdough crumb. A strong, active starter ensures proper fermentation and rise. Let’s explore how to maintain your starter’s health with the right feeding schedule and how to spot signs of a weak starter.
Feeding Schedule
Feeding your starter regularly keeps it active. A consistent schedule helps maintain its strength. Feed your starter every 12 hours at room temperature. This ensures a steady supply of food for the yeast and bacteria. If you keep your starter in the fridge, feed it once a week.
Use equal parts flour and water by weight for each feeding. This balance ensures the starter stays healthy. Adjust the feeding frequency based on the temperature and activity level. Warmer temperatures may require more frequent feedings.
Signs Of Weak Starter
A weak starter shows specific signs. Little or no rise after feeding is a clear indicator. A sluggish or inactive starter may also have a watery consistency. A strong, healthy starter should double in size within a few hours of feeding. It should also have a pleasant, slightly tangy smell. If your starter smells off or like alcohol, it needs attention.
Another sign is the presence of hooch, a layer of liquid on top. Hooch indicates that your starter is hungry and needs feeding. Address these issues promptly to keep your starter strong and active.

Credit: www.reddit.com
Dough Handling
Handling the dough properly is key to achieving a perfect sourdough crumb. This process includes several steps that help develop the dough’s structure and texture. Proper handling ensures that your bread will rise well and have the desired crumb. Let’s explore some crucial techniques.
Stretch And Fold
The stretch and fold method is essential for building dough strength. This technique replaces traditional kneading and is gentler on the dough. It involves stretching the dough and folding it over itself. This process helps align gluten strands and incorporates air into the dough.
Here’s how to do it:
- Wet your hands to prevent sticking.
- Lift one side of the dough and stretch it upwards.
- Fold the stretched part over the dough.
- Rotate the bowl 90 degrees and repeat the process.
- Continue until you have stretched and folded all four sides.
Repeat this process every 30 minutes for about 2 hours. This helps create a strong and elastic dough, leading to a better crumb.
Shaping Techniques
Proper shaping techniques are crucial for maintaining dough structure. Shaping gives the dough its final form and helps with even rising. There are several methods to shape the dough, depending on the type of bread you are baking.
Common shaping techniques include:
- Boules – Round loaves that are shaped by tucking the dough under itself.
- Batards – Oval loaves shaped by folding the dough in thirds.
- Baguettes – Long, thin loaves rolled out to shape.
Follow these steps for shaping:
- Lightly flour your work surface.
- Turn the dough out onto the surface.
- Use your hands to gently form the dough into the desired shape.
- Ensure the dough has a tight surface to help with rising.
Proper shaping helps maintain the dough’s structure and contributes to a beautiful crumb.
Baking Conditions
Baking conditions play a crucial role in the success of your sourdough. The right temperature and steam can affect the texture and flavor. Let’s explore how to optimize these conditions.
Oven Temperature
The oven temperature is vital for achieving the perfect crumb. A too-low temperature can result in a dense loaf. Conversely, a too-high temperature can cause the bread to burn on the outside while remaining raw inside.
Here’s a simple guide to help you:
- Preheat your oven: Ensure the oven is hot before placing your dough inside.
- Ideal range: Aim for a temperature between 450°F and 475°F.
- Monitor closely: Use an oven thermometer to ensure accuracy.
Maintaining the right temperature ensures a well-risen loaf with a crispy crust and airy crumb.
Steam Injection
Steam injection is another critical factor. It helps create that desirable crust and a soft, open crumb.
To achieve the best results, consider these methods:
- Use a steam pan: Place a pan of water at the bottom of the oven during preheating.
- Spray water: Mist the oven walls with water just before and after placing the dough inside.
- Cover the dough: Use a cloche or an inverted pot to trap steam around the bread.
Proper steam injection not only enhances the crust but also contributes to an even bake.
By adjusting these baking conditions, you can troubleshoot and improve your sourdough crumb.
Credit: www.the-sourdough-framework.com
Troubleshooting Tips
Having trouble with your sourdough crumb? Don’t worry. Many bakers face this issue. Understanding common mistakes and knowing quick fixes can help. Let’s dive into troubleshooting tips for a better sourdough crumb.
Common Mistakes
One common mistake is over-proofing the dough. This makes the crumb dense. Under-proofing also affects the crumb. It makes the bread gummy. Another mistake is not kneading enough. Proper kneading develops gluten. This gives the crumb structure. Using the wrong flour type is a common issue too. High-protein flour works best.
Quick Fixes
To fix over-proofing, reduce the proofing time. Keep an eye on the dough. To fix under-proofing, give the dough more time to rise. Check the dough’s elasticity. For better kneading, use the windowpane test. Stretch a small piece of dough. If it forms a thin membrane, it’s ready. To choose the right flour, look for high-protein content. Bread flour or strong white flour works well.
Frequently Asked Questions
Why Is My Sourdough Crumb Dense?
A dense crumb often means underproofed dough. Try letting it rise longer.
How Do I Get Bigger Holes In Sourdough?
Use higher hydration dough. Knead well and give it more time to rise.
Why Is My Sourdough Crumb Gummy?
A gummy crumb suggests underbaking. Bake longer and check the internal temperature.
What Causes Sourdough Crumb To Be Too Dry?
Too much flour can cause dryness. Ensure proper hydration and avoid overbaking.
How Can I Improve Sourdough Crumb Texture?
Use the right flour mix. Knead properly and let it proof adequately.
Conclusion
Solving sourdough crumb issues can seem tricky. But it’s doable. Stay patient. Observe your dough closely. Make small adjustments. Experiment with hydration and fermentation times. Always use fresh ingredients. Practice regularly. Success comes with persistence. Your perfect loaf is within reach.
Keep baking. Enjoy the process. Happy baking!
")