Sprinkler systems keep lawns lush and gardens thriving. But what happens when they malfunction?
Sprinkler valve issues are common and can disrupt your watering schedule. When your sprinkler system stops working correctly, it can be frustrating. Sprinkler valve problems are often the root cause. These valves control water flow to different zones in your yard.
If they fail, your plants might not get the water they need. But don’t worry, troubleshooting sprinkler valves is something you can handle. With a bit of guidance, you can diagnose and fix these issues. This blog will help you understand common problems and provide solutions. Whether it’s a stuck valve, a leak, or an electrical fault, we’ve got you covered. Let’s dive in and get your sprinkler system back on track.

Credit: www.youtube.com
Common Sprinkler Valve Issues
Sprinkler systems are essential for keeping your lawn green. But they can develop problems. Common sprinkler valve issues can disrupt your irrigation. Understanding these problems helps in maintaining your system efficiently.
Stuck Valve
A stuck valve is a common problem. This can happen due to dirt or debris. When a valve is stuck open, water flows continuously. This can lead to overwatering and high water bills. If a valve is stuck closed, your lawn will not get enough water. Cleaning the valve can often solve this issue. Sometimes, replacing the valve might be necessary.
Leaking Valve
Leaking valves are another issue. This can occur due to worn-out seals or gaskets. Leaks can waste a lot of water. They can also cause water pressure problems. Identifying and fixing leaks promptly is crucial. Regular maintenance helps in preventing leaks. Check for wet spots around the valve. This can indicate a leak. Replacing the seals or the valve itself can fix the problem.
Credit: www.socalyardtrans.com
Identifying The Problem
Sprinkler systems can sometimes fail. Identifying the problem is the first step in fixing it. Start by checking the obvious signs. Then, use tools like a multimeter for deeper insights.
Visual Inspection
Begin with a visual inspection. Look for obvious issues like broken or leaking parts. Check the sprinkler heads. Are they damaged or clogged? Make sure the valves are not stuck. Sometimes, debris can block them. This stops water from flowing properly.
Inspect the controller. Ensure it shows the correct time and settings. Check the wiring. Look for any loose or broken wires. These can disrupt the electrical flow. Note down any visible issues. This will help in the next steps.
Testing With Multimeter
If the visual inspection does not show the problem, test with a multimeter. This device measures electrical signals. It helps in finding issues with the electrical components.
First, turn off the power. Safety first! Set the multimeter to the resistance mode. Check the resistance of the valve solenoid. A good solenoid shows a resistance between 20 and 60 ohms. A reading outside this range means the solenoid is faulty.
Next, test the controller. Set the multimeter to voltage mode. Connect it to the terminals of the controller. When activated, it should show 24 volts. If not, the controller may be the issue.
Tools Needed For Troubleshooting
Having the right tools is essential for troubleshooting sprinkler valves. Whether you’re a professional or a DIY enthusiast, knowing what tools to have can save you time and effort. Below, we break down the necessary tools into two categories: basic tools and specialized tools.
Basic Tools
These tools are commonly found in most households. They are essential for initial troubleshooting and minor repairs.
- Screwdrivers: Both flathead and Phillips screwdrivers are necessary. They help in opening valve boxes and removing screws.
- Adjustable Wrench: Useful for tightening or loosening nuts and bolts. It fits various sizes of fasteners.
- Pliers: Needle-nose and slip-joint pliers can help in gripping and turning small parts.
- Multimeter: Helps in checking electrical connections and ensuring power is reaching the valve.
- Utility Knife: Ideal for cutting through tape or insulation.
Specialized Tools
These tools are specific to sprinkler systems. They are not usually found in a standard toolbox but are crucial for more complex troubleshooting.
- Valve Solenoid Tester: Checks the functionality of the valve solenoid. It ensures the valve operates correctly.
- Wire Strippers: Useful for stripping insulation from wires. They help in making clean electrical connections.
- Pressure Gauge: Measures the water pressure in the system. It helps in diagnosing pressure-related issues.
- Pipe Cutter: Used to cut PVC pipes accurately. It ensures clean cuts without damaging the pipe.
- Backflow Preventer Test Kit: Checks if the backflow preventer is working correctly. It ensures safe water flow.
Fixing A Stuck Valve
A stuck sprinkler valve can disrupt your irrigation system. It can lead to dry patches or overwatered areas in your lawn. Fixing a stuck valve is essential for maintaining a healthy garden. Below, we explore the steps to troubleshoot and fix a stuck valve.
Manual Operation
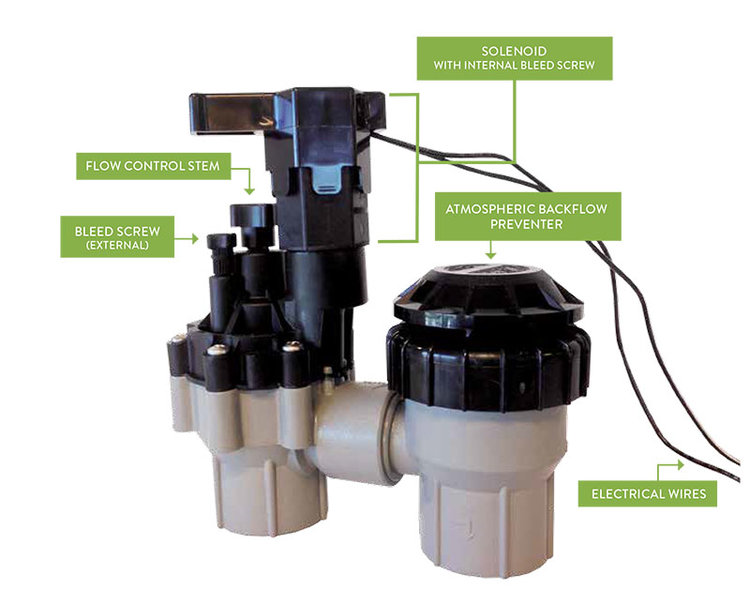
First, try to manually operate the valve. Locate the valve box in your yard. Open the box to access the valve. Look for the solenoid on the valve. Turn the solenoid counterclockwise to open the valve manually. If water flows, the issue may be electrical. If not, the valve itself may be stuck.
Cleaning The Valve
Dirt and debris can cause a valve to stick. Turn off the water supply to the sprinkler system. Unscrew the valve cover to expose the internal parts. Carefully remove any visible debris. Check the diaphragm and clean it if necessary. Reassemble the valve and turn the water back on. Test the valve again to see if it operates normally.
Repairing A Leaking Valve
Is your sprinkler system valve leaking? Don’t worry. Repairing a leaking valve is often a simple task. A leaking valve can waste water and increase your bill. Let’s look at how to fix this common issue.
Replacing The Diaphragm
The diaphragm controls the water flow in your valve. If it is damaged, your valve may leak. Follow these steps to replace it:
- Turn off the water supply to the sprinkler system.
- Remove the screws on the valve cover.
- Lift the cover off and remove the old diaphragm.
- Clean the valve body with a soft cloth.
- Place the new diaphragm in the valve body.
- Reattach the valve cover and screws.
- Turn the water supply back on.
Check for leaks. If the valve is still leaking, you may need to check other parts.
Checking The Solenoid
The solenoid is an electromagnet that controls the valve opening. A faulty solenoid can cause leaks. Here are the steps to check and replace it:
- Turn off the water supply.
- Locate the solenoid on top of the valve.
- Unscrew the solenoid and remove it.
- Check for any debris or damage.
- If damaged, replace it with a new solenoid.
- Screw the new solenoid into place.
- Turn the water supply back on.
Test the valve to ensure there are no leaks. This should resolve any solenoid-related issues.
Electrical Issues And Solutions
Sprinkler systems can face various electrical issues that disrupt their operation. Identifying and fixing these problems ensures your lawn stays green and healthy. In this section, we will explore common electrical issues and their solutions.
Wiring Problems
Wiring problems are a frequent cause of sprinkler valve malfunctions. Damaged or loose wires can prevent the valves from receiving power.
- Inspect the Wires: Look for any visible damage or corrosion. Replace any damaged wires immediately.
- Check Connections: Ensure all wire connections are tight and secure. Loose connections can disrupt the power flow.
- Use Waterproof Connectors: Protect wire connections with waterproof connectors to prevent moisture damage.
Proper wiring is critical for the smooth operation of your sprinkler system. Regular inspections help prevent unexpected failures.
Solenoid Replacement
The solenoid controls the flow of water in your sprinkler system. A faulty solenoid can cause valves to fail.
- Test the Solenoid: Use a multimeter to check for continuity. A reading outside the normal range indicates a problem.
- Turn Off the Water Supply: Ensure the water supply is off before replacing the solenoid.
- Remove the Old Solenoid: Unscrew the old solenoid from the valve. Be gentle to avoid damaging the valve.
- Install the New Solenoid: Screw the new solenoid into place. Ensure it is secure but not overly tight.
Regularly checking and replacing solenoids can prevent many common sprinkler valve issues. Keeping spare solenoids on hand can also save time in case of sudden failures.
Preventative Maintenance Tips
Fix sprinkler valve issues easily with these preventative maintenance tips. Check for leaks, clean debris, and test the system regularly to ensure proper function. Proper maintenance saves time and money.
Preventative maintenance keeps your sprinkler system running smoothly. It helps avoid costly repairs. Regular upkeep extends the lifespan of your system. Follow these tips for hassle-free maintenance.Regular Inspections
Check your sprinkler system monthly. Look for leaks or broken parts. Inspect all valves and pipes. Ensure they work properly. Replace any damaged components quickly. Clean the filters to prevent clogging. This keeps water flowing smoothly.Seasonal Adjustments
Adjust your sprinkler system with the seasons. In spring, check for winter damage. Test the system before regular use. In summer, water more frequently. Adjust the timer settings. In autumn, reduce watering. Prepare the system for winter. Drain water from the pipes. This prevents freezing and damage. “`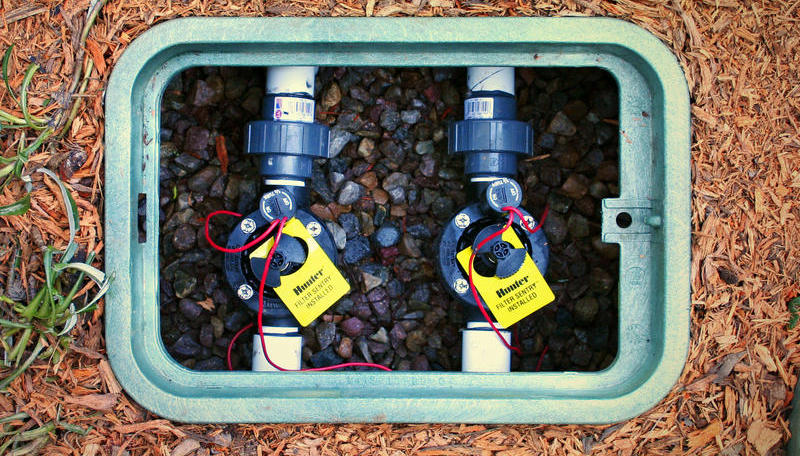
Credit: www.horizononline.com
When To Call A Professional
Troubleshooting sprinkler valves can be a daunting task. Sometimes, the issues are too complex or you might lack the necessary tools and expertise. Knowing when to call a professional can save you time, money, and stress.
Complex Problems
Some sprinkler valve problems are too complex for DIY solutions. These might include:
- Electrical malfunctions
- Severe leaks
- Valve blockages
Electrical issues often require specialized knowledge. Professionals can diagnose and fix these problems quickly. Severe leaks can cause significant water damage. A professional can identify the source and repair it efficiently. Valve blockages can be tricky. An expert has the skills to clear the blockage without damaging the system.
Lack Of Tools Or Expertise
Fixing sprinkler valves often requires specific tools. You might not have these tools at home. For example:
- Multimeters for electrical testing
- Pipe cutters
- Valve repair kits
These tools can be expensive. Without proper expertise, using them can lead to further damage. Professionals have the right tools and know how to use them. They have experience dealing with various sprinkler systems. This expertise ensures that your system is repaired correctly. In the long run, this saves you both time and money.
Frequently Asked Questions
Why Is My Sprinkler Valve Not Opening?
Your valve might be clogged with debris. Check for blockages and clean the valve.
How Do I Test A Sprinkler Valve Solenoid?
Turn off the water, remove the solenoid, and use a multimeter to check for continuity.
What Causes Sprinkler Valves To Leak?
Leaks can be caused by worn-out seals, damaged parts, or debris in the valve.
How Can I Tell If A Sprinkler Valve Is Bad?
A bad valve may not open or close properly. It might also leak or make strange noises.
How Do I Fix A Stuck Sprinkler Valve?
Turn off the water, clean the valve, and check for debris or damaged parts. Replace if necessary.
Conclusion
Troubleshooting sprinkler valves doesn’t have to be difficult. Start with basic checks. Clean debris from valves. Inspect for leaks and damaged parts. Replace faulty components promptly. Regular maintenance prevents future problems. Ensure valves are functioning properly. Proper care extends the life of your sprinkler system.
Keep your lawn healthy and green. Enjoy a hassle-free watering experience. Happy gardening!
")