Starlink is a satellite internet service that promises high-speed connections in remote areas. Yet, users sometimes face technical issues that need troubleshooting.
Is your Starlink internet acting up? Don’t worry. Many users experience common issues that can be resolved with some simple steps. This blog aims to help you troubleshoot and fix those problems. By following these tips, you can get your Starlink service back on track.
Ready to dive in? Let’s explore the solutions and get your internet working smoothly again.
Introduction To Starlink
Starlink is a satellite internet service. It was developed by SpaceX. This service aims to provide high-speed internet. Especially in remote and rural areas. Many people have started using Starlink for reliable internet.
What Is Starlink?
Starlink uses a network of satellites. These satellites orbit the Earth. They provide internet services to users. The system consists of a small dish and a modem. Users install the dish at their location. The dish connects to the satellites. The modem connects to the dish. This setup provides internet access.
Benefits Of Starlink
- High-speed internet: Starlink offers fast internet speeds. This is useful for streaming and gaming.
- Remote access: Even in rural areas, users get internet access. No need for traditional cable or fiber.
- Quick installation: The setup is simple. Users can install it themselves.
- Reliable connection: The service is consistent. It works well even in bad weather.
Starlink is an exciting option for many. It brings internet to places that had poor service. The benefits are clear. High-speed, remote access, and easy installation make it a great choice.
Credit: www.starlink.com
Common Connection Issues
Starlink has transformed internet access for many users. Yet, some face common connection issues that need troubleshooting. Let’s explore these issues and their solutions. We’ll cover frequent disconnections and slow internet speeds.
Frequent Disconnections
Frequent disconnections can be frustrating. They interrupt work, streaming, and browsing. Here are some common causes:
- Obstructions: Trees, buildings, and other objects can block the satellite signal.
- Weather Conditions: Heavy rain, snow, or thick clouds can interfere with the connection.
- Hardware Issues: Loose cables or faulty equipment can cause disconnections.
To troubleshoot, follow these steps:
- Check for obstructions and clear any that you can.
- Ensure all cables are securely connected.
- Restart your Starlink router and modem.
- Update the Starlink app and firmware.
Slow Internet Speeds
Slow internet speeds can be due to various reasons. Understanding the cause helps in finding the solution. Here are some potential causes:
| Cause | Description |
|---|---|
| Network Congestion | Too many users at peak times can slow the internet. |
| Distance from Router | Being far from the router can weaken the signal. |
| Outdated Equipment | Old devices may not support high speeds. |
To improve your speeds, try these tips:
- Test your speed using an online speed test tool.
- Move closer to the router or use a Wi-Fi extender.
- Limit the number of devices connected at the same time.
- Upgrade your equipment if it’s outdated.
By addressing these common connection issues, you can enhance your Starlink experience. Remember, regular maintenance and updates can prevent many problems.
Preliminary Checks
Starlink is an exciting technology, but sometimes things don’t work perfectly. Before diving into complex solutions, perform some preliminary checks. These basic steps can often resolve the issue or narrow down the problem.
Check Equipment Setup
Ensure your equipment is set up correctly. Begin by verifying the positioning of your Starlink dish.
- Clear View: Make sure there are no obstructions like trees or buildings blocking the dish’s view of the sky.
- Stable Mount: Confirm the dish is securely mounted and not wobbling.
- Cable Connections: Check that all cables are firmly connected to the dish and the router.
If the setup looks good, move on to the next step.
Verify Power Supply
Power issues can cause connectivity problems. Follow these steps to ensure everything is powered correctly:
- Check Power Cord: Inspect the power cord for any visible damage.
- Power Outlet: Ensure the outlet is working by plugging in another device.
- Power Cycle: Unplug the router and dish for 30 seconds, then plug them back in.
These steps will help ensure your Starlink system is properly powered and set up.

Credit: www.youtube.com
Diagnosing Hardware Problems
Experiencing issues with your Starlink connection can be frustrating. Diagnosing hardware problems is crucial to restore your internet service. This guide helps you identify and fix common hardware issues.
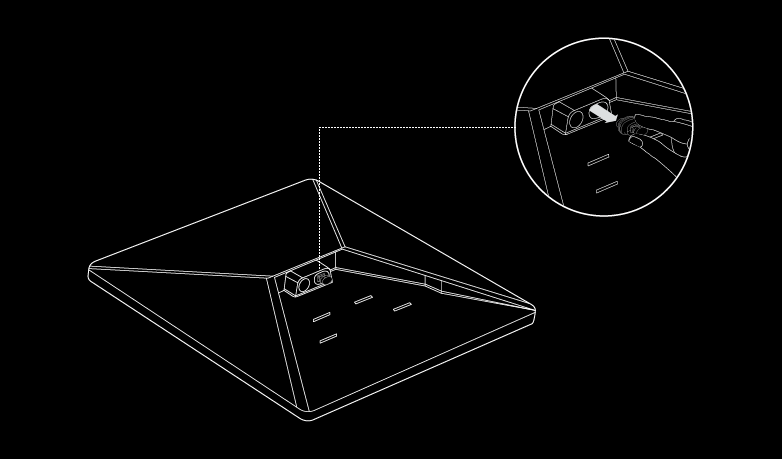
Inspect Dish And Cables
Start by examining the Starlink dish. Look for visible damage or obstructions. Ensure the dish is clean and free of debris. Check the alignment of the dish. It should point towards the sky with a clear line of sight.
Next, inspect the cables. Look for frayed or damaged sections. Ensure all connections are secure. Loose or damaged cables can disrupt the signal. Replace any damaged cables to restore functionality.
Check Router Functionality
Verify that your router is working properly. Check the power supply and ensure it is plugged in. Look at the indicator lights on the router. They should be steady or blinking, not off.
Restart the router by unplugging it for 10 seconds. Plug it back in and wait for the lights to stabilize. If the router is still not working, consider resetting it to factory settings. This can resolve many connection issues.
Software Troubleshooting
Starlink users may sometimes encounter software-related issues. Addressing these problems can enhance your connectivity experience. This guide will help you tackle software troubleshooting for your Starlink system.
Update Firmware
Updating the firmware is crucial for optimal performance. Firmware updates fix bugs and improve system stability. Follow these steps to update your Starlink firmware:
1. Open the Starlink app on your mobile device.
2. Go to the settings menu.
3. Select “Firmware Update” and follow the on-screen instructions.
Ensure your device stays connected during the update process. A successful update can resolve many software issues.
Reset Network Settings
Resetting network settings can solve connectivity problems. It can also resolve configuration errors. To reset your Starlink network settings, follow these steps:
1. Open the Starlink app.
2. Navigate to the settings menu.
3. Select “Reset Network Settings.”
4. Confirm your selection when prompted.
This will reset your network configurations to default. It may require you to reconnect your devices. Resetting can often clear up persistent connection issues.

Credit: www.reddit.com
Addressing Environmental Factors
Starlink provides high-speed internet through its satellite network. Yet, environmental factors can affect your connection. This section will help you address these factors effectively.
Obstructions And Interference
Ensure your Starlink dish has a clear line of sight. Trees, buildings, or other structures can block the signal. Even small obstructions can cause issues. Check for any objects in the path and remove them if possible.
Electronic devices can also cause interference. Keep your dish away from devices like routers, cordless phones, and microwaves. These devices can disrupt the signal.
Weather Conditions
Weather can impact your Starlink connection. Heavy rain or snow can weaken the signal. Check your dish during storms to ensure it’s clear of snow or ice. Use a soft brush to clean it if needed.
Wind can also be a factor. Strong winds can move the dish slightly. Ensure your dish is securely mounted. This will prevent movement and maintain a strong connection.
Extreme temperatures can affect performance too. Ensure your dish is placed in a location that minimizes exposure to extreme heat or cold.
Advanced Troubleshooting
Advanced troubleshooting for Starlink can help resolve persistent issues. While basic steps fix common problems, advanced methods dive deeper. These steps ensure optimal network performance and connectivity.
Check Signal Strength
First, ensure your Starlink dish has a clear view of the sky. Obstacles like trees and buildings can block signals. Use the Starlink app to check signal strength. A strong signal means better performance.
Next, adjust the dish to improve signal strength. Small changes can make a big difference. If the signal is still weak, consider relocating the dish to a higher or more open area.
Analyze Network Logs
Access network logs to understand connectivity issues. These logs provide detailed information about network performance. Look for patterns or errors in the logs.
Use the Starlink app or a computer to view these logs. Regular analysis helps identify recurring issues. Addressing these issues can improve overall network stability.
Don’t hesitate to contact Starlink support if you find complex errors. They can offer expert guidance to resolve any issues.
Getting Support
Experiencing issues with your Starlink service can be frustrating. Getting support quickly can help resolve any problems. The following sections will guide you on how to get the help you need.
Contacting Starlink Support
To contact Starlink Support, visit the Starlink website. Navigate to the “Support” section. There, you will find a “Contact Us” option. Fill in the form with your details. Describe your issue clearly. Starlink Support usually responds within a few days. Ensure you check your email regularly. They may ask for more information or offer a solution directly.
Using Online Resources
Starlink has a range of online resources. These can help you troubleshoot common issues. Visit the Starlink Support page. You will find FAQs and troubleshooting guides. These resources cover many topics. From setup issues to connectivity problems. Often, you can solve your issue without contacting support. Additionally, consider joining Starlink user forums. Many users share their solutions to common problems. This community can be very helpful.
Preventive Measures
Starlink users often face connectivity issues. Preventive measures can help avoid these problems. Proper maintenance and equipment placement are key. These steps will ensure your Starlink performs well.
Regular Maintenance
Regular maintenance is crucial. Check all cables and connections monthly. Look for any wear or damage. Clean the dish to remove dirt and debris. This will prevent signal disruptions.
Update the firmware regularly. This ensures optimal performance. Follow the manufacturer’s instructions for updates. Regular checks and cleaning can save you from big issues later.
Optimal Equipment Placement
Place your Starlink dish in an open area. Avoid obstructions like trees and buildings. These can block the signal. The dish needs a clear view of the sky.
Mount the dish high, if possible. This reduces the chance of obstructions. Ensure it is stable and secure. A well-placed dish will provide better connectivity.
Frequently Asked Questions
How Do I Reset My Starlink Router?
To reset your Starlink router, press and hold the reset button for 10 seconds.
Why Is My Starlink Internet Slow?
Slow Starlink internet may be due to network congestion, weather conditions, or obstructions blocking the satellite signal.
What Does A Red Light On Starlink Mean?
A red light on your Starlink device indicates a connectivity issue. Check for obstructions and ensure the dish is properly aligned.
How Do I Update My Starlink Firmware?
To update Starlink firmware, connect to the Starlink app. Updates are usually automatic but can be manually triggered.
Can Bad Weather Affect Starlink Performance?
Yes, bad weather like heavy rain or snow can interfere with the satellite signal, causing slower internet speeds.
Conclusion
Troubleshooting Starlink can be simple with these tips. Check your connections regularly. Restart the router often. Keep the dish clear of obstructions. Update the firmware when needed. Contact support if problems persist. Patience and persistence are key. Starlink offers a great service.
With these steps, you can enjoy a smooth internet experience. Happy browsing!
")


