Sump pumps are essential for keeping basements dry. When they fail, it can be stressful.
Understanding common sump pump problems can save time and money. In this blog post, we will explore the most frequent issues homeowners face with their sump pumps. From power failures to clogged discharge lines, these problems can often be fixed with simple solutions.
Knowing how to troubleshoot your sump pump can prevent potential water damage. Stay with us as we guide you through the steps to identify and resolve these common issues. This knowledge will help you maintain a dry and safe basement. Ready to get started? Let’s dive in!
Identifying Sump Pump Problems
Dealing with a malfunctioning sump pump can be stressful. Knowing how to identify problems early can prevent major issues. This guide will help you spot common signs of trouble. It will also explain typical problems you might face.
Signs Of Malfunction
Is your sump pump making strange noises? Unusual sounds can signal a problem. Listen for grinding, rattling, or excessive vibration. These noises often mean there’s an issue with the motor or impeller.
Is the sump pump running constantly? A pump that runs non-stop can burn out quickly. This could indicate a switch problem or a clogged discharge line. Check these parts if your pump won’t shut off.
Is water pooling in your basement? This is a clear sign of a sump pump malfunction. If the pump isn’t removing water, there may be a blockage or a power issue.
Common Issues
Power failure is a common problem. Ensure the pump is plugged in and check the circuit breaker. Sometimes, resetting the breaker can fix the issue.
Clogged or frozen discharge pipes can prevent proper drainage. Regularly inspect and clean the pipes. In cold weather, check for ice blockages.
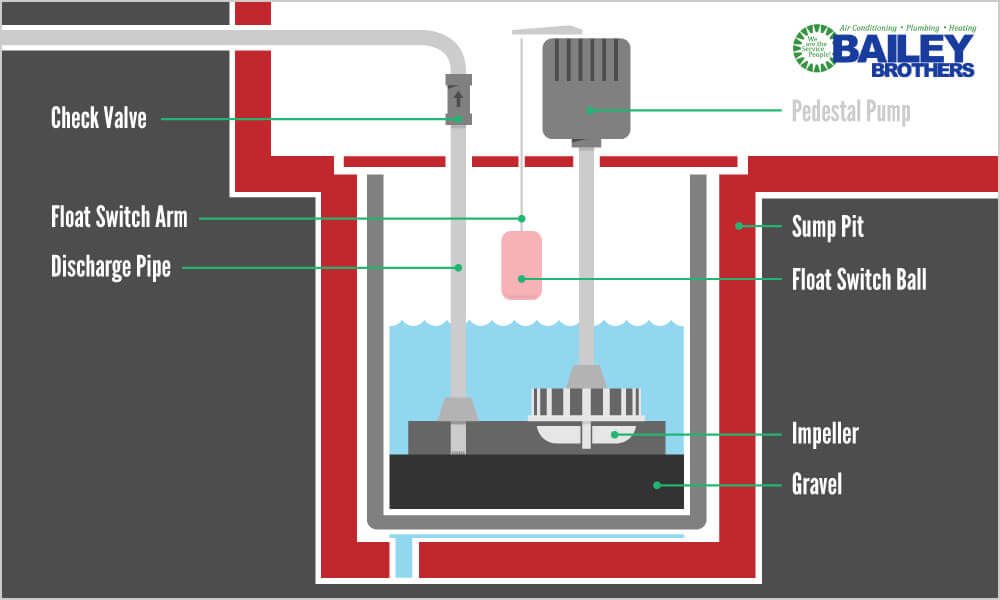
Float switch problems can cause the pump to run irregularly. The float switch triggers the pump when water levels rise. Make sure the switch moves freely without obstruction.
Overheating can cause the pump to fail. This often happens if the pump runs too long or has inadequate cooling. Ensure the pump has proper ventilation and isn’t overworked.
Check valves prevent water from flowing back into the sump pit. A faulty check valve can lead to repeated cycling and eventual pump failure. Inspect the valve for wear and replace if necessary.
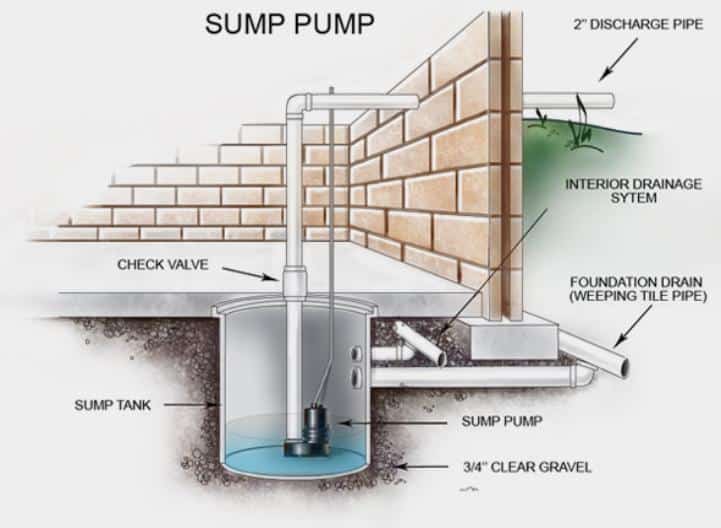
Credit: www.cartersmyplumber.com
Tools For Troubleshooting
Troubleshooting a sump pump can be challenging. Having the right tools makes the job easier and safer. This section covers the essential tools and safety gear needed to troubleshoot a sump pump effectively.
Essential Tools
To diagnose and fix sump pump issues, certain tools are necessary. Here are the must-have items:
- Multimeter: Measures electrical current and helps identify wiring issues.
- Flashlight: Improves visibility in dark sump pump pits.
- Pliers: Useful for tightening and loosening nuts and bolts.
- Screwdrivers: Both flathead and Phillips for various screws.
- Pipe Wrench: Essential for working with the pump’s plumbing.
Safety Gear
Safety is paramount when working with electrical and plumbing systems. Ensure you have the following gear:
- Gloves: Protect your hands from sharp edges and contaminants.
- Goggles: Shield your eyes from debris and splashes.
- Rubber-Soled Shoes: Prevent electrical shocks by providing insulation.
- Face Mask: Avoid inhaling dust and mold spores.
Having these tools and safety gear on hand will help you troubleshoot and repair your sump pump efficiently and safely.
Checking Power Supply
Experiencing issues with your sump pump? Start by checking the power supply. A faulty power connection can cause your sump pump to fail. Follow these steps to ensure your sump pump gets the power it needs.
Inspecting Power Cords
Begin by inspecting the power cords. Unplug the sump pump and check for any visible damage. Look for frayed wires, cuts, or burns. Damaged cords can interrupt the power supply. Replace any damaged cords immediately. Ensure the cord connections are secure and tight. Loose connections can cause intermittent power loss.
Resetting The Circuit
If the power cords are in good condition, reset the circuit. Locate the circuit breaker panel in your home. Find the breaker labeled for your sump pump. Flip the breaker to the “off” position, then back to the “on” position. This simple reset can often restore power. If the breaker trips again, there may be an underlying issue. Call a professional for further assistance.
These steps help ensure your sump pump gets consistent power. Always prioritize safety when dealing with electrical components. Regular checks can prevent future problems.
Testing The Float Switch
The float switch is a critical component of your sump pump. It activates the pump when water levels rise. Regular testing ensures your sump pump runs efficiently and prevents flooding. This guide will help you understand how to test the float switch manually and replace it if necessary.
Manual Testing
Manual testing of the float switch can help you identify issues early. Follow these steps to perform a manual test:
- Unplug the sump pump from the power source.
- Remove the sump pump cover.
- Locate the float switch inside the sump pit.
- Lift the float switch manually. This simulates rising water levels.
- Plug the pump back in and observe. The pump should activate immediately.
- If the pump does not activate, check for obstructions. Ensure the float can move freely.
- Unplug the pump again after testing.
If the float switch does not respond, it might be faulty. Consider replacing it to maintain your sump pump’s efficiency.
Replacing A Faulty Switch
If the manual test indicates a faulty switch, follow these steps to replace it:
- Purchase a compatible float switch for your sump pump model.
- Unplug the sump pump from the power source.
- Remove the sump pump cover and locate the float switch.
- Disconnect the faulty switch from the pump. Refer to the user manual for specific instructions.
- Install the new float switch by following the manufacturer’s instructions.
- Ensure the new float switch moves freely within the sump pit.
- Reassemble the sump pump cover.
- Plug the pump back in and test the new float switch manually.
Replacing a faulty float switch can restore your sump pump’s functionality. Regular maintenance and testing of the float switch can prevent unexpected failures.
Clearing Clogs And Debris
A sump pump works hard to keep your basement dry. Over time, it can get clogged with dirt and debris. This reduces its efficiency and may cause it to fail. Regular maintenance is essential to ensure your sump pump works smoothly. This section will guide you through clearing clogs and debris from your sump pump.
Cleaning The Intake Screen
The intake screen keeps large debris from entering the pump. If the screen is clogged, the pump won’t work properly. Follow these steps to clean it:
- Turn off the power to the sump pump.
- Disconnect the pump from the discharge pipe.
- Remove the pump from the sump pit.
- Locate the intake screen at the bottom of the pump.
- Use a brush or cloth to remove dirt and debris from the screen.
- Rinse the screen with water if needed.
- Reinstall the pump and reconnect the discharge pipe.
- Turn the power back on and test the pump.
Maintaining The Discharge Pipe
The discharge pipe carries water away from your home. Keeping it clear is crucial for the sump pump’s efficiency. Follow these steps to maintain the discharge pipe:
- Inspect the discharge pipe for any visible clogs or blockages.
- If you find a clog, use a plumber’s snake to remove it.
- Ensure the pipe is securely connected to the pump.
- Check the pipe for any cracks or damage. Replace it if needed.
- Make sure the pipe’s exit point is clear and not blocked by debris.
By cleaning the intake screen and maintaining the discharge pipe, you can prevent many common sump pump issues. Regular checks and cleaning will keep your sump pump in top condition.
Addressing Motor Issues
Sump pumps are essential for keeping basements dry. They prevent flooding by pumping out water. But, if the motor fails, the pump stops working. Understanding motor issues helps in quick fixes and maintenance. This section covers diagnosing motor failure and lubricating the motor.
Diagnosing Motor Failure
Motor failure in a sump pump can cause serious problems. Identifying the issue early can save time and money. Here are some common signs of motor failure:
- The pump makes strange noises.
- The pump runs but does not pump water.
- The motor does not start at all.
Use a multimeter to check the voltage at the motor. Ensure it matches the pump’s specifications. Inspect the wiring for any signs of wear or damage. Check for tripped circuit breakers or blown fuses. Replace them if needed.
Lubricating The Motor
Lubrication is crucial for the smooth operation of the motor. It reduces friction and prevents overheating. Follow these steps to lubricate the motor:
- Turn off the sump pump and unplug it.
- Remove the motor cover using a screwdriver.
- Locate the lubrication points on the motor.
- Apply a few drops of machine oil to each point.
- Reassemble the motor cover and plug in the pump.
Regular lubrication extends the motor’s life and improves efficiency. Check the manufacturer’s guidelines for recommended lubrication frequency.
Fixing Discharge Problems
Fixing discharge problems in a sump pump is essential for a dry basement. A malfunctioning discharge system can cause water to back up and flood your space. In this section, we will discuss how to inspect check valves and ensure proper drainage. These steps will help you maintain a properly functioning sump pump.
Inspecting Check Valves
Check valves prevent water from flowing back into the sump pit. If they fail, water can return and cause issues. Start by turning off your sump pump. Then, locate the check valve on the discharge pipe. Unscrew the valve and inspect it for debris or damage. Clean it thoroughly or replace it if necessary. A functioning check valve is crucial for proper water flow.
Ensuring Proper Drainage
Proper drainage is vital for sump pump efficiency. First, check the discharge pipe for clogs or obstructions. Remove any debris that might block the water flow. Next, make sure the pipe extends far enough from your home. Ideally, the discharge point should be at least 10 feet away from the foundation. This distance helps prevent water from seeping back into the basement. Finally, ensure the ground slopes away from your home. This slope helps direct water away, reducing the risk of flooding.
Credit: baileyokc.com
Preventive Maintenance Tips
Proper maintenance is essential to keep your sump pump running smoothly. Regular checks and seasonal care can prevent many common issues. Follow these preventive maintenance tips to ensure your sump pump stays in good working condition.
Regular Inspections
Inspect your sump pump every few months. Check for any visible damage or wear. Make sure the pump is upright and not leaning. Examine the power cord for any signs of damage. Ensure the pump is plugged in and receiving power. Test the pump by pouring water into the pit. The pump should activate and remove the water quickly.
Seasonal Maintenance
Perform seasonal maintenance to keep your sump pump in top shape. Clean the pump and pit at the start of each season. Remove any debris or dirt that may have accumulated. Check the discharge pipe for any clogs or obstructions. Ensure the float switch moves freely and is not stuck. Replace the pump’s battery backup if it has one, to ensure it works in a power outage.

Credit: www.youtube.com
Frequently Asked Questions
Why Is My Sump Pump Not Turning On?
Check if the power supply is connected. Ensure the float switch is not stuck.
How Often Should A Sump Pump Run?
It depends on water levels and rainfall. Usually, it runs during heavy rains or melting snow.
What Causes A Sump Pump To Stop Working?
Possible reasons include power failure, clogged discharge lines, or a broken motor. Check these parts first.
How Do I Test My Sump Pump?
Pour water into the sump pit. The pump should turn on and remove the water quickly.
Can A Sump Pump Overflow?
Yes, if the pump fails or the discharge line is blocked. Regular checks can prevent overflow.
Conclusion
A sump pump keeps your basement dry. Issues can arise, but you can fix them. Regular checks help prevent big problems. Clean the pump and test it often. Don’t ignore small signs of trouble. A little effort now saves time and money later.
Keep your sump pump in good shape. Your home will stay dry and safe. Thank you for reading.
")