Is your Taco zone valve giving you trouble? You’re not alone.
When your heating system isn’t working as it should, it’s not just inconvenient—it can leave you frustrated and uncomfortable. The good news? Most Taco zone valve issues are easier to fix than you might think. By understanding what’s going wrong, you can save time, money, and avoid unnecessary stress.
Stick around, and you’ll discover simple troubleshooting steps to get your system back on track. Ready to take control of your home’s heating? Let’s dive in.
Common Signs Of Valve Issues
Taco zone valves play a key role in heating systems. Over time, they may develop issues that affect performance. Recognizing these signs early can help prevent costly repairs. Below are some common symptoms of valve problems to watch for.
Cold Spots In Heating Zones
Uneven heating is a common sign of valve trouble. You might notice certain rooms or areas staying cold. This happens when the valve fails to open or close properly. It restricts hot water from circulating as needed.
Cold spots often indicate a malfunctioning valve motor or internal blockage. Regular inspections can help catch this issue before it worsens.
Unresponsive Thermostats
An unresponsive thermostat could point to a valve problem. If the thermostat sends signals but the zone stays cold, the valve might be stuck. This disrupts the flow of hot water into the zone.
Worn-out or jammed components inside the valve are common causes. Testing the valve manually can confirm if it’s the source of the issue.
Unusual Noises From The Valve
Strange sounds often signal valve issues. Clicking or buzzing noises may mean a failing motor or loose wiring. Grinding sounds might suggest damaged internal parts.
Listen closely to the valve during operation. Persistent noises usually indicate that repairs or replacements are needed.

Credit: www.comfort-calc.com
Tools Needed For Troubleshooting
Taco zone valves are reliable, but they can face issues over time. Troubleshooting requires the right tools to diagnose and fix problems. Preparing these tools ahead of time saves effort during repairs. Below is a breakdown of the essential tools you need.
Basic Hand Tools
Basic hand tools are essential for valve troubleshooting. A screwdriver set helps remove screws and panels. Needle-nose pliers assist in gripping wires and small components. A wrench set is useful for loosening or tightening valve connections. Keep these tools organized for quick access.
Multimeter For Electrical Testing
A multimeter is crucial for testing electrical circuits. It checks voltage and continuity in the valve wiring. Use it to identify shorts or breaks in the electrical system. Ensure the multimeter has fresh batteries for accurate readings. Read its manual for correct usage.
Replacement Parts To Keep Handy
Replacement parts ensure smoother repairs during troubleshooting. Spare zone valve motors are helpful for fixing motor failures. Extra wiring can replace damaged connections. Valve cartridges are useful for mechanical repairs. Store these parts in a dry and safe place.
Checking The Power Supply
Checking the power supply is a key step in Taco zone valve troubleshooting. A faulty or disrupted power supply can stop the valve from working. Ensuring proper power flow helps identify and fix the issue quickly. Below are steps to check the power supply effectively.
Inspecting The Wiring Connections
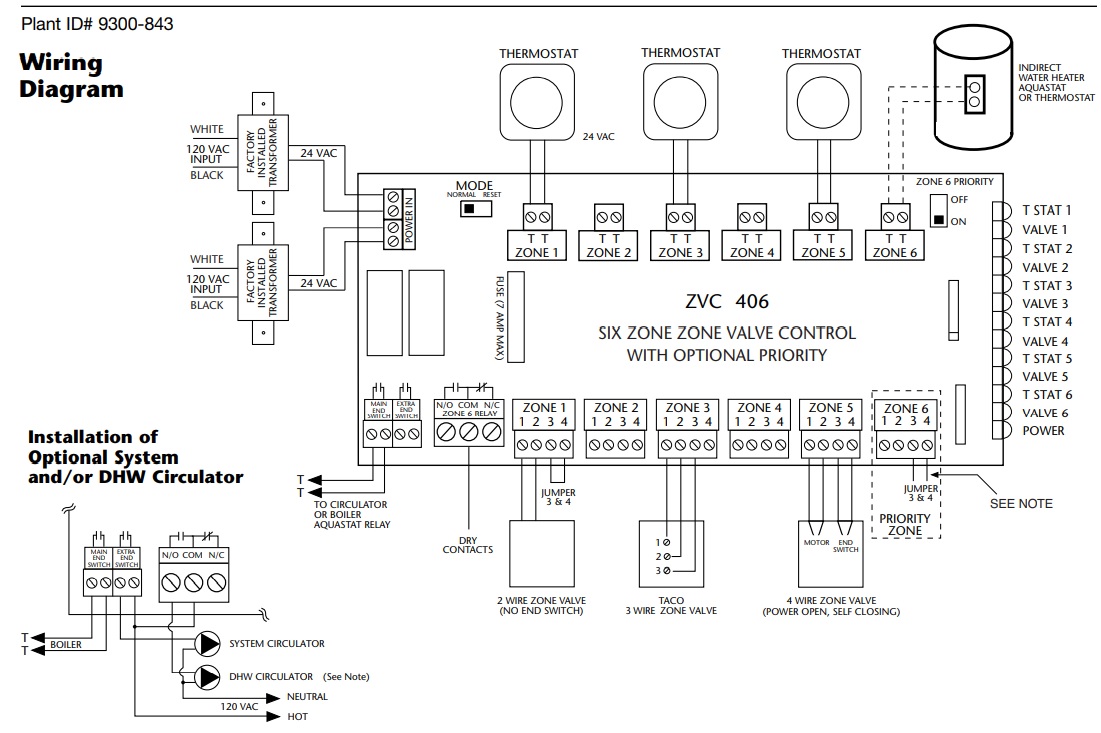
Begin by examining the wiring connections at the valve. Loose or damaged wires can interrupt power flow. Look for frayed insulation or disconnected wires. Tighten any loose connections and replace damaged wires if needed.
Testing Voltage At The Valve
Use a multimeter to test the voltage at the valve. Set the multimeter to the correct voltage setting. Place the probes on the power terminals of the valve. A Taco zone valve typically requires 24 volts to operate. If the reading is lower, the power source may be faulty.
Resetting The Circuit Breaker
Locate the circuit breaker controlling the valve. A tripped breaker can cut power to the system. Flip the breaker off, then back on, to reset it. Check if power is restored to the valve. If the breaker trips again, there may be an electrical fault.
Testing The Motor Operation
Troubleshooting a Taco zone valve often involves testing the motor operation. The motor is a critical component that ensures the valve opens and closes properly. If the valve isn’t functioning as expected, the motor might be the issue. Testing the motor can help identify whether it needs repair or replacement. This guide will walk you through identifying a faulty motor, replacing it, and knowing when to seek professional help.
Identifying A Faulty Motor
A faulty motor can cause the zone valve to stop working. Common signs include the valve failing to open or close or making unusual noises. Start by turning off the power to the zone valve. Inspect the motor for visible damage, corrosion, or loose connections. Use a multimeter to check the motor’s electrical continuity. If the motor doesn’t show continuity, it’s likely defective.
Observe the motor while the valve is in operation. If it struggles to move or stays unresponsive, it might be worn out. A faulty motor can also create excessive heat, so check for overheating signs. If these issues persist, replacement may be necessary.
Steps To Replace The Motor
Replacing a Taco zone valve motor is a straightforward process. Start by switching off the power supply to ensure safety. Remove the valve cover to access the motor. Take note of the motor’s wiring connections before disconnecting them.
Unscrew the motor from its mounting base using a screwdriver. Install the new motor by aligning it with the mounting holes. Reconnect the wiring exactly as it was before. Secure the motor firmly in place and reattach the valve cover. Turn the power back on and test the valve operation to confirm the replacement was successful.
When To Call A Professional
Some issues with a Taco zone valve motor may require expert help. Call a professional if you’re unsure about handling electrical components. If the problem persists after replacing the motor, it might be a deeper issue with the valve or system. Experts can diagnose and resolve complex problems efficiently.
Seek assistance if the motor wiring appears damaged or complicated. Electrical safety is crucial, and a trained technician can prevent further damage. Professionals also have the tools to test the entire system for additional faults.
Examining The End Switch
When troubleshooting Taco Zone Valve issues, one key component you’ll want to inspect is the end switch. This small but critical part plays a big role in ensuring your heating system operates smoothly. If your zone valve seems to be malfunctioning, the end switch might be the culprit. Let’s break it down step by step.
How The End Switch Works
The end switch acts as a communicator in your Taco Zone Valve system. Once the valve opens, the end switch signals the boiler to turn on, allowing hot water to flow into the heating zone. Without this signal, your system won’t deliver heat even if the valve itself is functioning properly.
Imagine turning the key in a car ignition but not hearing the engine start—this is similar to what happens when an end switch fails. It’s an essential step in the heating process, and understanding how it works can help you pinpoint problems faster.
Detecting A Malfunction
If your heating system isn’t responding, the end switch might not be sending the signal to the boiler. Start by observing whether the zone valve is opening correctly. If the valve opens but the boiler stays off, the end switch could be faulty.
Use a multimeter to test the switch. Check for continuity when the valve is fully open. If there’s no continuity, the end switch isn’t working as it should. This simple test can save you hours of guesswork.
Ask yourself: Has your heating zone been unusually quiet? If so, an end switch issue could be the root cause. Don’t overlook this tiny but crucial piece of hardware.
Replacing A Faulty End Switch
Replacing an end switch is straightforward if you follow the steps carefully. First, turn off the power to your heating system to avoid electrical hazards. Then, remove the zone valve’s cover to access the switch assembly.
Disconnect the old switch by unscrewing it from its mounting and detaching the wires. Take note of how the wires are connected—it’s always smart to snap a photo for reference. Install the new switch by reversing these steps and ensuring the wires are securely connected.
Test the system after replacement to confirm the boiler activates when the valve opens. A properly functioning end switch can restore your heating system’s efficiency and keep your home warm. Have you replaced a component before? This task is manageable even for beginners with basic tools.

Credit: www.reddit.com
Dealing With Stuck Valves
Dealing with stuck Taco zone valves can be frustrating. These valves control water flow in your heating system. A jammed valve can disrupt heat distribution and reduce efficiency. Understanding the cause and fixing it quickly is essential. This guide will help you address stuck valves with practical steps.
Causes Of A Stuck Valve
There are several reasons a Taco zone valve might get stuck. Dirt and debris can block the valve’s movement. Old or worn-out parts may cause mechanical failure. Lack of regular maintenance can lead to build-up or corrosion. Identifying the root cause is the first step in troubleshooting.
Lubricating The Valve Mechanism
Lubrication can often solve minor valve issues. First, turn off the power to the system. This ensures safety while you work. Use a high-quality lubricant recommended for heating systems. Apply a small amount to the valve’s moving parts. Operate the valve manually to spread the lubricant evenly. Avoid over-lubricating, as it may attract dirt.
Steps To Free A Jammed Valve
Start by switching off the power to the valve. Remove the valve cover to inspect its components. Check for visible debris or build-up blocking the mechanism. Carefully clean the area using a soft brush or cloth. If the valve remains stuck, gently move it back and forth by hand. This can help loosen any internal blockages. Replace damaged parts if necessary. Once done, reassemble the valve and test its operation.
Preventing Future Issues
When it comes to Taco Zone Valve systems, prevention is always better than repair. A properly maintained system saves you time, money, and frustration. Let’s dive into practical ways to keep your valves running smoothly and avoid unnecessary breakdowns.
Regular Maintenance Tips
Small maintenance tasks can make a big difference. Clean the valves periodically to prevent dirt buildup, which can interfere with their functionality. Tighten any loose screws or connections to keep everything secure.
Schedule a yearly inspection of your Taco Zone Valve system. This allows you to catch wear and tear before it turns into costly damage. Make it part of your routine, just like checking your HVAC filters.
Don’t ignore the manual. It’s packed with specific maintenance tips that apply directly to your model. Following these guidelines ensures your system operates at its best.
Monitoring For Early Warning Signs
Listen to your system. If you hear unusual noises like clicking or humming, your valve may need attention. These sounds often signal a mechanical issue that can worsen over time.
Watch for inconsistent heating in your home. If certain rooms are colder than others, it could mean the valve isn’t opening or closing properly. Address the issue early to avoid long-term discomfort.
Check for leaks around the valve. Even small leaks can lead to major problems if left unaddressed. A quick visual inspection once a month can save you trouble down the road.
Upgrading To More Reliable Components
Sometimes, older components just don’t cut it anymore. Upgrading to newer, more reliable Taco Zone Valves can improve efficiency and reduce the risk of issues. Modern valves often have better sealing mechanisms and longer lifespans.
Consider adding smart features. Many newer systems offer compatibility with smart thermostats, allowing you to monitor performance remotely. This keeps you in control and helps identify problems before they escalate.
Think about the cost versus benefit. While upgrading may require an upfront investment, it can save you money in the long run by reducing repair costs and improving energy efficiency.
Are you staying proactive with your Taco Zone Valve maintenance? A little effort now can save you from major headaches later.

Credit: m.youtube.com
Conclusion
Troubleshooting Taco zone valves doesn’t have to feel overwhelming. Start by checking common issues like power supply, wiring, or debris buildup. Regular maintenance can prevent many problems and extend the valve’s lifespan. If the issue persists, consulting a professional may be the safest option.
Remember, addressing small issues early can save time and money. By understanding your zone valve’s basics, you’ll handle repairs with more confidence. Keep your heating system running smoothly with these practical steps. A little effort goes a long way in maintaining comfort at home.


