Are your trailer lights acting up right when you need them most? Flickering brake lights, turn signals that won’t flash, or running lights that dim unexpectedly can turn a simple trip into a stressful challenge.
But don’t worry—most trailer wiring problems are easier to fix than you think. By understanding the common causes and following some straightforward troubleshooting steps, you can get your trailer lighting back in perfect working order quickly and safely. In this guide, you’ll learn how to check your tow vehicle’s fuses, inspect connectors and grounds, and test the wiring and bulbs on your trailer.
Stick with me, and you’ll gain the confidence to tackle trailer wiring issues yourself—saving time, money, and frustration on every journey. Let’s get started!
Check Tow Vehicle Fuses
Checking the tow vehicle fuses is an essential step in trailer wiring troubleshooting. Fuses protect the electrical system by breaking the circuit if there is a fault. A blown fuse can stop power from reaching the trailer lights. This results in non-functioning or flickering lights. Finding and fixing fuse issues often restores proper trailer lighting quickly.
Locate Relevant Fuses
Begin by finding the fuse box in your tow vehicle. Common locations include under the dashboard or in the engine compartment. Use the owner’s manual to identify fuses linked to trailer lights or towing functions. These fuses often have labels such as “Trailer,” “Tow,” or “Trailer Lights.” Knowing the right fuses saves time during troubleshooting.
Inspect For Blown Fuses
Remove each relevant fuse carefully. Look through the clear plastic to check the metal wire inside. A broken or melted wire means the fuse is blown. Sometimes, a fuse may look intact but still fail. Testing with a multimeter can confirm if the fuse allows current to pass. Do not skip this step to avoid missing hidden faults.
Replace Faulty Fuses
Replace blown fuses with new ones of the exact same amperage rating. Using a fuse with a different rating can cause further electrical issues or damage. Insert the new fuse firmly into the slot. After replacement, test the trailer lights to ensure they work properly. Keep spare fuses in your vehicle for quick repairs on the road.
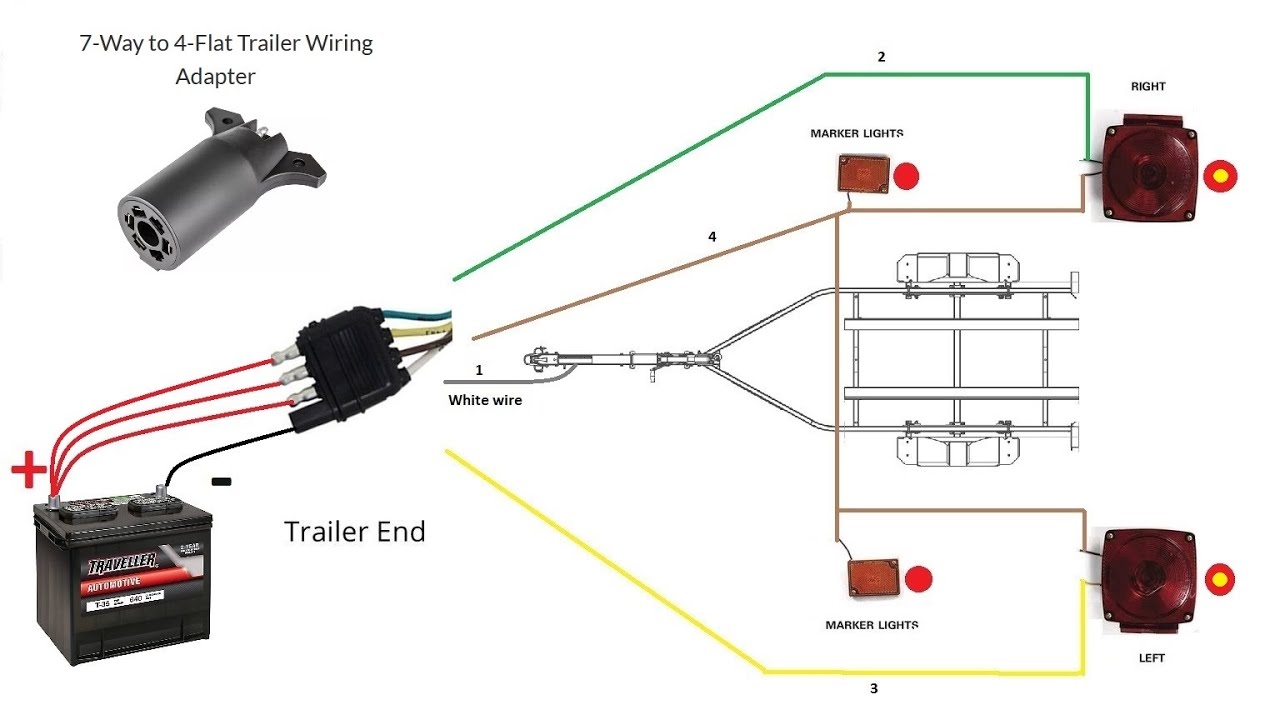
Use Trailer Light Tester
Using a trailer light tester is an easy way to find wiring problems. It helps you check if each light works correctly. This tool saves time and avoids guesswork. You can spot issues like bad connections or faulty bulbs quickly. Follow simple steps to test your trailer lights with a tester.
Plug In Tester To Socket
First, connect the tester to the trailer’s wiring socket. Make sure the connection is secure. The tester fits into the trailer plug just like the trailer does. This allows the tester to check all the wires at once. A good connection helps get accurate test results.
Verify Turn Signal Operation
Next, turn on the tow vehicle’s turn signals one at a time. Watch the tester lights for the left and right signals. The tester will light up on the side you signal. This shows the turn signal wiring works properly. If no light appears, that circuit has a problem.
Confirm Brake And Running Lights
Press the brake pedal to test the brake lights. The tester should light up the brake light circuit. Also, turn on the vehicle’s running lights. The tester will show if running lights have power. If the tester does not light up, check for wiring or bulb faults.
Inspect Trailer Connector
Inspecting the trailer connector is a vital step in trailer wiring troubleshooting. The connector links your tow vehicle to the trailer’s electrical system. Dirt, corrosion, or damage here can cause poor light function or total failure. Regular checks keep your trailer safe and road-ready.
Look For Corrosion And Dirt
Corrosion and dirt often hide inside the trailer connector. These elements block electrical flow. Check for green or white buildup on the metal pins. Dirt can clog the connector, stopping proper contact between wires. Use a bright light to see inside clearly.
Clean Connector Pins
Cleaning the connector pins restores good electrical contact. Use a small wire brush or sandpaper to remove corrosion gently. Avoid bending or damaging the pins. After cleaning, wipe away dust with a dry cloth. This simple step improves the connection instantly.
Apply Dielectric Grease
Apply dielectric grease to the cleaned pins to prevent future corrosion. This grease blocks moisture and dirt from entering. A thin layer is enough; avoid overuse that can attract debris. This step extends the life of your trailer connector and keeps lights working well.
Check Ground Wire
Checking the ground wire is a key step in trailer wiring troubleshooting. A bad ground connection often causes trailer lights to flicker, dim, or stop working. The ground wire completes the electrical circuit between the trailer and the tow vehicle. Without a solid ground, the electrical system cannot function properly. Focus on ensuring the ground wire is firmly attached and free from corrosion or rust. This section guides you through important checks for the ground wire.
Verify Secure Attachment
Start by inspecting the ground wire’s connection point. Make sure the wire is tightly attached to the trailer frame or the designated grounding spot. A loose or broken connection can cause intermittent light problems. Use a wrench or screwdriver to tighten any loose bolts or screws securing the ground wire. The wire should not move or pull away easily.
Remove Paint Or Rust
Paint and rust can block electrical contact and disrupt the ground connection. Check the area where the ground wire attaches to the trailer frame. Scrape off any paint or rust using sandpaper or a wire brush. Clean the surface until the bare metal shines. This ensures the ground wire makes a good electrical connection with the trailer frame.
Ensure Bare Metal Contact
The ground wire must touch bare metal for proper conductivity. Avoid attaching the wire to painted or coated surfaces. Confirm the wire’s end is stripped of insulation and firmly pressed against the clean metal. Reattach the wire securely. This direct metal-to-metal contact provides a stable path for electrical current, preventing light issues.
Examine Trailer Wiring
Examining trailer wiring is essential when trailer lights fail or act irregularly. A careful check can find broken wires, loose connections, or damaged parts. This helps fix problems early and avoids accidents on the road.
Start by inspecting the entire wiring harness. Look closely at all connectors and splices. Check if any wires are pinched or burnt. Each step helps pinpoint the cause of the trouble.
Trace Harness For Damage
Follow the wiring harness from the trailer plug to the lights. Watch for cuts, cracks, or worn spots in the wires. Damage often happens where wires rub against metal or get stepped on. Find and mark any weak points for repair.
Inspect Splices And Connectors
Open all splices and connectors carefully. Dirt, corrosion, and rust can block electricity flow. Clean or replace corroded connectors. Make sure splices are tight and sealed to prevent water entry. Loose connections cause flickering or no lights.
Look For Pinched Or Burnt Wires
Pinched wires break the electrical path. Check tight spots near hinges or frame corners. Burnt wires show black marks or melted insulation. These signs mean a short circuit or overload. Replace damaged wires to avoid further issues.
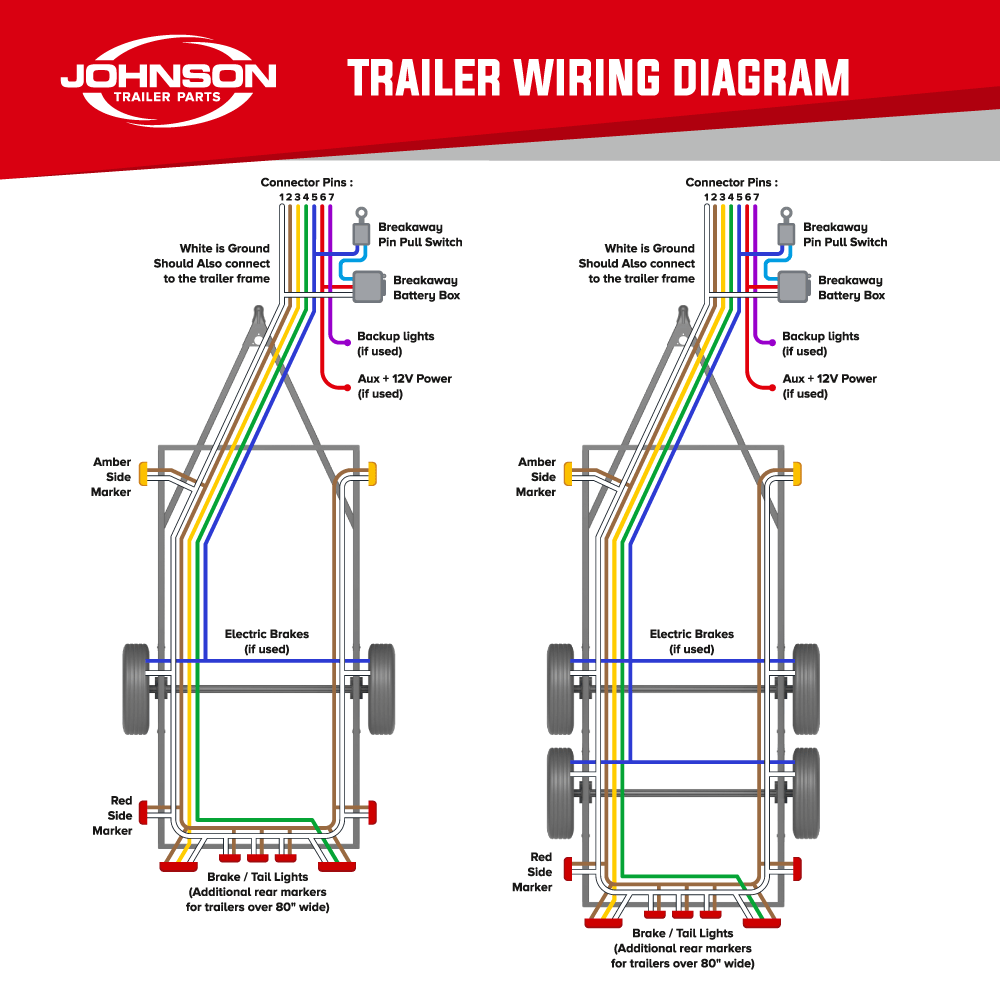
Credit: johnsontrailerparts.com
Test Bulbs And Sockets
Testing bulbs and sockets is a key step in trailer wiring troubleshooting. Faulty bulbs or damaged sockets often cause trailer lights to fail. Simple tests can identify problems quickly. This helps avoid costly repairs and ensures safety on the road.
Remove Lens Covers
Start by removing the lens covers from each trailer light. Use a screwdriver or your fingers, depending on the design. Take care not to crack or damage the covers. Removing covers gives clear access to bulbs and sockets for inspection.
Check For Burnt-out Bulbs
Look closely at each bulb for signs of burning or blackening. A burnt-out filament means the bulb needs replacement. Test bulbs using a 12-volt power source or a test light. Replace any bulbs that do not light up to restore proper function.
Clean Or Replace Corroded Sockets
Inspect each socket for rust, dirt, or corrosion. Corrosion blocks electrical contact and causes light failure. Clean sockets using fine sandpaper or a wire brush. If corrosion is severe, replace the socket entirely. Proper socket condition ensures good electrical flow.
Use Multimeter For Continuity
Using a multimeter for continuity is a key step in trailer wiring troubleshooting. It helps find wiring problems by checking if electrical current flows through wires without breaks. This method is simple but very effective for identifying faults in trailer wiring systems.
A multimeter can test each wire in the trailer’s harness. It detects broken wires, poor connections, and ensures current flows correctly. This tool saves time and prevents guesswork during repairs.
Test Individual Wires
Set the multimeter to continuity mode. Touch one probe to one end of the wire and the other probe to the opposite end. A beep or reading means the wire is good. No beep shows a break or fault in the wire.
Test each wire separately. This isolates problems to a specific wire. It helps you focus repairs only where needed, avoiding unnecessary fixes.
Identify Broken Connections
Broken connections cause lights to fail or flicker. Use the multimeter to check connectors and terminals. Place probes on both sides of a connector to check continuity.
No continuity means the connection is bad. Clean or replace the connector. This ensures power flows through the wiring system properly.
Confirm Proper Current Flow
Continuity testing alone does not check current flow strength. Use the multimeter’s voltage or current mode to confirm power delivery. Measure voltage at the trailer lights or connector pins.
Proper voltage means the wiring and connections work well. Low or no voltage signals wiring faults, requiring further inspection or repair.
Credit: www.youtube.com
Address Common Fixes
Addressing common fixes in trailer wiring troubleshooting helps restore proper light function quickly. Simple repairs often solve most trailer wiring problems. Focus on cleaning, securing, replacing, and restoring parts to ensure reliable connections. These steps prevent flickering, dimming, or non-working trailer lights.
Clean Corroded Contacts
Corrosion blocks electrical flow and causes light failure. Use a wire brush or sandpaper to clean contacts. Remove rust and dirt carefully for better connection. Clean both trailer and tow vehicle connectors. This simple step improves current flow and light performance.
Secure Loose Connections
Loose wires cause intermittent lighting problems and flickering. Check all wire terminals and plugs. Tighten any loose screws or clamps. Make sure wires fit snugly in connectors. A secure connection keeps power steady and lights working.
Replace Damaged Terminals
Terminals wear out or get bent over time. Damaged terminals cause poor contact and signal loss. Cut off old terminals and strip the wire ends. Crimp new terminals firmly onto wires. Use terminals that match your trailer’s wiring system for best results.
Swap Out Bad Fuses
Fuses protect the wiring from overload and short circuits. A blown fuse stops power flow to trailer lights. Locate the fuse box on the tow vehicle. Check each fuse related to trailer wiring. Replace any blown fuses with the correct rating to restore power.
Restore Corroded Connectors
Corroded connectors reduce electrical conductivity and cause failures. Disconnect the connectors and spray electrical contact cleaner. Scrub lightly to remove corrosion. Allow connectors to dry fully before reconnecting. This restores a clean, solid connection for better light function.
Prevent Future Issues
Preventing future trailer wiring problems saves time and keeps your trailer safe. Simple habits protect wiring from damage and corrosion. These easy steps help avoid breakdowns and costly repairs.
Regularly Inspect Wiring
Look over your trailer wiring often. Check for cracks, frays, or loose connections. Early spotting of damage stops small issues from growing. Pay close attention to areas near the hitch and wheel wells. Replace worn or broken wires promptly.
Keep Connectors Clean
Dirt and rust block electrical flow. Clean trailer connectors before each trip. Use a small brush or cloth to remove grime. Keeping connectors clean ensures strong, reliable signals. Avoid moisture buildup by drying connectors after cleaning.
Use Protective Grease
Apply dielectric grease to wiring connectors. This grease blocks water and prevents corrosion. It also helps connectors plug in smoothly. A thin layer of grease extends wiring life and improves electrical contact. Reapply grease during regular inspections.

Credit: www.etrailer.com
Frequently Asked Questions
How To Troubleshoot Trailer Lights Wiring?
Start by checking the tow vehicle’s fuses and trailer light tester for proper signals. Inspect the trailer connector for corrosion or bent pins. Ensure the ground wire attaches securely to bare metal. Examine trailer wiring for damage or breaks. Use a multimeter to test bulbs and circuits.
What Are The Symptoms Of Bad Ground On Trailer Lights?
Symptoms of bad ground on trailer lights include flickering, dimming, or intermittent operation of brake, turn signal, and running lights.
How To Check Trailer Wiring With Multimeter?
Set the multimeter to voltage or continuity mode. Test each trailer wire at the connector for proper voltage or continuity. Check the ground wire connection to the trailer frame. Replace or repair any damaged or corroded wires for correct trailer wiring function.
How To Find A Short In Trailer Brake Wiring?
Use a multimeter to test continuity and voltage on brake wires. Check for blown fuses, damaged connectors, and poor grounds. Inspect wiring for cuts or corrosion. Isolate sections to pinpoint the short. Repair or replace faulty wiring to fix the issue.
What Causes Trailer Lights To Flicker Or Dim Unexpectedly?
Flickering or dimming lights usually mean a bad ground connection. This interrupts the electrical flow and causes uneven lighting. Checking and tightening the ground wire often fixes this issue.
Conclusion
Troubleshooting trailer wiring can save time and prevent frustration. Start by checking fuses and connectors carefully. Clean and secure all connections to ensure good contact. Use a tester or multimeter to find faults quickly. Pay special attention to the ground wire; it often causes issues.
Replace damaged bulbs and corroded sockets as needed. Taking small steps helps maintain safe, working trailer lights. Regular checks keep your trailer ready for the road. Simple fixes often solve the most common wiring problems. Stay patient and methodical for best results.
")