Are your trailer lights flickering, dim, or not working at all? If so, you’re not alone—and you’re in the right place to fix it.
Utility trailer wiring problems can be frustrating, especially when you need your lights to work perfectly for safety and legal reasons. But don’t worry, understanding how to troubleshoot your trailer wiring doesn’t have to be complicated. You’ll discover simple, step-by-step solutions to diagnose common wiring issues and get your trailer lights shining bright again.
Keep reading, and by the end, you’ll feel confident handling your trailer’s electrical system like a pro.
Symptoms Of Wiring Problems
Identifying wiring problems in your utility trailer early prevents bigger issues. Wiring faults often show through the trailer lights. These signs help pinpoint the problem quickly.
Flickering Lights
Trailer lights blinking on and off is a common sign. This often happens on rough roads or bumps. Flickering means there is a loose wire or bad connection.
Dim Or Weak Lights
Lights that are not bright enough indicate voltage loss. This may come from corroded connectors or poor grounding. Dim lights reduce visibility and safety on the road.
Intermittent Light Operation
Lights that work sometimes but not always can confuse drivers. This issue usually points to broken or frayed wiring. Moving the trailer or connector may cause lights to flicker or fail.
Uneven Light Function
When some lights work and others don’t, it shows wiring imbalance. For example, brake lights might function, but turn signals do not. This uneven behavior hints at a bad ground or damaged wire.
Backfeeding Electrical Issues
Backfeeding happens when running lights go out after braking or turning. Electricity takes the wrong path due to wiring faults. This can cause lights to blink or fail unexpectedly.
Complete Light Failure
All trailer lights not working means a major wiring problem. This could be a broken main wire or blown fuse. Complete failure makes the trailer unsafe and illegal to drive.
Credit: www.etrailer.com
Causes Of Wiring Failures
Wiring failures in utility trailers cause many lighting and electrical problems. Identifying the root causes helps fix these issues quickly. Several common reasons lead to wiring breakdowns. Understanding them improves troubleshooting and maintenance.
Poor Ground Connections
Poor ground connections stop electricity from flowing properly. The trailer frame often acts as the ground path. Dirt, paint, or rust can block the connection. Loose or missing ground wires also cause flickering or no lights.
Corrosion And Rust
Corrosion and rust damage wiring and connectors. Moisture and road salt speed up this process. Corroded wires lose conductivity and break easily. Rust on metal parts weakens ground connections. This leads to intermittent or failed lights.
Loose Or Damaged Wires
Wires can become loose or damaged over time. Vibration and movement cause wear and tear. Exposed or broken wires create shorts or open circuits. Loose wires cause flickering or no light at all. Regular inspection catches these problems early.
Incorrect Wiring Connections
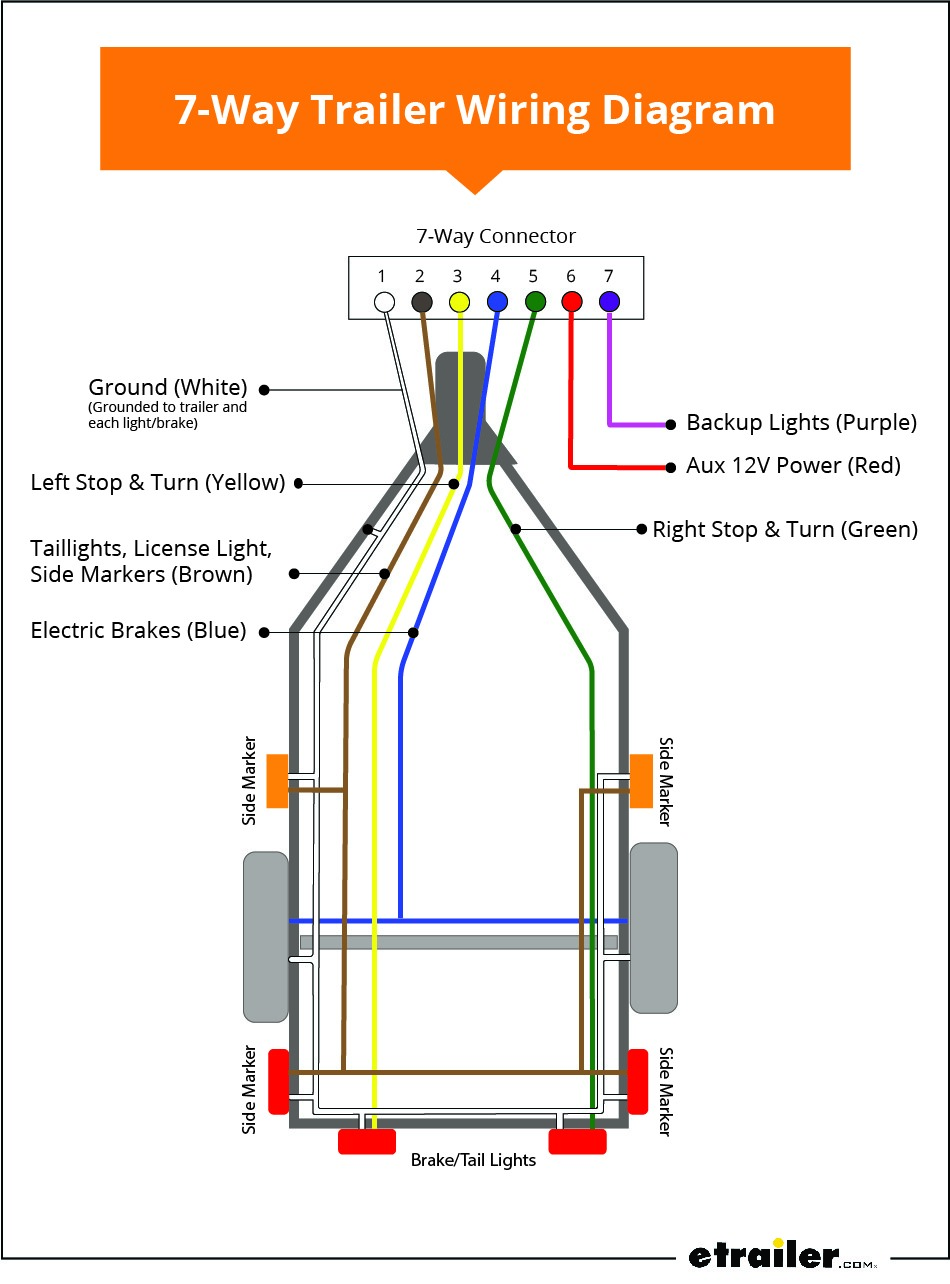
Incorrect wiring connections cause many electrical faults. Mixing up wire colors or terminals leads to wrong signals. This results in non-working brake lights or turn signals. Always follow wiring diagrams carefully to avoid mistakes.
Worn Or Faulty Connectors
Connectors wear out from use and exposure. Dirt, moisture, and corrosion damage pins and sockets. Faulty connectors cause poor contact and signal loss. Replacing worn connectors restores reliable electrical flow. Check connectors regularly for signs of wear.
Basic Troubleshooting Steps
Basic troubleshooting steps help identify common issues in utility trailer wiring. These steps are simple to follow and require minimal tools. They guide you through checking the main parts of the wiring system. Start with easy inspections and move to testing electrical components. This approach saves time and avoids unnecessary repairs.
Inspecting The Trailer Plug
Begin by examining the trailer plug for visible damage. Look for bent or broken pins inside the plug. Check if the plug fits tightly into the vehicle socket. Loose connections can cause wiring problems. Clean the plug contacts to remove dirt or debris. This ensures good electrical contact.
Checking Vehicle Fuse And Power
Check the vehicle’s fuse box for blown fuses related to trailer lights. A blown fuse stops power from reaching the trailer wiring. Replace any faulty fuses with the correct rating. Also, test the vehicle power outlet with a test light. Confirm that power flows to the trailer connection point.
Testing With A Multimeter
Use a multimeter to test voltage and continuity in the trailer wiring. Set the multimeter to measure DC voltage. Test each wire at the trailer plug for proper voltage. Check for breaks by measuring continuity between wire ends. A multimeter helps find hidden wiring faults quickly.
Examining Ground Wire Condition
Inspect the ground wire connecting the trailer to the vehicle frame. A poor ground causes flickering or dim lights. Ensure the ground wire is securely attached and not frayed. Clean the connection points to remove rust or paint. A solid ground connection is crucial for proper light function.
Looking For Corrosion And Damage
Look closely at all wiring and connectors for corrosion or physical damage. Corrosion weakens electrical flow and causes failures. Cut or cracked wires need immediate repair or replacement. Use dielectric grease on connectors to prevent future corrosion. Protect wiring from water and road debris.

Credit: www.etrailer.com
Quick Fixes That Work
Quick fixes can solve many common trailer wiring problems fast. These simple steps restore proper function without complex tools or skills. Start with basic checks and small repairs to save time and money. The following methods help get your trailer lights working again quickly.
Cleaning And Tightening Grounds
Ground connections often cause wiring issues. Dirt, rust, or paint can block electricity flow. Clean the ground points with sandpaper or a wire brush. Tighten screws and bolts to ensure a solid contact. A good ground improves the overall electrical circuit.
Replacing Or Repairing Connectors
Damaged connectors stop signals from passing correctly. Check for cracks, corrosion, or bent pins. Replace broken connectors with new ones designed for trailers. For minor damage, carefully repair bent pins or clean contacts. Reliable connectors keep lights working well.
Running A Dedicated Ground Wire
Sometimes the trailer frame ground is weak or unreliable. Adding a separate ground wire from the trailer plug to the vehicle helps. Use a thick wire for better conductivity. Secure it with clean, tight connections at both ends. This step prevents ground-related problems.
Securing Loose Or Frayed Wiring
Loose wires can disconnect or short out easily. Inspect wiring for any frays or breaks. Use electrical tape or heat shrink tubing to cover exposed wires. Bundle loose wires together and fasten them with zip ties. Properly secured wiring lasts longer and works better.
Applying Dielectric Grease
Dielectric grease stops moisture and corrosion in connectors. Apply a thin layer inside plugs and sockets. This grease protects metal parts and improves electrical contact. It also makes connectors easier to unplug. Use it regularly for lasting wiring health.
Advanced Troubleshooting Tips
Advanced troubleshooting tips help solve complex trailer wiring problems. These methods go beyond basic checks. They reveal hidden issues that simple tests might miss. Using the right tools and techniques ensures safe and reliable trailer lighting.
Using A Circuit Tester
A circuit tester checks power flow in wiring. Connect it to each wire at the trailer connector. The tester lights up when power is present. It helps find broken or disconnected wires quickly. Test each function: brake, turn, and running lights.
Tracing Wiring Shorts
Shorts cause lights to malfunction or fuse to blow. To trace shorts, disconnect the trailer wiring harness. Use the circuit tester to check for continuity between wires and ground. A beep or light shows a short circuit. Inspect damaged wires and repair or replace them.
Testing Individual Light Assemblies
Light assemblies can fail separately. Remove each light from the trailer. Test each bulb socket with the circuit tester. Check bulbs for damage or corrosion. Replace faulty bulbs or sockets to restore proper lighting.
Checking Trailer Frame For Ground Integrity
The trailer frame often acts as the ground. Clean the frame where the wiring grounds connect. Remove rust, dirt, and paint. Use a multimeter to check for good ground continuity. Poor grounding causes flickering or dim lights. Tighten or replace ground wires if needed.
Verifying Vehicle Wiring Compatibility
Vehicle wiring must match trailer wiring types. Check the vehicle’s wiring connector and the trailer’s plug. Confirm they use the same wiring standard and pin functions. Mismatched wiring can cause lights to fail or behave oddly. Use adapters if necessary.

Credit: mechanicalelements.com
Preventive Maintenance Advice
Preventive maintenance is key to avoiding utility trailer wiring problems. Small checks and care keep your trailer lights working well. This saves time and money on repairs. Follow simple steps to protect your wiring and connectors.
Regular Wiring Inspections
Check your trailer wiring at least once a month. Look for cracks, cuts, or worn insulation on wires. Make sure wires are tight and not loose. Replace any damaged wires immediately to avoid shorts or failures. Early detection stops bigger problems.
Protecting Connectors From Moisture
Moisture causes corrosion and shorts in connectors. Use dielectric grease on connectors to repel water. Cover connectors with plastic caps or waterproof boots when not in use. Keep connections dry and sealed to extend their life and reliability.
Proper Storage Of Trailer Wiring
Store wiring and connectors in a dry place when the trailer is not in use. Avoid leaving wires on the ground where dirt and water collect. Coil wires loosely to prevent kinks and breaks. Proper storage reduces wear and tear.
Upgrading To Weatherproof Components
Consider replacing old parts with weatherproof connectors and wiring. These parts resist rain, mud, and snow better. Weatherproof materials last longer and need less repair. This upgrade improves the safety and function of your trailer.
Routine Cleaning Of Ground Points
Ground points often collect rust and dirt that block electricity flow. Clean ground connections regularly with a wire brush. Tighten bolts and remove paint around grounding spots. Good grounds prevent flickering and light failures.
Frequently Asked Questions
How To Troubleshoot Trailer Lights Wiring?
Check the trailer’s ground wire for corrosion or looseness. Test each wire with a multimeter for power. Inspect connectors for damage. Clean all connections and tighten securely. Replace faulty wires or fuses to restore proper trailer light function.
What Are The Symptoms Of Bad Ground On Trailer Lights?
Symptoms of bad ground on trailer lights include flickering, dim or intermittent lights, one-sided failure, backfeeding issues, and complete light failure.
How To Check Trailer Wiring With Multimeter?
Set the multimeter to DC voltage. Connect the black probe to ground, red to each wire. Check for proper voltage output.
Why Am I Not Getting Power To My Trailer?
Check the vehicle’s fuse box for a blown fuse first. Inspect trailer wiring for corrosion, loose connections, or damage. Ensure the trailer plug and ground connection are clean and secure. Faulty wiring or poor ground often causes power loss to the trailer.
What Are Common Signs Of Utility Trailer Wiring Problems?
Flickering or dim lights often signal wiring issues. Sometimes lights work intermittently or not at all. These signs suggest loose connections or poor grounding.
Conclusion
Troubleshooting utility trailer wiring does not have to be hard. Check all connections carefully for dirt or rust. Clean and tighten wires to ensure a strong link. Test each light to find flickering or dimming signs. Replace damaged wires or connectors as needed.
A solid ground connection keeps your lights working well. Regular maintenance prevents most common wiring issues. Stay safe on the road with reliable trailer lighting. Simple steps make a big difference in trailer wiring performance.
")


