Thermostats ensure a comfortable living space. But what happens when they malfunction?
Venstar thermostats can sometimes face issues that disrupt your comfort. Understanding how to troubleshoot these problems is crucial. Whether it’s a blank screen, incorrect temperature readings, or connectivity issues, knowing the basics can save time and money. This guide will help you diagnose and fix common Venstar thermostat problems.
With simple steps and clear instructions, you can resolve most issues on your own. Ready to get your thermostat back to working perfectly? Let’s dive into the troubleshooting process and regain control of your home’s climate.
Introduction To Venstar Thermostats
Venstar Thermostats offer user-friendly control for home temperatures. Problems like incorrect settings or connectivity issues can arise. Quick troubleshooting steps can help resolve common issues easily.
Venstar thermostats are popular for their reliability and advanced features. They help control home temperatures with ease and precision. These devices are user-friendly and offer various benefits.Features And Benefits
Venstar thermostats come with a touch screen for easy navigation. The intuitive interface allows users to set temperatures quickly. These devices also offer Wi-Fi connectivity. This lets users control the thermostat remotely through a smartphone app. Energy-saving features help reduce utility bills. Venstar thermostats also work well with HVAC systems. This ensures a comfortable home environment year-round.Common Issues
Users may face some common issues with Venstar thermostats. One issue is the screen not responding. This can often be fixed by resetting the thermostat. Another issue is incorrect temperature readings. This may require recalibrating the device. Wi-Fi connectivity problems can also arise. Ensure the thermostat is within range of the router. Regular maintenance helps prevent many of these issues. Cleaning the thermostat and checking for updates can improve performance. “`
Credit: venstar.com
Thermostat Not Powering On
Is your Venstar thermostat not powering on? This problem can be frustrating. But don’t worry, we have a simple guide to help. Let’s look at some common troubleshooting steps.
Check Power Source
First, make sure your thermostat is getting power. Check if the power source is working. Is the circuit breaker on? If not, switch it on. Also, check the power outlet. Plug in another device to see if it works. If the outlet is not working, try a different one.
Inspect Wiring Connections
Next, inspect the wiring connections. Loose or disconnected wires can be the problem. Turn off the power before you start. Remove the thermostat cover. Look for any loose wires. Tighten them if needed. Also, check for any signs of damage. Replace damaged wires if necessary.
Incorrect Temperature Display
Many users encounter issues with their Venstar thermostats displaying incorrect temperatures. This can cause discomfort and inefficient energy use. Understanding the causes can help fix these problems quickly.
Calibrating The Thermostat
Calibrating your thermostat can correct the temperature display. Start by accessing the settings menu. Look for the calibration option. Follow the on-screen instructions to adjust the temperature reading. Use a reliable thermometer to compare readings. Adjust until the thermostat matches the thermometer. This can ensure accurate temperature control.
Sensor Placement
Incorrect sensor placement can affect temperature readings. Ensure the sensor is away from direct sunlight. Avoid placing it near vents or drafty areas. Place the sensor in a central location. This helps it read the average room temperature. Proper placement can improve accuracy and comfort.
Thermostat Not Responding To Settings
Is your Venstar thermostat not responding to settings? This issue can be frustrating, especially on hot or cold days. Understanding the possible causes and solutions can help. Let’s explore some effective troubleshooting steps.
Resetting The Device
Sometimes, a quick reset can fix many thermostat issues. To reset your Venstar thermostat, locate the reset button. Press and hold it for a few seconds. This will restart the device. Check if the thermostat responds to your settings now.
Software Updates
Outdated software can cause your thermostat to malfunction. Ensure your thermostat has the latest software. To update, go to the settings menu on the thermostat. Look for the software update option. Follow the on-screen instructions to complete the update. After updating, test if the thermostat responds correctly.
Hvac System Not Turning On
Experiencing issues with your Venstar thermostat? Many users report their HVAC system not turning on. This problem can be frustrating. Let’s explore some troubleshooting steps to get your system back on track. Here are two key areas to check.
Check Circuit Breakers
First, inspect your circuit breakers. Sometimes, a tripped breaker can cause the HVAC system to stop working. Go to your breaker panel. Look for any switches in the “off” position. If you find one, flip it back to “on”. This simple step can often solve the issue.
Inspect Hvac Components
Next, examine your HVAC components. Start with the thermostat itself. Ensure it has power and is set to the correct mode. Check the furnace or air handler. Look for any signs of damage or wear. Also, inspect the outdoor unit if you have one. Clear any debris around it. Make sure the fan can spin freely.
Wi-fi Connectivity Issues
Wi-Fi connectivity issues are common with Venstar thermostats. These issues can disrupt your thermostat’s performance. Understanding the problem helps in fixing it quickly. Below are some steps to troubleshoot and resolve these issues effectively.
Reconnecting To Wi-fi
If your Venstar thermostat is not connected to Wi-Fi, follow these steps:
- Go to the thermostat menu and select Wi-Fi Settings.
- Click on Network and then Scan for Networks.
- Select your Wi-Fi network from the list.
- Enter your Wi-Fi password and click Connect.
- Wait for the thermostat to connect. This may take a few minutes.
If the connection fails, ensure your password is correct. Also, make sure the network is not hidden. A hidden network will not show up in the scan results.
Router Placement
The placement of your router can impact Wi-Fi connectivity. Follow these tips for optimal placement:
- Place the router in a central location of your home.
- Avoid placing the router near thick walls or metal objects.
- Keep the router away from other electronic devices that may cause interference.
- Elevate the router on a shelf or mount it on a wall for better signal distribution.
| Issue | Solution |
|---|---|
| Weak Signal | Move router closer to the thermostat |
| Interference | Keep the router away from other electronics |
| Obstructions | Remove obstacles between router and thermostat |
By adjusting the router placement, you can improve your Venstar thermostat’s Wi-Fi connectivity. This ensures a stable and consistent connection, enhancing the overall performance of your thermostat.
Thermostat Display Issues
Experiencing problems with your Venstar thermostat display? It can be frustrating when the screen doesn’t work properly. Let’s explore common display issues and how to fix them. Simple steps can solve these problems, so your thermostat works perfectly again.
Screen Calibration
If the touch screen is not responding correctly, calibration might be the issue. Follow these steps:
- Go to the settings menu on your thermostat.
- Select “Screen Calibration.”
- Follow the on-screen instructions to calibrate the touch screen.
Calibration ensures the touch screen responds accurately to your inputs. This process is simple and usually takes just a few minutes.
Replace Display
If the display is cracked or not working, you might need to replace it. Here’s how:
- Turn off the power to the thermostat.
- Remove the thermostat from the wall.
- Disconnect the wiring carefully.
- Replace the old display with a new one.
- Reconnect the wiring and mount the thermostat back on the wall.
- Turn the power back on and check the display.
Replacing the display might seem daunting, but following these steps can make the process smooth and easy.
To recap, common display issues with Venstar thermostats can often be resolved through simple screen calibration or by replacing the display if it’s damaged. Keep your thermostat functioning efficiently with these troubleshooting tips.

Credit: www.youtube.com
Unusual Noises From Thermostat
Venstar thermostats are reliable. Sometimes, they make unusual noises. These noises can be annoying. They can also be a sign of a problem. Understanding these noises helps in troubleshooting.
Identify Noise Source
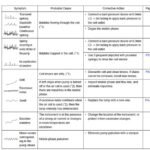
First, listen carefully. Different noises indicate different issues. A clicking sound may come from the relay. Buzzing could mean electrical problems. Humming might be a loose part. Note the noise and its pattern. This information is crucial.
Contacting Support
If the noise source is unclear, contact Venstar support. They have trained professionals. Describe the noise to them. Provide details about the thermostat model. This helps them diagnose the problem. They may suggest simple fixes or a technician visit.
Maintaining Your Venstar Thermostat
A well-maintained Venstar Thermostat ensures that your home remains comfortable and your HVAC system works efficiently. Regular maintenance helps prevent any unexpected issues, saving you time and money. Let’s look at two main aspects of maintaining your Venstar Thermostat: regular cleaning and scheduled inspections.
Regular Cleaning
Regular cleaning is essential for the optimal performance of your Venstar Thermostat. Dust and debris can accumulate over time, affecting its functionality. Follow these simple steps to keep your thermostat clean:
- Turn off the thermostat before cleaning.
- Use a soft, dry cloth to wipe the exterior.
- Gently remove any dust or dirt from the display and buttons.
Avoid using water or any liquid cleaners, as they can damage the device. Keeping the thermostat clean ensures accurate temperature readings and smooth operation.
Scheduled Inspections
Scheduled inspections are crucial for identifying potential issues early. Regular checks can help you maintain the efficiency of your Venstar Thermostat. Here’s a simple checklist for your inspections:
| Inspection Item | Frequency |
|---|---|
| Battery Check | Every 6 months |
| Wire Connections | Annually |
| Software Updates | Annually |
Ensure the batteries are in good condition. Check wire connections for any signs of wear or damage. Update the software to the latest version to ensure the thermostat runs smoothly. These inspections are simple yet effective in maintaining your thermostat.
Proper maintenance of your Venstar Thermostat extends its lifespan and ensures your home remains at a comfortable temperature. Regular cleaning and scheduled inspections are easy tasks that can make a big difference.

Credit: thermostat.guide
Frequently Asked Questions
How Do I Reset My Venstar Thermostat?
To reset your Venstar thermostat, press and hold the reset button for 5 seconds.
Why Is My Venstar Thermostat Not Cooling?
Check if the thermostat is set to “Cool” mode. Ensure the batteries are working and the circuit breaker isn’t tripped.
How Do I Change The Battery In My Venstar Thermostat?
Remove the thermostat from the wall, open the battery compartment, and replace the old batteries with new ones.
Why Is My Venstar Thermostat Screen Blank?
A blank screen usually means the batteries are dead. Replace them and check the circuit breaker for issues.
How Do I Program My Venstar Thermostat?
Access the “Program” menu on the thermostat. Follow the on-screen instructions to set your desired temperature schedule.
Conclusion
Troubleshooting your Venstar thermostat can be simple. Follow the steps mentioned. Check connections, settings, and power sources. Resetting the device can help. Refer to the manual for detailed instructions. Regular maintenance prevents future issues. Seek professional help if problems persist.
Your comfort and energy savings depend on a well-functioning thermostat. Stay proactive and keep your home cozy year-round.
")