Are you frustrated with dropped calls or weak signals indoors? You’re not alone, and the solution might be simpler than you think.
Verizon Wireless Network Extenders are designed to boost your signal, ensuring clear communication and uninterrupted connectivity. But, like any technology, they can sometimes run into issues. If your Network Extender isn’t performing as expected, you might feel a mix of confusion and urgency to get back to seamless connectivity.
This troubleshooting guide is here to calm those nerves and empower you with straightforward solutions. Imagine the ease of fixing problems with just a few steps, without needing to rely on tech support or wait for hours on hold. You’ll find actionable tips that you can apply right away, making your home or office a zone of connectivity bliss once more. Dive in to discover how to transform your frustration into confidence as you take control of your Network Extender issues.
Common Issues With Verizon Network Extenders
Verizon Network Extenders are a practical solution for enhancing signal strength indoors. Despite their benefits, users sometimes face common issues that can disrupt connectivity. Understanding these problems and knowing how to troubleshoot them is essential for maintaining a seamless network experience.
Connection Drops Frequently
One of the primary issues is frequent connection drops. This can occur due to interference from other electronic devices. Ensure the extender is placed away from microwaves or cordless phones. Positioning near windows may also help improve signal stability.
Poor Signal Quality
Poor signal quality is another common problem. This can be due to an incorrect setup or placement. Check if all cables are securely connected. Adjust the extender’s location to a central spot within your home or office.
Device Compatibility Issues
Some users face compatibility issues with certain devices. Ensure your devices support the frequency bands of the extender. Updating your device’s software can also solve compatibility problems. Double-check settings for any misconfigurations.
Setup Errors
Setup errors often lead to frustration. Review the installation instructions carefully. Use the correct cables and connectors. If setup problems persist, resetting the extender might help. This can resolve many initial setup errors.
Network Extender Not Detected
Sometimes, the extender may not be detected by your devices. Verify that the extender is powered on. Check if the LED indicators are displaying correctly. Ensure it is connected to your router properly.
Interference From Other Networks
Interference from nearby networks can affect performance. Check for overlapping Wi-Fi channels. Switching to a less crowded channel can improve connectivity. Adjusting the extender’s settings might also help reduce interference.

Credit: www.verizon.com
Checking Device Compatibility
Ensure your device is compatible for a seamless Verizon Wireless Network Extender experience. Check settings and model numbers to verify compatibility. Troubleshoot common issues by updating software and adjusting placement for optimal signal strength.
When setting up a Verizon Wireless Network Extender, ensuring that your device is compatible is a crucial step that can save you from future headaches. Imagine the frustration of going through the setup process only to find out your device doesn’t work with the extender. It’s like trying to fit a square peg into a round hole. To avoid this scenario, let’s dive into the essentials of checking device compatibility.Understanding Device Requirements
Every device comes with its unique set of specifications. Knowing these requirements is like having a roadmap before a journey. Check if your device meets the technical specifications needed for the extender. You might need to refer to your device’s manual or Verizon’s support page for this information.Operating System Compatibility
Is your device’s operating system up to date? Outdated systems often lack the necessary support for newer technologies. Ensure your device runs on a compatible OS version. It’s like ensuring your car has the latest software updates before a long road trip.Network Frequency Support
Devices connect to networks using specific frequencies. Check if your device supports the frequencies used by the extender. Picture this: trying to tune into a radio station that your radio can’t pick up. Compatibility in frequency is key to seamless connectivity.Checking Manufacturer Updates
Manufacturers frequently update device software to enhance compatibility and performance. Regularly check for updates to ensure your device can work with the extender. It’s a simple action that can prevent many technical issues down the line.What If Your Device Isn’t Compatible?
If you find your device isn’t compatible, don’t despair. Consider options like upgrading your device or exploring alternative network solutions. Reflect on how technology constantly evolves, and sometimes upgrading is a necessary step to keep pace.Engage With Verizon Support
If you’re uncertain about compatibility, reaching out to Verizon’s support can provide clarity. Their team can offer insights specific to your device and extender model. Have you ever solved a puzzle with a little help from a friend? Sometimes, expert advice is just what you need. Checking device compatibility isn’t just a technical step; it’s a proactive approach to ensure smooth and efficient network performance. How confident are you in your current device’s compatibility? Take a moment to verify, and set yourself up for success with your Verizon Wireless Network Extender.Connecting To The Internet
Connecting to the internet is the heart of any digital device, and ensuring that your Verizon Wireless Network Extender is properly connected can make all the difference in your online experience. Whether you’re streaming your favorite shows or working from home, a stable connection is crucial. But what happens when things don’t go as planned? Let’s dive into troubleshooting steps to get your internet connection back on track.
Internet Connection Verification
First, check if other devices are connected to the internet. Can your laptop or smartphone access web pages? If they can, the issue might be specific to your extender. But if all devices are offline, it’s time to look deeper.
Restart your network extender by unplugging it for a few seconds before plugging it back in. This simple reset often resolves connectivity hiccups. Have you tried this before? You might be surprised how often it works!
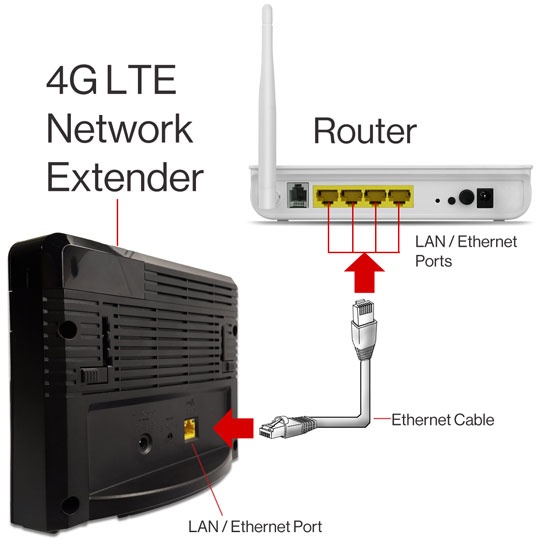
Router And Modem Checks
Ensure your router and modem are powered on and functioning correctly. Look for blinking lights that indicate activity. A solid connection light typically means the internet is flowing.
Check the cables connecting your modem to the router. Are they securely plugged in? Loose connections can disrupt your internet access. Consider replacing old cables with new ones for better reliability.
Access your router settings through your browser. Is the network extender listed among connected devices? If not, try adding it manually and ensure the extender’s settings match your Wi-Fi network details.
Have you ever wondered why sometimes the simplest solutions are the most effective? Troubleshooting can be a game of patience and persistence, but the reward is a seamless internet experience.
Power Cycling The Extender
Power cycling the extender can resolve minor connectivity issues. Turn off the device, unplug it, and wait a few minutes. Plug it back in and turn it on to refresh the network connection.
Power cycling your Verizon Wireless Network Extender is a simple yet effective troubleshooting step. If you’re experiencing connectivity issues, this method can often resolve them. It involves turning the device off and back on to reset its functions, potentially solving minor glitches without further intervention.What Is Power Cycling?
Power cycling involves turning off your Network Extender, waiting a few seconds, and then turning it back on. This process helps clear any temporary software bugs or glitches. It’s a quick fix that can save you a lot of hassle.Steps To Power Cycle Your Extender
To begin power cycling, first locate the power cable connected to your extender. Unplug the device from its power source. Wait at least 10 seconds before plugging it back in and turning it on.Why Power Cycling Helps
Power cycling can refresh the extender’s system. Sometimes, electronic devices need a reboot to clear their memory and start anew. This can improve performance and resolve connectivity problems.Personal Experience With Power Cycling
I remember a time when my network extender suddenly stopped working during an important video call. Power cycling saved the day. Within minutes, my connection was restored, and I was back online.Common Mistakes To Avoid
Don’t rush the process. Ensure you wait the full 10 seconds before plugging the extender back in. Skipping this step can result in the same issues persisting.How Often Should You Power Cycle?
Consider power cycling your extender once a month. Regular resets can maintain optimal performance and prevent future problems. However, only do this when necessary to avoid unnecessary wear and tear. Power cycling is a simple yet powerful tool in your troubleshooting toolkit. What other methods have you found effective in dealing with network issues?Signal Strength Optimization
Signal strength is crucial for the Verizon Wireless Network Extender’s performance. Optimizing the signal ensures your devices connect seamlessly. A few simple adjustments can make a big difference. Discover practical tips for boosting your signal strength below.
Extender Placement Tips
Place the extender in a central location. It should be away from thick walls or large metal objects. These can block or weaken the signal. A higher position often helps. Consider a shelf or a high table. Ensure it is near a power source and has a clear line of sight.
Avoiding Signal Interference
Keep your extender away from electronic devices. Microwaves, cordless phones, and baby monitors can interfere. Wi-Fi routers are another source of interference. Ensure the extender and router use different channels. This reduces overlap and improves signal strength.
Software And Firmware Updates
Software and firmware updates are essential for Verizon Wireless Network Extenders. They ensure smooth operation and enhance security. Regular updates help fix bugs and improve performance. Understanding how to manage these updates can prevent connectivity issues. Let’s explore how to keep your device updated.
How To Check For Updates
Checking for updates is simple. First, access the device settings. Find the update section. It shows available updates. Review the details before proceeding. Ensure your internet connection is stable. This prevents download errors.
Updating Firmware
Updating the firmware can be automatic. Enable automatic updates in settings. This allows the device to update on its own. Manual updates are also possible. Download the update file from the Verizon website. Follow the instructions carefully. Restart the device after updating.
Software Update Steps
Software updates differ slightly from firmware updates. First, check for notifications about new updates. They often appear on the device screen. Follow the prompts to install. Ensure the power supply is steady during installation. This prevents interruptions.
Common Issues
Sometimes, updates fail. Slow internet is a common cause. Check your connection. Restart the device if needed. Verify the update file is correct. Corrupted files can cause failures. If issues persist, contact Verizon support for help.
Benefits Of Regular Updates
Regular updates have many benefits. They enhance security features. New updates improve device performance. Bug fixes make the extender more reliable. Staying updated ensures optimal connectivity. It reduces the risk of unexpected outages.
Resetting To Factory Settings
Resetting your Verizon Wireless Network Extender to factory settings can resolve many issues. This process erases all customized settings, returning the device to its original state. It’s a straightforward procedure that can help restore performance and connectivity.
How To Reset Your Network Extender
Locate the reset button on your extender. It’s usually at the back or bottom. Use a small tool like a paperclip to press it. Hold for about 10 seconds until the lights flash. Your extender will begin resetting.
Why Resetting Might Be Necessary
Resetting can fix persistent connectivity problems. It clears any faulty configurations that might cause disruptions. If your extender is unresponsive, a reset might be the solution.
Precautions Before Resetting
Ensure your extender is plugged in and powered on. Backup any important settings beforehand. Resetting will erase all custom configurations. Be prepared to reconfigure your network settings afterward.
Post-reset Steps
Once reset, reconnect your extender to your network. Follow the setup instructions provided by Verizon. Customize your settings as needed for optimal performance.
Credit: www.verizon.com
Contacting Verizon Support
Experiencing issues with your Verizon Wireless Network Extender? Contacting Verizon Support can help resolve problems quickly. Their troubleshooting guide offers step-by-step solutions to enhance your network experience.
Contacting Verizon Support can feel daunting, especially when you’re dealing with a frustrating technical issue. But fear not, this guide will help you navigate the process smoothly. By being prepared and knowing exactly what information to provide, you can make the call more efficient and effective.Preparing For The Call
Before you dial Verizon Support, take a moment to gather all relevant information. This will save you time and help the support team assist you faster. Make sure your network extender is plugged in and turned on. Check if all the lights are functioning as expected. If there are any error messages, jot them down. Have your Verizon account details handy. This includes your account number and any PINs or passwords associated with your account. Think about the issue you’re experiencing. Is the signal weak? Are calls dropping? The more specific you can be, the better.Information To Provide
When you speak with Verizon Support, clear communication is key. Start by explaining the problem concisely. Share any error messages or unusual behavior you’ve noted. This can help them diagnose the issue more accurately. Provide your account details when asked. This helps the support team access your account and verify your identity. If you’ve tried any troubleshooting steps on your own, let them know. This can prevent redundant advice and speed up the process. Have you ever wondered why some calls to support seem more fruitful than others? A little preparation goes a long way. Being ready with the right information can make a world of difference. By following these steps, you’re not just another caller—you’re an informed customer ready to get the help you need.
Credit: www.verizon.com
Frequently Asked Questions
Why Is My Verizon Network Extender Not Working?
Check power, internet connection, and placement. Restart device. Ensure compatibility with your phone model.
How Do I Reset My Verizon Network Extender?
Press and hold the reset button for 10 seconds. Wait for device to restart.
What Lights Should Be On Verizon Network Extender?
All lights should be solid blue. Blinking lights indicate issues with connection.
Does Verizon Network Extender Need Internet?
Yes, it requires a stable internet connection to function properly. Check your network settings.
Can Verizon Network Extender Improve Call Quality?
Yes, it boosts signal strength, improving call quality and reducing dropped calls indoors.
Conclusion
Troubleshooting your Verizon Wireless Network Extender doesn’t have to be hard. Follow the steps outlined in this guide. Check your connections and settings carefully. Ensure your internet service is stable. Restart devices if needed. Consult the user manual for extra help.
Patience and attention can solve most issues. If problems persist, contact Verizon support. They offer professional guidance and solutions. Remember, a strong signal brings better communication. Enjoy seamless connectivity with your network extender. Stay connected and happy browsing!
")


